Provisioning
The Wasabi Ball Transfer Appliance has four ports in total:
Two 1 GbE LAN (management) ports
These 1 GbE ports can also be used as data ports for the customer who has only a 1 GbE network.Two 10 GbE LAN (data) ports
Refer to the figure below for a rear view of the Appliance. It is recommended but not required to use a different port for management versus data transfer.
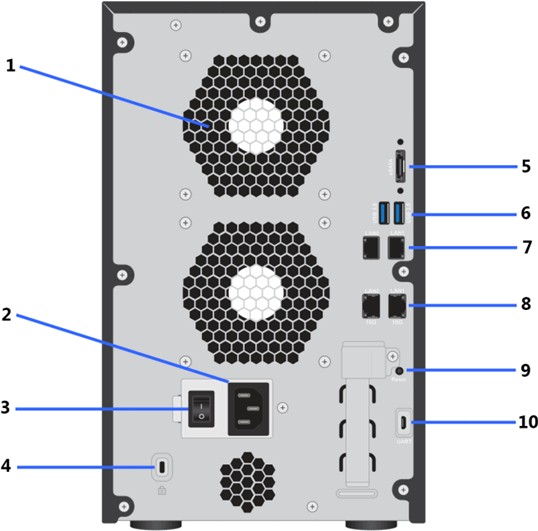
Rear Panel ReadyNAS 628X
Exhaust fan
Power cable socket
Power switch
Kensington lock
eSATA port
USB 3.0 ports
1 GbE LAN ports with LED status indicators
10 GbE LAN ports with LED status indicators
Reset button
Micro USB console connector (marked as UART)
IP Address
By default, the Appliance is configured for DHCP. If you connect the two ports (one 1 GbE for management and one 10 GbE for data transfer) into the DHCP-capable network, both should acquire an IP address from different subnets. The IP address should be displayed on the front LED display. If the display is blank, press the power button behind the front door to turn on the Appliance.
Wasabi configures the second IP interface (LAN2) as a static 192.168.100.100 address for users who are not running DHCP on the management network. Use LAN1 (1 GbE) for DHCP. Or, use LAN2 (1 GbE) for the static IP 192.168.100.100.
To use a static IP, you can cross-connect to the Appliance on LAN2, use the default credentials provided by the Wasabi Sales Engineer to ssh into the Appliance, and make changes as needed. If you do not have the default credentials, reach out to the Wasabi Sales Engineer via the Support ticket link that was shared with you for the Wasabi Ball transaction.
Host: 192.168.100.100
Username: <Enter the username provided by the Wasabi Sales Engineer>
Password: <Enter the password provided by the Wasabi Sales Engineer>
Once in the Appliance, you can use ifconfig to assign it a static IP.
The following command will set the IP address to the eth2 10G interface.
ifconfig eth2 10.1.1.1 netmask 255.255.255.0
The IP address configured using this method is not persistent on a reboot. You can use the Netgear user interface (UI) to configure a Static IP as well, which stays persistent on a reboot.
Log in to the NetGear UI:User:<Enter the username provided by the Wasabi Sales Engineer>
Password: <Enter the password provided by the Wasabi Sales Engineer>
Proceed to the Network tab to configure a static IP address on the appropriate interface.
wasabi$ ssh root@Ip_Address
username's password:
Welcome to ReadyNASOS 6.10.0
Last login: Tue May 7 11:02:11 2019 from 10.6.140.8
root@wasabiball34:~# ifconfig eth2 10.1.1.1 netmask 255.255.255.0
root@wasabiball34:~# ifconfig eth2
eth2Link encap:Ethernet HWaddr b0:b9:8a:44:2c:f2
inet addr:10.1.1.1 Bcast:10.1.1.255 Mask:255.255.255.0
UP BROADCAST MULTICAST MTU:1500 Metric:1
RX packets:0 errors:0 dropped:0 overruns:0 frame:0
TX packets:0 errors:0 dropped:0 overruns:0 carrier:0
collisions:0 txqueuelen:1000
RX bytes:0 (0.0 B) TX bytes:0 (0.0 B)
Supported File Systems
The Wasabi Ball Transfer Appliance supports the following file system interfaces:
AFP (Apple File Protocol)
DLNA (Digital Living Network Alliance)
FTP (File Transfer Protocol)
HTTP (Hypertext Transfer Protocol)
NFS (Network File Service)
Rsync
SMB (Server Message Block)
Mounting the Wasabi Ball Transfer Appliance
Wasabi Ball supports both NFS and S3 applications for uploading objects to the Wasabi Ball. The mount point needed to write data is:
/Volume1/wasabi
Be sure to mount using one of the 10G interfaces, if available.
If you use an S3 application, the mount point needed to write data is:
/Volume1/wasabi-S3
Mounting for NFS Uploads
You can add directories under /Volume1/wasabi. For example:
mkdir /Volume1/wasabi/mystuff
All data copied to this directory will be uploaded to your account in the specified bucket.
Mounting for S3 Uploads
You should upload the data set to /Volume1/wasabi-s3. For example:
mkdir /Volume1/wasabi-s3/mystuff
All data copied to this directory will be uploaded to your account in the specified bucket.
The Wasabi Ball supports either an NFS file upload to the Appliance or an S3 file upload to the device. You must use one OR the other.
You should consult with the appropriate transfer method to determine the correct procedure to choose for the upload.
It is important to understand that if your local storage is on a S3-supported platform and you want to maintain the metadata on those files, it is highly recommended to continue to use the same method with Wasabi Ball.
If you simply copy the data assets from an NFS Volume or SMB Share, that data set will be uploaded from the Wasabi Ball to your account as S3 Objects.