How do I use ActiveImage Protector with Wasabi?
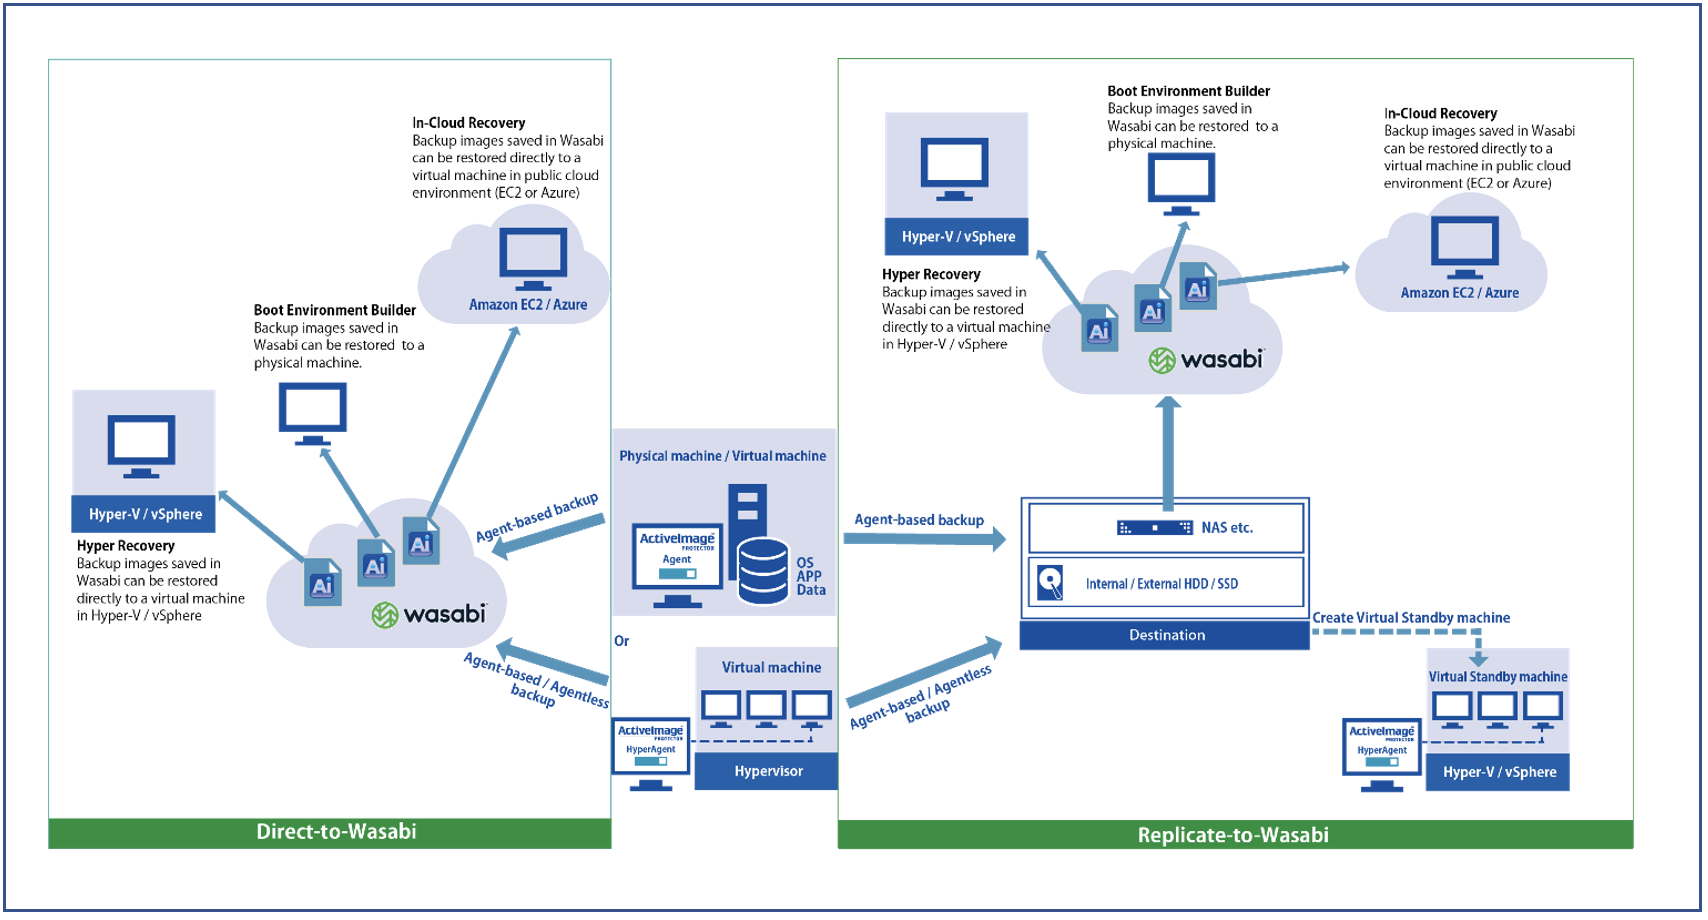
Wasabi has been validated for use with Actiphy's ActiveImage Protector. ActiveImage Protector is a backup and disaster recovery solution that supports both physical and virtual (Hyper-V/VMware), Windows/Linux, and On-Premise/Cloud environments. To learn more about the Actiphy - Wasabi joint solution, refer to our joint Partner Solution Brief. To use this product with Wasabi, follow the instructions below.
Reference Architecture

Requirements
ActiveImage Protector 2022
A valid ActiveImage Protector 2022 license
An active Wasabi account
Configuring a Backup Directly to Wasabi
ActiveImage Protector 2022 provides a Direct-To-Cloud Backup feature to save your created backups directly to Wasabi Hot Cloud Storage (“Wasabi”). To directly save your backup files to Wasabi, follow the steps below to specify Wasabi as the destination storage.
Before starting the configuration of a backup task, navigate to Help, then select About and check the version information of ActiveImage Protector 2022.
The following versions are supported:
Product Version: 6.0.0.7292 or above
Agent Version: 6.0.2.7482 or above
Console Version: 6.0.2.7482 or above
.png)
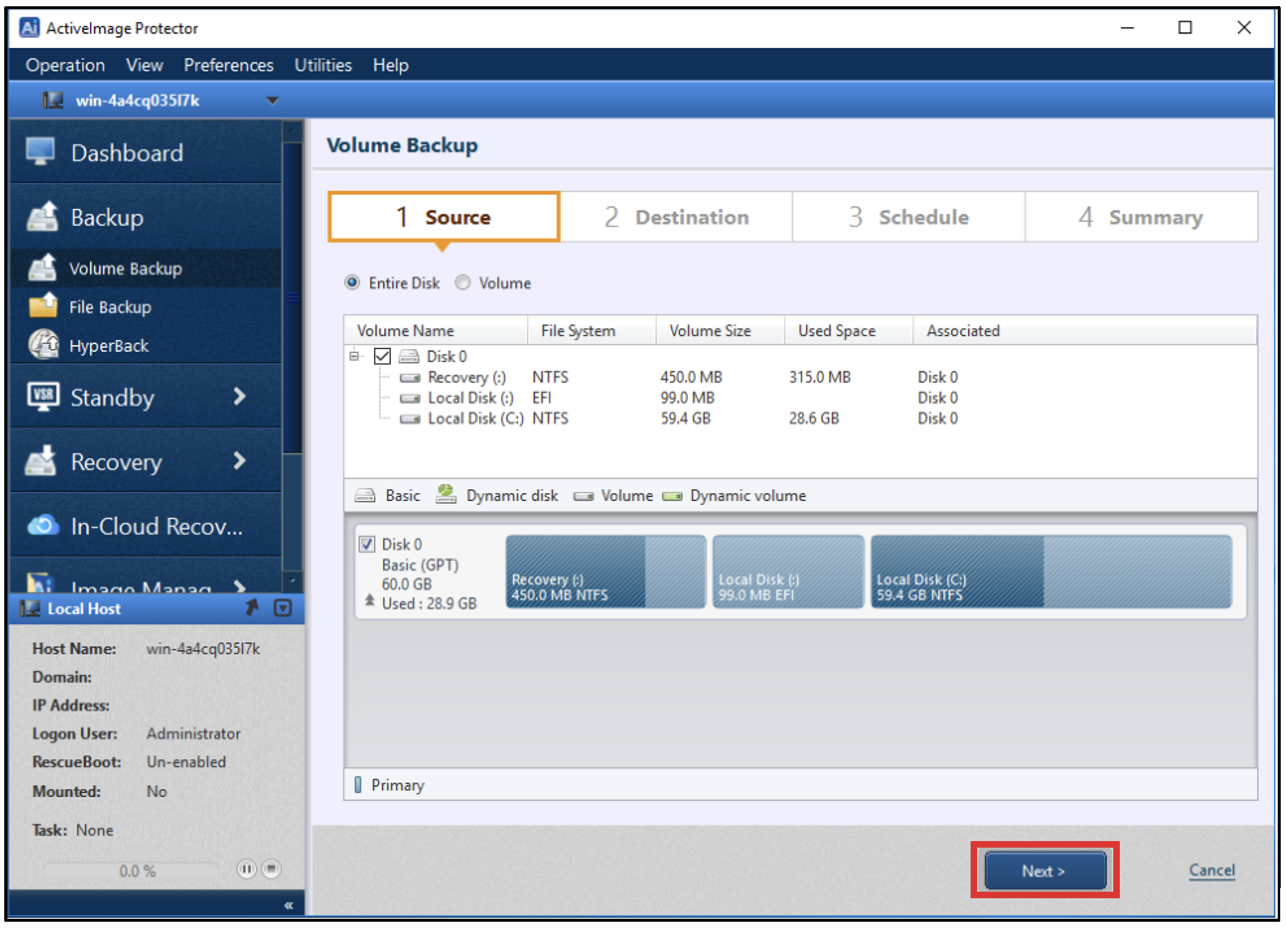
Select a backup source on ActiveImage Protector 2022 and click Next.

On the Destination tab, click Select folder …
.png)
Enter the following credentials for accessing Wasabi and click Connect.
Access Key Id
Secret Key
Region - Region of your bucket
Specify Provider - Select wasabisys from the drop-down.
.png)
This configuration example discusses the use of Wasabi's us-west-1 storage region. To use other Wasabi storage regions, select the appropriate Wasabi region from the drop-down options.
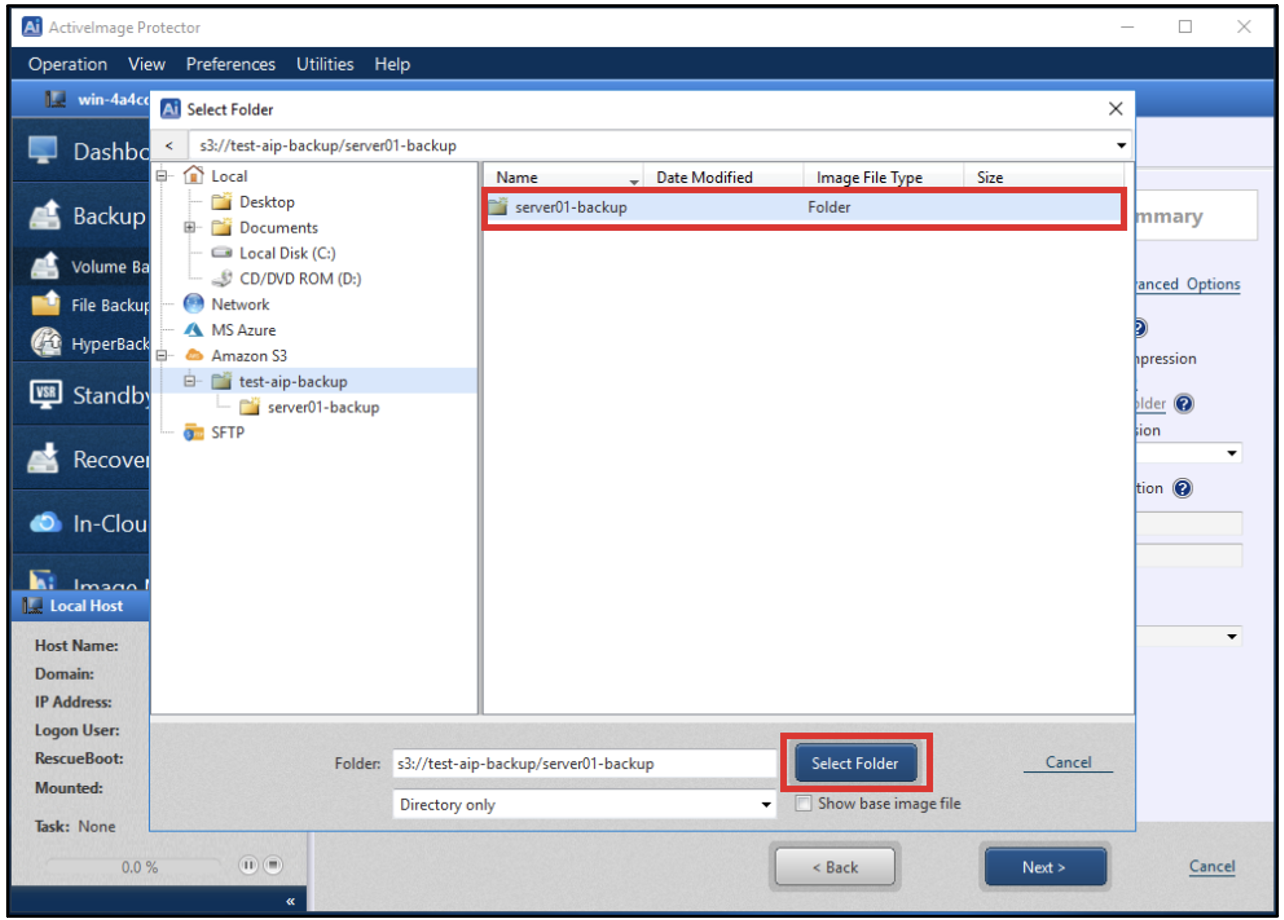
Select the backup destination folder (bucket and subfolder) that was created in Wasabi. Click Select Folder.

Verify the destination and click Next.
.png)
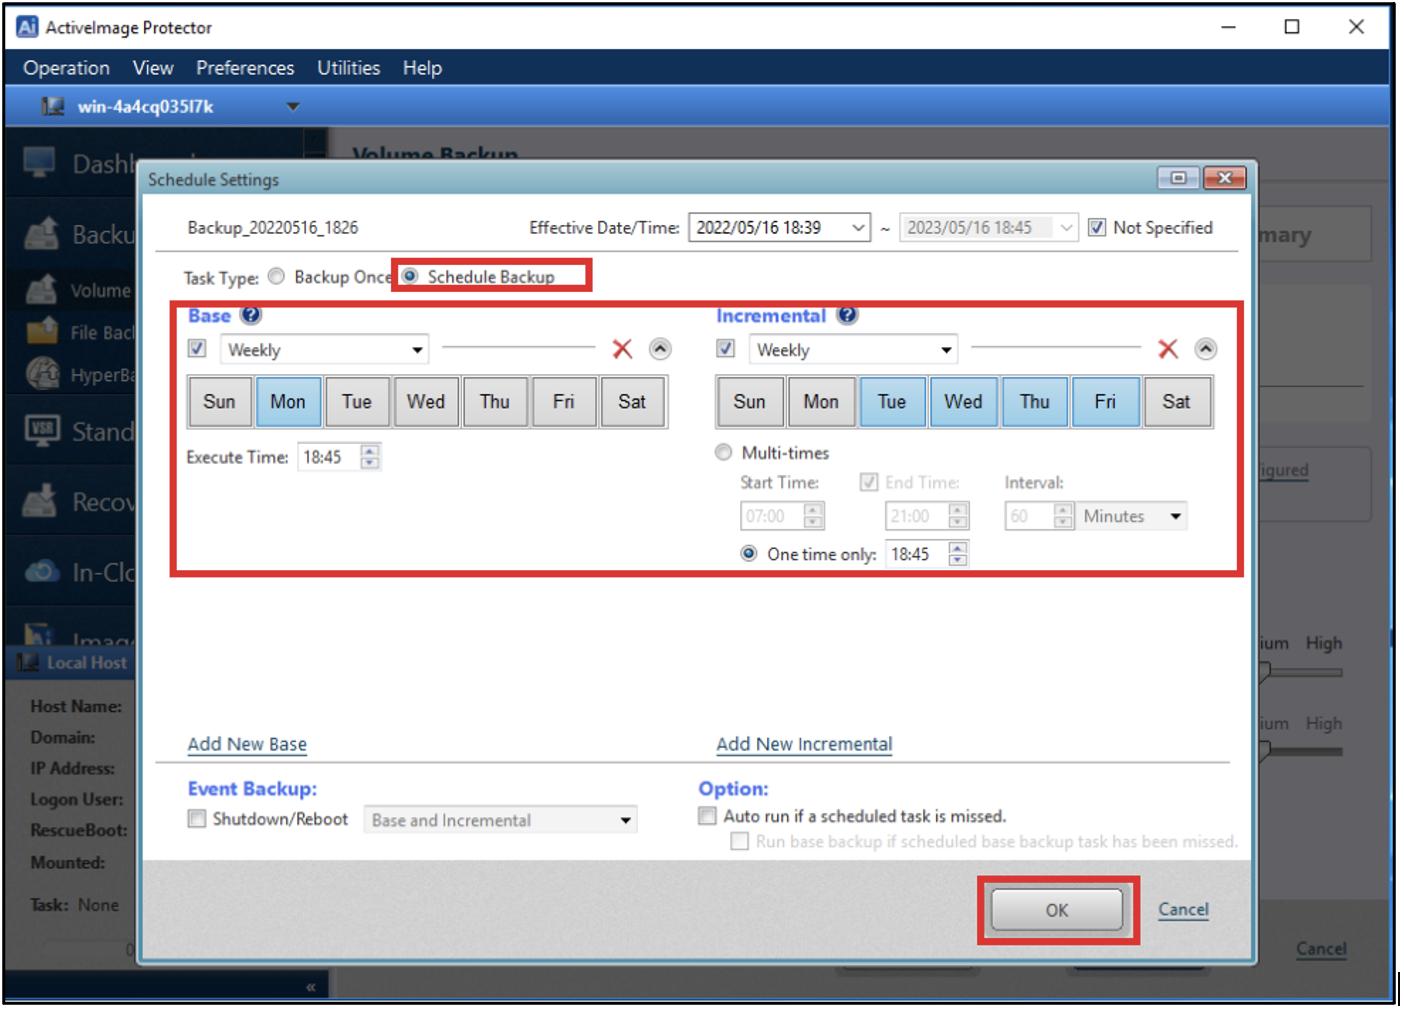
Select the backup task type, specify further details, and click OK. In the example below, Schedule Backup is selected.
.png)
Click the check box to Enable Retention Policy and Send Email options, if needed. Click Next.
.png)
Verify the configured settings. Click Done.
.png)
The following pop-up dialog is displayed. Click Yes to start the task immediately.
Optionally, click No to go back to the Dashboard window.
Optionally, click Cancel to go back to the wizard instead of completing the configured setting.
.png)
ActiveImage Protector’s Dashboard allows you to monitor the status of the backup task execution in real time.
.png)
Once the backup task is complete, navigate to Image Manager, then click Select Folder… Access the folder in Wasabi to check the backup image file.
.png)
.png)
.png)
For security purposes, the backup image file name is displayed in UUID. Select a backup image file and check the information of the backup source computer.
.png)
Log into your Wasabi and confirm the backup image file(s) inside your specified folder.
.png)
Replicating Backups to Wasabi
Select a backup source on ActiveImage Protector 2022. Click Next.
.png)
Click “Select folder…” and specify a backup destination (first destination) that is not a cloud storage or a SFTP. Click Next.
.png)
Select Schedule Backup and specify further details. Click OK.

Under Post-backup Process, click Replication: Unconfigured.
.png)
Enter the following credential information to access Wasabi. Click Connect.
.png)
Select the replication destination folder that was previously created on Wasabi. Click Done.
.png)
Optionally, enable retention policy and send email options. Click Next.
.png)
The following pop-up dialog is displayed. Click Yes to start the task immediately.
Optionally, click No to go back to Dashboard window.
Optionally, click Cancel to go back to the wizard instead of completing the configured setting.
.png)
ActiveImage Protector’s Dashboard enables you to monitor the status of the backup task execution in real-time.
.png)
Once the backup and replication task is completed, navigate to Image Manager > “Select Folder…”. Access the folder in Wasabi to check the information of the backup source computer.
.png)
.png)
Log in to your Wasabi and confirm the backup image file(s) inside your specified folder.
.png)