Wasabi has been validated for use with SoDA. SoDA’s data management software is storage agnostic, providing unprecedented insight into a company’s storage ecosystem. To learn more about the Wasabi - SoDA solution, please refer to our joint solution brief. To use this product with Wasabi, please follow the instructions below.
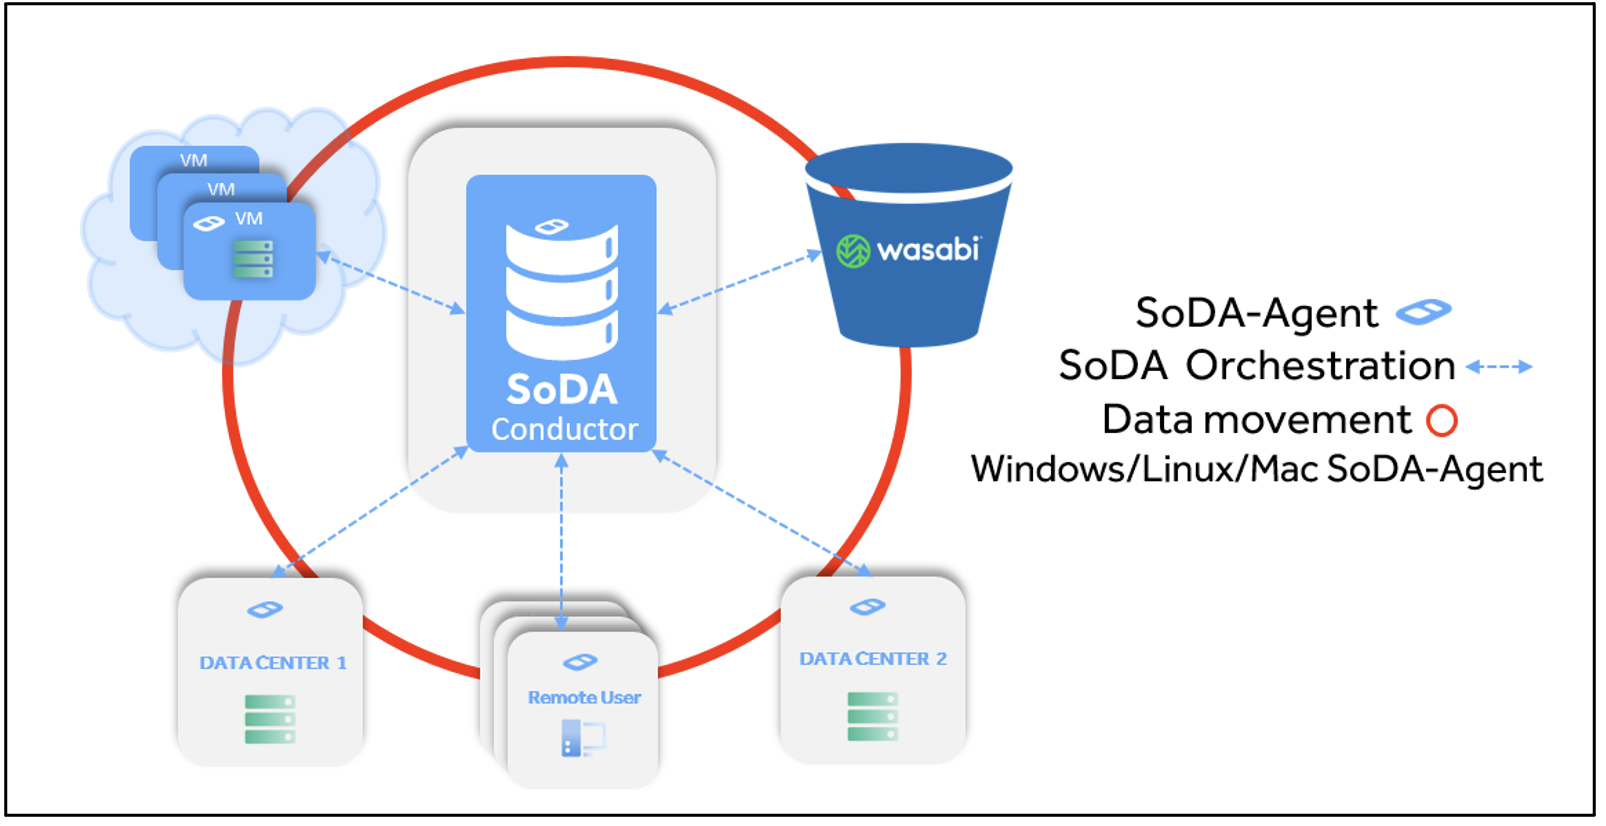
Reference Architecture
Prerequisites
SoDA v 22.1.1
An active Wasabi account
Configuration
Adding Wasabi Storage
1. Log in to the SoDA User Interface.
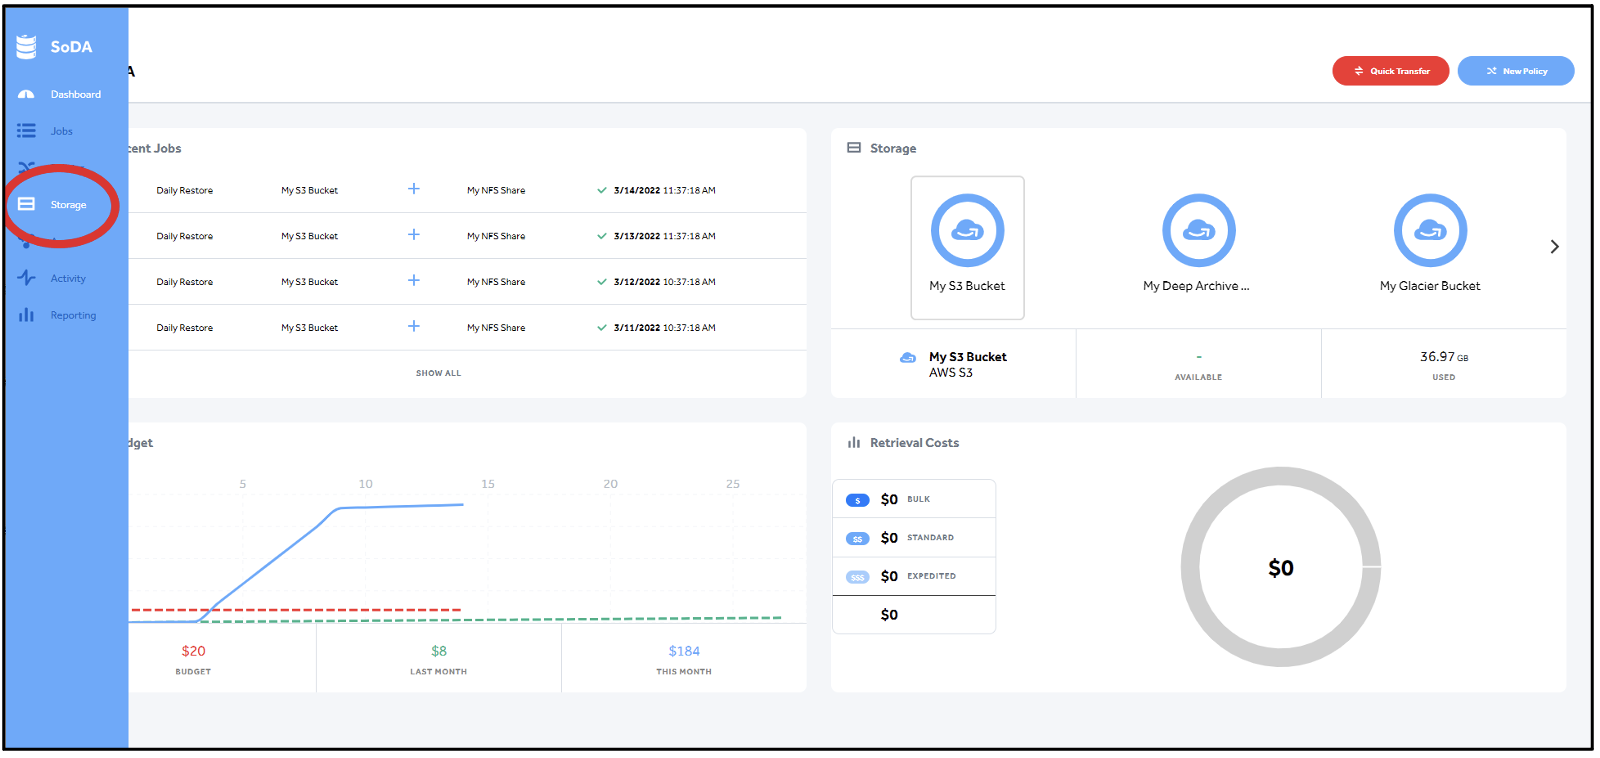
2. Click Storage.
.png)
3. Click Price Books.
.png)
4. Click Add Price Book.
.png)
5. Fill out the Add Price Book page as shown below, checking for any updated pricing from Wasabi. Click Save to finalize the updates.
.png)
6. Click Storage.
.png)
7. Click Add Storage.
.png)
8. Fill out the page as shown below. If you want to use a prefix (or folder), you can specify one. Use your own SoDA Storage Name and the bucket you created in Wasabi.
.png)
9. Click Save to finalize your updates. After clicking Save, the corresponding Storage card view appears.
.png)
10. Click Agents.
.png)
11. Click Accessors.
.png)
12. Click Add Accessor.
.png)
13. Enter the fields as shown below.
Provide a name for your access method.
Select Accessor Type Custom S3.
Enter the appropriate URL for your Wasabi region in the Api URL field.
Use the Access Key ID and Secret Access Key for your bucket that Wasabi supplied to you.
Click the Configure Accessor button to finalize your updates.
Note: Each Agent can have a different access key if desired.
.png)
Note: This config example discusses the use of Wasabi's us-west-1 storage region. To use other Wasabi storage regions, please use the appropriate Wasabi service URL as described in this article.
14. Your newly-created Accessor is listed.
.png)
15. Click Agents.
.png)
16. Click on any Agent that you want to access the Wasabi bucket.
.png)
17. Click the Attach Storage button.
.png)
18. Select the Wasabi storage you created and your accessor.
.png)
19. Click Attach Storage, confirm that it is now attached, and close the window.
.png)
20. Click Storage.
.png)
21. Click Wasabi storage.
.png)
22. Click on the 3 dots to open the additional options. Click Enable.
.png)
23. Your Wasabi bucket is now online, as indicated by the icon.
.png)
Adding Local Storage
Before creating file storage, SoDA offers the ability to create a price book on file-based storage. Follow the instructions in the Wasabi Price Book, select a local price book. Once finished, follow the instructions below to add local storage.
24. Click Storage.
25. Click Add Storage.
.png)
26. Give your Storage a name and select File as the Storage Type. If you configured a local price book, select it here and click Save.
.png)
27. Your new storage appears, as shown below.
.png)
28. Click Agents.
.png)
29. Click Accessors.
.png)
30. Click Add Accessor.
.png)
31. Enter the fields as shown below.
Give your access method a name.
Select Local as the Accessor Type.
Enter the appropriate mount path in the Path field
For Linux, use the root path.
For Windows, use the Volume letter and folder V:\Files.
.png)
32. Click Configure Accessor to create the Accessor. The new Accessor appears below.
![]()
33. Click Agents.
.png)
34. Click any Agent you want to access.
.png)
35. Click Attach Storage.
.png)
36. Select the File Storage you created and the Accessor, and click Attach.
.png)
37. When the Attach Agent to Storage screen closes, you see the newly attached Agent listed as attached in the previous Agent display, as shown below and close the window.
.png)
38. Click Storage.
.png)
39. Click My Local Storage storage card.
.png)
40. Click on the 3 dots to open additional options. Click Enable.
.png)
41. Your file-based storage is now online.
.png)
Moving Data into Wasabi
You can move data in and out of Wasabi using SoDA by establishing a Policy or by using a one-time Quick Transfer. To do so using a Quick Transfer, follow the procedure below, or proceed to the Moving Data via Policy procedure.
Moving Data via Quick Transfer
42. Click Jobs.
.png)
43. Click Quick Transfer.

44. On the Quick Transfer Page, complete the following
Select your Source as My Local Storage.
Select your Target as My Wasabi Bucket.
Select Copy, Move, Sync between the Source and Target fields to indicate how to transfer the data.
Copy and Move use conflict handling of Overwrite/Rename/Skip for identical files already on the Target.
Sync creates a Smart Duplicate of the Source to the Target, including propagation of deletes.
Click on the right of the Source to select the folders to transfer.
Click on the right of the Target to select folders to create or to put data into.
Select Filters to filter the data set as desired.
Click Dry Run, which simulates the transfer and calculates the cost and time of the transfer, without actually executing the transfer.
.png)
45. The results of the dry run are shown below.
.png)
46. Determine if the dry run was successful. If so, proceed to the next step; otherwise, reconfigure your Quick Transfer by returning to step 44 above.
47. When satisfied with the dry run results, click Transfer Now to begin the transfer.
.png)
48. The Jobs page is displayed, where you can see the current job process.
.png)
49. Click job record to display information.
.png)
50. Log in to the Wasabi UI to verify data.
.png)
Moving Data via Policy
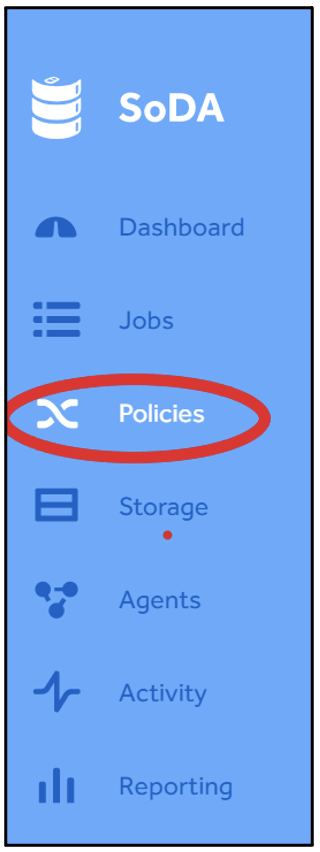
51. Click Policies.
52. Click Add Policy.
.png)
53. On the Policy page, update the following elements.
Give the Policy a name.
Select your Source as My Local Storage.
Select your Target as My Wasabi Bucket.
Select Copy/Move/Sync in the drop-down between the Source and Target fields to indicate how to transfer the data.
Copy and Move use conflict handling of Overwrite/Rename/Skip for identical files already on the Target.
Sync makes a Smart Duplicate of the Source to the Target, including propagating deletes.
Click on the right of the Source to select the folders to transfer.
Click on the right of the Target to select folders to create or to put data into.
Select Filters to filter the Data Set as desired.
54. Click the Dry Run, which simulates the transfer and calculates the cost and time of the transfer before it happens, without actually executing the transfer.
55. Determine if the dry run is successful. If so, proceed to the next step; otherwise, reconfigure your Policy by returning to step 53 above.
56. Click Deploy.
.png)
57. The Deploy Policy window opens. Enter the information in the fields, and click Deploy.
Select the desired start time.
Select the cadence at which the policy should run.
Activate the policy.
.png)
58. The Deploy Policy window closes. You can see the new policy configured on the Policies page.
.png)