Wasabi had been validated for use with Spectra Vail. Vail is a breakthrough cloud data management software solution for the multi-cloud world. Vail unifies all of your data, allowing you to leverage on-prem applications and native cloud services, no matter where your data is created or stored. To use this product with Wasabi, please follow the instructions below.
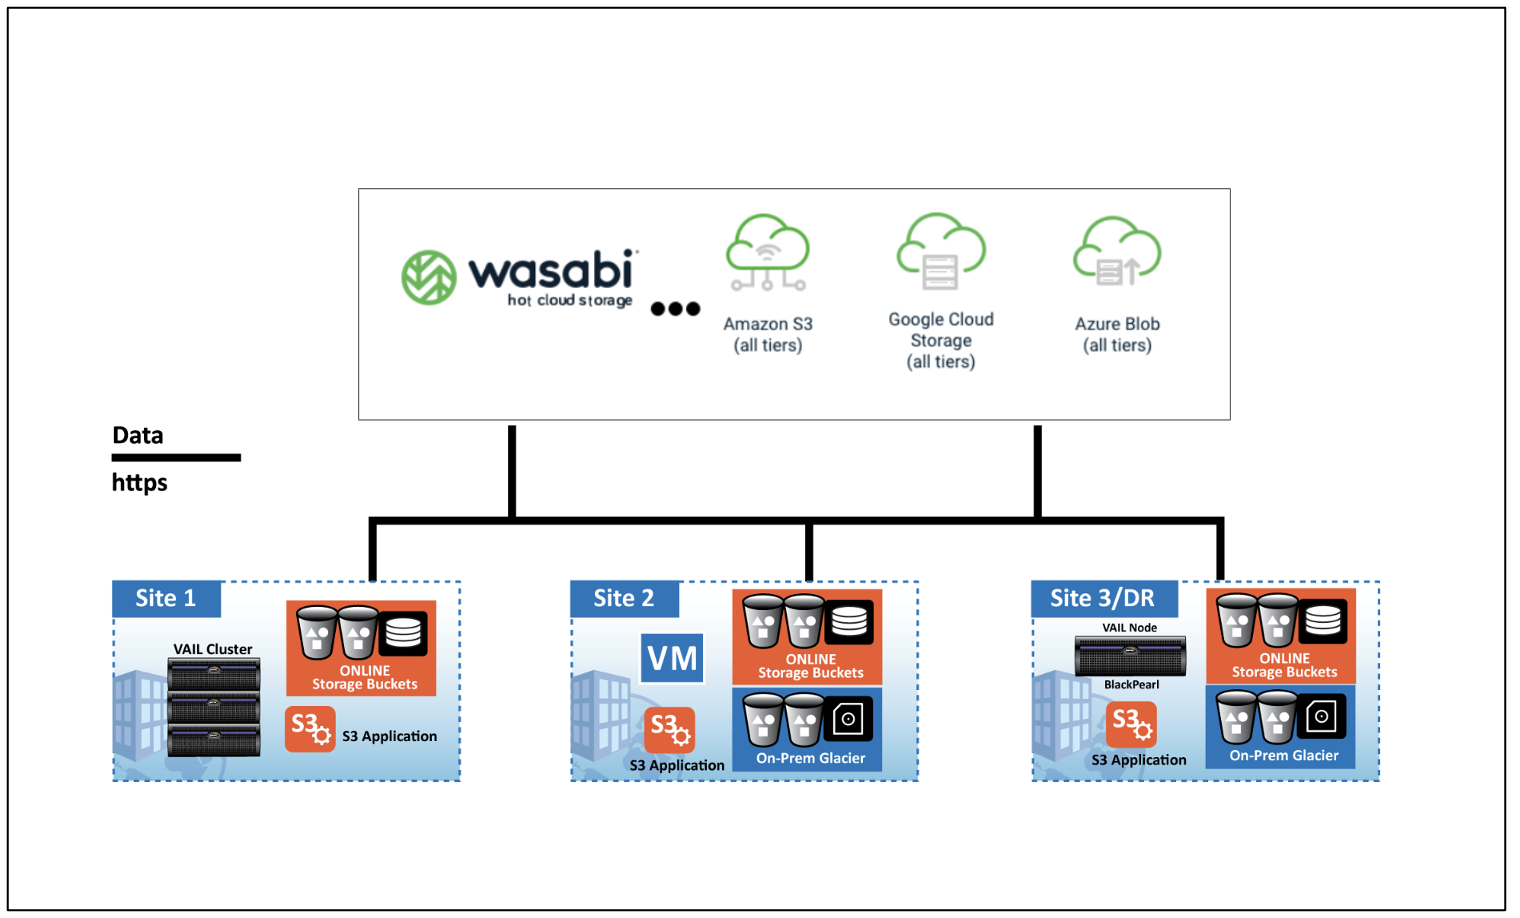
1. Reference Architecture
2. Prerequisites
Spectra Vail v 2.1.X
An active Wasabi account
Wasabi Bucket - See our Bucket Creation Guide
Access & Secret Key Pair - See our Access Keys Guide
3. Introduction
Vail presents a single unified S3 interface to the end user and presents all managed data regardless of the users physical location or which Vail node/endpoint to which they are connected as a single worldwide bucket that can span across a variety of physical storage, across multiple public clouds, and across multiple storage class tiers at each location.
Administrators have access to a rich Vail user interface, which allows adding physical or cloud storage locations, setting powerful lifecycle rules that can orchestrate and place clone copies of objects across multiple physical locations and cloud storage locations for speed of access and data protection, and allow intimate monitoring of data access, location, and performance.
4. Configuring Cloud Storage
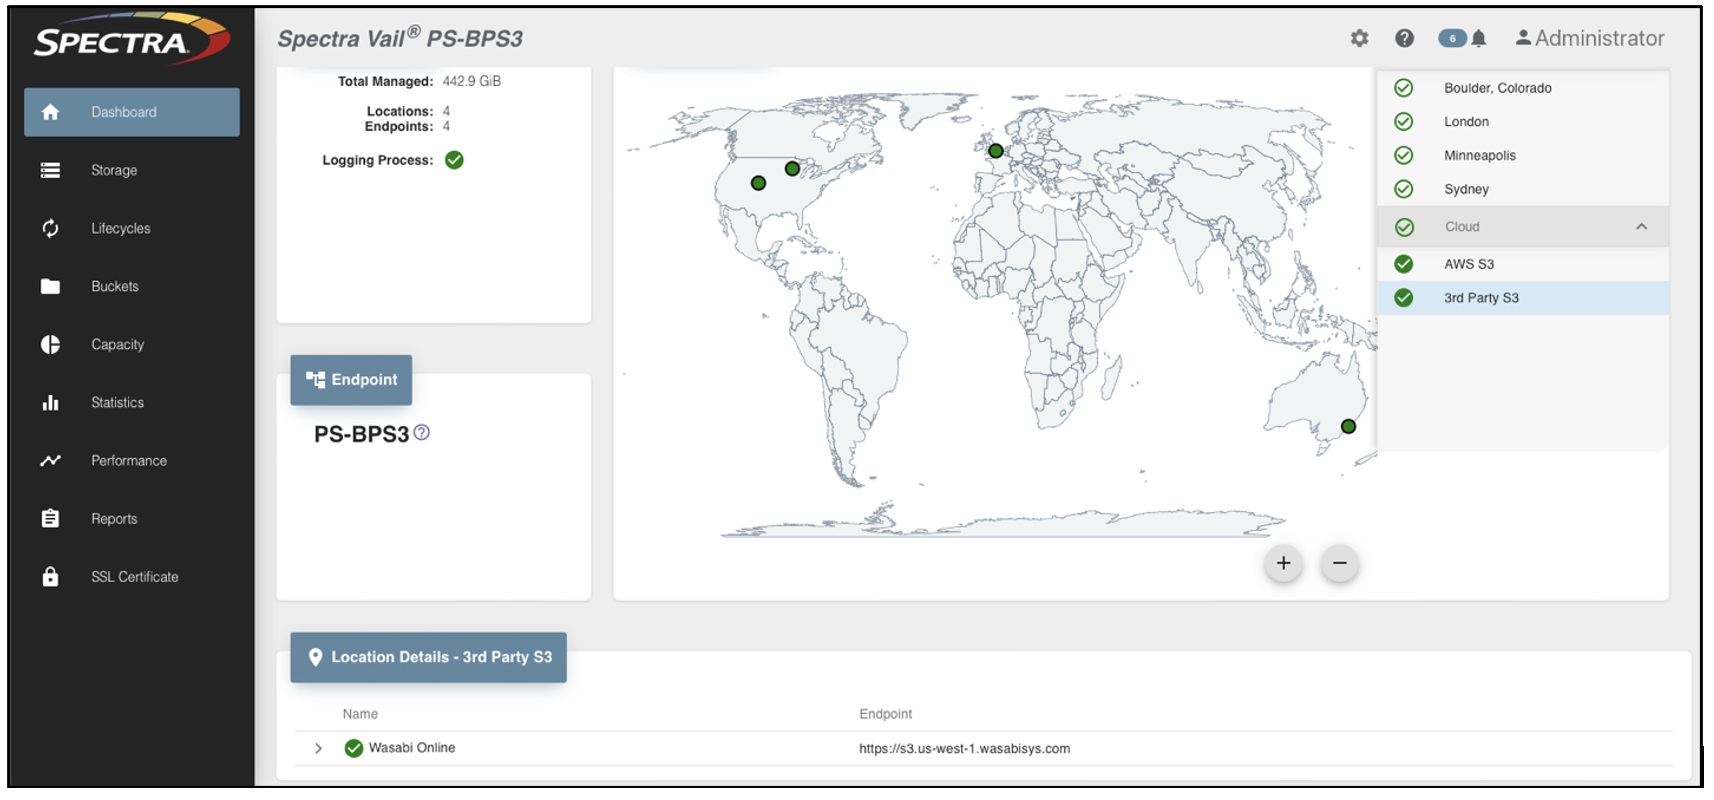
4.1. Log in to the Vail dashboard. The main Vail dashboard provides the administrator with a global view of the Vail system, operational nodes, and the overall status of connections, including connectivity to each physical and cloud storage location.
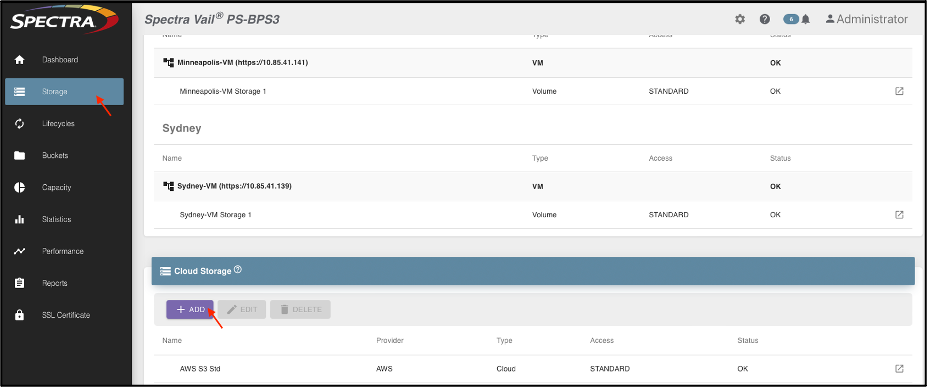
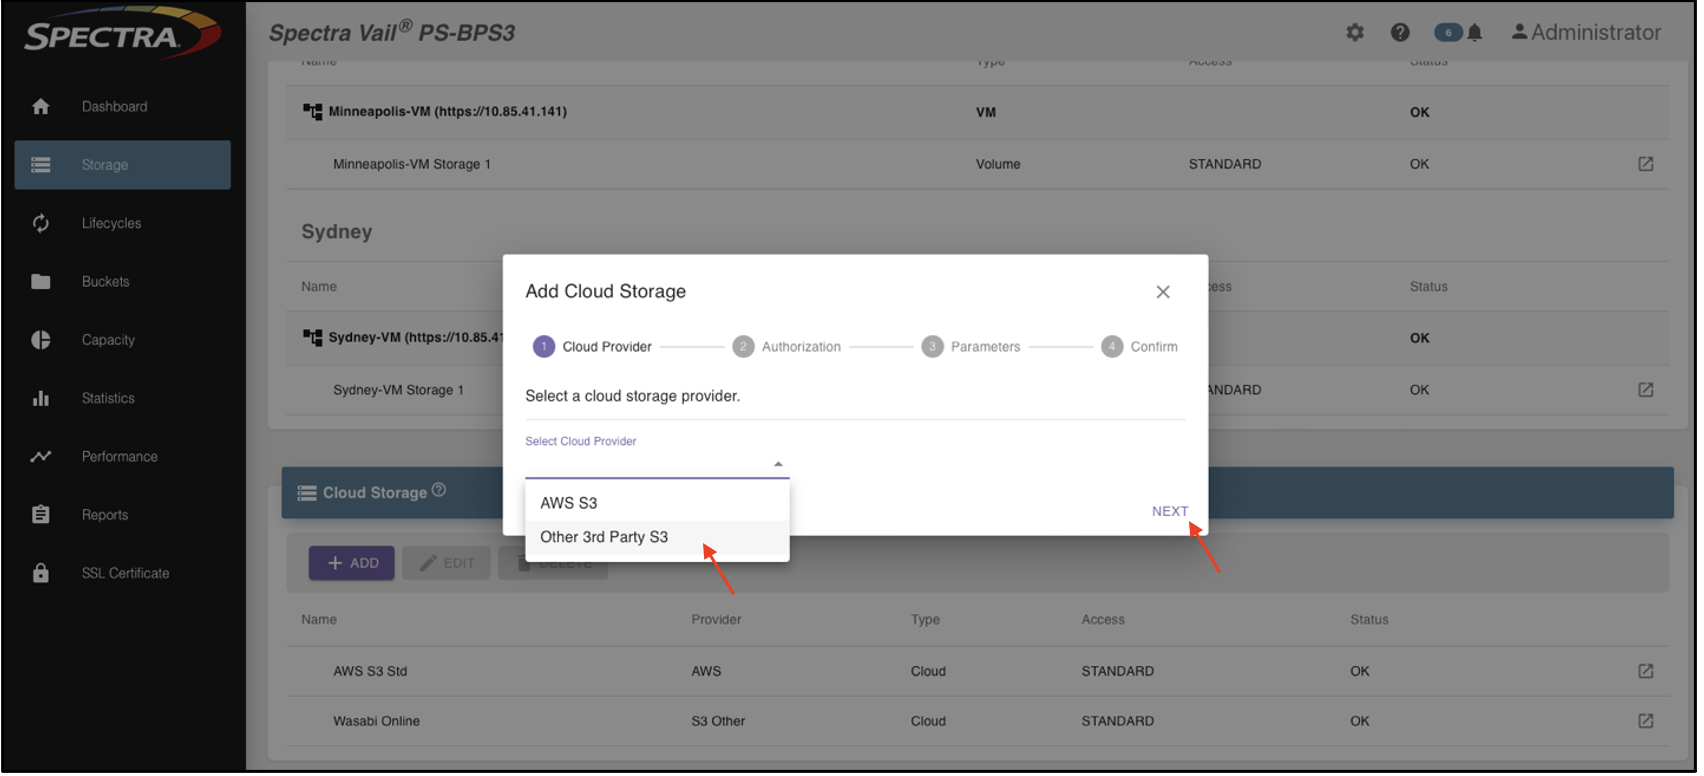
4.2. Click Storage. In the Cloud Storage page, click on + ADD to add Wasabi storage.
4.3. The Add Cloud Storage dialog box is displayed. In the Cloud provider tab, select Other 3rd Party S3 as the cloud provider and click Next.
4.4. In the Authorization tab, provide the following details and click Next.
Data Path Endpoint - endpoint URL of the region where the bucket is located
Access Key
Secret Key
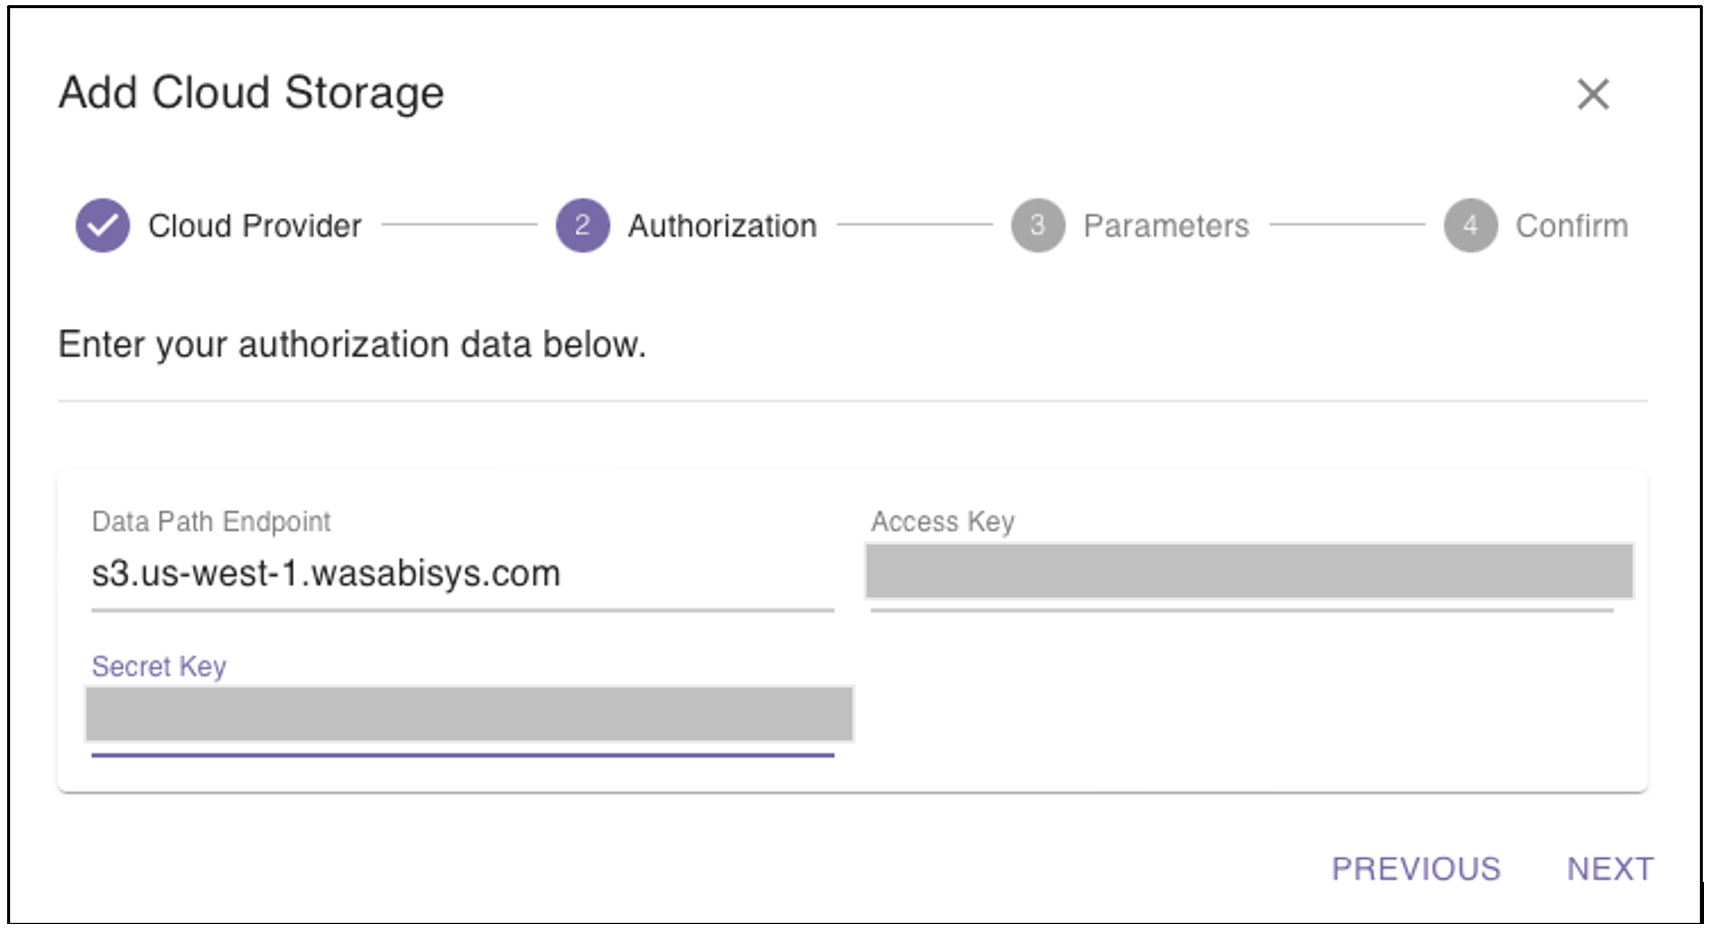
This configuration example uses Wasabi's us-west-1 storage region. To use other Wasabi storage regions, please use the appropriate Wasabi service URL as described in our Wasabi Service URLs article.
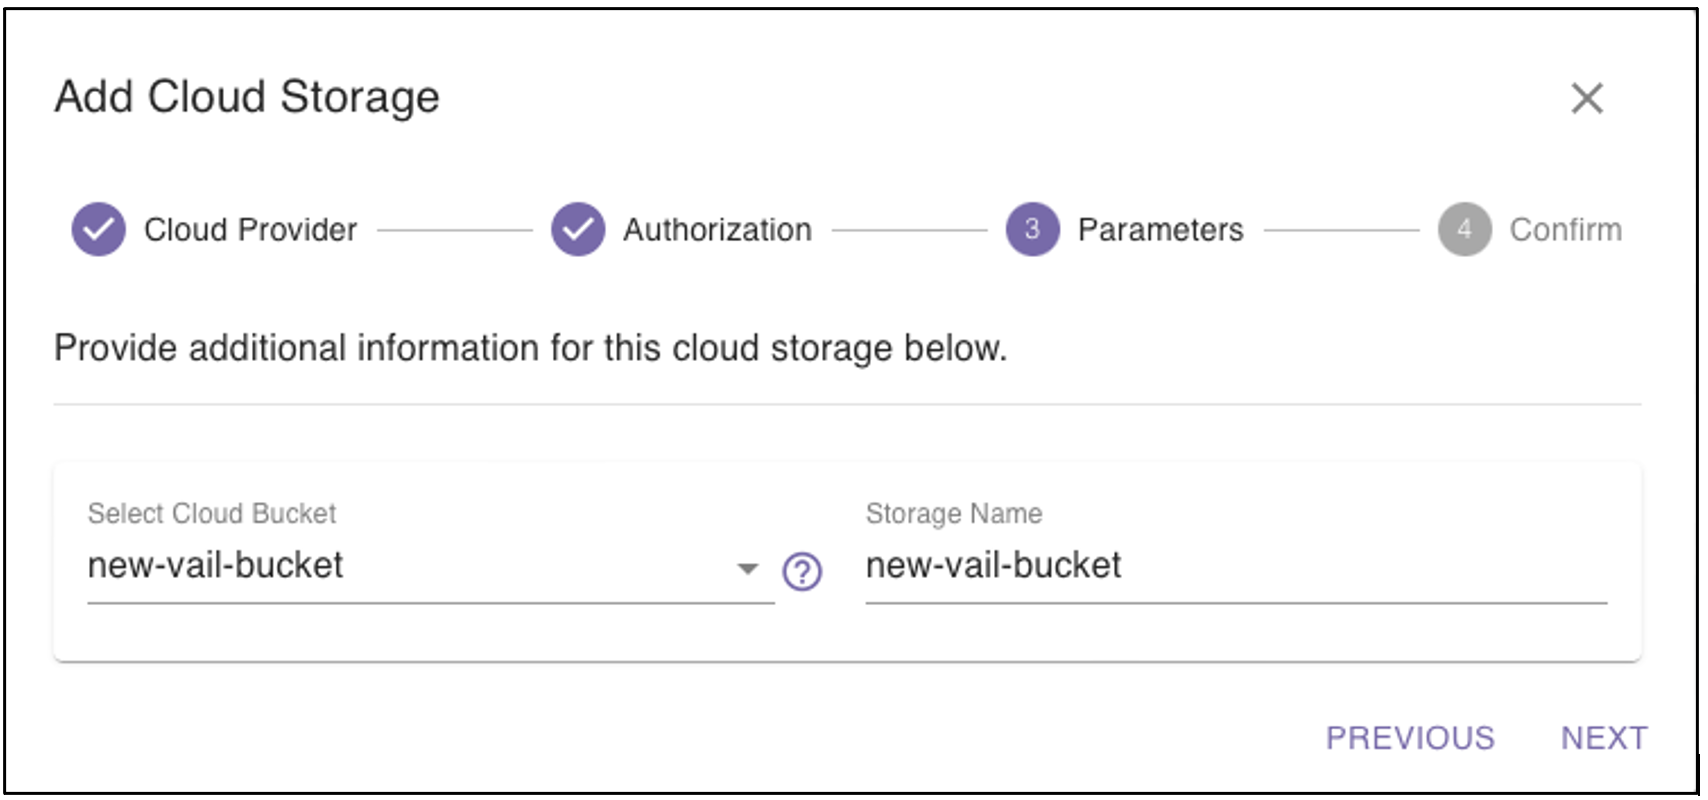
4.5. In the Parameters tab, Vail will present a list of the Wasabi buckets available with those credentials. Select the one to be used for Vail lifecycle rules.
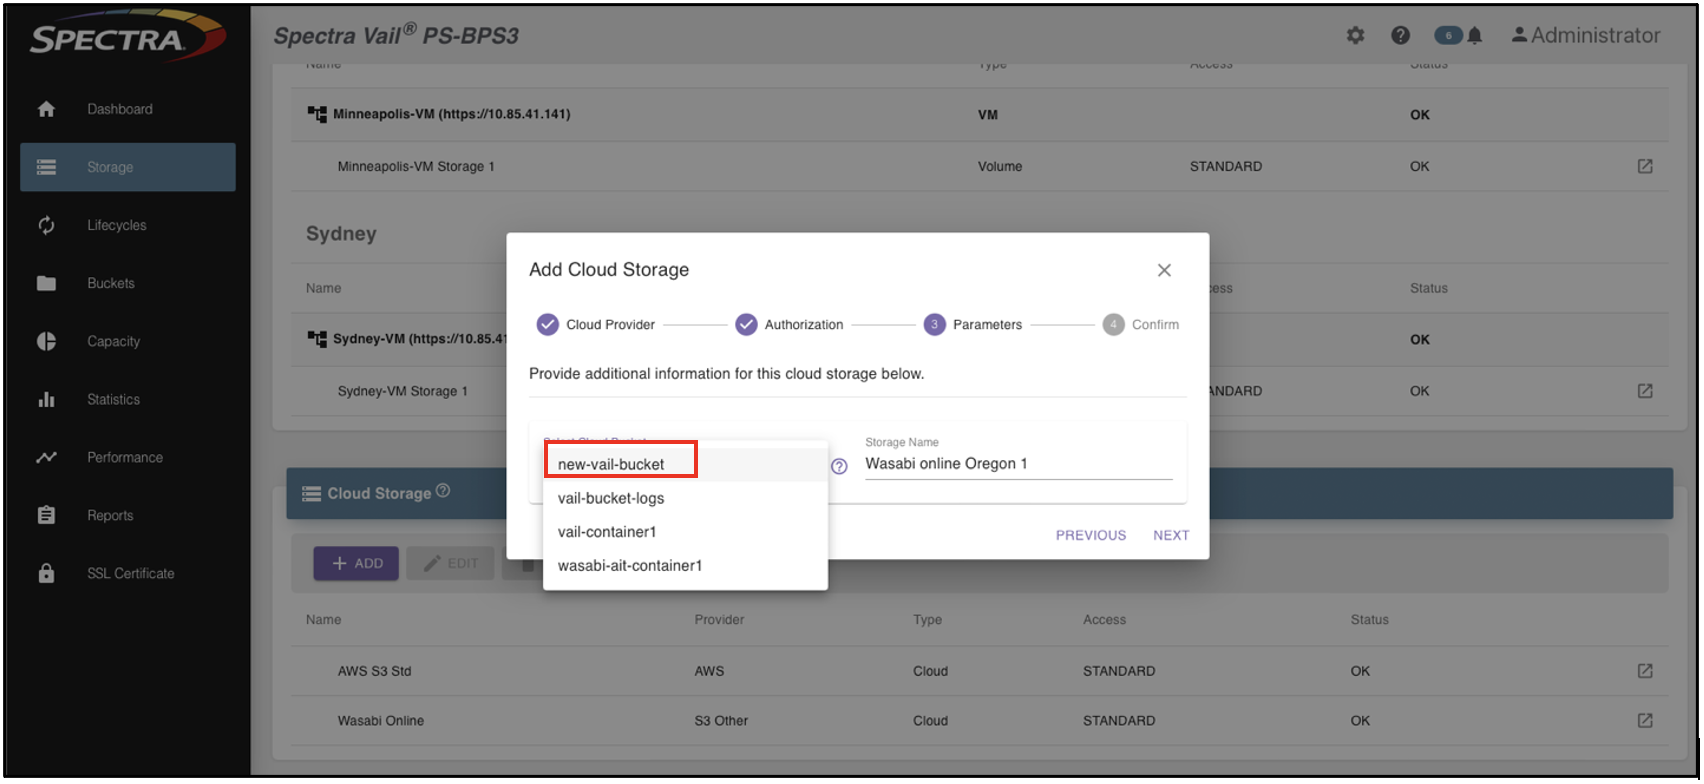
4.6. Provide a name to be used for this specific storage bucket and click Next. This name will be visible when creating Vail lifecycle rules.
On the next screen, review the configuration and click Finish.
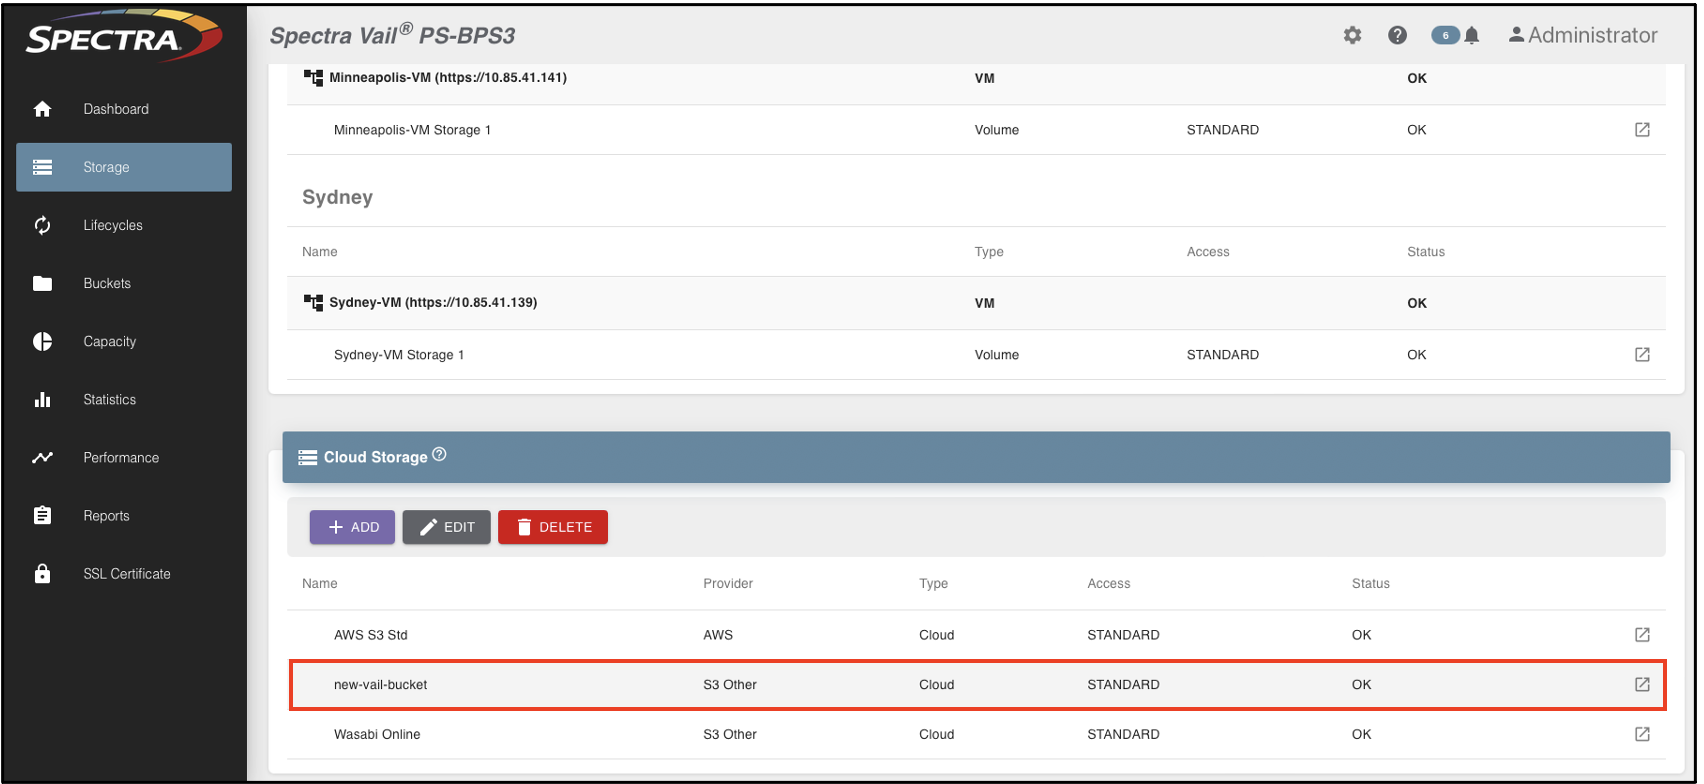
4.7. The new Wasabi bucket will appear as a valid storage location within Vail.
5. Configuring Vail Lifecycle rules
A Vail lifecycle rule can now be created and attached to any Vail bucket to direct the initial placement and subsequent actions for any object placed in that bucket via any Vail endpoint.
As an example, in this section, we will create a Vail bucket called cloud-and-denver and a lifecycle rule to move objects placed in this bucket to S3-Standard disk storage on BlackPearl S3 in Colorado and to the Wasabi bucket created above. In this case, we will also create a rule that consolidates all copies of that object to live exclusively on Wasabi after 6 months.
We will create the lifecycle rule first, then create the Vail bucket and attach the new lifecycle rule to it.
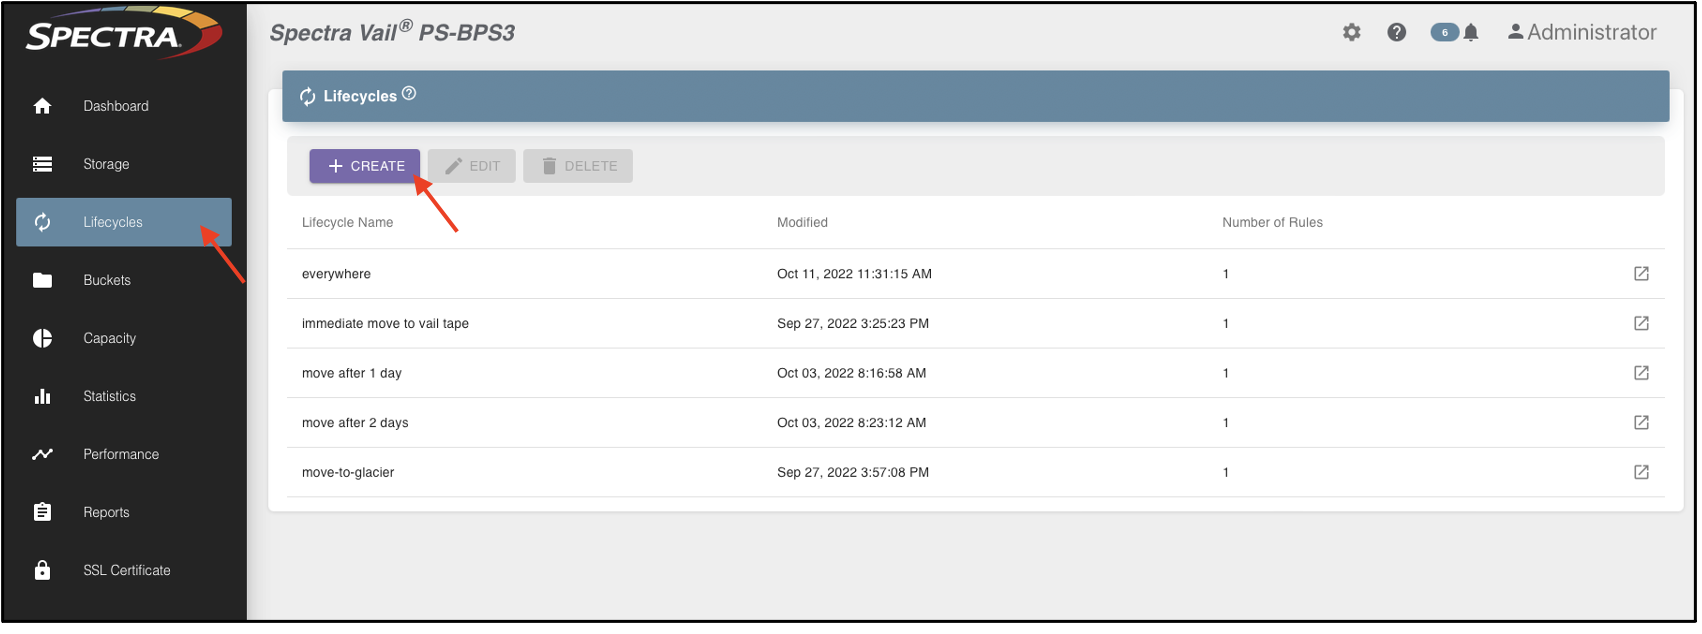
5.1. Click Lifecycles. On the Lifecycles page, click + CREATE.
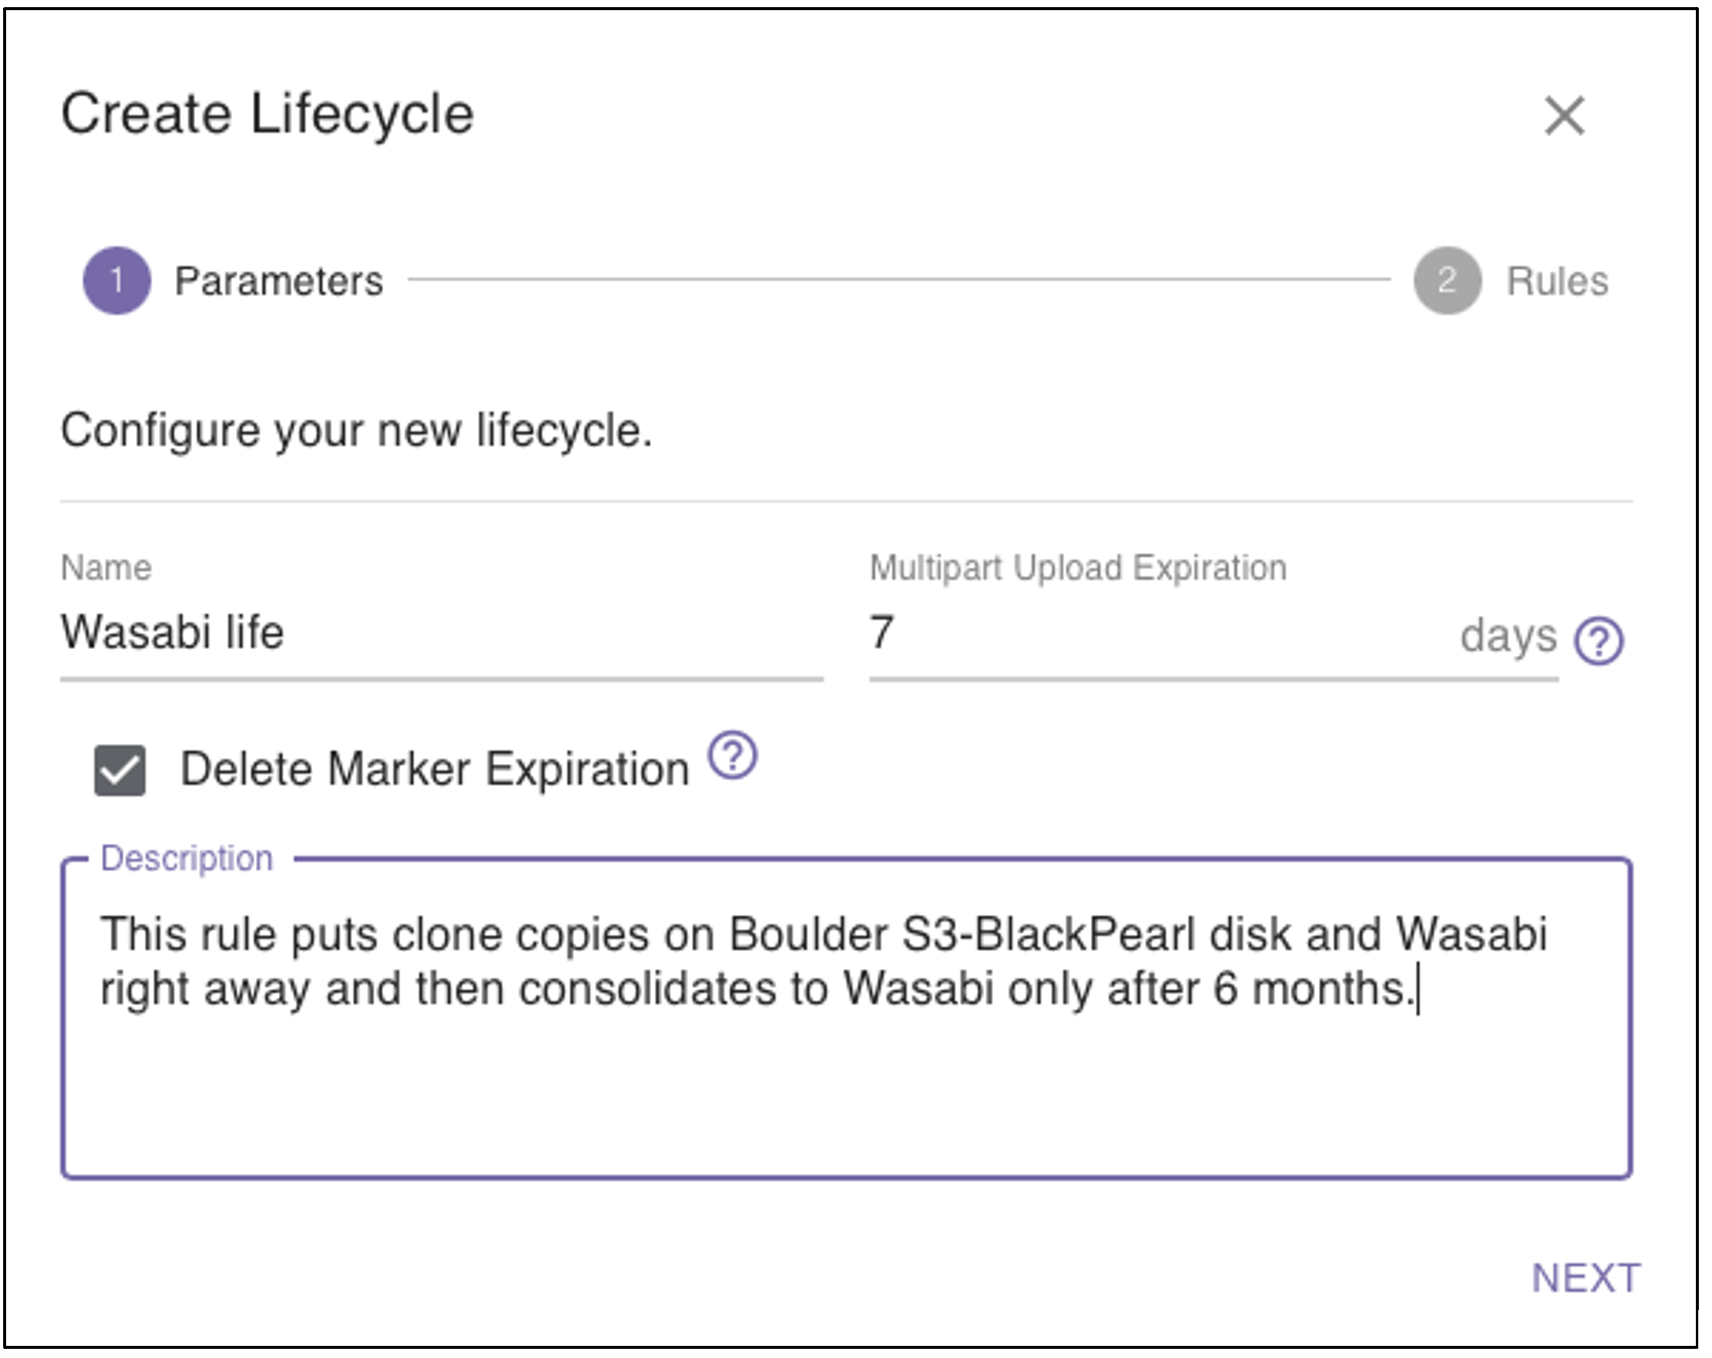
5.2. The Create Lifecycle dialog box is displayed. In the Parameters tab, provide the following details to configure the lifecycle policy.
Name: Provide a name for the lifecycle policy.
Multipart Upload Expiration: How long should multipart uploads remain open in the event of a slow connection?
Delete Marker Expiration: configure how deletes are handled.
Description: Provide an appropriate description that would be useful for other administrators.
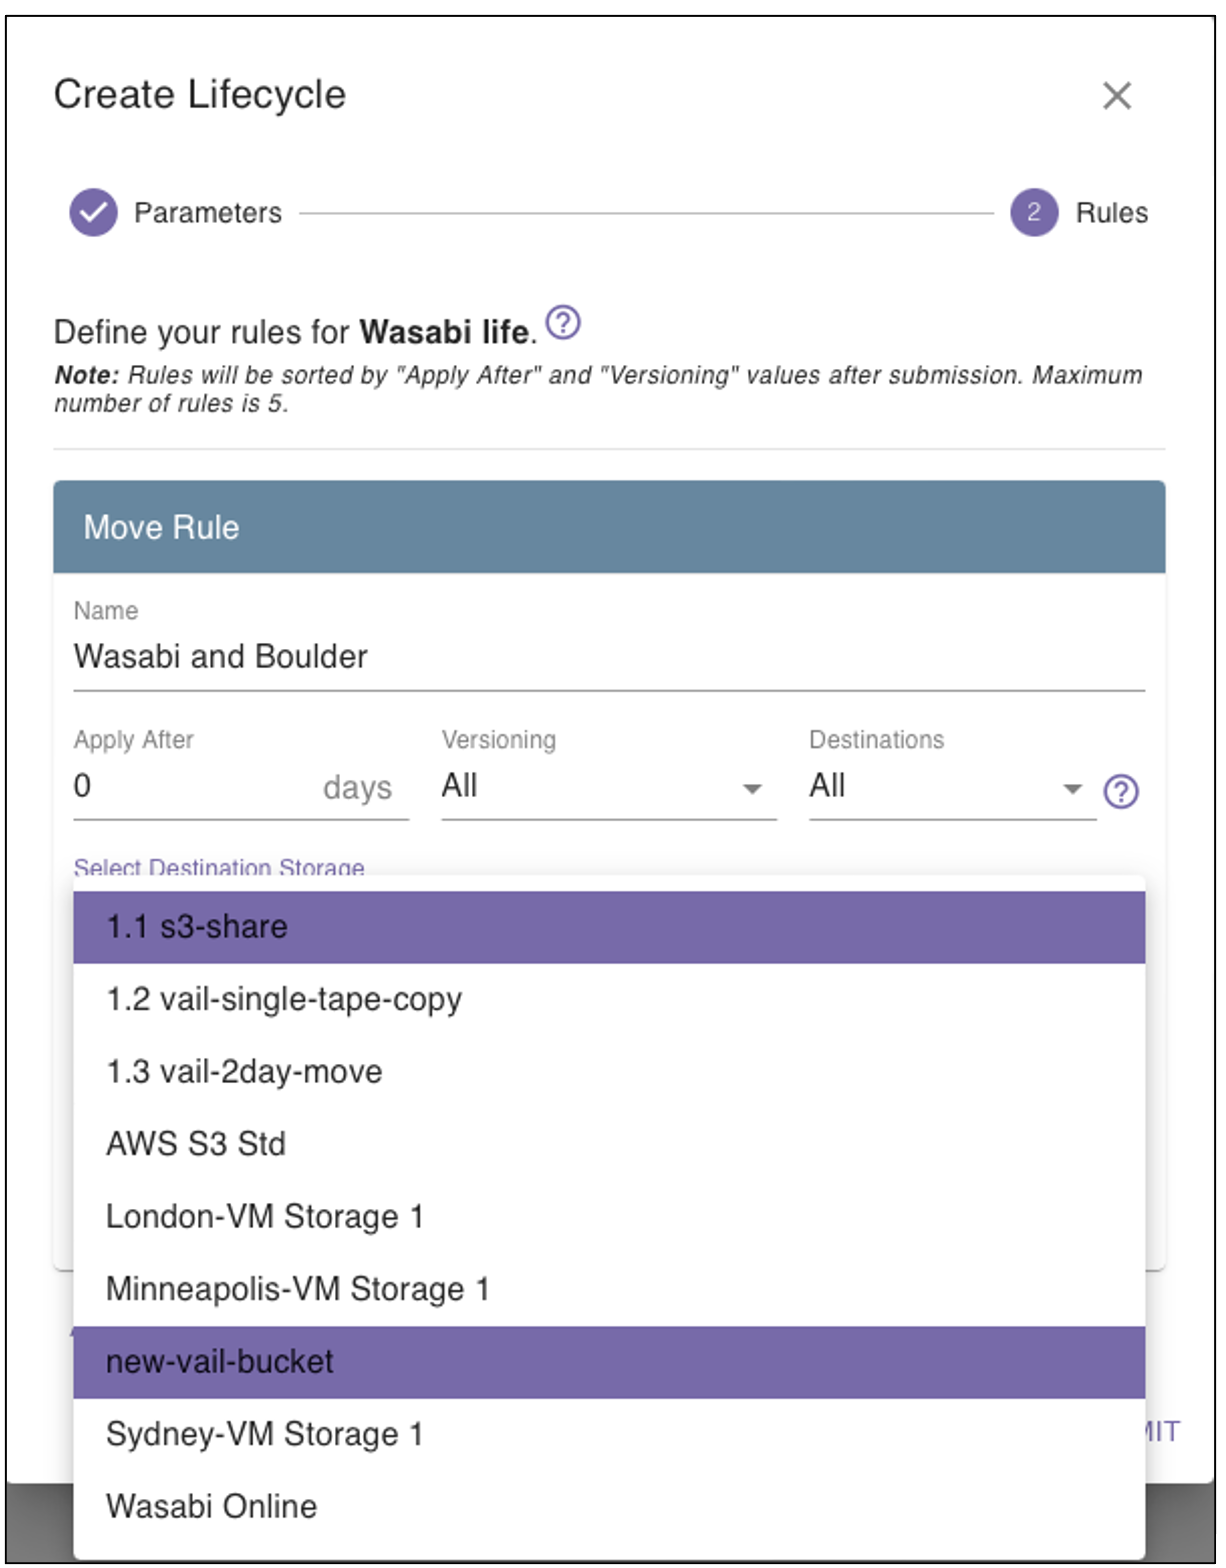
5.3 Choose the Rules tab, enter two rules for this lifecycle. The first rule will be configured to make two clone copies of any uploaded object. One in Boulder and one in Wasabi. Click on Add Move Rule.
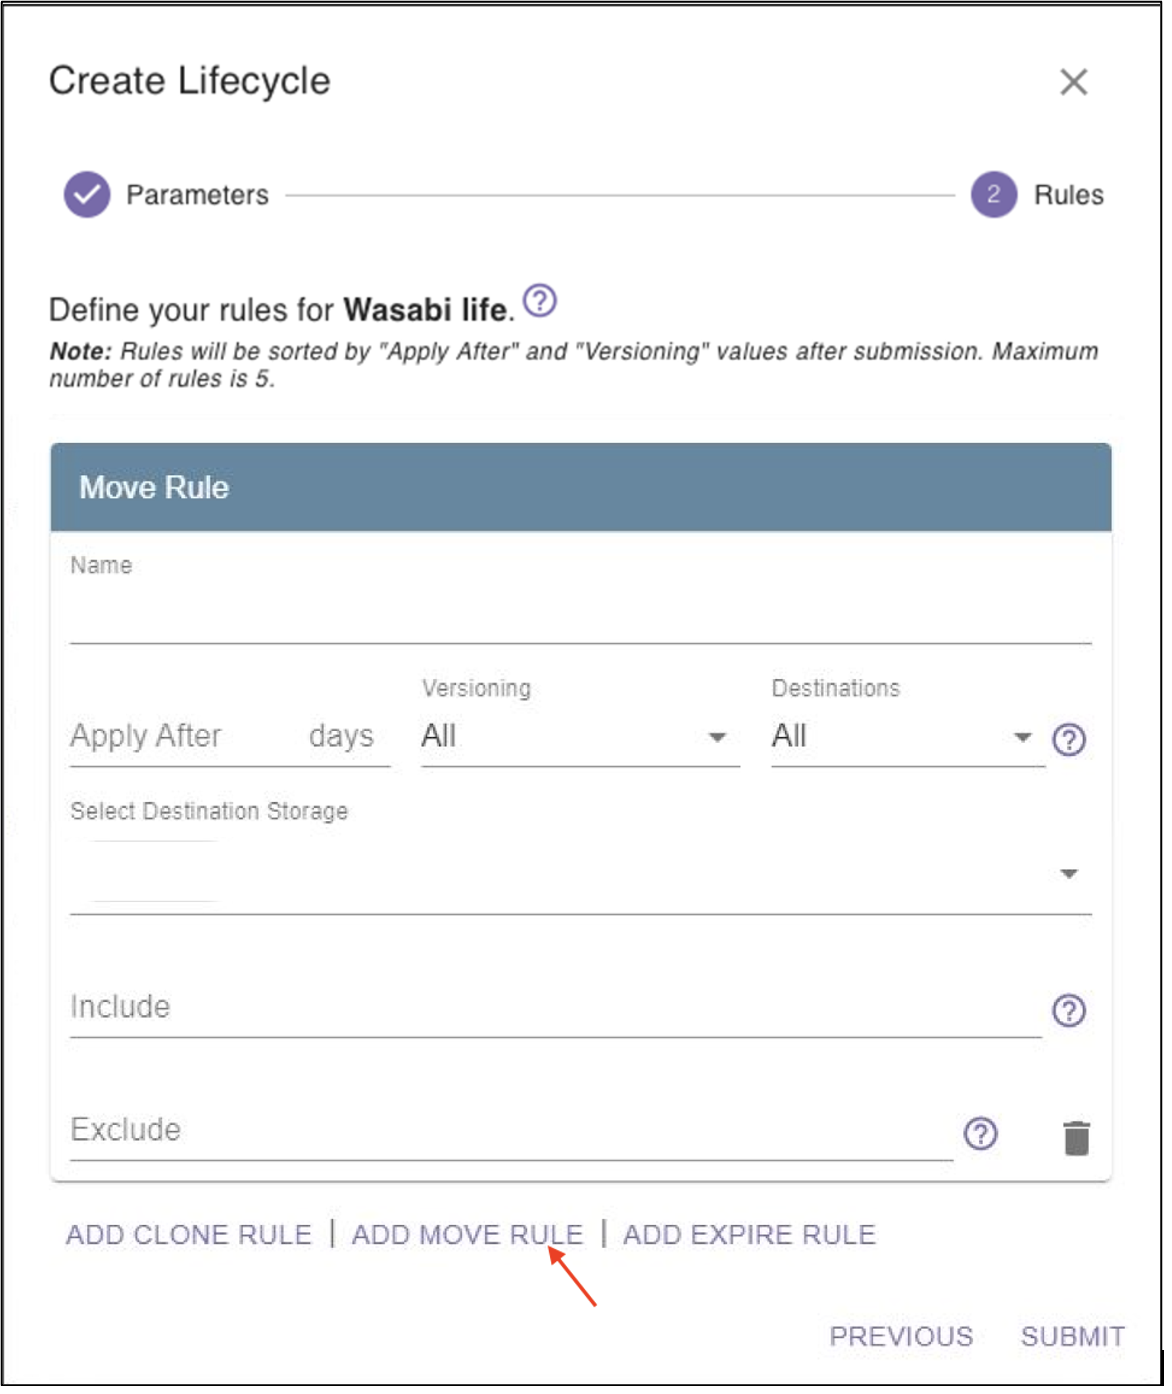
5.4. Provide a name (in this case), Wasabi and Boulder. Specify that it should apply immediately, in this case, after 0 days, it should apply to all versions of the object, and select the locations, in this case, new-vail-bucket, just created in Wasabi, and 1.1 s3 share (a location in Boulder in a BlackPearl).
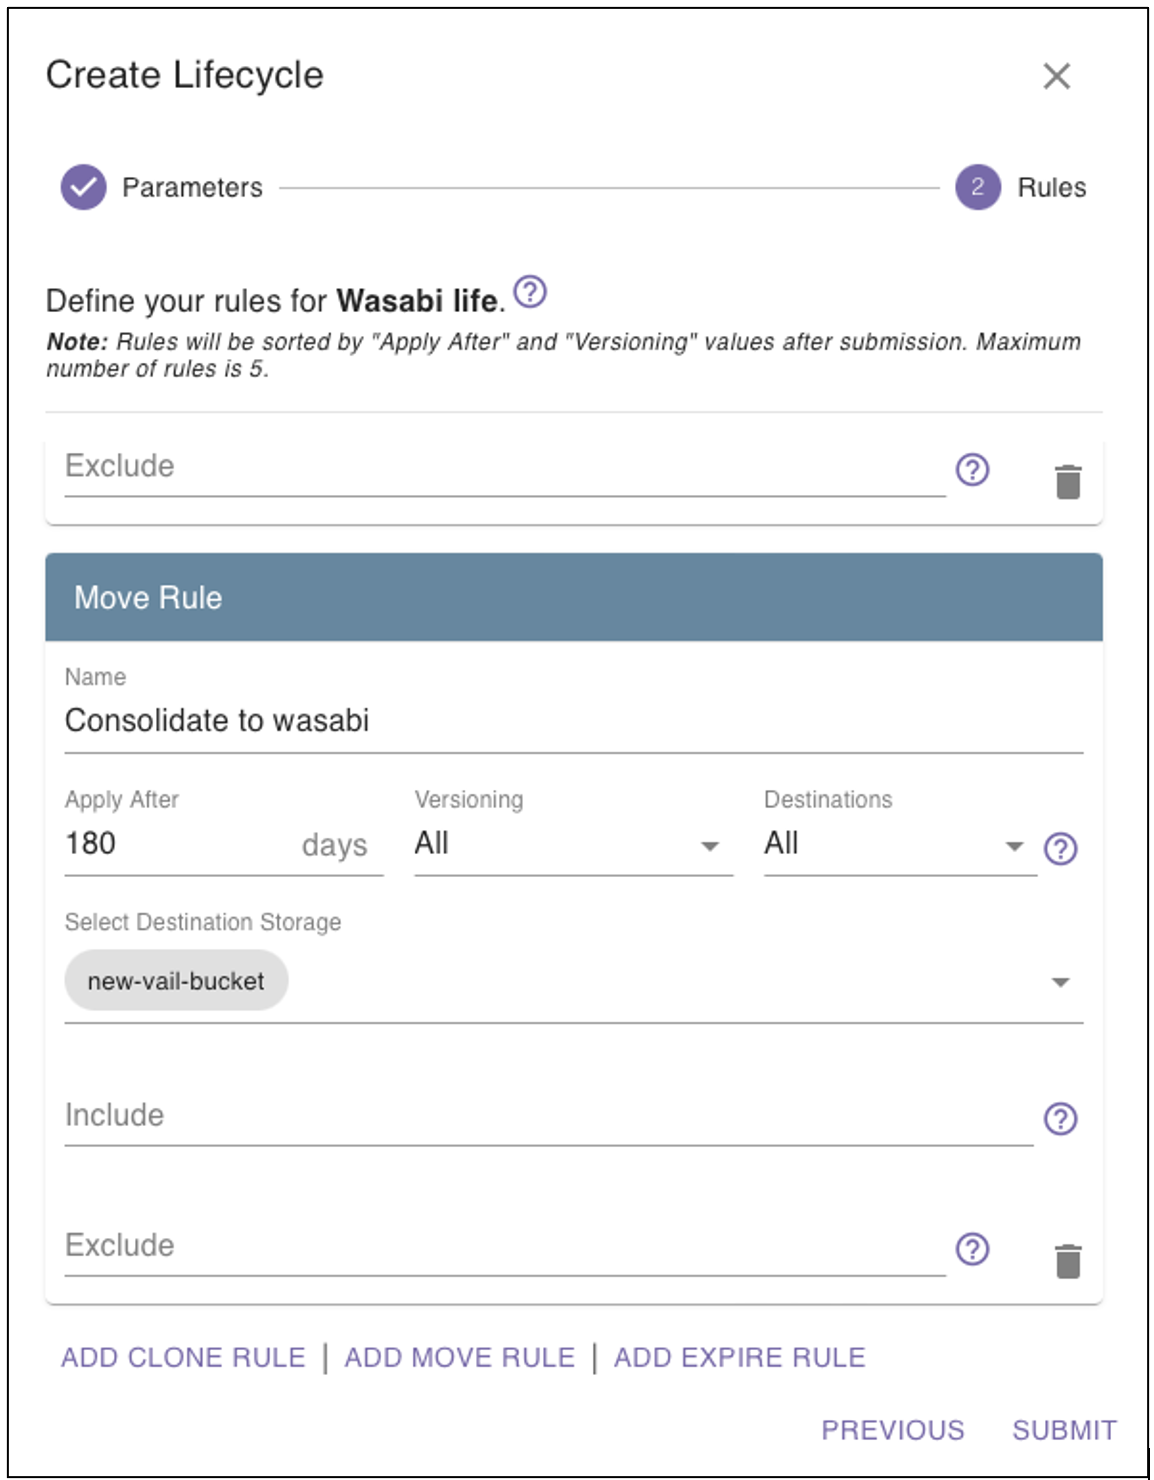
5.5. Click Add Move Rule and add a second rule to this lifecycle that will consolidate the copies to Wasabi only after 6 months.
In this case, the name Consolidate to Wasabi, which triggers in 6 months (180 days), should apply to all versions, and the destination of the new-vail-bucket is the target. Note that include and exclude filters can be applied to limit specific file types or locations to/from this rule.
Please note that a move rule was used as opposed to a copy rule – a copy rule creates new clone copies, a move rule makes the specified copies, and then releases all other clone copies for deletion. An expire rule is also available if these functions need to be split up in time or triggered.
5.6. On the Vail create bucket screen, create a new Vail bucket.
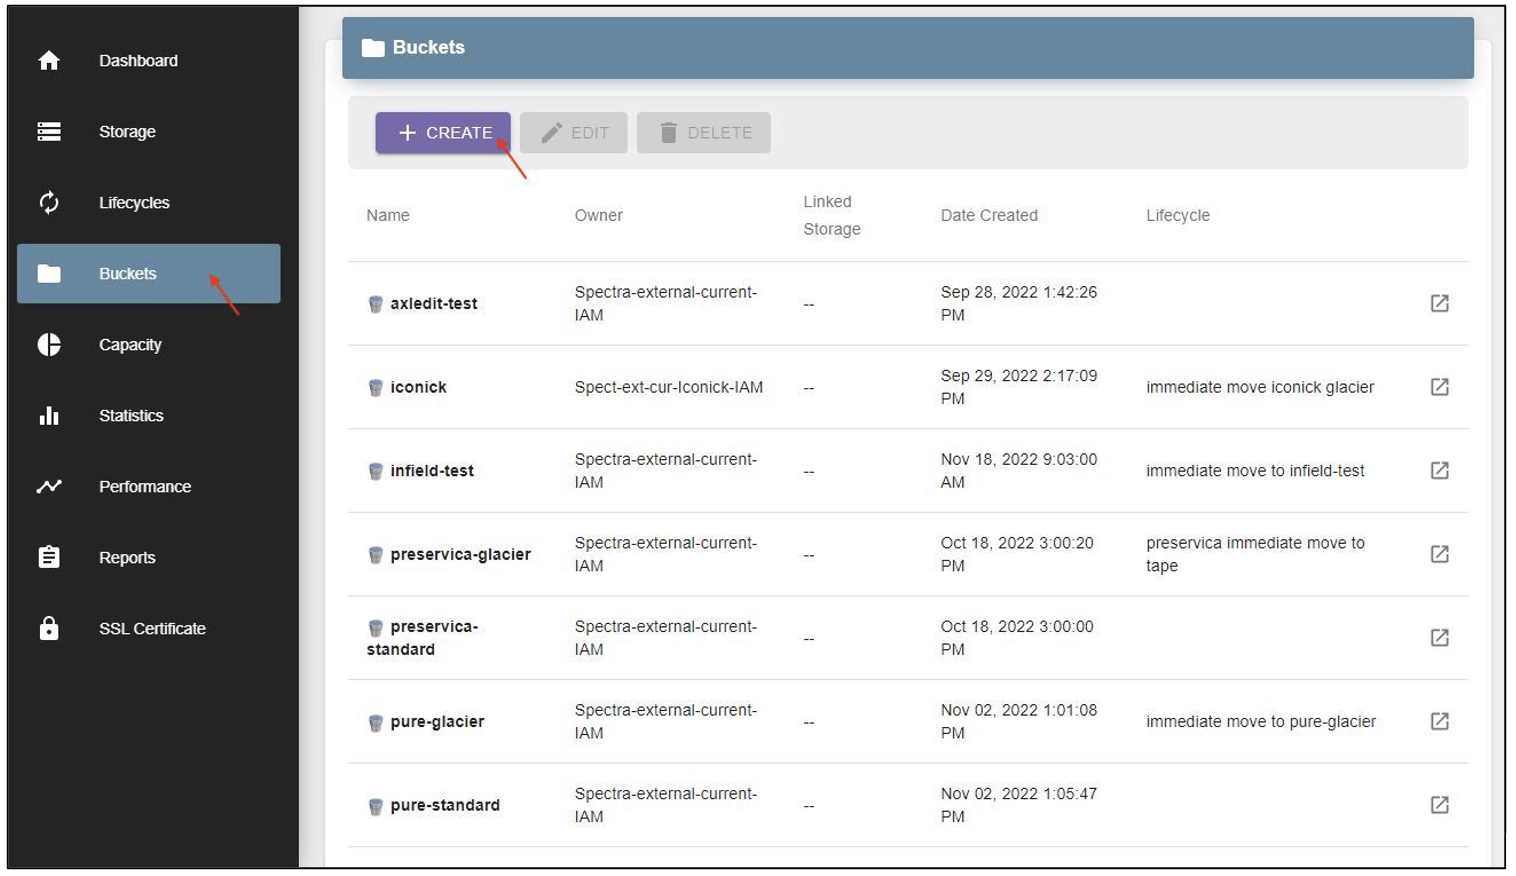
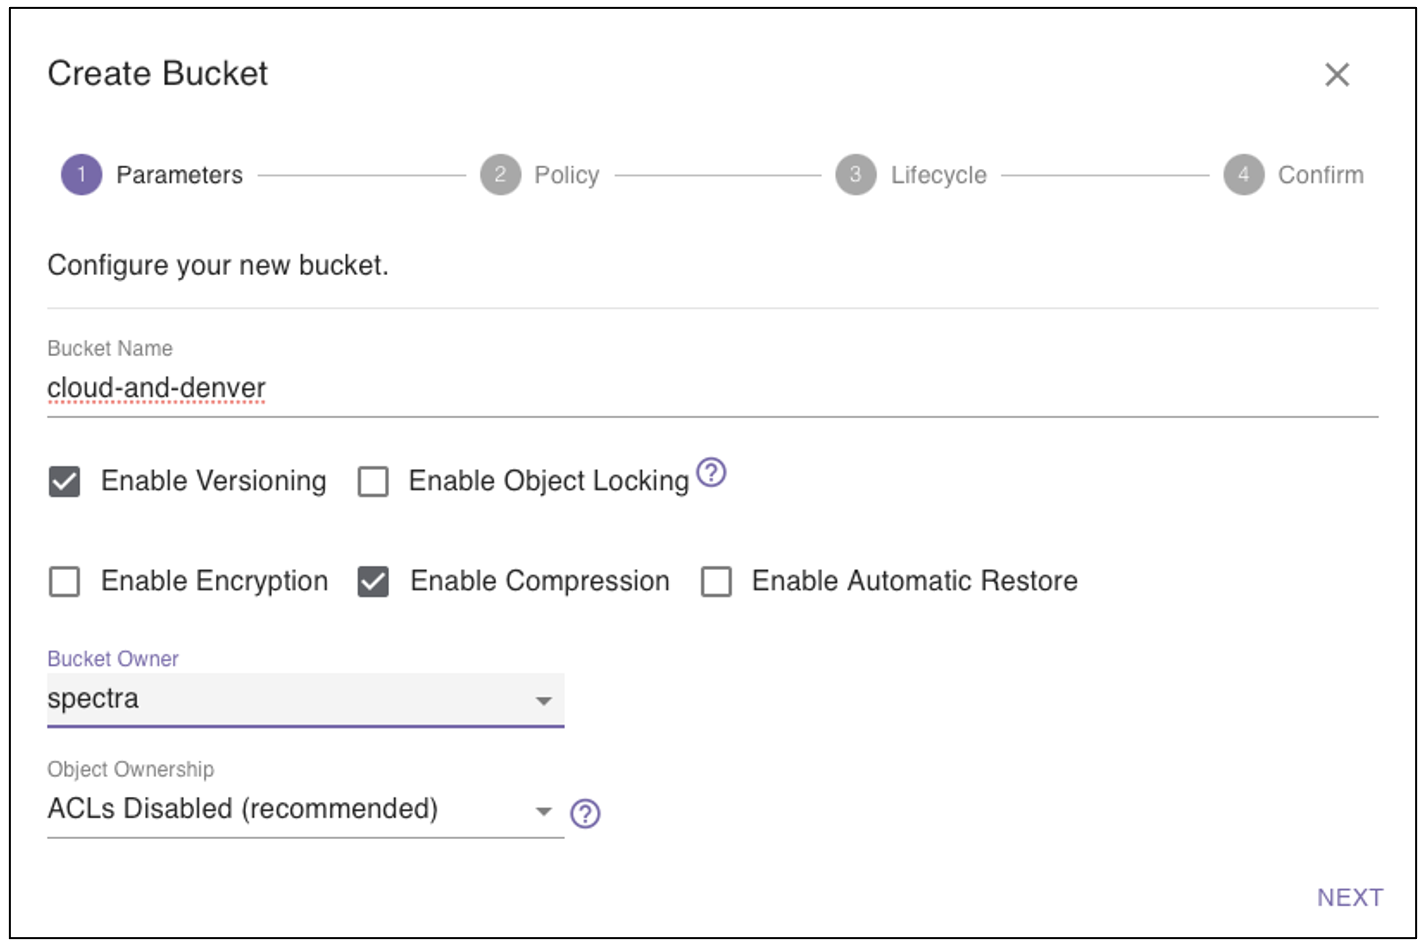
5.7. The Create Bucket dialog box is displayed. In the Parameters tab, provide a name for the bucket, configure the required settings, then click Next.
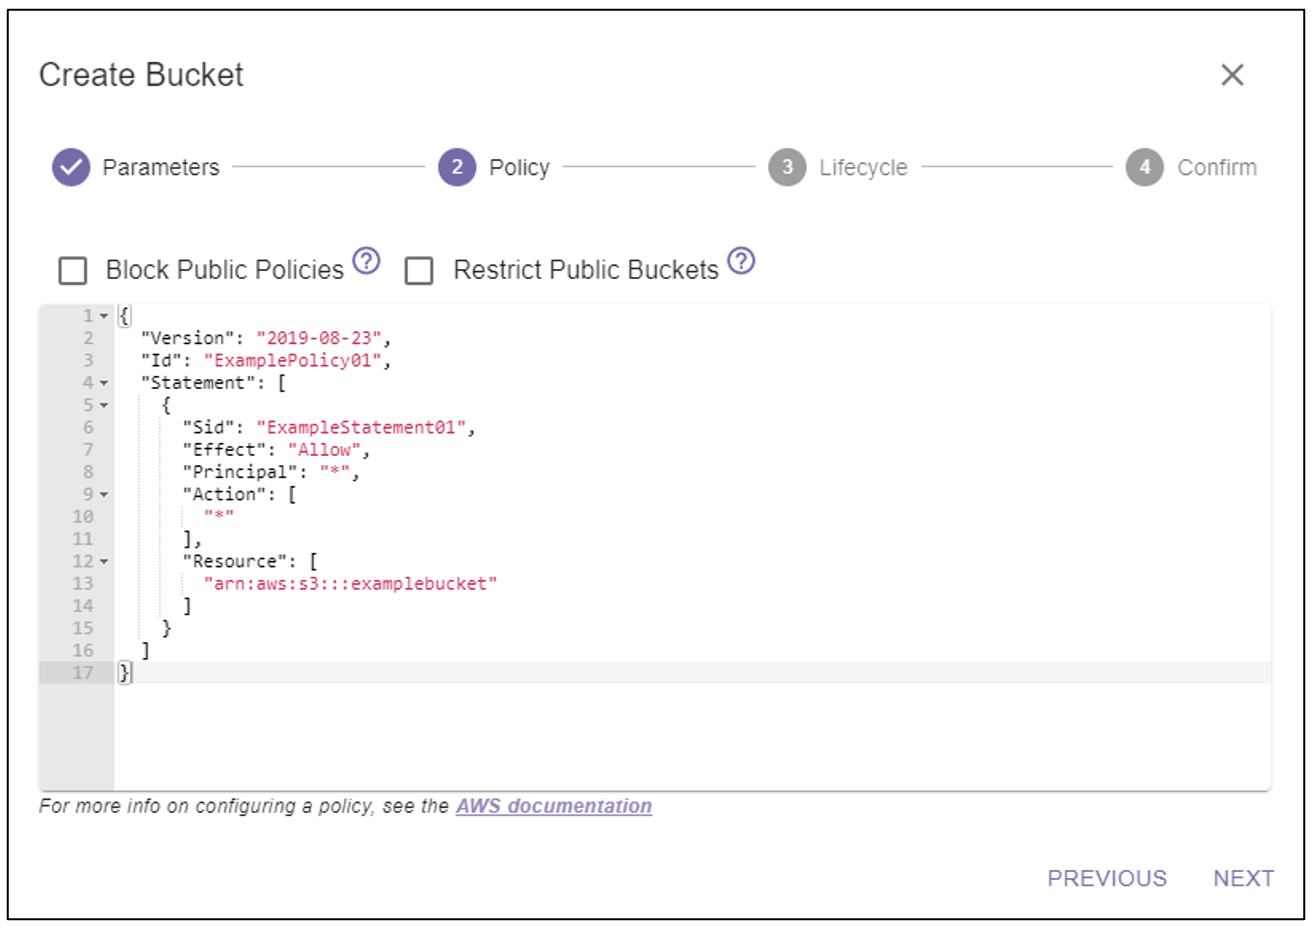
5.8. In the Policy tab, configure specific json permissions as per the policy shown below and click Next.
{
"Version": "2019-08-23",
"Id": "ExamplePolocy01",
"Statement": [
{
"Sid": "ExampleStatement01",
"Effect": "Allow",
"Principal": "*",
"Action": [
"*"
],
"Resource": [
"arn:aws:s3:::examplebucket"
]
}
]
}
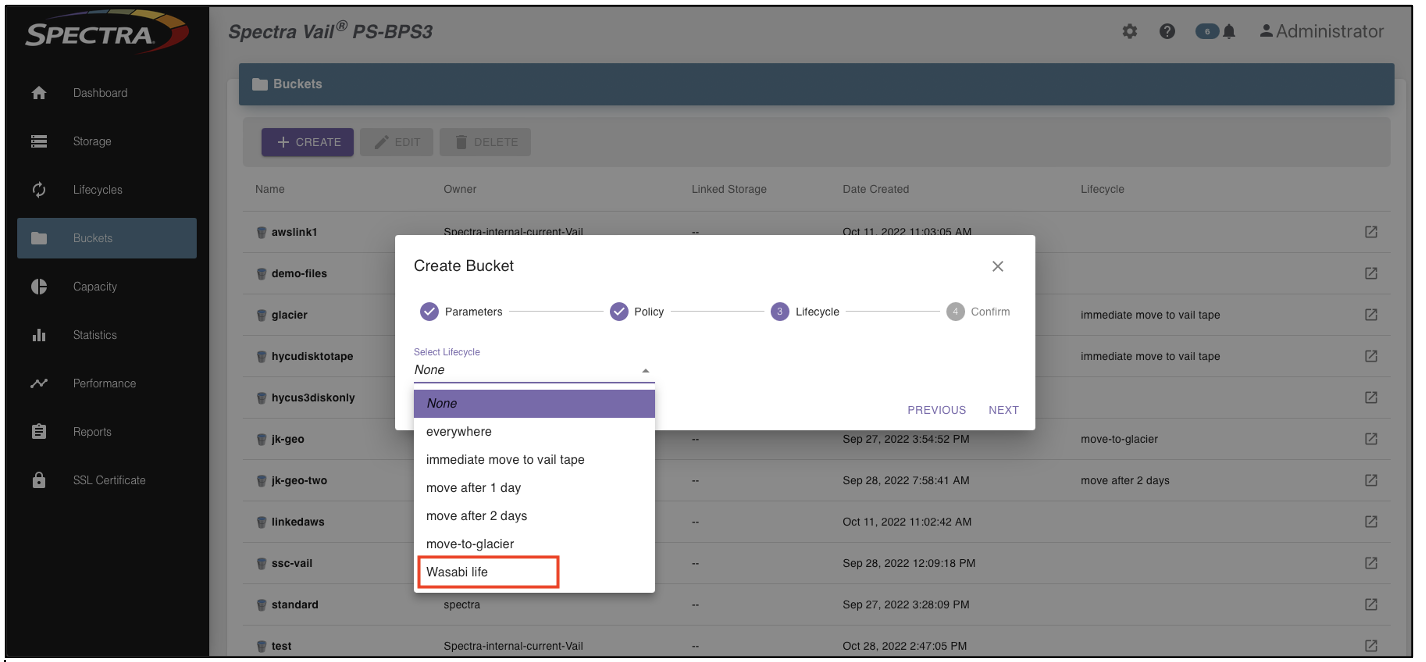
5.9. In the Lifecycle tab, select the Wasabi life created earlier. Click Next. On the next screen, review the config and click Submit.
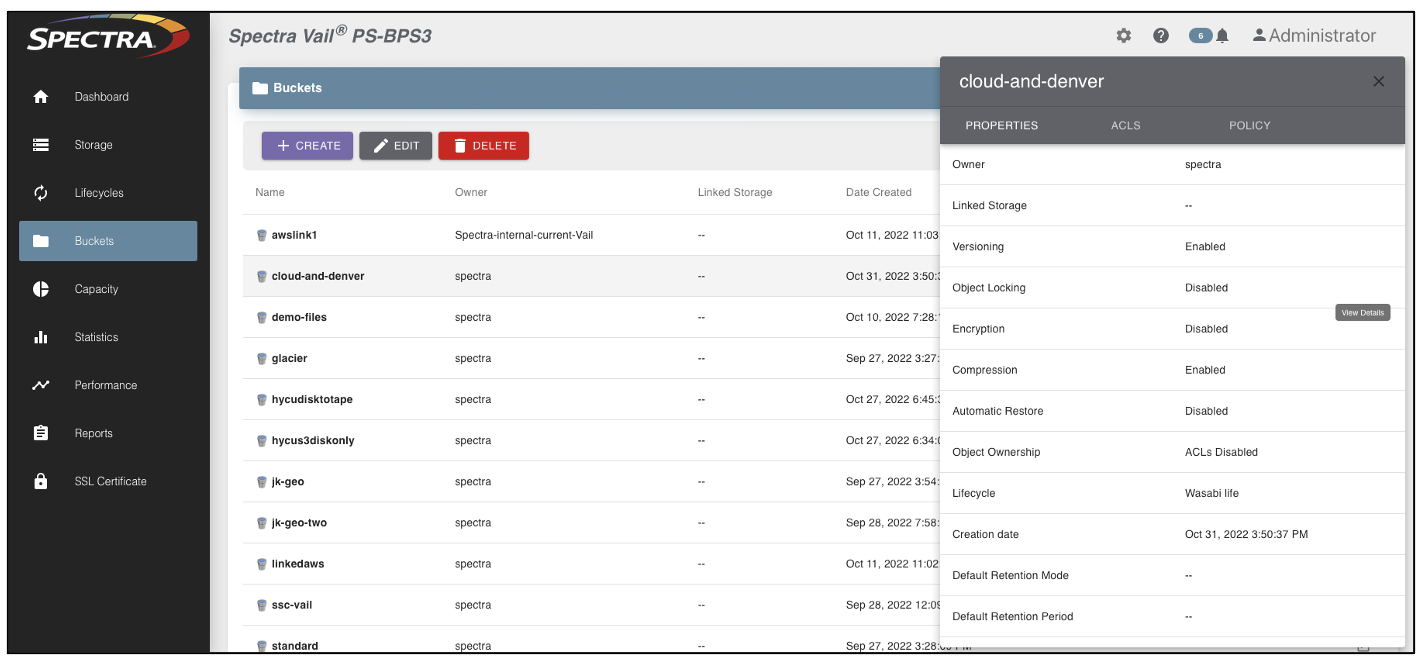
5.10. The lifecycle rule attached to this Vail bucket, are displayed on the bucket info screen.
6. Using Vail to transfer data
6.1. Using a client such as Mountain duck, connecting to any Vail endpoint in the system, the newly created bucket can be seen and mounted as a network drive. Dragging a file into the cloud-and-denver bucket results in the object being put/uploaded to the Vail node, the lifecycle rule is triggered, and the appropriate clone copies are created.
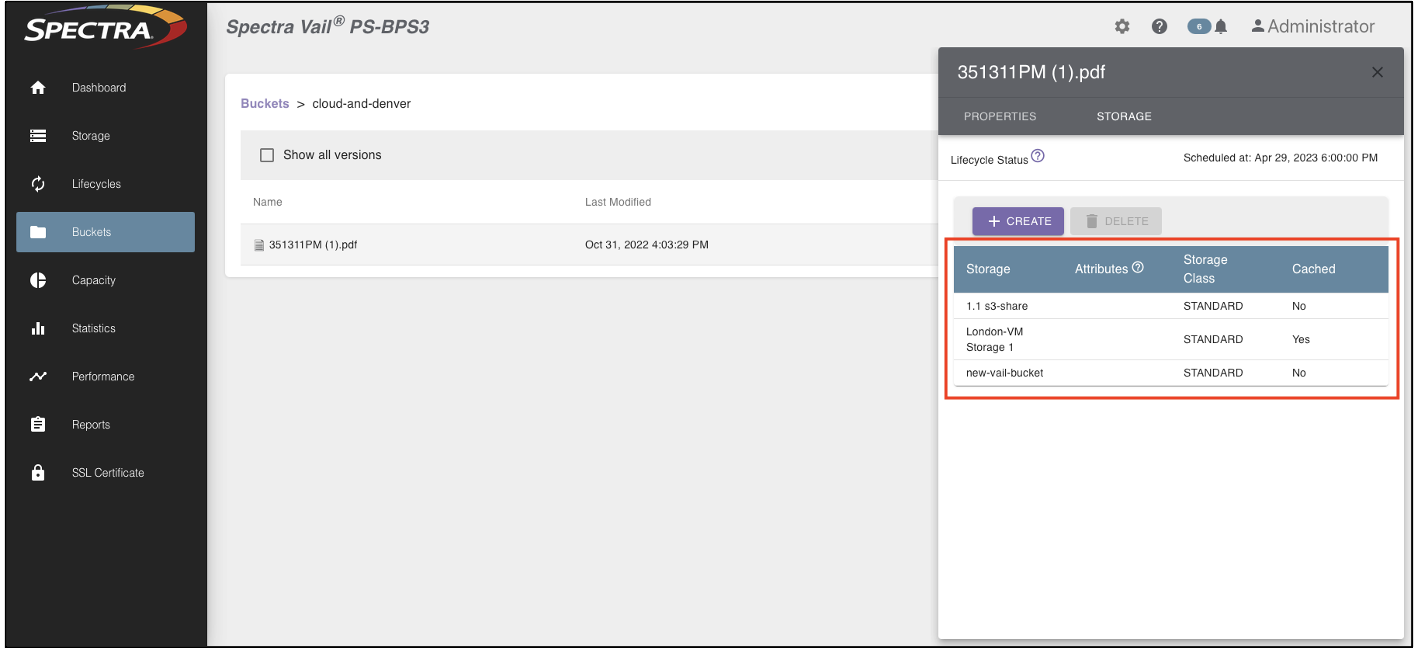
6.2. In the bucket menu of the Vail UI, the object (a .pdf) is shown with all its storage locations – a copy in 1.1 s3-share (The Boulder disk), in the wasabi new-vail-bucket, and the just uploaded, released for delete version on the United Kingdom VM – the endpoint to which the file was uploaded. Notice that the copy shows cached, meaning released for deletion.
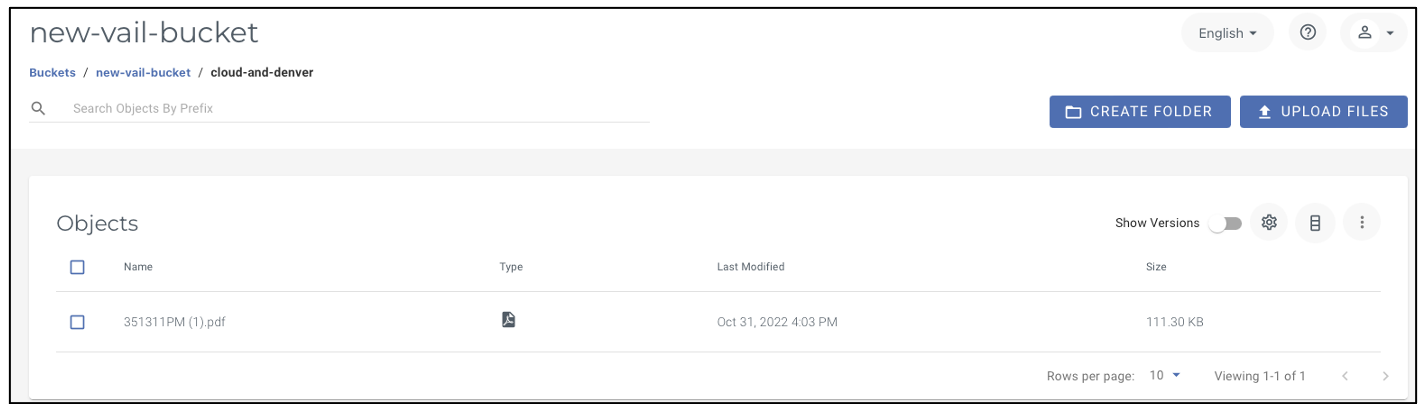
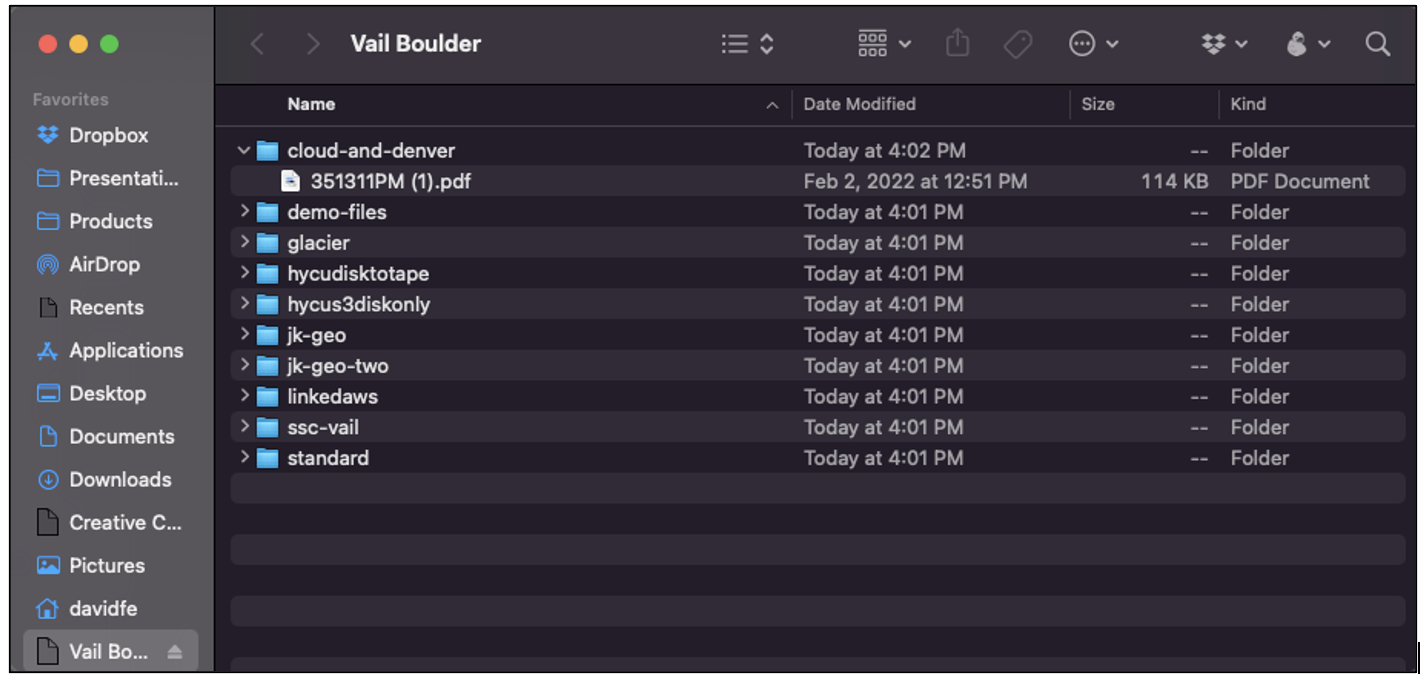
6.3. Logging into the Wasabi web portal, the new-vail-bucket can be seen as well as the subfolder created with the Vail bucket name, cloud-and-denver, as well as the .pdf that was uploaded to the United Kingdom, and a copy made directly on Wasabi.