Zerto (recently acquired by HPE) has been validated for use with Wasabi. HPE Zerto enables you to protect your infrastructure in a single, simple, and scalable cloud data management and protection platform.
The data restoration process is handled by your specific backup software application. As many variables can affect your unique environment, it is strongly recommended that you seek guidance from your backup software’s technical support team if you encounter difficulties or have application-specific inquiries.
Requirements
Zerto v9
An active Wasabi account
Creating a Repository
Log in to the Zerto Virtual Manager portal.
.png)
Navigate to Setup.
.png)
On the Setup page, navigate to the Repositories tab.
Click + to add a New Repository.
.png)
In the New Repository window, under the General section, provide a Name and select S3-compatible storage from the drop-down menu.
.png)
In the Settings section, provide the following details. Click Save.
Region
Endpoint URL
Bucket Name
Access Key
Secret Key
.png)
This configuration example uses Wasabi’s us-east-2 storage region. To use other Wasabi storage regions, use the appropriate Wasabi service URL as described in this Service URLs for Wasabi's Storage Regions.
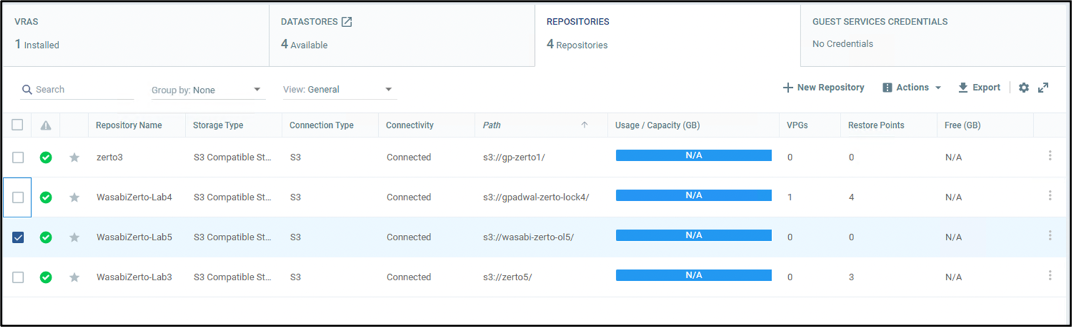
The Repositories page lists the newly created Wasabi repository.
.png)
Configuring Long-term Retention
The repository configured above needs to be assigned as a Long-term retention target for a VPG (Virtual Private Group).
Navigate to the VPGs tab.
.png)
On the VPGs page, select the desired VPG and select Edit VPG under the Actions drop-down.
.png)
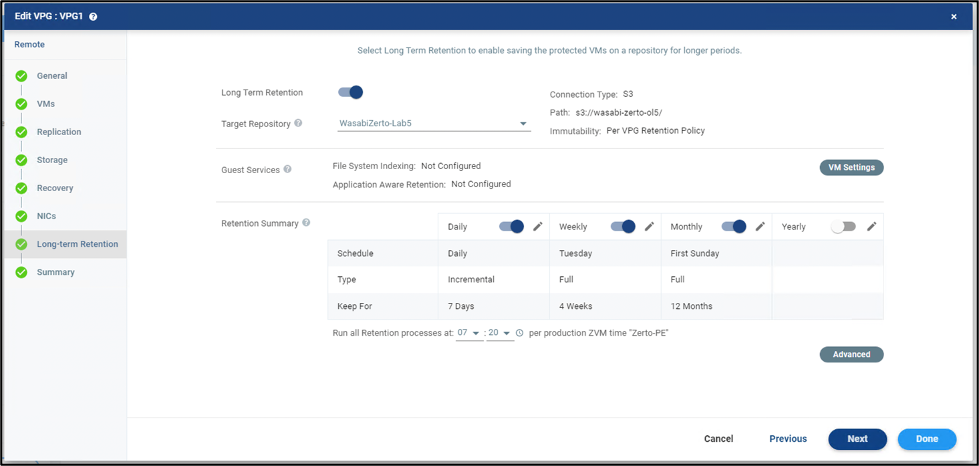
In the Edit VPG window, navigate to the Long-term Retention tab. Enable Long-term Retention and select the repository created earlier as the Target Repository. Configure the desired retention periods and click Done.
.png)
The retention process will run at the time configured above.
To run a retention process manually, select the VPG and select Run Retention Process from the Actions drop-down.
.png)
Configuring Immutable Retention sets Using Object Lock
Customers can use Zerto to create immutable retention sets using Wasabi’s Object Lock feature to protect against ransomware.
The minimum software version to support Immutability on Zerto is 9.0U3P1
The following steps outline how to enable Immutability on Zerto retention sets.
Create an object lock-enabled bucket on Wasabi Console.
Create a new repository.
In the settings section, provide the details below and use the object lock bucket name created above.
Region
Endpoint URL
Bucket Name
Access Key
Secret Key
.png)
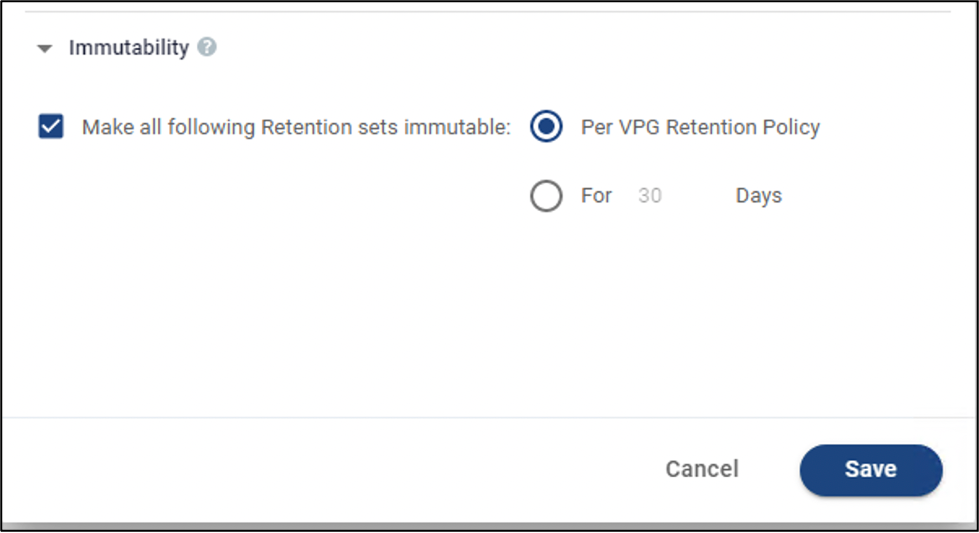
Under Immutability, configure the following. Click Save.
Select the checkbox Make all following Retention sets immutable to enable immutability.
To use the retention periods defined in the VPG Retention policy, select ‘Per VPG Retention policy’.
Select For (duration) Days to set a specific number of days for which the Retention Sets are to be immutable. The default value for this setting is 30 days.
In case the period is longer than the planned expiry by VPG Retention Policy, the minimum will be applied.
For more details on Immutability settings, refer to the Zerto documentation on Immutability.
The Repositories page lists the newly created Wasabi repository.
Edit the VPG. In the Edit VPG window, navigate to the Long-term Retention tab.
Enable Long-term Retention and select the repository created earlier as the Target Repository.
Configure the desired retention periods and click Done.