How do I use Macrium Site Manager with Wasabi?
Wasabi has been validated for use with Macrium. Macrium's Site Manager 8 gives users full control over the backup and restoration of every connected workstation in your network. To use this product with Wasabi, please follow the instructions below
Prerequisites
Site manager 8 v8.0.5934
A license for SM agents (for more information please click here)
An active Wasabi account
Wasabi configuration
Login to the Wasabi Management Console.
Create a Bucket
1. Using the left menu panel, navigate to the Buckets menu. Click Create Bucket
.png)
2. Supply a bucket name and select the preferred region
.png)
3. Click Next and review the additional bucket options (bucket versioning isn’t required for Remote Sync).
4. Click Next and review the listed bucket configuration.
5. Click Create Bucket to complete bucket creation.
Create a Policy
6. Using the left menu panel, navigate to the Policies menu. Click the Create Policy button
.png)
7. Policies are created through the Policy Generator or by manually producing the policy document.
8. Supply a policy name
9. Create the policy. Remote Sync requires the policy to allow the following actions:
s3:ListAllMyBuckets
s3:ListBucket
s3:ListBucketMultipartUploads
s3:ListBucketVersions
s3:ListMultipartUploadParts
s3:GetObject
s3:AbortMultipartUpload
s3:DeleteObject
s3:DeleteObjectVersion (optional if bucket versioning is not used)
s3:PutObject
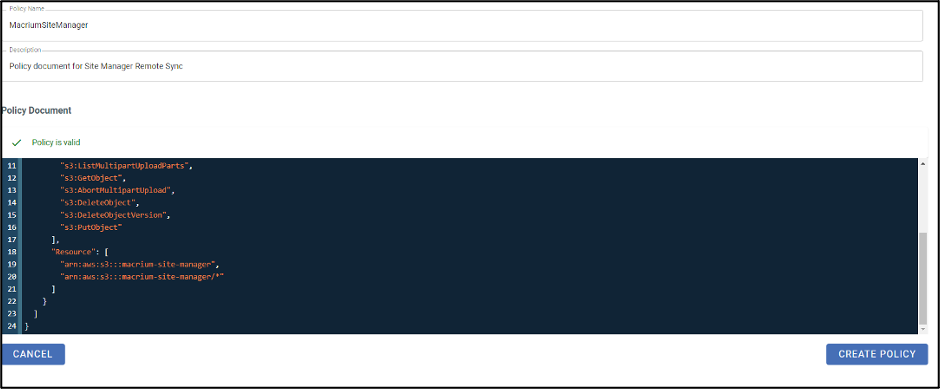
The following policy document example covers the expected actions and restricts its use to the ‘macrium-site-manager’ bucket created earlier:
{
  "Version": "2012-10-17",
  "Statement": [
    {
      "Effect": "Allow",
      "Action": [
        "s3:ListAllMyBuckets",
        "s3:ListBucket",
        "s3:ListBucketMultipartUploads",
        "s3:ListBucketVersions",
        "s3:ListMultipartUploadParts",
        "s3:GetObject",
        "s3:AbortMultipartUpload",
        "s3:DeleteObject",
        "s3:DeleteObjectVersion",
        "s3:PutObject"
      ],
      "Resource": [
        "arn:aws:s3:::macrium-site-manager",
        "arn:aws:s3:::macrium-site-manager/*"
      ]
    }
  ]
}
The policy document example is intended to be a simple but functional example, readers may wish to improve this policy with further restrictions.
10. Select the Create Policy button to complete policy creation.
Create User
11. Using the left menu panel, navigate to the Users menu. Click the Create User button.
.png)
12. Provide a username. Select Programmatic (create API key). Console access is optional. Select Next
.png)
13. Optional, add to an existing or create a new group for the user to be associated with.
14. Select Next on group setup completion. Search for the policy created earlier and attach it to the user (or attach the policy to a group associated with this user after the user is created).
.png)
15. Select Next to review the created user configuration. Select Create User to complete the user creation process.
16. The Create New Access Key dialog will appear containing the user's Access Key and Secret Key, this information should be stored securely, the secret key can’t be recovered after this point but replacement keys can be generated
.png)
Macrium Site Manager Remote Sync Configuration
Remote Sync is configured on a per-repository basis. Remote Sync configurations that share a single bucket must use unique pathing to prevent conflicts.
Note: The repositories need to be created before configuring a synchronization. For instructions on creating a repository, please click here.
17. Using the left menu panel, navigate to the Scheduled Activity page.
18. Using the left sub-menu panel, select New Activity or find the repository nominated for Remote Sync and select No Remote Sync followed by Configure Synchronization
.png)
19. In the Choose Activity Type tab, select Schedule Synchronization. Select the repository nominated for Remote Sync Select Next
(This stage may be skipped by the wizard depending on how the wizard is launched in the previous step.)
.png)
20. In the Synchronization Type tab, select Amazon S3 and select Next
.png)
21. Set the S3 Service dropdown menu to Wasabi.
.png)
22. Set the Region dropdown menu to match your bucket’s region.
.png)
23. Set the Bucket field to match your bucket’s name.
24. Set the Root Path field with the path to place repository data within the bucket. This field isn’t required.
.png)
25. Set the Access Key and Secret Key with the credentials previously provided by Wasabi and select Next
.png)
26. In the Configuration tab, set the required details to configure the synchronization schedule.
Optional, set the Custom Name field (used for display purposes within Site Manager).
Set the Folder Name that will contain the backup data, the folder will be added after the Root Path.
Set the Synchronization Window times, Remote Sync will run between this time block, syncs still running by the end time will be abandoned until the following day. This feature can prevent high internet bandwidth usage during known peak times.
Set the (Synchronization Window) Frequency, Remote Sync will only run on the days selected.
Set the Allow Backups During Remote Synchronization under Options as preferred, if active Site Manager will attempt to run backups and remote syncs simultaneously when possible
.png)
27. On selecting Finish, the wizard will perform a connection test to Wasabi.
Monitoring
Viewing Remote Sync Status
The Wasabi Remote Sync details are accessible through the Scheduled Activity sub-menu panel. The page displays a general status, configuration information and a breakdown of the last run Remote Sync result, including whether it succeeded, any error messages, the amount of data uploaded and which files were affected
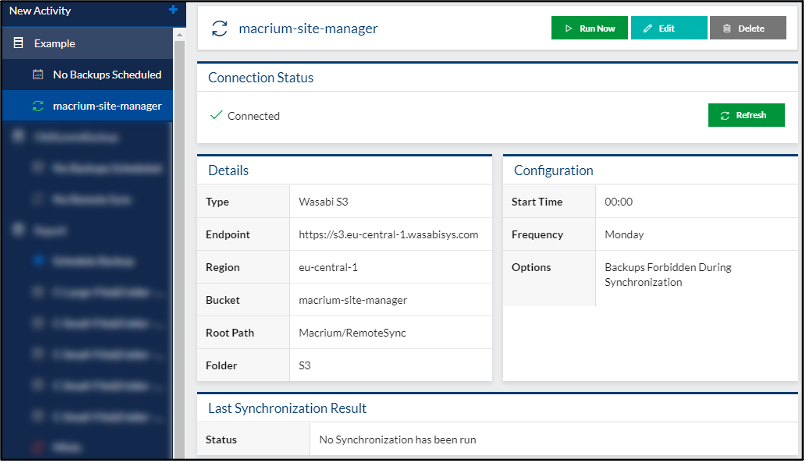
The Run Now option allows a sync to be started manually. This manually started sync will wait for any active backups in the Repository to finish before starting and will prevent any backups from starting until the sync is completed.
Viewing Remote Sync Forecast
The upcoming forecast for a remote sync can be found on the Dashboard page under the Forecast widget or within the Repositories page.
.png)
Viewing an in-progress Remote Sync
The in-progress details for a remote sync can be found on the Dashboard page under the Activity widget.
.png)
Common Remote Sync Issues and Fixes
Synchronization Failures
If a sync fails partway through the upload process, the next sync will roll the remote server back to its previous state before starting, there is no need to do anything to repair the remote sync repository state, this will happen automatically on the next sync. Communication issues are handled by internally retrying the upload for up to 10 minutes if a disconnection from the server happens.
Full Backup Files are Synchronized When Creating Incremental Backups
The remote synchronization process uploads any new or changed backups. As this works at a file level, a change to a full backup caused by the Create Synthetic Fulls option in the backup schedule will cause the full image file to be re-uploaded. It is recommended to avoid this option if the amount of data uploaded is a problem.
Remote Server ID mismatch
.png)
.png)
Sometimes a remote sync connection or sync attempt will fail the error Remote server ID does not match this repository. This error means that the local repository's unique ID does not match the one recorded on the server for this sync. This can have many causes:
An error on the Repository - If the ID file is deleted from the repository, a new ID will be generated. If this happens the remote sync is stopped to prevent local repository data with errors from overwriting the remote copy
Multiple Repositories syncing to the same server - if multiple repositories sync to the same server and path, the one which connects first and writes their unique ID file to the server will own it and sync to it. The other repository will generate an error instead. This prevents multiple repositories from overwriting each other's data.
Server space is being reused for a different Repository - If a Site Manager server is moved or the remote sync destination has old Site Manager sync data, there may be an ID error generated because the remote sync server still has the ID from the old Repository.
If the ID mismatch has been caused by old data or is otherwise not relevant, the Repository can write a new ID file to the remote server and take it over by using the Reinitialize option. This will update the ID file and allow the remote sync to proceed.
Appendix
For more information on configuring Site Manager, please click here or select one of the following topics: