How to Back Up macOS Using Time Machine to a Mountable Drive and Sync to Wasabi via rclone?
This knowledge base (KB) article describes how to back up a macOS system using Time Machine to a mountable drive and then sync the backup to Wasabi cloud storage using rclone. This solution has been validated for use with Wasabi.
To use this product with Wasabi, please follow the configuration tips below.
For more information about rclone usage with Wasabi, see the official documentation: How do I use rclone with Wasabi?
Note: This example discusses the use of Wasabi's us-east-1 storage region. To use other Wasabi storage regions, please use the appropriate Wasabi service URL as described in our Service URLs KB.
Prerequisites
macOS 12+ (Tested on macOS 15.5)
Sufficient internal disk space (recommended: >1.5x used system space)
Wasabi account with bucket created (Bucket Creation Guide)
Access Key and Secret Key from Wasabi (Access Keys Guide)
rclone installed (How do I use rclone with Wasabi?)
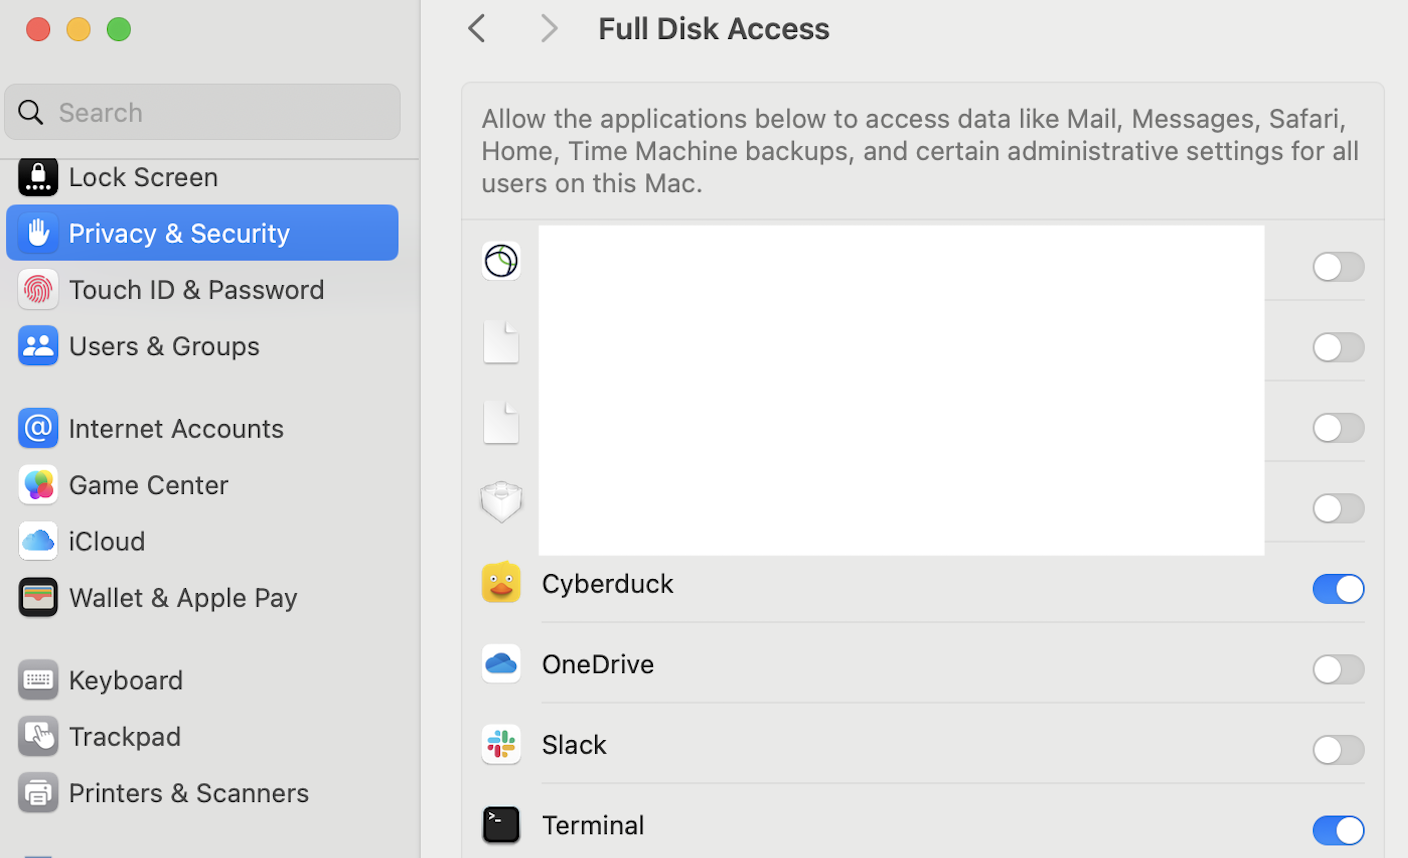
Terminal with Full Disk Access granted (System Settings > Privacy & Security > Full Disk Access)
1. Prepare a Time Machine-Compatible Mount Drive
You can use any mounted drive that satisfies Time Machine's requirements:
This can be:
External storage device connected to Mac
Mac shared as a network backup destination
Network-attached storage (NAS) device
AirPort Extreme Base Station or AirPort Time Capsule
A virtual disk image such as a sparsebundle (used in this guide for flexibility and easier cloud sync)
1.1. To create a sparsebundle (optional):
Recommended Disk Size: >1.5x used system space
hdiutil create -size <disk-size> -type SPARSEBUNDLE -fs HFS+J -volname "<volume-name>" <path-to-folder>.sparsebundle Command variables:
<disk-size-in-GB>: Size of the virtual disk in GB (e.g., 500)<volume-name>: The name shown in /Volumes/ (e.g., TimeMachineDisk)<path-to-folder>: Folder where the sparsebundle will be saved (e.g., ~/)<sparsebundle-name>: Name of the sparsebundle file (e.g., TimeMachineDisk)
Example:
hdiutil create -size 500g -type SPARSEBUNDLE -fs HFS+J -volname "TimeMachineDisk" ~/TimeMachineDisk.sparsebundle1.2. Mount the Drive (if virtual):
hdiutil attach <path-to-folder>.sparsebundle Command variables:
<path-to-folder>: Folder where the sparsebundle will be saved (e.g., ~/)
Example:
hdiutil attach ~/TimeMachineDisk.sparsebundleThe volume will be mounted under /Volumes/<volume-name>.
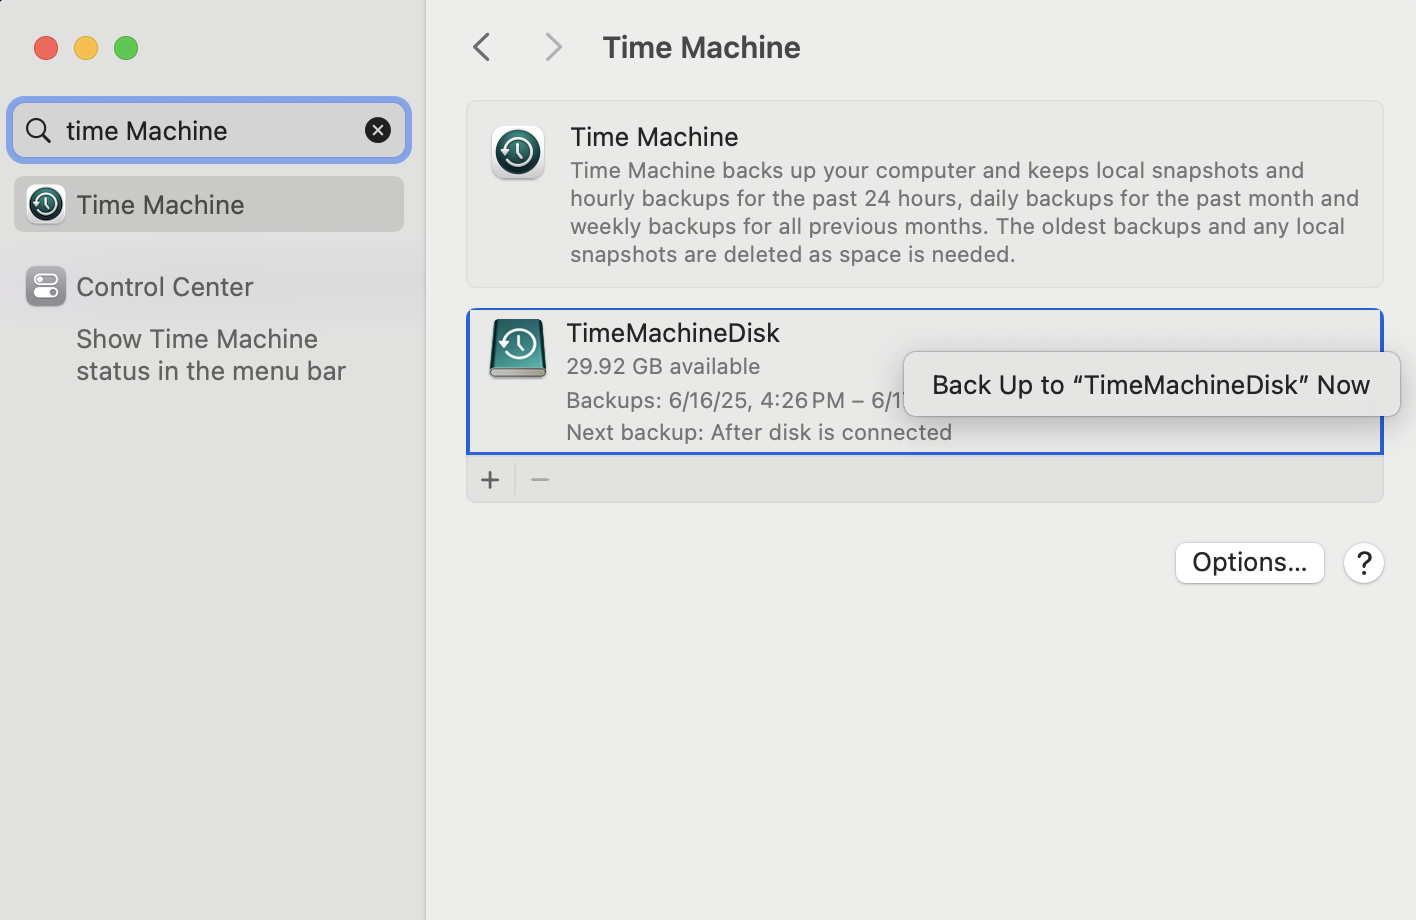
2. Set Time Machine to Use the Mounted Drive
sudo tmutil setdestination /Volumes/<volume-name>Command variables:
<volume-name>: The name shown in /Volumes/ (e.g., TimeMachineDisk)
Example:
sudo tmutil setdestination /Volumes/TimeMachineDiskTime Machine will now treat this mount as a backup disk. 
3. Run the Initial Time Machine Backup
3.1. Time Machine to complete a full system backup. (System Settings > Privacy & Security > Full Disk Access)
3.2 Back Up: This may take several hours depending on system size. (System Settings > Time Machine > Right Click the Mounted Drive)
4. Configure rclone for Wasabi
To configure rclone to work with Wasabi, follow the official guide.
Summary of steps:
Run rclone config
Select n for new remote, name it (e.g., wasabi-us-east-1)
Choose storage type S3, then provider Wasabi
Input your access key and secret key
Choose endpoint (e.g., s3.<your-region>.wasabisys.com, our Service URLs KB)
Set ACL to private
5. Sync the Backup to Wasabi
rclone sync <path-to-sparsebundle> <remote-name>:<bucket-name> --progressCommand variables:
<path-to-folder>: Folder where the sparsebundle is stored (e.g., ~/)<sparsebundle-name>: The sparsebundle name (e.g., TimeMachineDisk)<remote-name>: The rclone remote name you configured (e.g., wasabi)<bucket-name>: The Wasabi bucket name (e.g., time-machine-backup)
Example:
macbookpro ~ % rclone sync ~/TimeMachineDisk.sparsebundle wasabi:time-machine-buckup --progress
Transferred:      42.240 GiB / 42.240 GiB, 100%, 17.736 MiB/s, ETA 0s
Transferred:         5415 / 5415, 100%
Elapsed time:      37m7.3s
This will upload the entire sparsebundle (or any mountable backup folder) to your Wasabi bucket.
6. Automate the Sync (Optional)
6.1. Find the rclone full path using:
which rcloneExample Output: <full-path-to-rclone>
/usr/local/bin/rclone6.2. Then create a scheduled sync task using the full path:
Example: Daily sync at 6 PM
0 18 * * * <full-path-to-rclone> sync <path-to-folder>/<sparsebundle-name>.sparsebundle <remote-name>:<bucket-name>Example: Weekly sync at 6 PM every Friday
0 18 * * 5 /usr/local/bin/rclone sync <path-to-folder>/<sparsebundle-name>.sparsebundle <remote-name>:<bucket-name>Example:
0 18 * * * /usr/local/bin/rclone sync ~/TimeMachineDisk.sparsebundle wasabi:time-machine-buckupIn your crontab command:
<minute>: Minute of the hour (e.g.,0means :00)<hour>: Hour in 24-hour format (e.g.,18means 6 PM)<day-of-month>: Use*for any day<month>: Use*for any month<day-of-week>:0= Sunday,1= Monday, ...,5= Friday<path-to-folder>: e.g.,~/<sparsebundle-name>: e.g.,TimeMachineDisk<remote-name>: The name you assigned in rclone config<bucket-name>: The Wasabi bucket name
6.3. Use crontab to schedule regular syncs:
crontab -e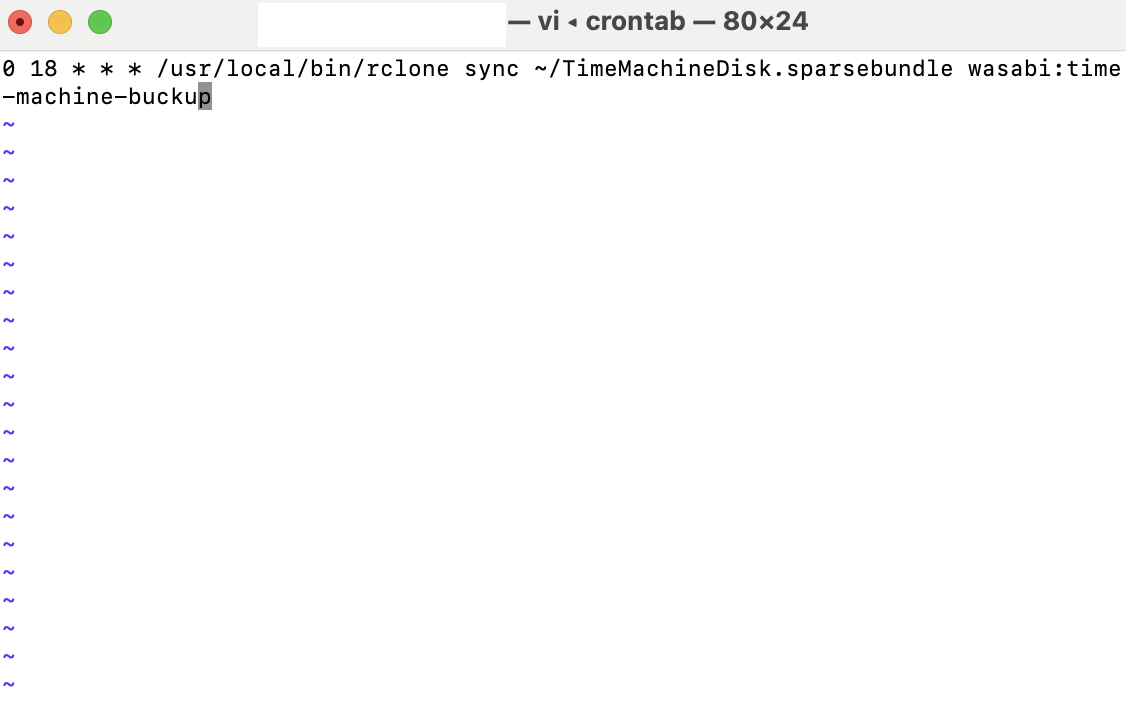
6.4. Save and Exit Crontab
If using vi editor:
Press
EscType
:wqPress
Enter
If using nano editor:
Press
Control + Oto savePress
Enterto confirmPress
Control + Xto exit
Once the crontab command saved, this will automatically sync the entire sparsebundle (or any mountable backup folder) to your Wasabi bucket at the scheduled time.
Tips:
Ensure no Time Machine job is running during
rclone syncIf encountering
Permission denied, check.sparsebundleownership and run withsudoYou may compress
.sparsebundleto.dmgor.zipfor other backup methods