CTERA is a global file system management platform that has been validated for use with Wasabi. For details on how Wasabi works with CTERA, click here.
Requirements
CTERA portal installed and configured compatible with AD, LDAP, SAML based auth services. This solution was most recently tested with version 8.3.3000.26.
CTERA Edge Filer installed and configured
Optionally the CTERA agent installed and configured
A valid Wasabi account
Please Note: The data restoration process is handled by your specific backup software application. As there are many potential variables that will affect your unique environment, it is strongly recommended that you seek the guidance of your backup software's technical support team in the event that you encounter difficulty, or have application-specific inquiries.
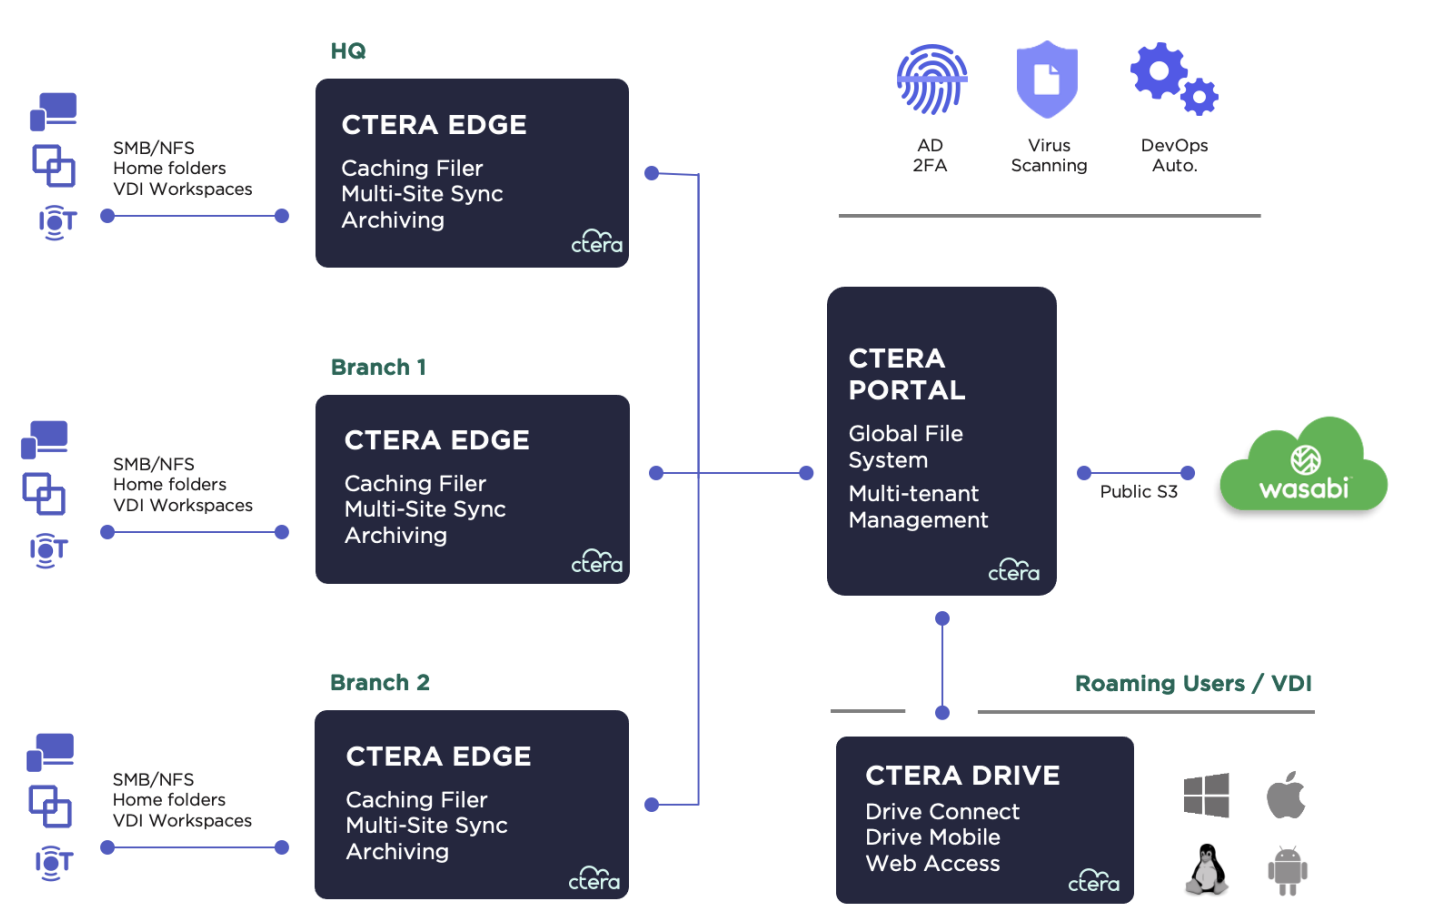
Reference Architecture
Configure Wasabi on the CTERA Portal
Login to the CTERA portal.
Be sure you are in the administration mode, then click Storage Nodes on your left.

Click + New Storage Node and choose Wasabi (S3).

Configure the following, then click Save.
Provide a storage name, an ex: Wasabi-Data
Bucket Name - a previously configured bucket in Wasabi
Access Key
Secret Key
Endpoint - for testing we are using s3.us-east-2.wasabisys.com
Note that this config example discusses the use of Wasabi's us-east-2 storage region. To use other Wasabi storage regions, please use the appropriate Wasabi service URL as described in this article. Use the region your bucket is located in.

To configure immutability (S3 Object Lock), see the Configuring Immutability (Object Lock) section below.
At this point, the CTERA application is linked to Wasabi for reading, writing, and deleting data.
Migrating data from CTERA to Wasabi
Change mode from Administration to Portal.
Please note that the following sections walk you thru managing data via CTERA manually, however in a typical CTERA implementation CTERA Edge Filer automates the process. Please contact your CTERA sales rep for information around how a CTERA Edge Filer needs to be setup to work with CTERA portal.

Click Global File System and then Cloud Drive Folders.

Under Cloud Drive Folders, click + New, and provide the following information. Click Save.
Name - WasabiFolder (as an example)
Owner - Select your local user
Folder Group - portal-CloudFolders

Click the name of the newly created Cloud Drive folder.

Click View Files.
.png)
CTERA portal will navigate you to another webpage where uploading data to the cloud drive can be performed manually.

Click +New and then Upload file to select files from your local storage to Wasabi.

Downloading data to CTERA from Wasabi
Via the Cloud Drive folder, click on the object(s) that need to be downloaded and click the Download File icon.

Deleting data from Wasabi via CTERA
In order to manually delete the objects from Wasabi, click an object via Cloud Drive Folder and click the Delete file icon.

Configuring Immutability (Object Lock)
Object Lock helps prevent accidental or malicious deletion of your data. CTERA currently supports only Governance Mode which allows users with sufficient permissions to delete data.
Log into your Wasabi Console and create an Object Lock enabled bucket following the steps in the Object Lock Enabled Bucket article.
Create a Lifecycle Policy for your bucket. This is used to delete non-current objects and delete-markers in your bucket, not to delete current versions of data. Click Buckets, then click on the name of your bucket.

Click on the Settings gearwheel button.

Go to the Lifecycle tab and click Create New Rule.

Give the rule a name and configure the policy as shown in the screenshot below. Set the Days after object becomes noncurrent to 1. Scroll down.

Click Create.

Repeat the Configure Wasabi on CTERA Portal section above. In step 4 ensure the checkbox next to Use S3 Object Lock is checked.

Change mode from Administration to Portal.
Click Global File System and then Cloud Drive Folders.
Under Cloud Drive Folders, click + New, and provide the following information.
Name (WasabiObjectLockTest2 in our example)
Owner - Select your local user
Folder-Group - portal-CloudFolders or another appropriate folder group

Click the WORM tab. Slide the WORM slider to the right to enable it. Enter a grace period (0 for disabled). Enter the appropriate Retention Mode for your organization.
Please note the Retention Mode configured here is the CTERA retention mode. Since CTERA does not yet support S3 Compliance Object Lock mode, all objects will be written to Wasabi in Governance mode. Governance mode allows your Wasabi account’s root user or others with sufficient permissions to delete objects using the Wasabi console or another S3 client.
Configure the retention period during which objects are locked (90 days in our example). Select the checkbox next to I understand and click Save.

Repeat the Migrating data from CTERA to Wasabi section above to upload files to Wasabi.
Login to the Wasabi Console and click Buckets.
Click the name of your Wasabi Object Lock bucket.
Click the blocks folder, and then another subfolder. Enable Show Versions.

Click the name of an object to see its Object Lock status. Note that CTERA initially writes data without Object Lock and adds the Object Lock configuration a few minutes later. If you do not see the object being locked, check back after a few minutes.
