The integration between Autotask and Wasabi Account Control Manager (WACM) enables Managed Service Providers (MSPs) and resellers to provision their clients and customers for Wasabi services without leaving the Autotask platform. This integration uses WACM Connect APIs to directly provision sub-accounts and channel accounts within WACM from the Autotask platform. Additionally, daily and monthly usage data from monthly invoices are transmitted by WACM to the Autotask platform, allowing MSPs and resellers to consolidate usage for services managed there.
Requirements
WACM account enabled for the Account Control API/WACM.
MSPs or resellers should have admin access to Autotask to generate the security keys. These keys will be used to enable the integration in the Wasabi Integrations portal.
Whitelist WACM IPs if IP restrictions are enabled for this API user.
User Guide Video
Configuring Autotask
An Autotask API User account and API password are required for the integration. The API User account must have access to the Companies, Contacts, and Contracts entities in Autotask. Regular Autotask login credentials cannot be used.
Create an Autotask API user account by navigating to the Autotask Admin menu and setting up a new resource with generated API credentials.
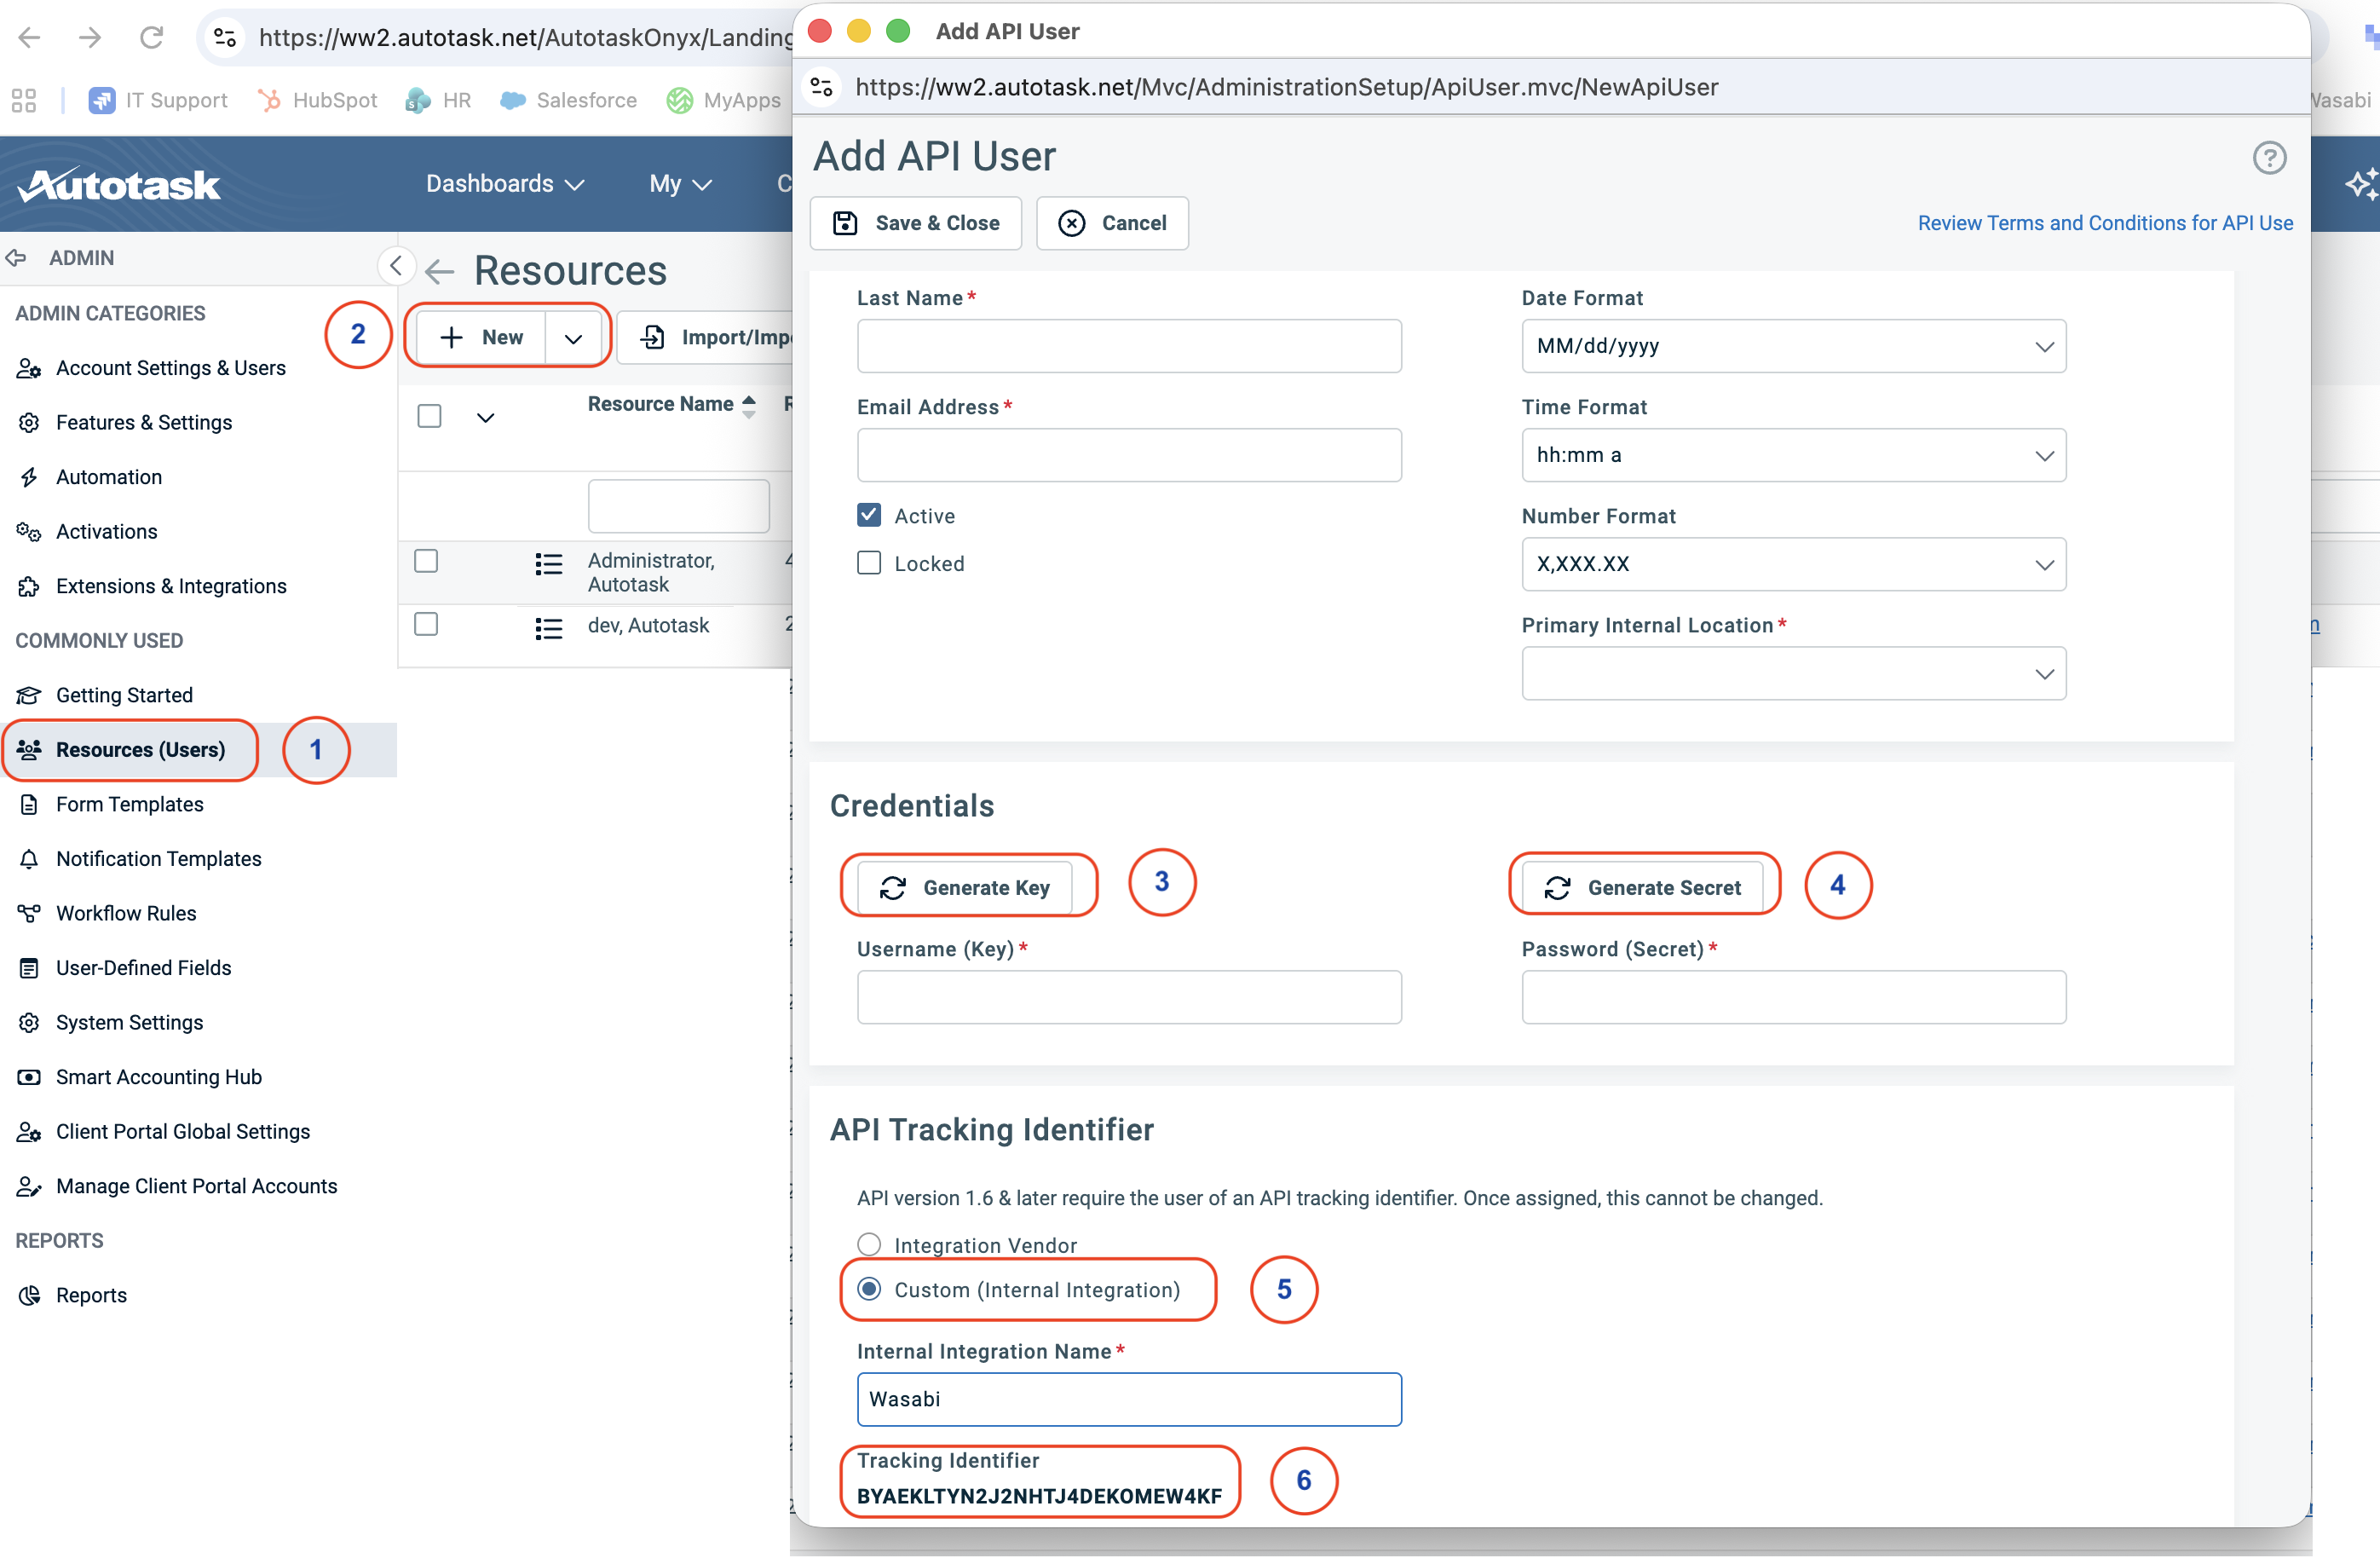
Create an API User Account
1—Log in to Autotask, navigate to the Admin menu, and select Resources (Users).
2—Click the + New dropdown and select New API User. The Add API User panel is displayed.
3—In the Credentials section, click Generate Key. Copy the key for use in the integration.
4—Click Generate Secret. Copy the key for use in the integration.
5—In the API Tracking Identifier section, select Custom (Internal Integration), then enter Wasabi in the Internal Integration Name field.
6—Copy the generated Tracking Identifier. This is the Autotask Integration Code required to enable the integration.
7—Click Save & Close.
Find the Autotask API endpoint / Zone URL for your account. In a web browser, enter the URL:
https://webservices.autotask.net/atservicesrest/v1.0/zoneInformation?user=<user_email>, replacing<user_email>with the email used to sign in to the Autotask account, then open the URL. The response provides the API endpoint (Zone URL) associated with your Autotask account.Create user-defined fields (UDF) for the tickets.
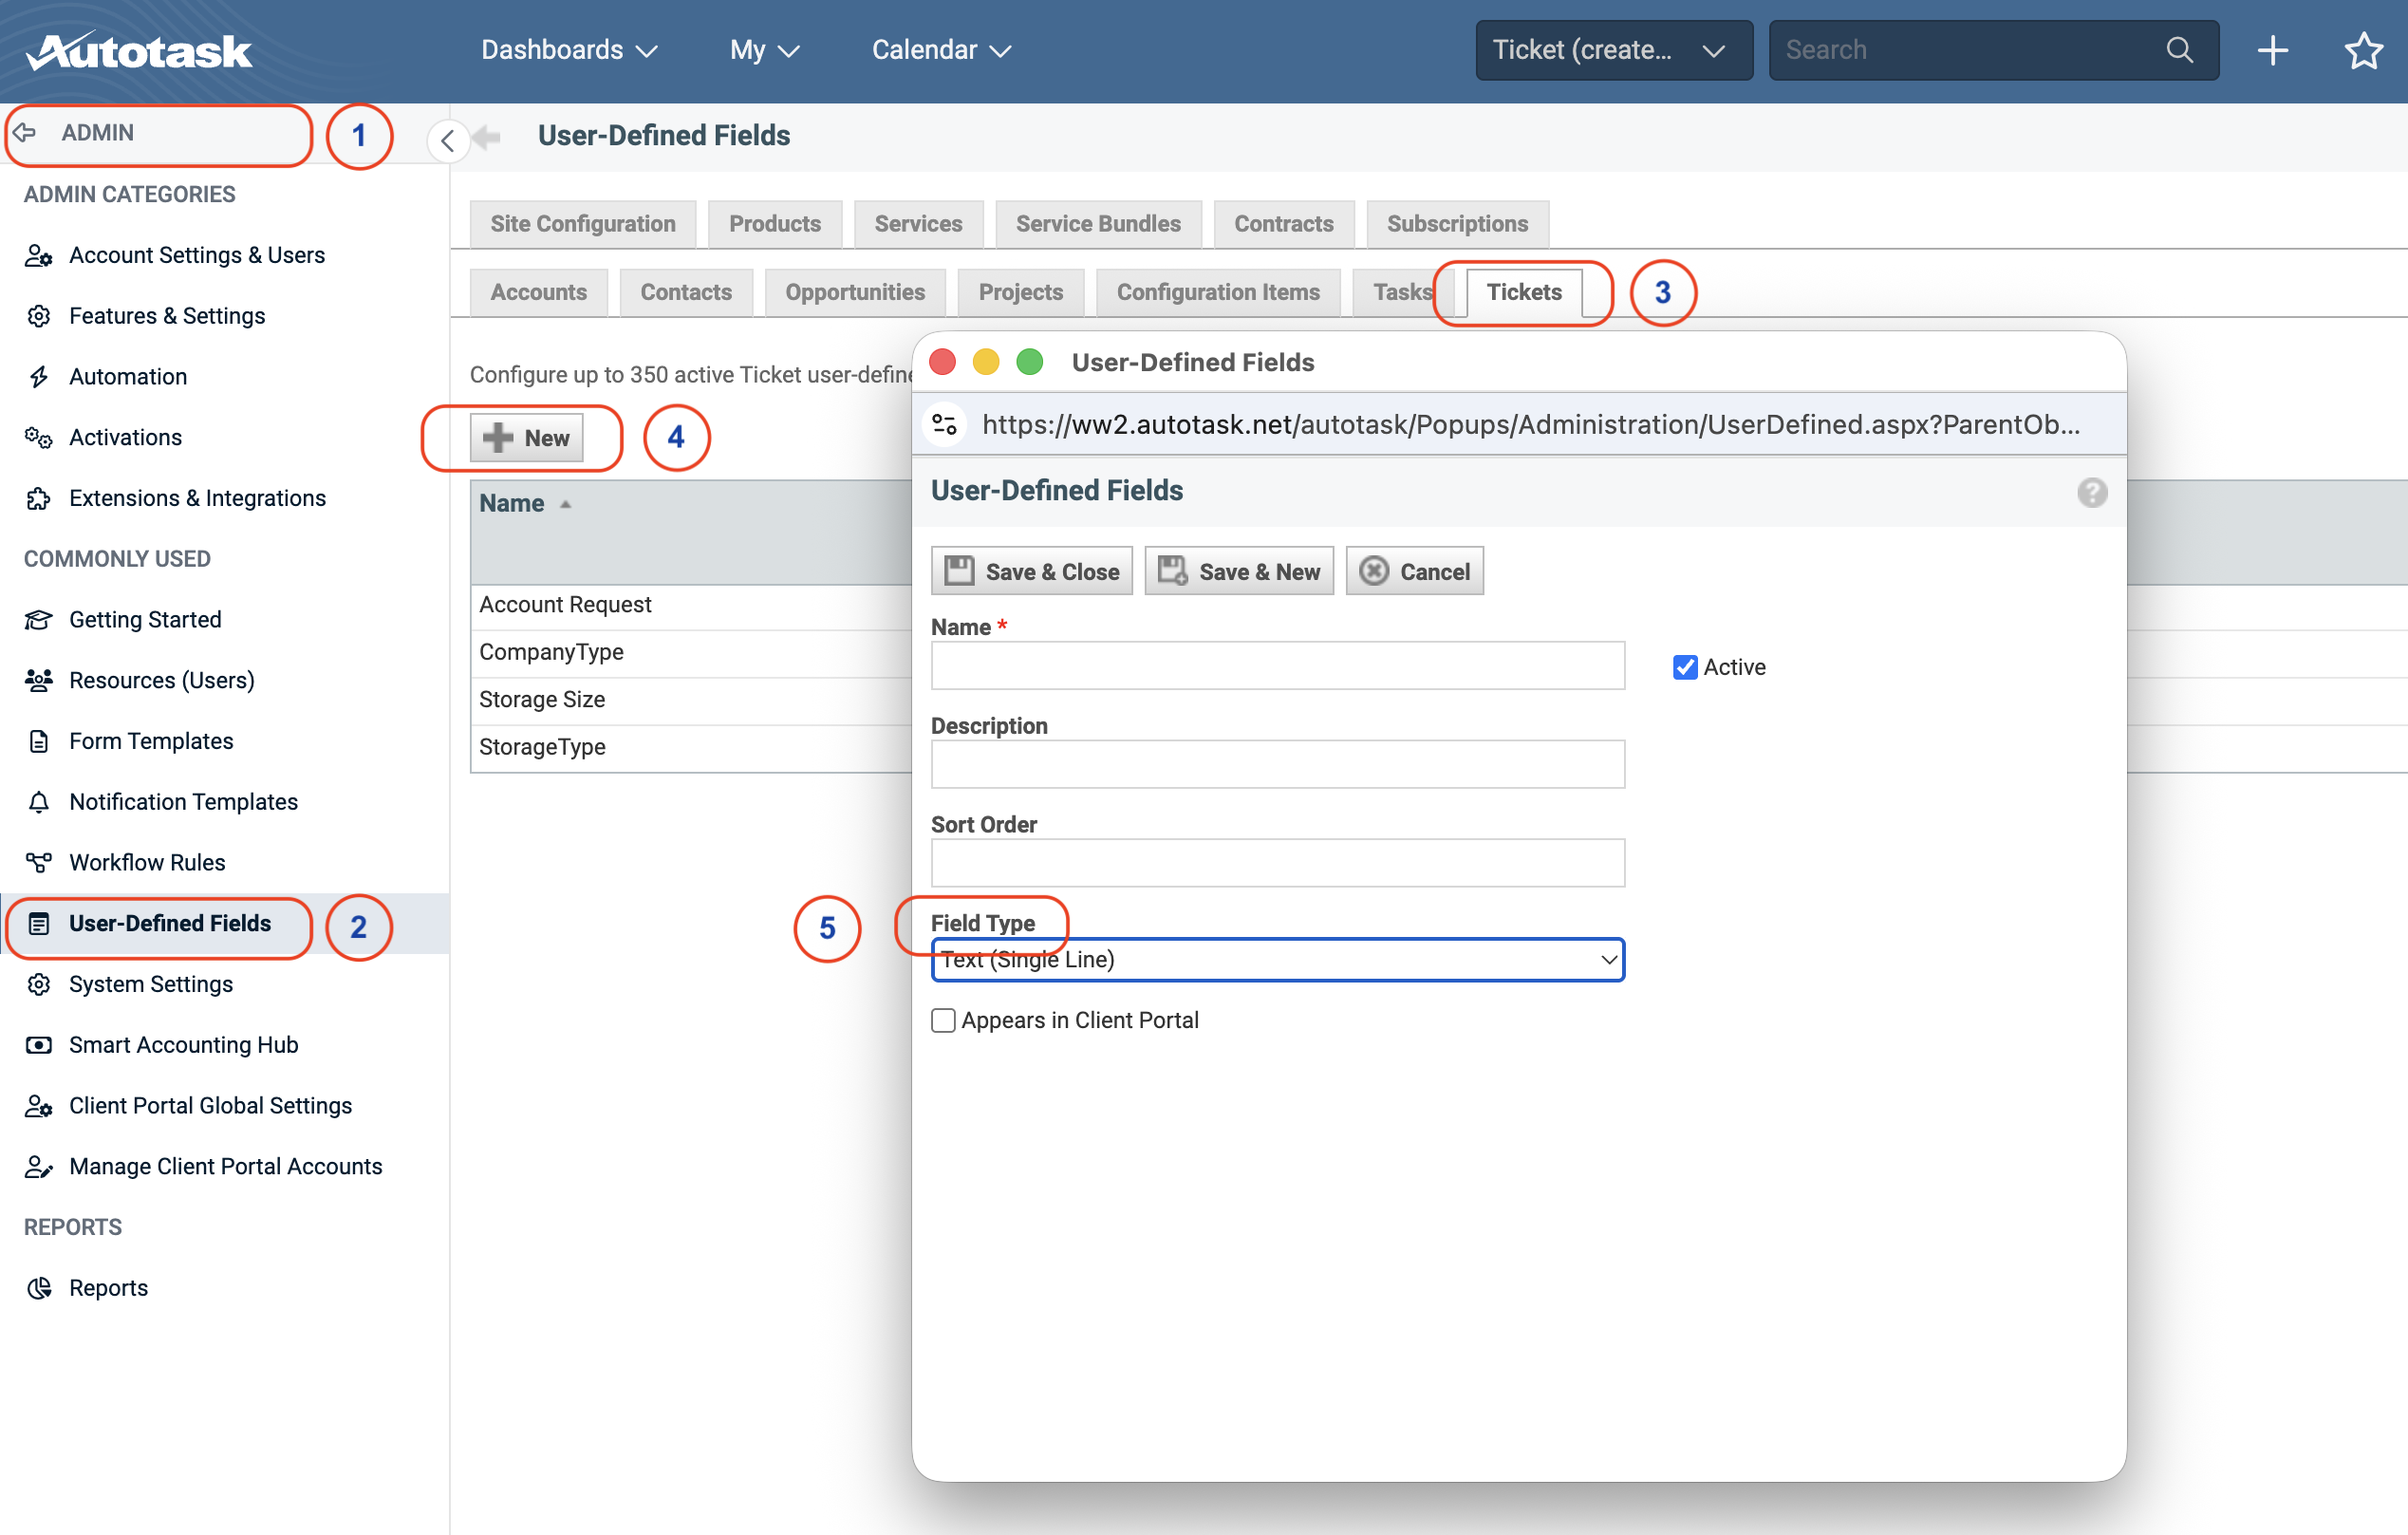
Create the User-Defined Fields
1—Navigate to the Admin menu.
2—Select User-Defined Fields.
3—Select the Tickets tab.
4—Click + New and create the following UDFs:
1—Company Type—List Field Type, single select (5) (Values: Reseller, MSP, Distributor, Channel Partner, Customer, or end user)
2—Storage Size—List Field Type, set to Text (Single Line), save and assign it to Ticket Categories.
3—Storage Type—List Field Type, single select (Values: Wasabi (defaulted))
4—Account Request—List Field Type, single select (Values: Create, Suspend, Delete)
5—Select Field Type.
Unhide the custom fields so they are visible on the Service Desk ticket form. From the Admin menu, select Features & Settings, Service Desk (Tickets), and then Ticket Categories.
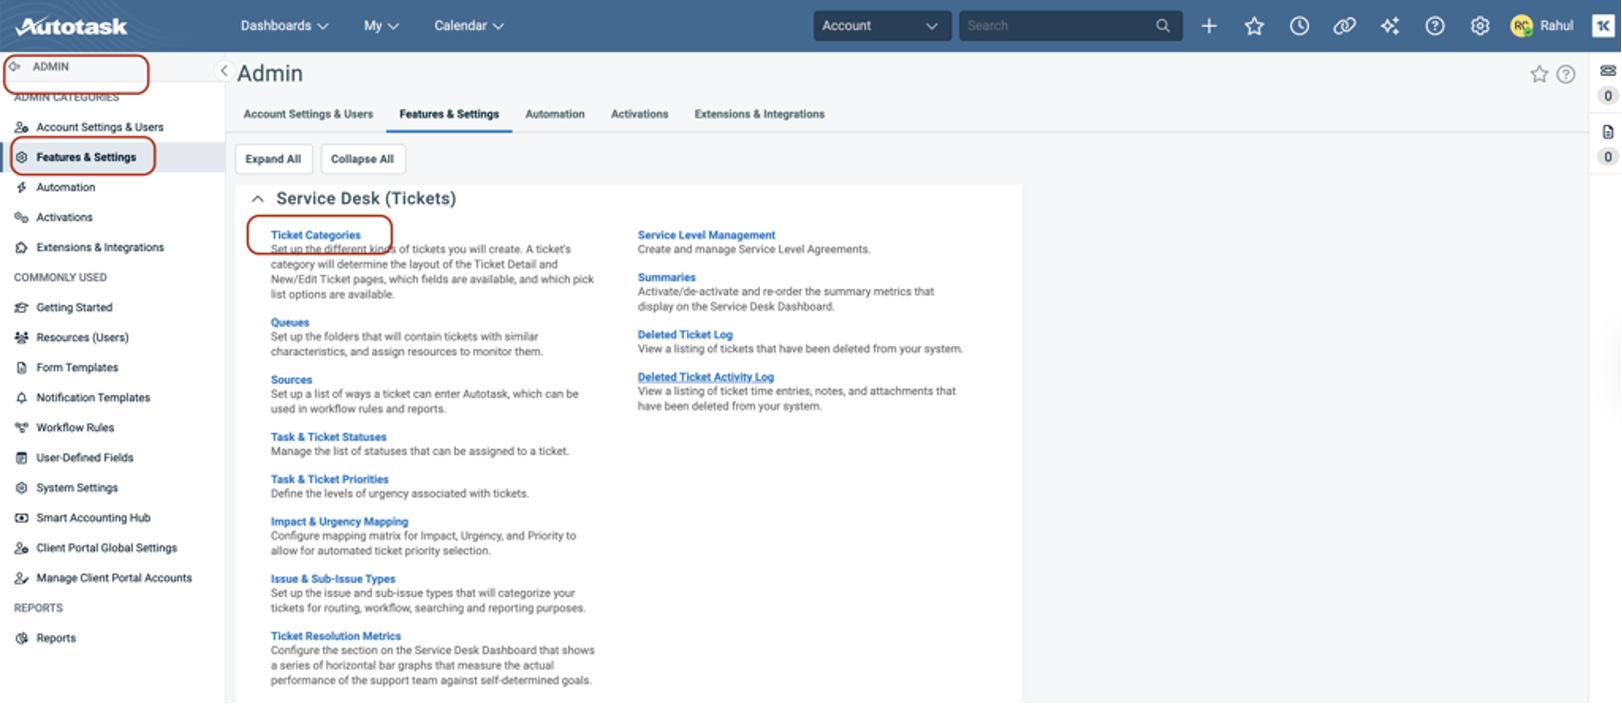
In the Ticket Categories section, click Edit.
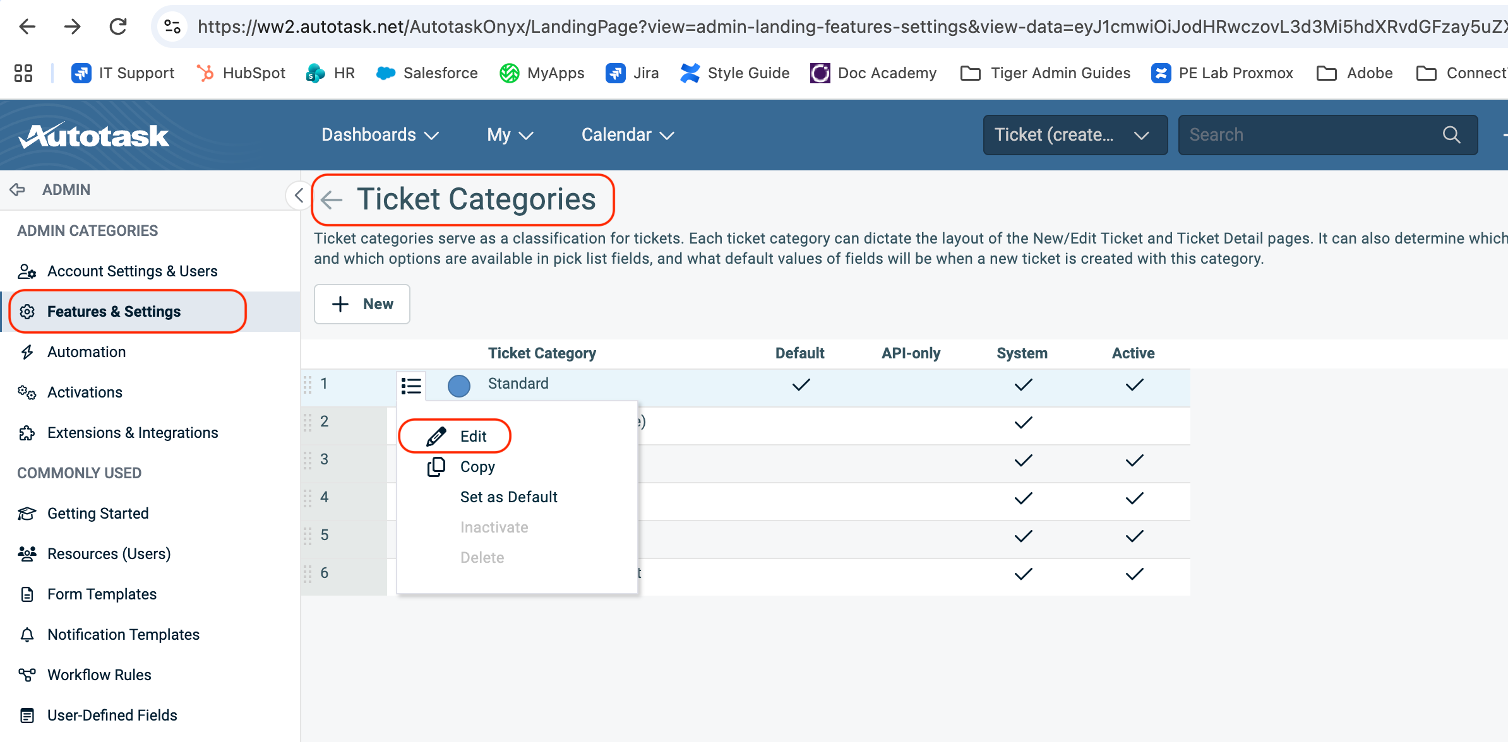
The Edit Ticket Category default Standard section is displayed.
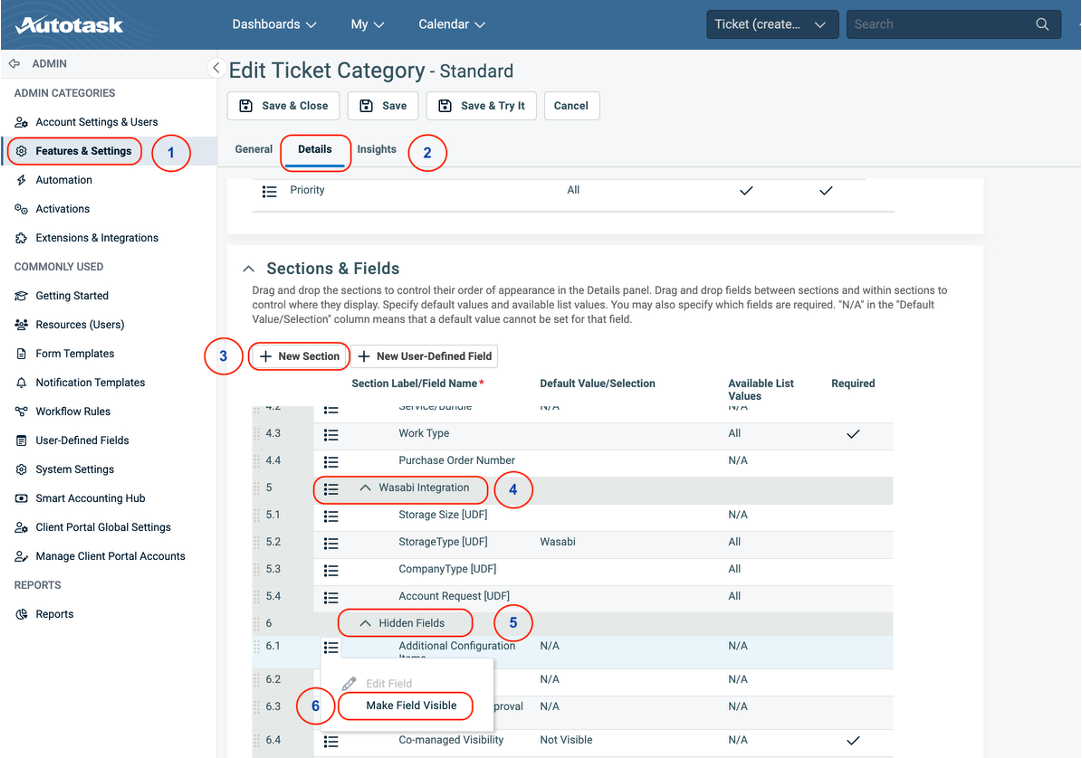
Edit the Ticket Category
1—Navigate to the Admin menu and select Features & Settings.
2—Click the Details tab.
3—Click + New Section and select Wasabi Integration.
4—The new Wasabi Integration section will be listed in the Hidden Fields section.
5—Locate the UDFs in the Hidden Fields section.
6—Select the breadcrumbs displayed before the UDF fields and click Make Field Visible.
7—Drag and drop the UDF fields into the Wasabi Integration section.
Final Step. Review the New Ticket. All UDFs should be grouped and displayed under the Wasabi Integration section of the New Ticket form.
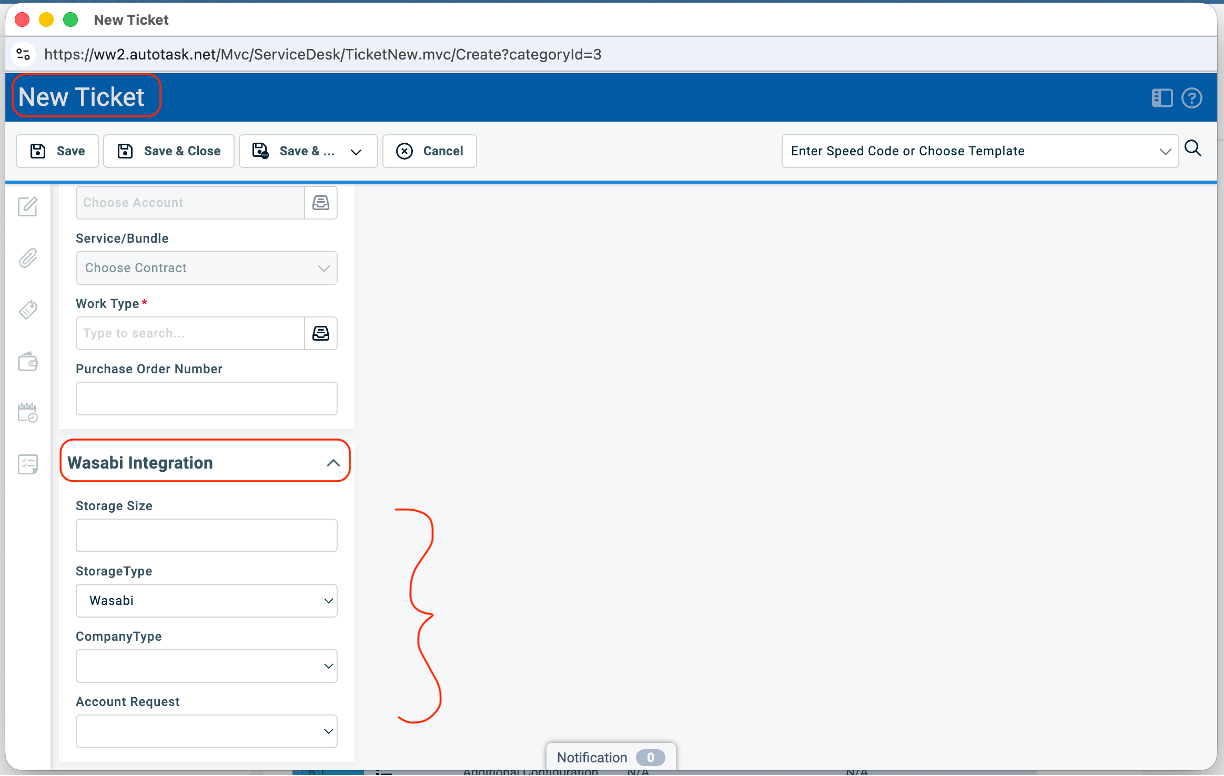
Enabling the Autotask Integration
After completing the Autotask configuration, navigate to the Partner Integrations page in WACM. From the Partner Integrations page, select the Autotask integration.
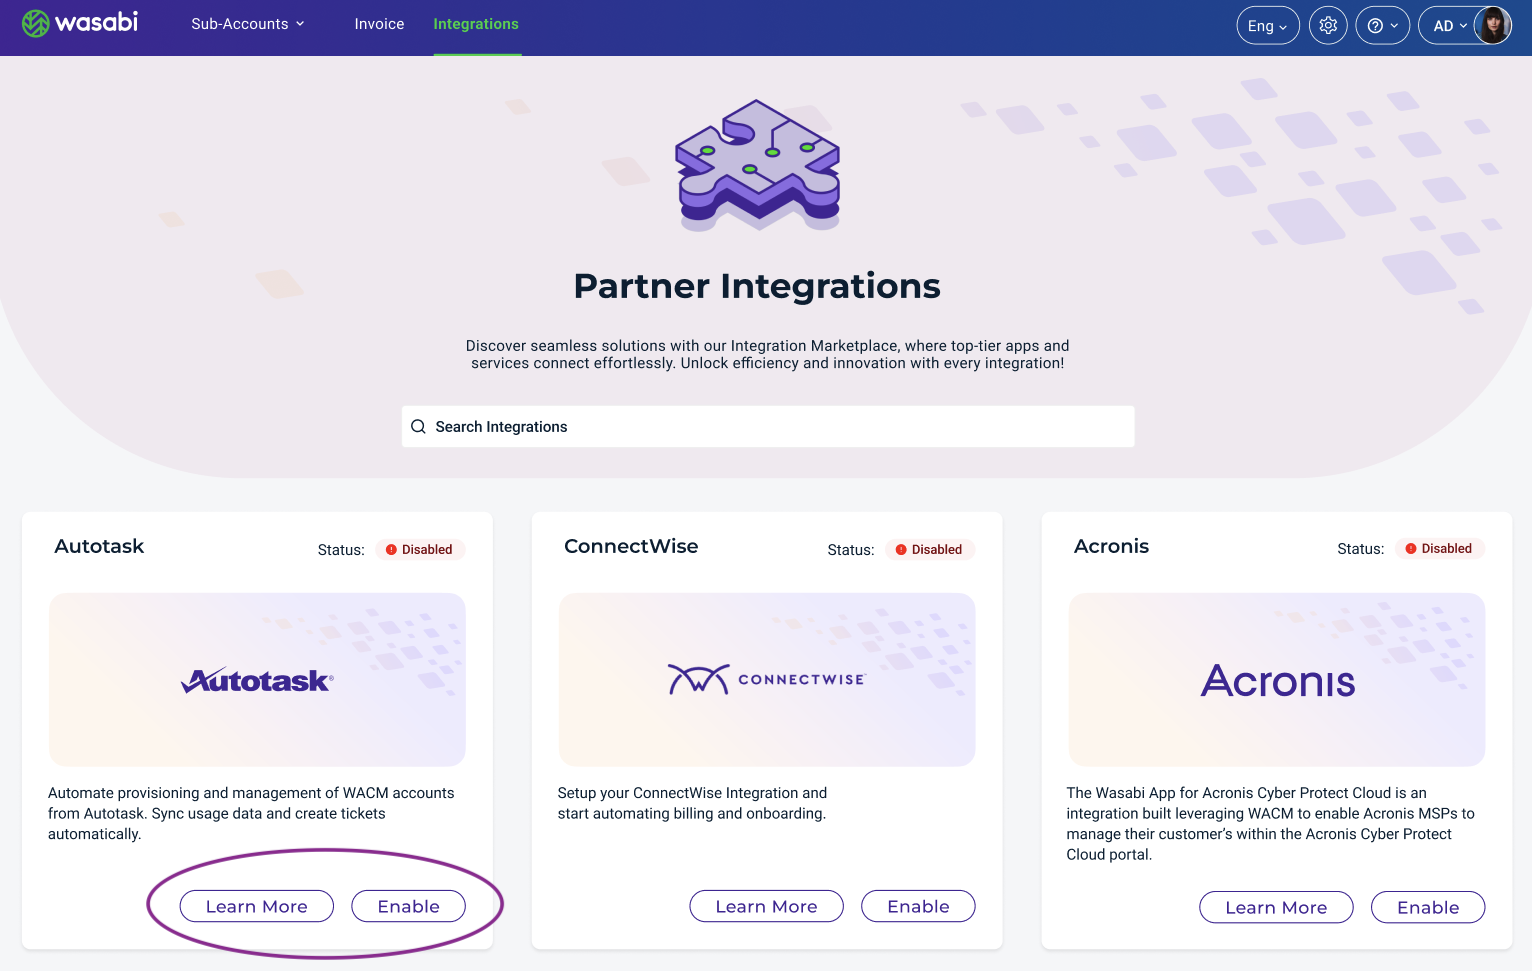
In the Autotask tile, click Enable. The Set up Austotask PSA Integration form is displayed.
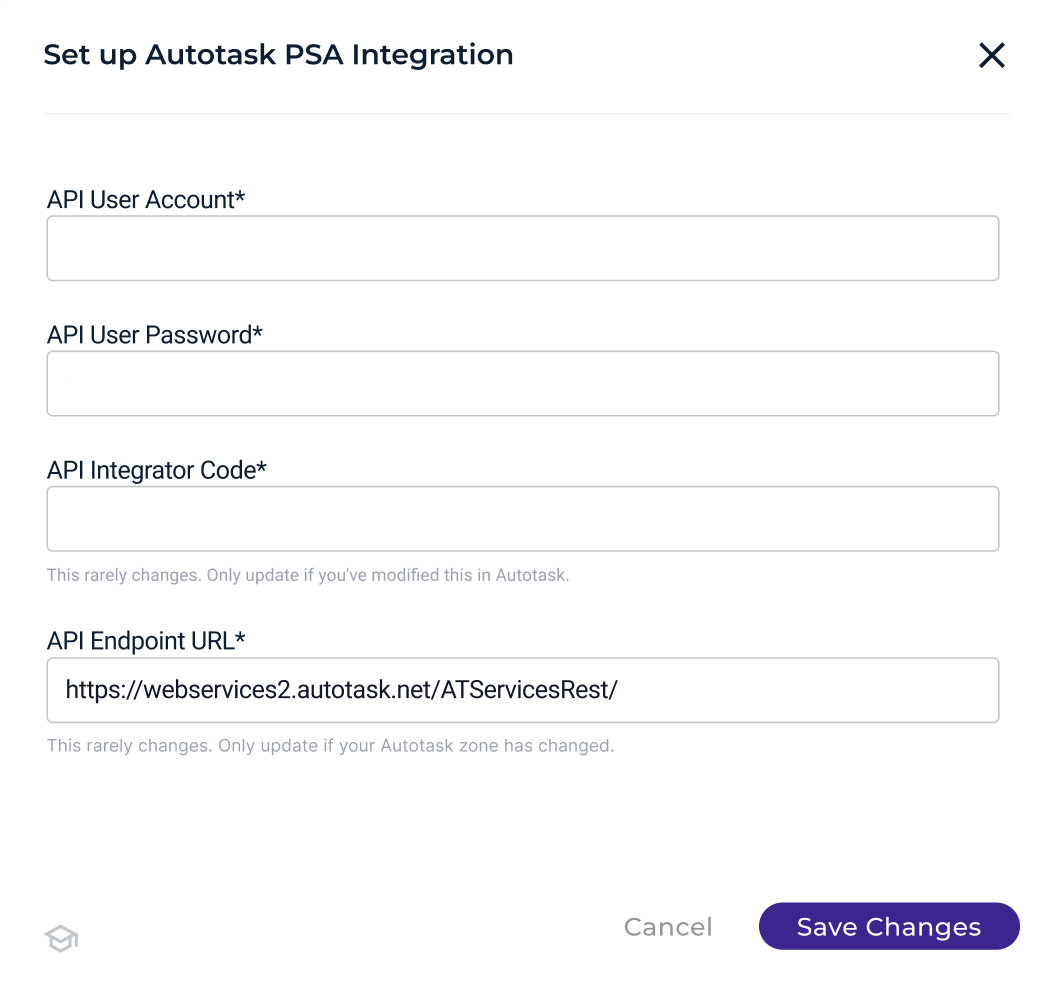
Enter the Set up Autotask PSA Integration Details, then click Save Changes
API User Account—API User generated from Autotask when you created the API User Account.
API User Password—API User generated from Autotask when you created the API User Account.
API Integrator Code—API Tracking Identifier when you created the API User Account.
API Endpoint URL—Autotask API endpoint / Zone URL (https://webservices2.autotask.net/ATServicesRest/). Find the Autotask API endpoint URL for your account. In a web browser, enter the URL:
https://webservices.autotask.net/atservicesrest/v1.0/zoneInformation?user=<user_email>, replacing<user_email>with the email used to sign in to the Autotask account.
After successful authentication, configure the integration settings to provision a Sub- and/or Channel Account.
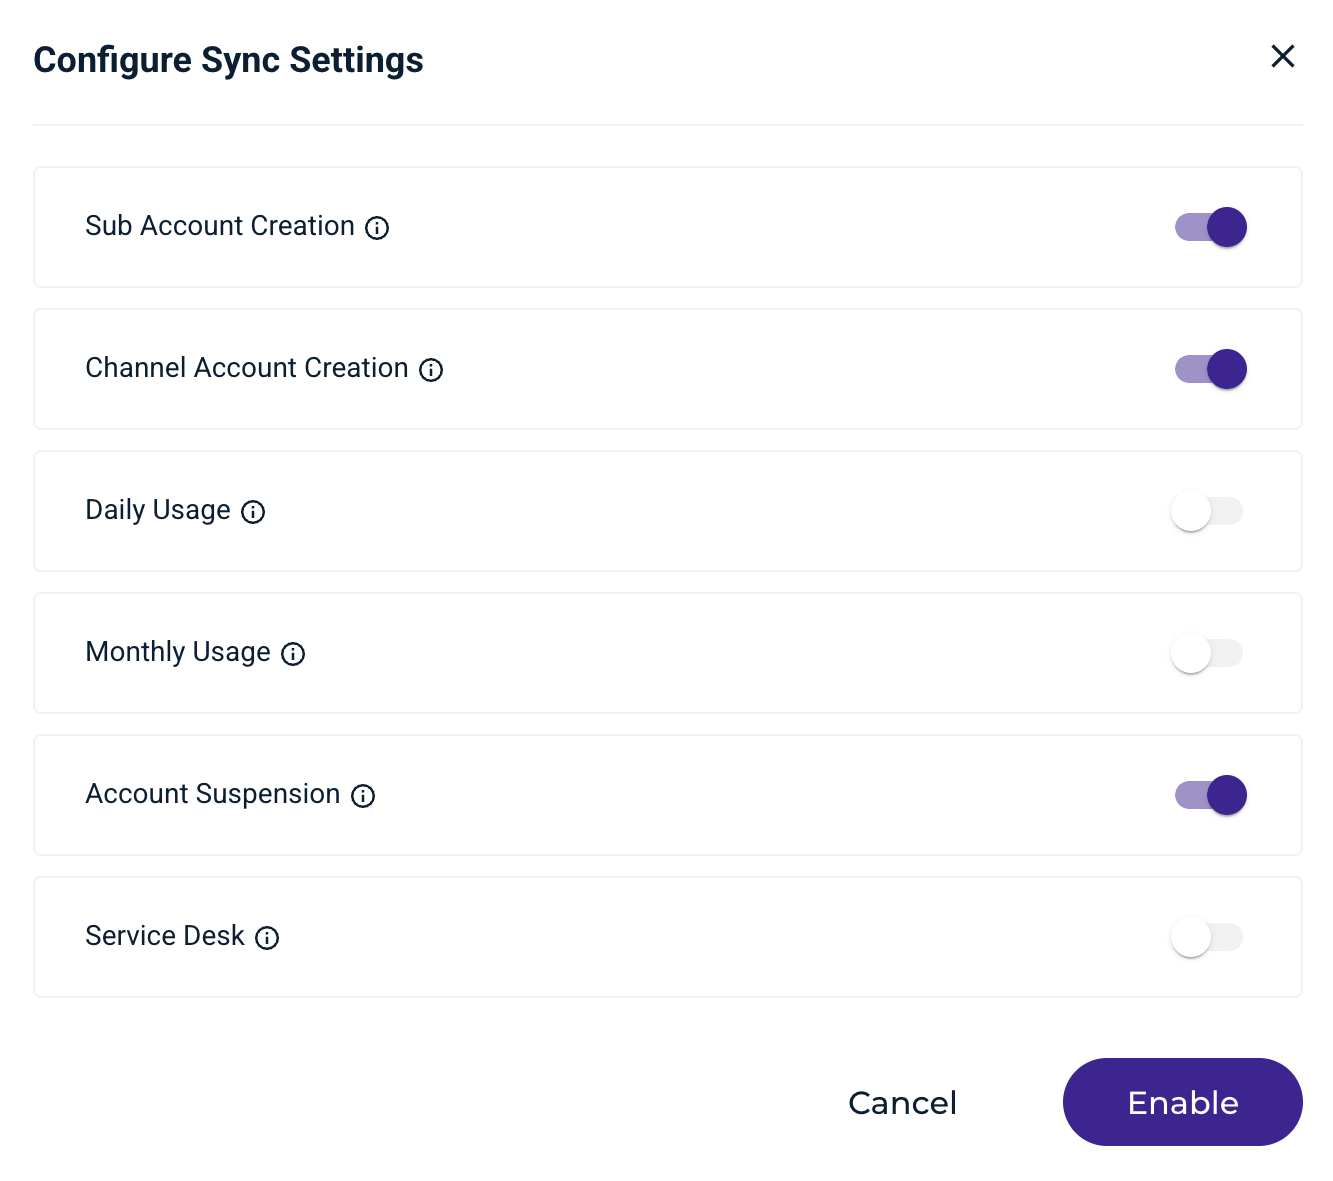
Configure Sync Settings, then click Enable
If the logged-in user’s profile is set to Channel Account in WACM, the Channel Account creation option will be disabled and cannot be enabled.
If the logged-in user’s profile is set to Control Account Admin, both the Channel Account and Sub-Account options can be enabled.
Enable Daily and Monthly Usage options to allow the integration to post daily and monthly usage in the ticket description text area. This is the same ticket used to provision the Sub- and Channel Account.
Enable the Account Suspension option to automatically deprovision a WACM account when a ticket is submitted to Autotask to suspend or delete an account.
Enable the Service Desk option to integrate and post tickets for service disruptions and any account provisioning failures. When enabled, this option displays all available service desk queues from the logged-in user’s Autotask account. Select your preferred queue, and all tickets related to the integration will be created in the queue.
After enabling the settings, you are directed to the WACM Autotask integration page.
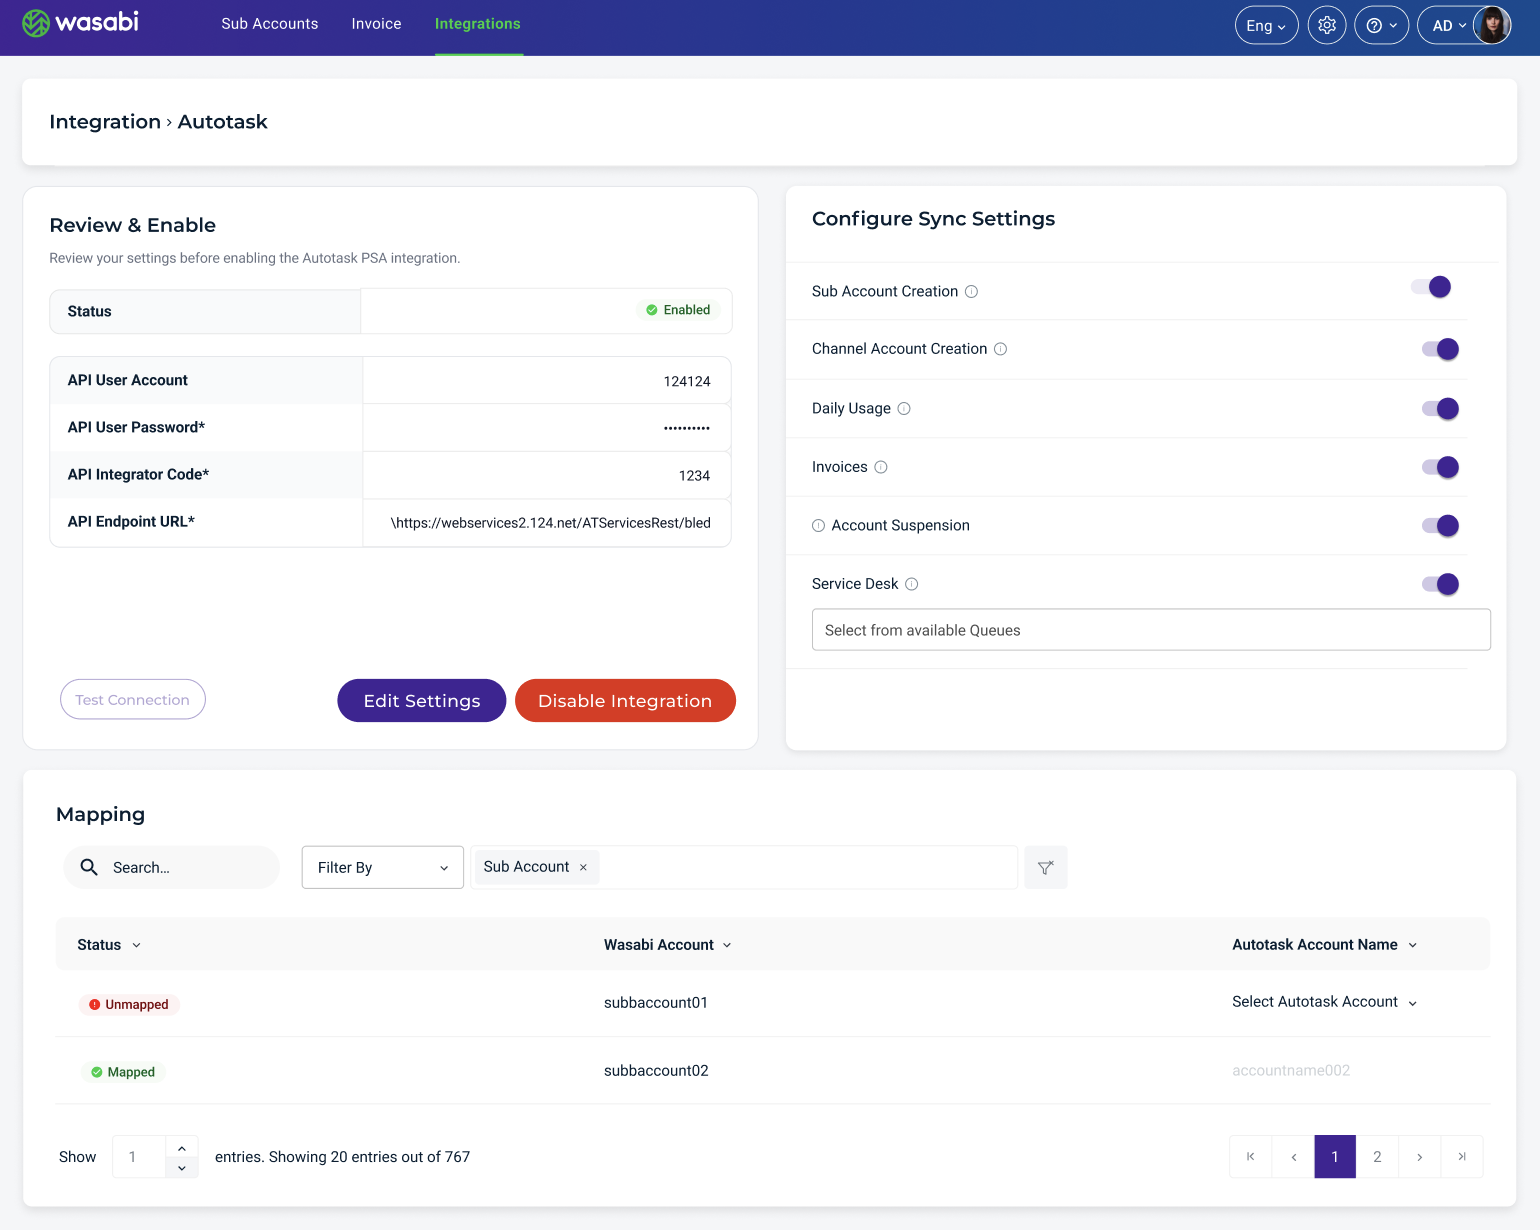
The Mapping section of the Autotask integration page lists WACM accounts that existed before the Autotask integration was enabled. Use this section to map these accounts to their corresponding Autotask accounts. It also displays accounts provisioned through the integration, along with their associated Autotask account mappings.
Autotask-to-WACM Workflow
The Autotask-to-WACM integration provides an end-to-end workflow for provisioning accounts, tracking storage usage, and supporting MSP billing. The workflow begins with an Autotask company and service request, continues through the provisioning of a WACM Channel Account or Sub-Account, and associates Wasabi storage usage with that account. Usage data is then updated in Autotask, where it can be used for MSP billing.
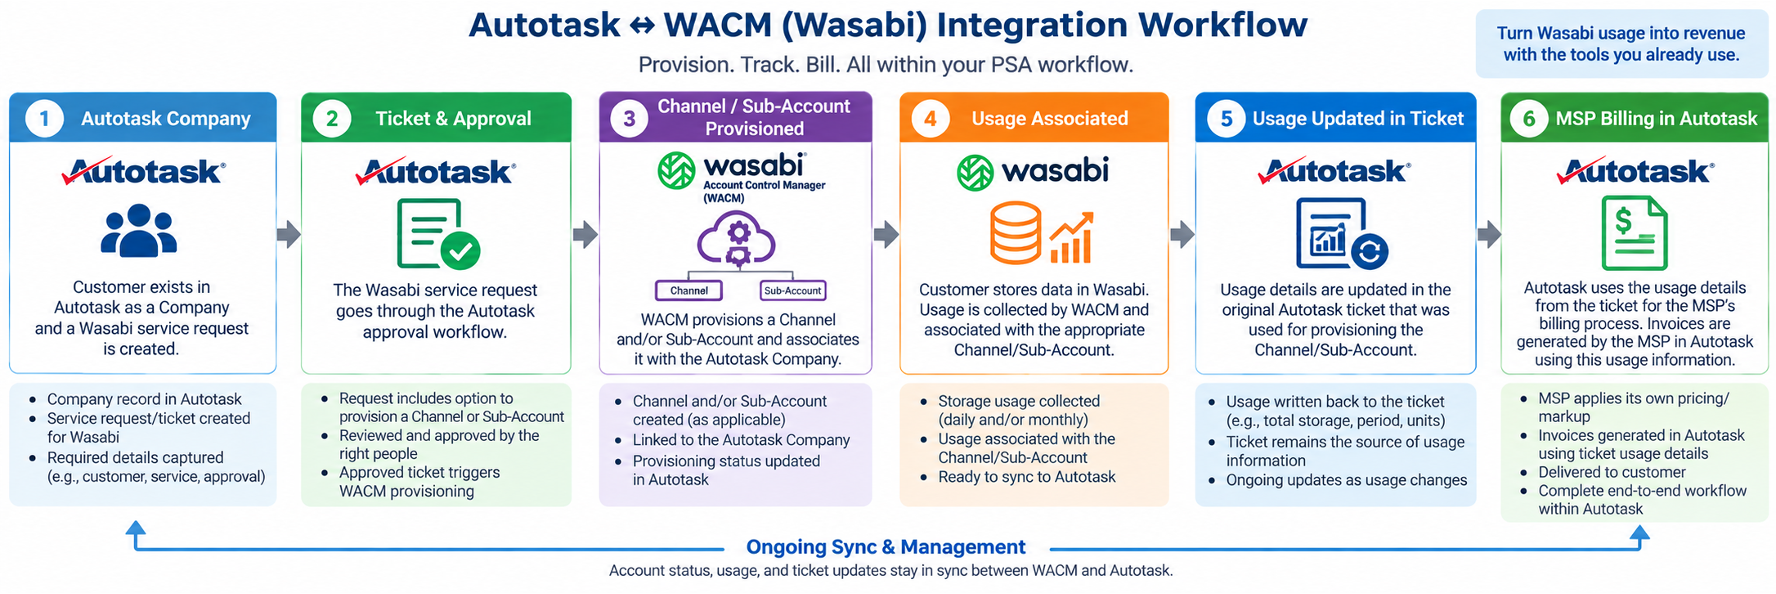
Provision and Manage WACM Accounts from Autotask
On the WACM Partner Integrations page, enable Autotask.
Enable the Sync Settings and configure the toggle options to automatically provision Channel Accounts and Sub-Accounts, receive daily or monthly usage details, and create service desk tickets in the selected Autotask queue.
To provision an account in WACM, submit a service desk ticket in Autotask. The integration provisions the account when the ticket meets the following requirements:
Status is set to Approved.
Account Request is set to Create.
The required UDF fields specify Wasabi as the storage type, storage size, and Company Type.
The Autotask company has at least one contact with an associated email address.
The Company Type determines the type of account provisioned in WACM:
A Channel Account is created when Company Type is Reseller, MSP, Distributor, or Channel Partner.
A Sub-Account is created when Company Type is Customer or End User.
Note 1: Do not delete the Autotask ticket used to provision the WACM account. After the account is provisioned, the integration posts the WACM user ID and temporary password to this ticket and uses it to report daily and monthly usage details. You can change the ticket status to Closed or Complete, but the ticket must remain in Autotask. If the ticket is deleted, usage details cannot be delivered.
Note 2: The Autotask company must have at least one contact with an associated email address.
After the account is provisioned, the automation updates the submitted Autotask ticket with the WACM User ID and a temporary password. Use these credentials to access the provisioned account. At initial sign-in, the user is prompted to change the temporary password.
Depending on the settings, the ticket that provisioned the account will be updated with the daily and monthly usage details.
A ticket is automatically created in the queue specified on the integration settings page when the integration detects a usage overage or a service disruption.
From the Autotask integration Edit Settings page in WACM, you can map existing WACM accounts that were created before the integration was enabled to their corresponding Autotask accounts. When an account is mapped, a service desk ticket is automatically created in the selected Autotask queue to confirm the mapping.
FAQs
What happens if the WACM account provisioning request fails during the account creation process?
The automated process attempts account provisioning up to five times, with a five-minute interval between attempts. If provisioning fails after the fifth attempt, the middleware generates an Autotask ticket to notify users of the failure. Users are advised to reopen the previously approved ticket for account provisioning, amend the description with “Second Attempt," and revert the ticket status to “Approved” to initiate the reprovisioning process.
Why am I unable to provision a Channel account even though I specified in the ticket that the Company Type is Reseller, MSP, Distributor, or Channel Partner?
It is because your profile is not set up as a Control Account in WACM. Only users with the Control Account user role have permission to provision a channel account.
Why are all the tickets created by default in a Service Desk queue I never specified?
It is because the Service Desk settings are not enabled in the integration. In this situation, a service disruption or integration issue is reported to the first available queue in Autotask.
My billing process already works. Does this integration change it?
This integration incorporates an approval-driven workflow, allowing MSP to retain operational control before a WACM provisioning action can be performed. This lets MSP gain the benefits of automation without necessarily removing human approval.
Can I continue using my existing Autotask workflows?
This is one of the primary benefits. Rather than creating a separate operational process for Wasabi, the integration incorporates Wasabi into familiar Autotask entities such as companies, service requests, tickets, queues, contracts, and services wherever applicable.
Should I be worried about the customer data that is stored in the Wasabi passthrough in Autotask?
No, the integration focuses on managing the information and workflows, not transferring the customer’s stored objects through Autotask.
Do I need to install anything to make this integration work?
This integration uses WACM and Autotask's publicly available APIs and is not an API endpoint storage agent. This integration doesn’t require any installations.
Does this integration generate invoices automatically?
The integration provides service and usage information to support Autotask’s contract and billing processes rather than replacing Autotask’s invoicing engine. Autotask remains responsible for MSPs’ PSA/billing workflow.
What happens when the API credentials are changed?
WACM will no longer be able to authenticate using the old credentials. The integration configuration must be updated with the new credentials. Validate connectivity immediately after credential rotation.