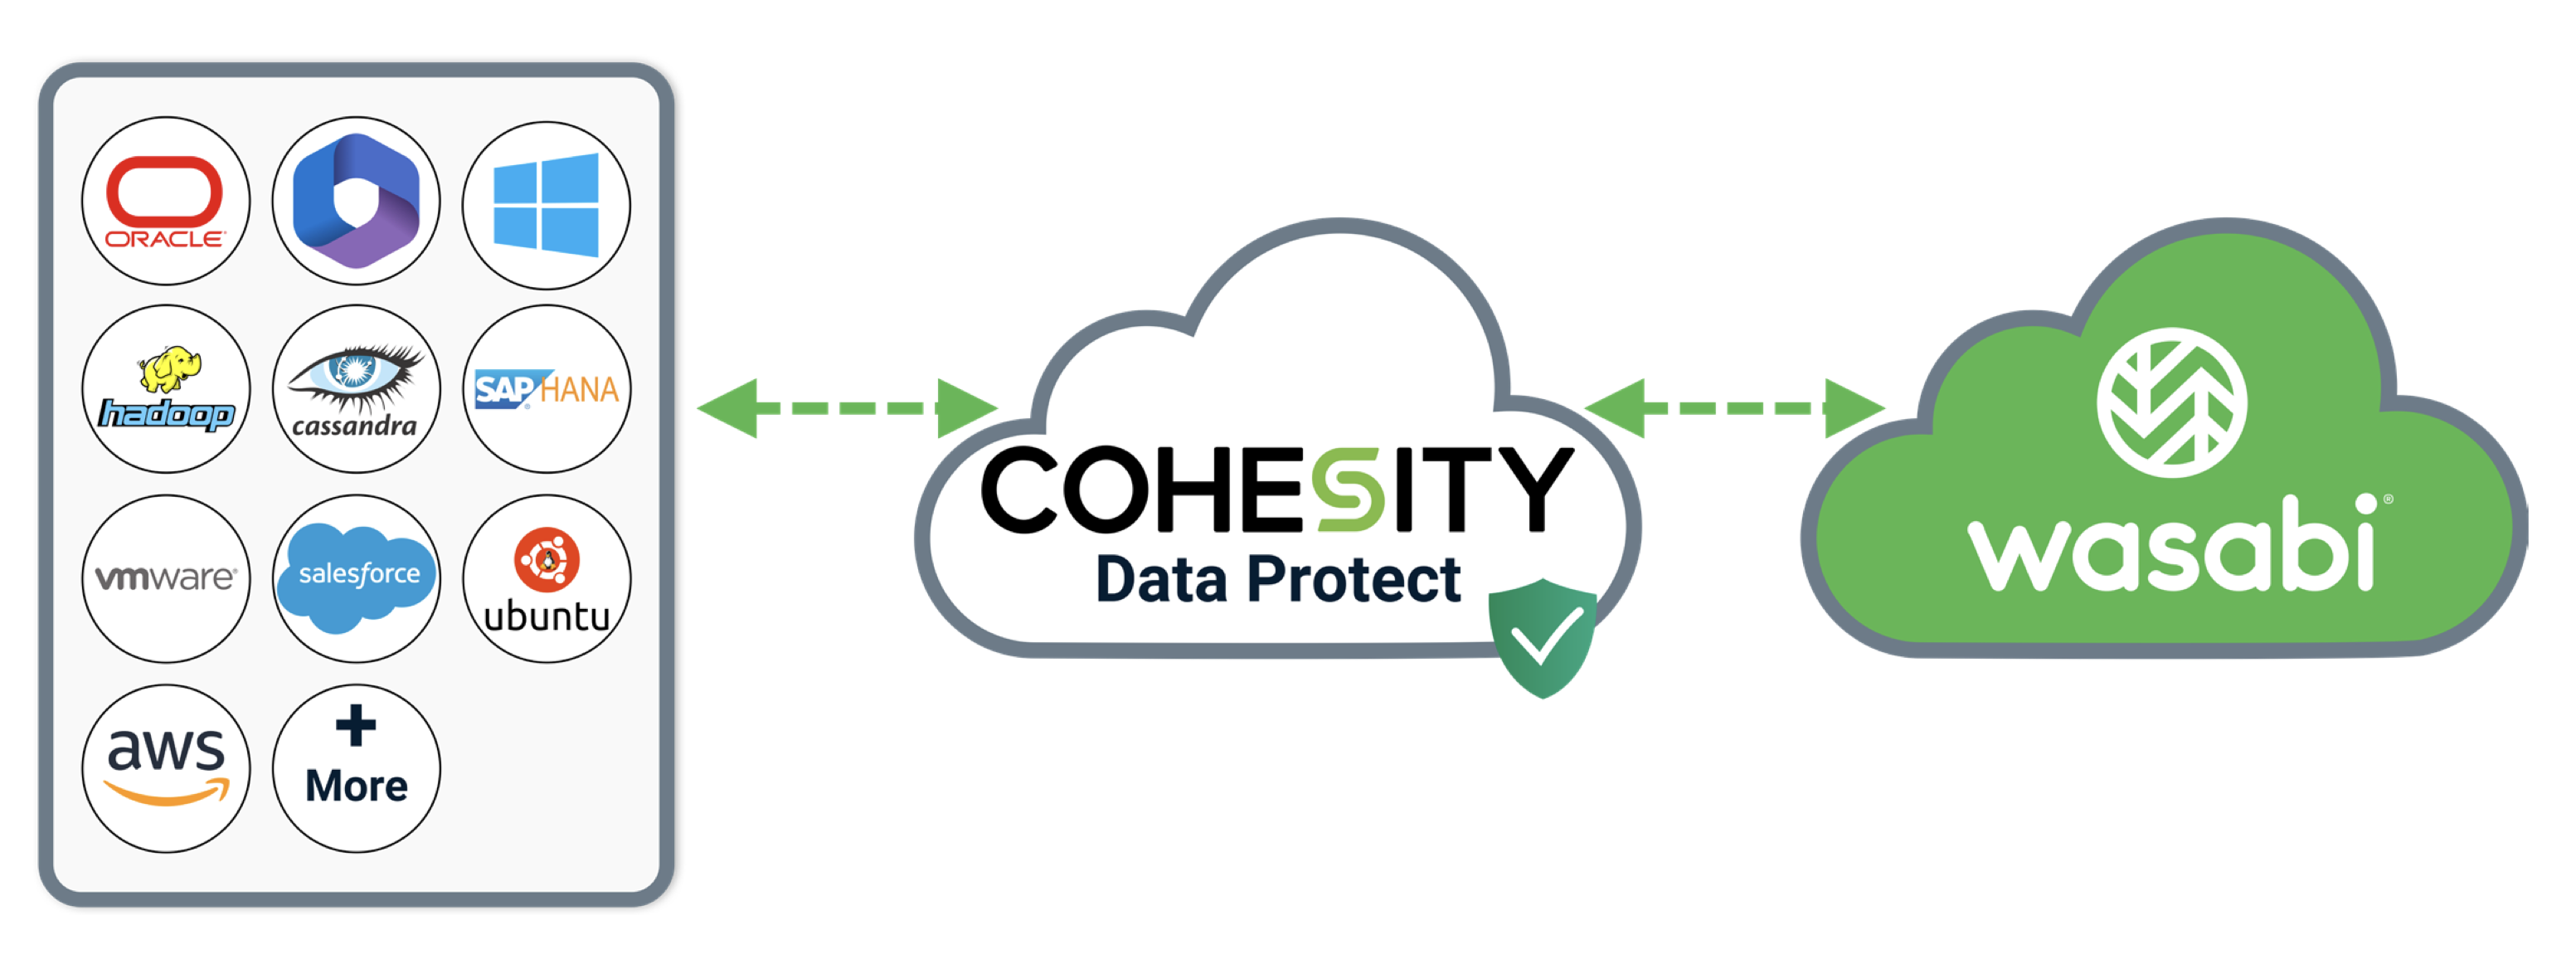
Cohesity DataProtect is a high-performance, secure backup and recovery solution. Wasabi is validated to be used as an External Target for Cohesity DataProtect. The procedures in this article detail the steps to add a Wasabi bucket as an External Target. To learn more about the Cohesity + Wasabi solution, refer to our solution brief.
Requirements
Active Wasabi Cloud Storage account.
Wasabi Bucket (see Working With Buckets and Objects). This may be either a regular bucket or Object-Lock-enabled (immutable) one.
Access & Secret Key Pair (see Creating a User Account and Access Key).
Cohesity DataProtect is installed and licensed. This solution was most recently tested with version 7.3.1.
A VMware vCenter or another hypervisor is added as a source. A source is an object in your organization that you want to protect, such as a VM, physical server, Pure Storage volume, MS SQL Server or NAS. Refer to Register or Edit a Hypervisor Source page on Cohesity documentation for details on how to add a source or an asset for data protection. This article provides an example to protect a virtual machine on VMware vCenter, which was added as a source.
The data restoration process is handled by your specific backup software application. As there are many potential variables that will affect your unique environment, it is strongly recommended that you seek the guidance of your backup software's technical support team in the event that you encounter difficulty, or have application-specific inquiries.
Reference Architecture Diagram
Creating a Wasabi Bucket and Keys
Follow the steps in this section to create a standard Wasabi bucket. We will later use this bucket to create an External Target on Cohesity to write backups to Wasabi. To enable immutability, follow the steps in the Configuring Immutability (Object Lock) section at the end of this article.
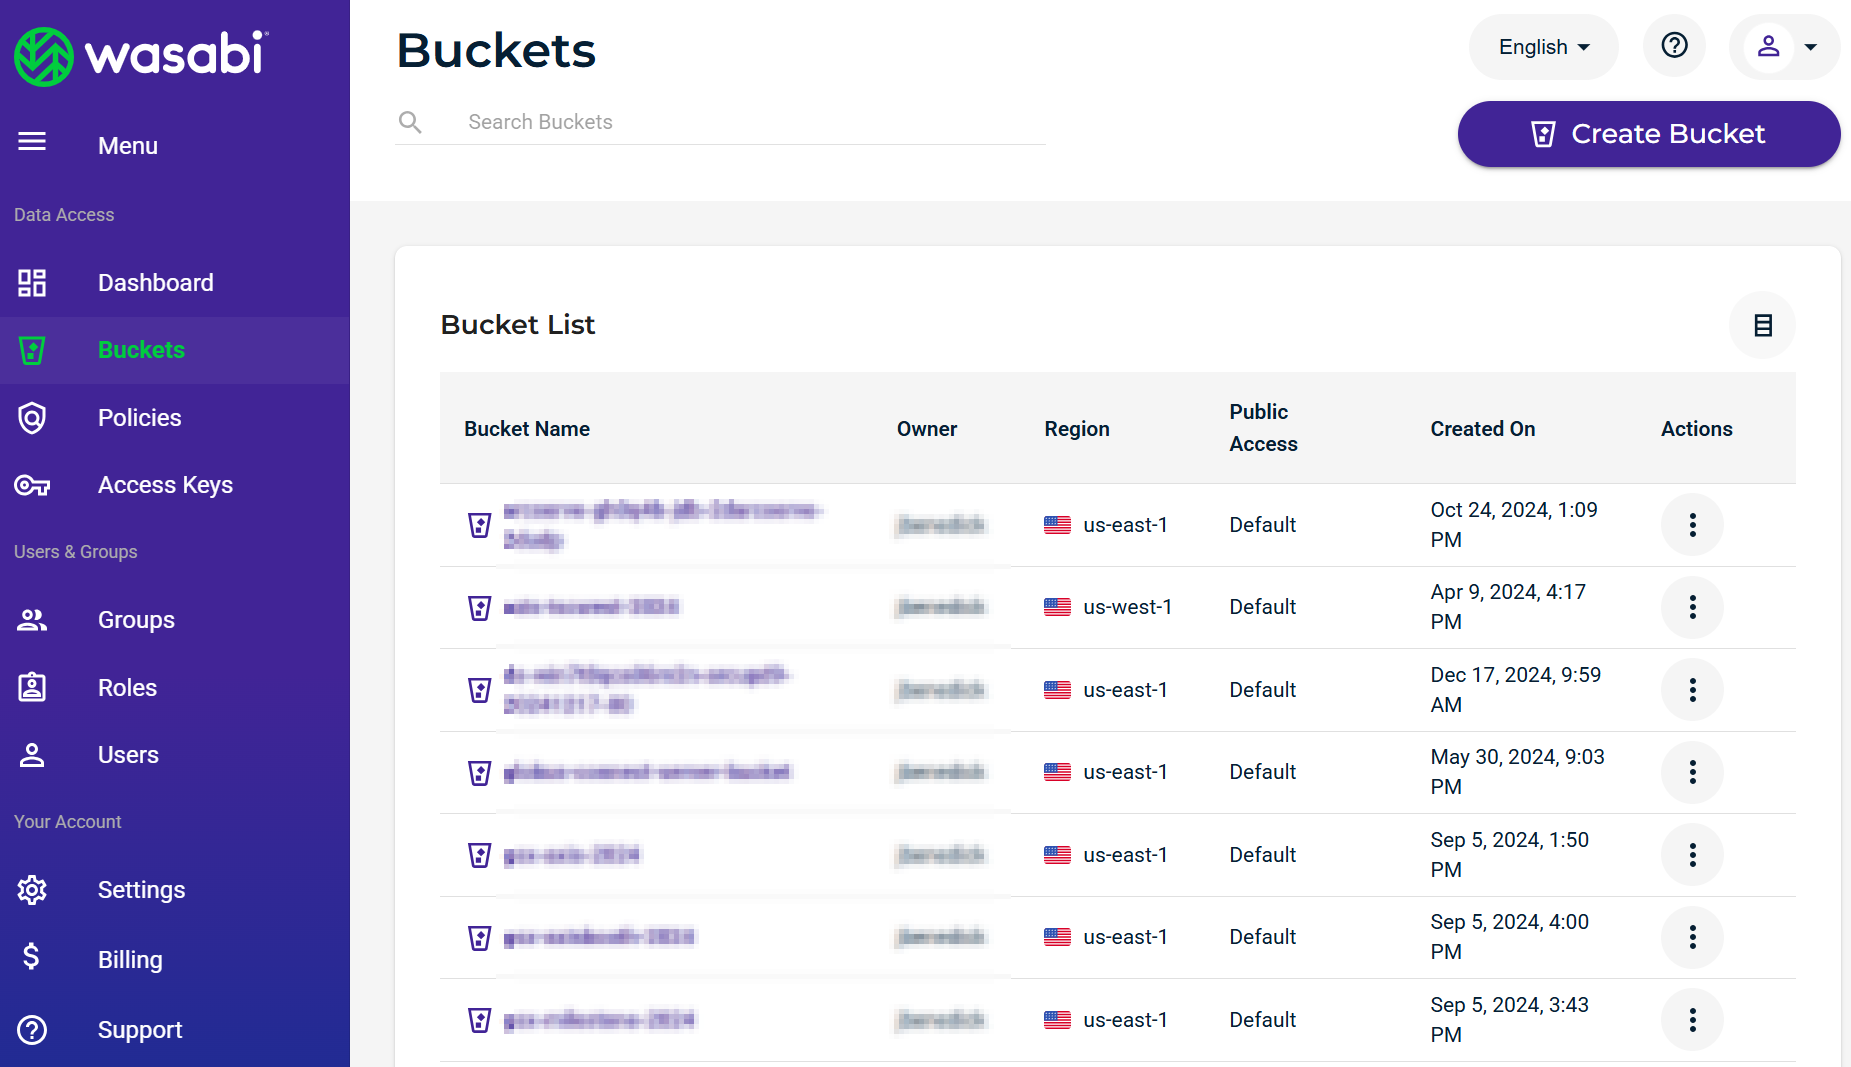
Log in to the Wasabi Console.
Click Buckets in the left-hand pane and then click Create Bucket.
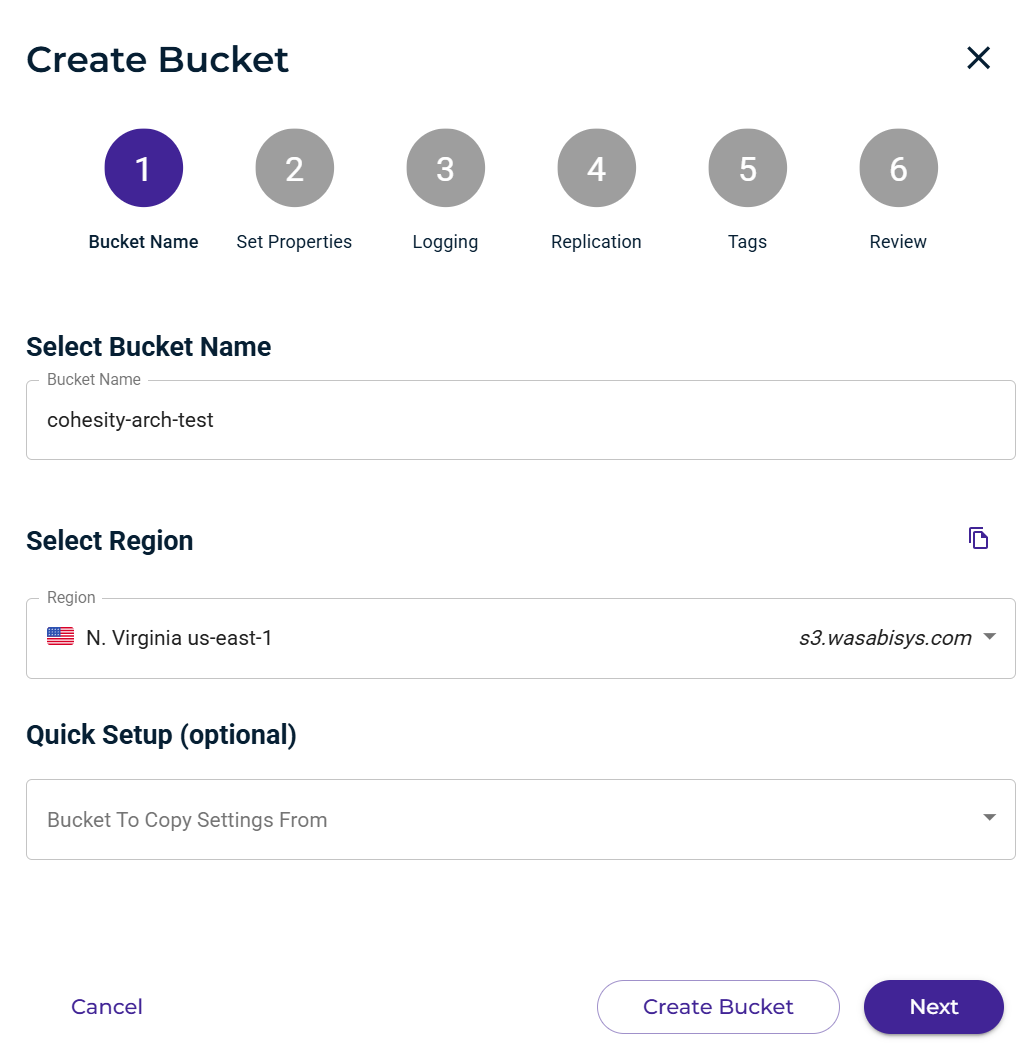
In the Create Bucket window, enter a unique bucket name.
Select the appropriate region. Click Create Bucket.
To create a sub-user with access keys, review Creating a User Account and Access Key to access the Wasabi bucket created above.
The following user permissions are required to use the Cohesity cloud services as outlined in the Minimum Permissions for Registering External Targets. This policy may be copied directly into the policy editor on the Wasabi Console. Replace YOUR_BUCKET_NAME with the name of your bucket. See Creating a Policy for details on how to create a policy.
{
  "Version": "2012-10-17",
  "Statement": [
    {
      "Sid": "VisualEditor0",
      "Effect": "Allow",
      "Action": [
        "s3:PutObject",
        "s3:GetObject",
        "s3:ListBucket",
        "s3:GetObjectVersion",
        "s3:DeleteObject",
        "s3:GetBucketVersioning",
        "s3:GetBucketLocation",
        "s3:GetBucketObjectLockConfiguration",
        "s3:ListBucketMultipartUploads",
        "s3:ListMultipartUploadParts",
        "s3:AbortMultipartUpload",
        "s3:DeleteObjectVersion",
        "s3:RestoreObject",
        "s3:GetLifecycleConfiguration",
        "s3:PutObjectRetention",
        "s3:ListBucketVersions"
      ],
      "Resource": [
        "arn:aws:s3:::YOUR_BUCKET_NAME",
        "arn:aws:s3:::YOUR_BUCKET_NAME/*"
      ]
    }
  ]
}
Adding Wasabi as an External Target
Wasabi can be added as an External Target for Archival or Tiering.
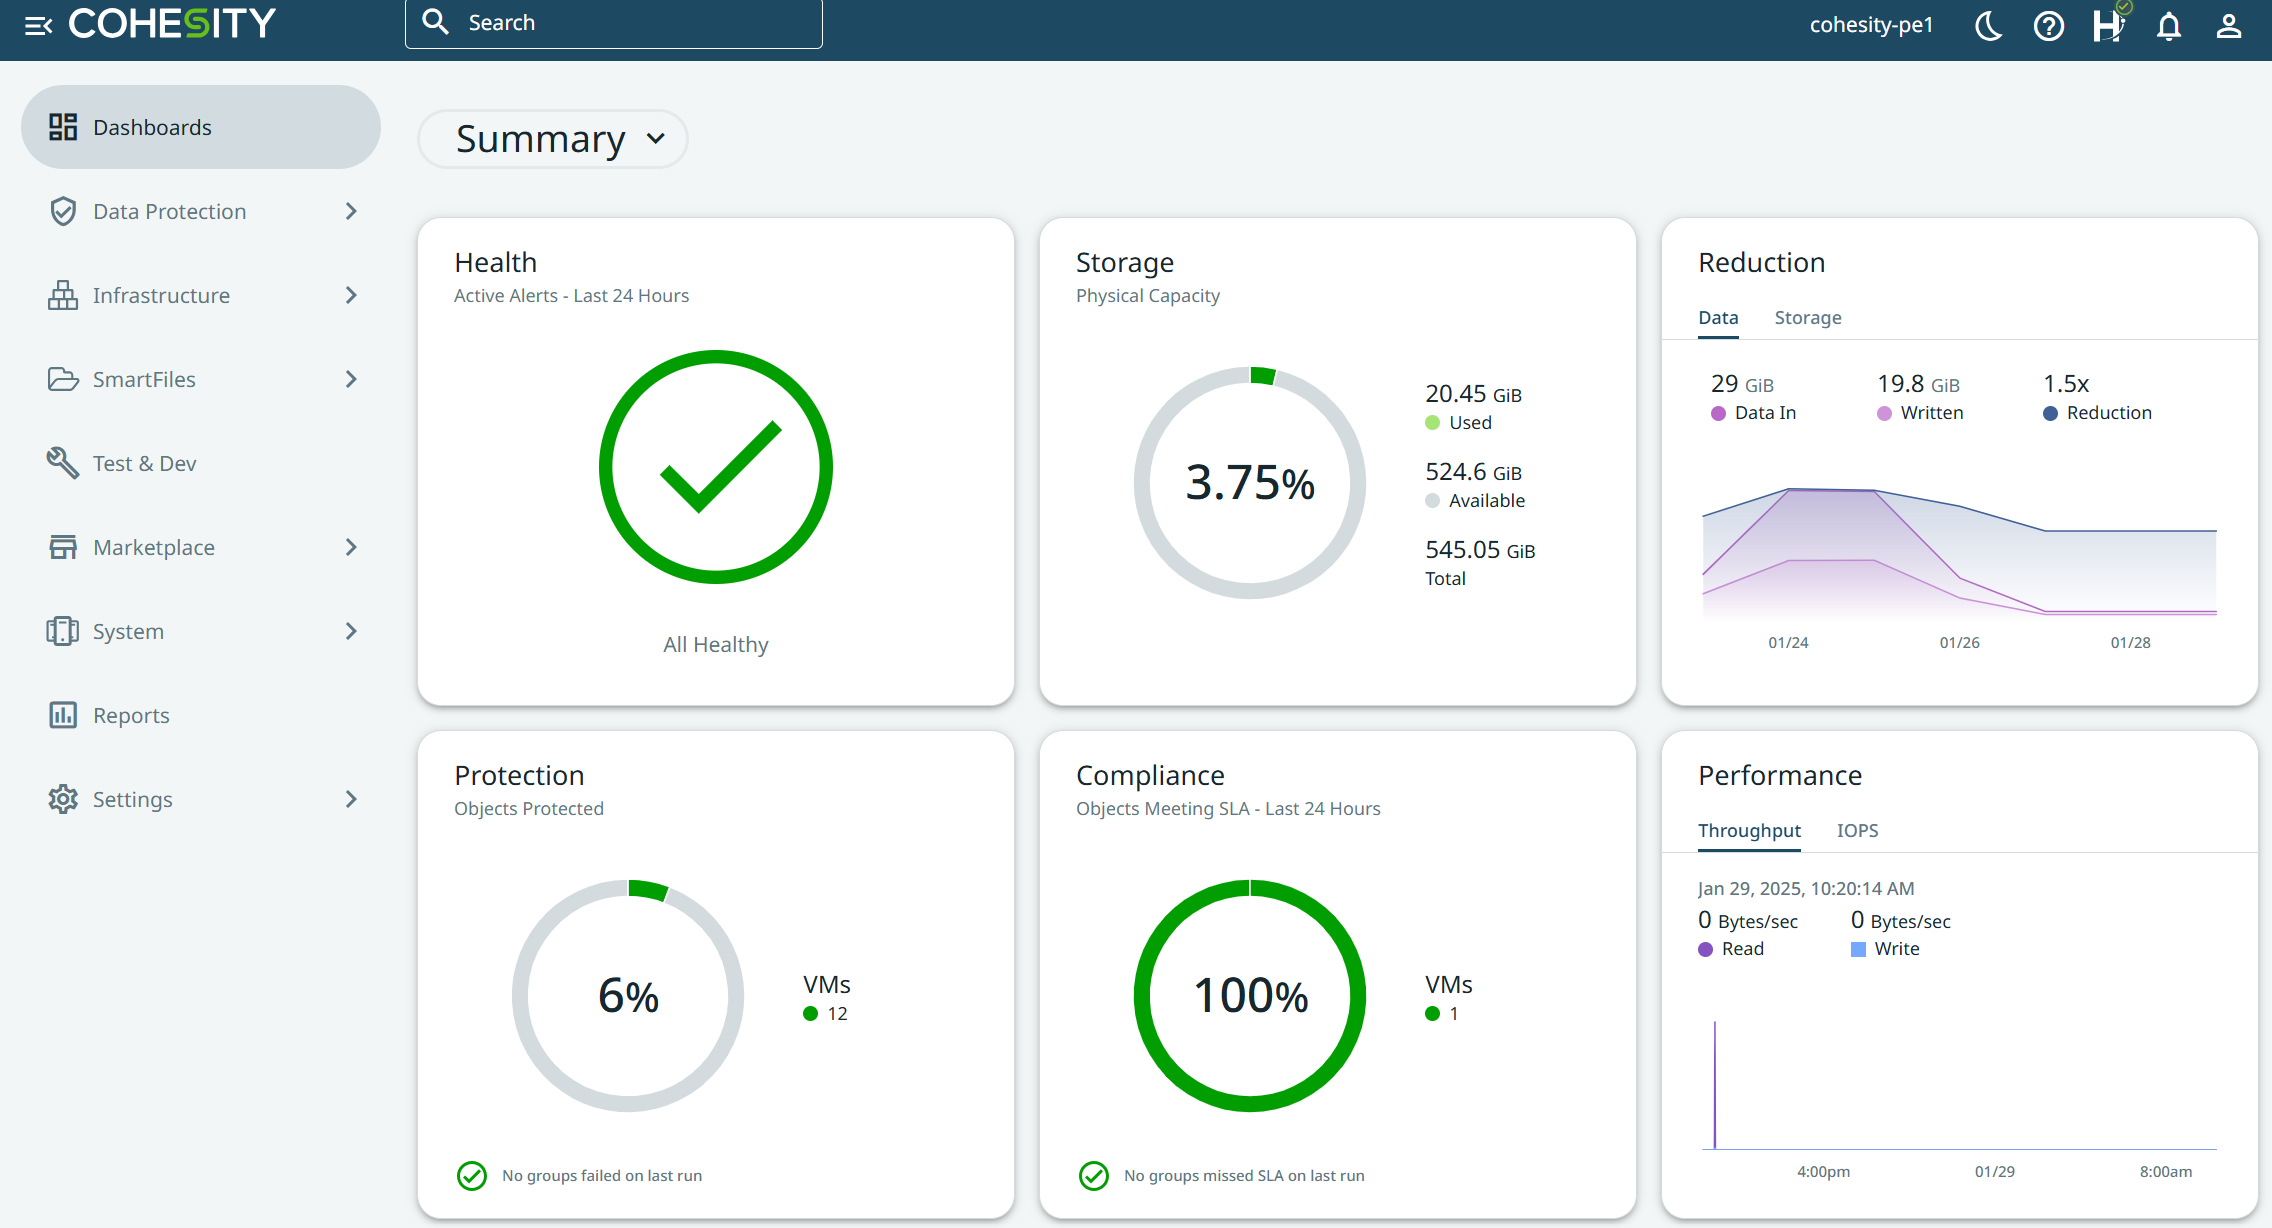
Log in to your Cohesity System.

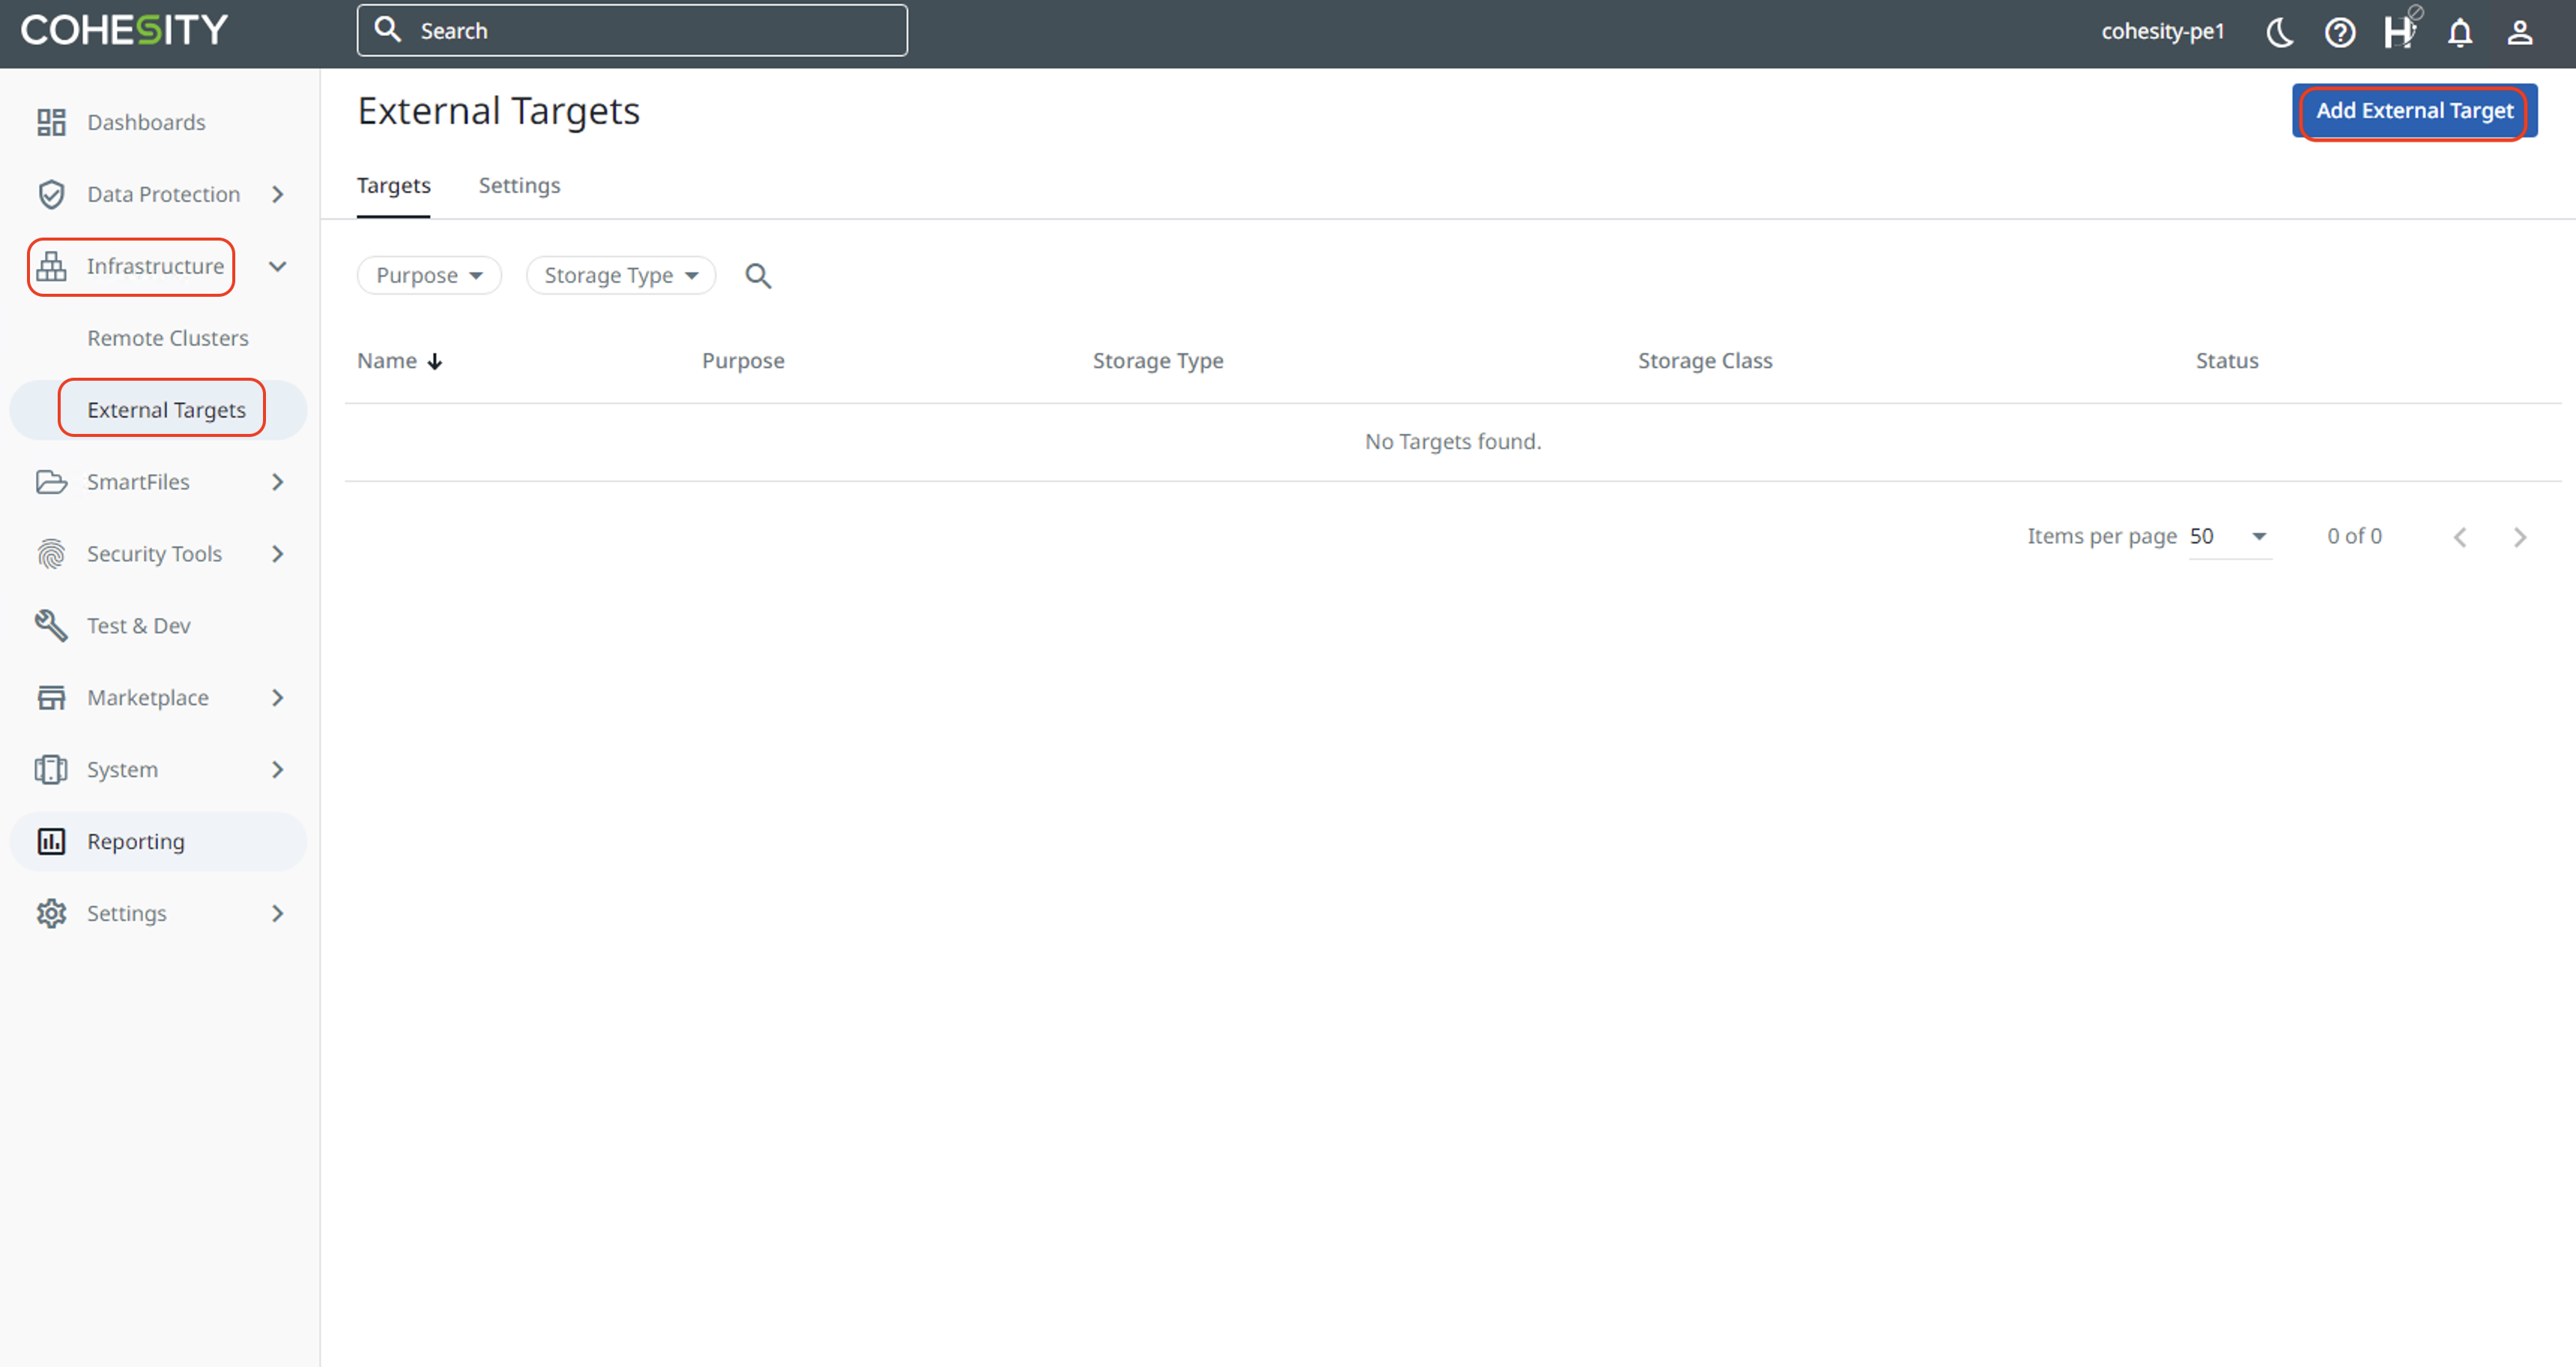
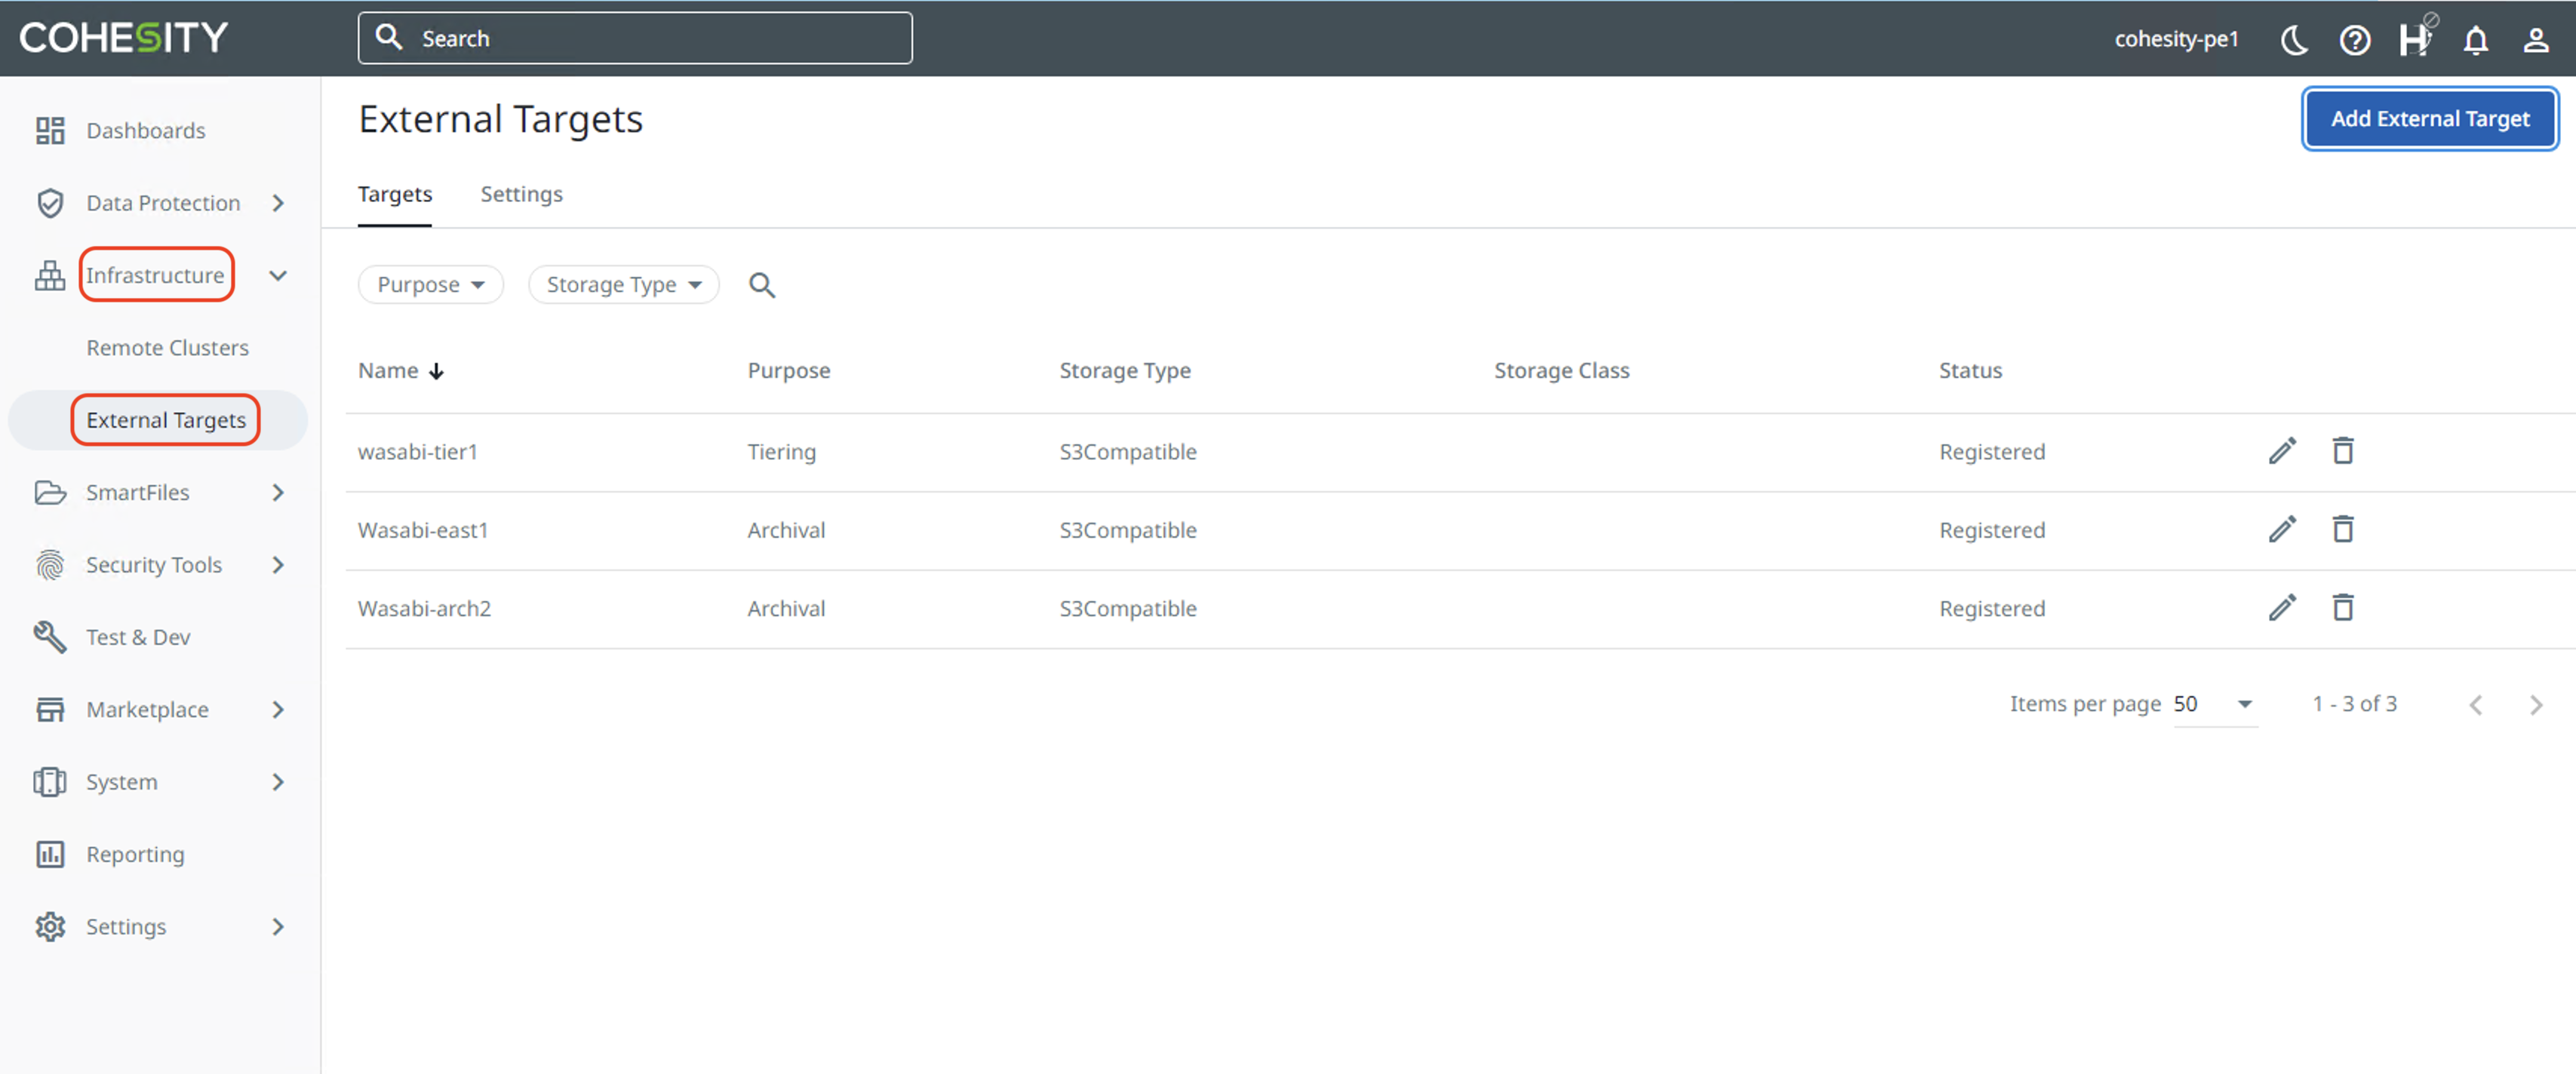
Select Infrastructure and then External Targets. Click Add External Target on the top right.
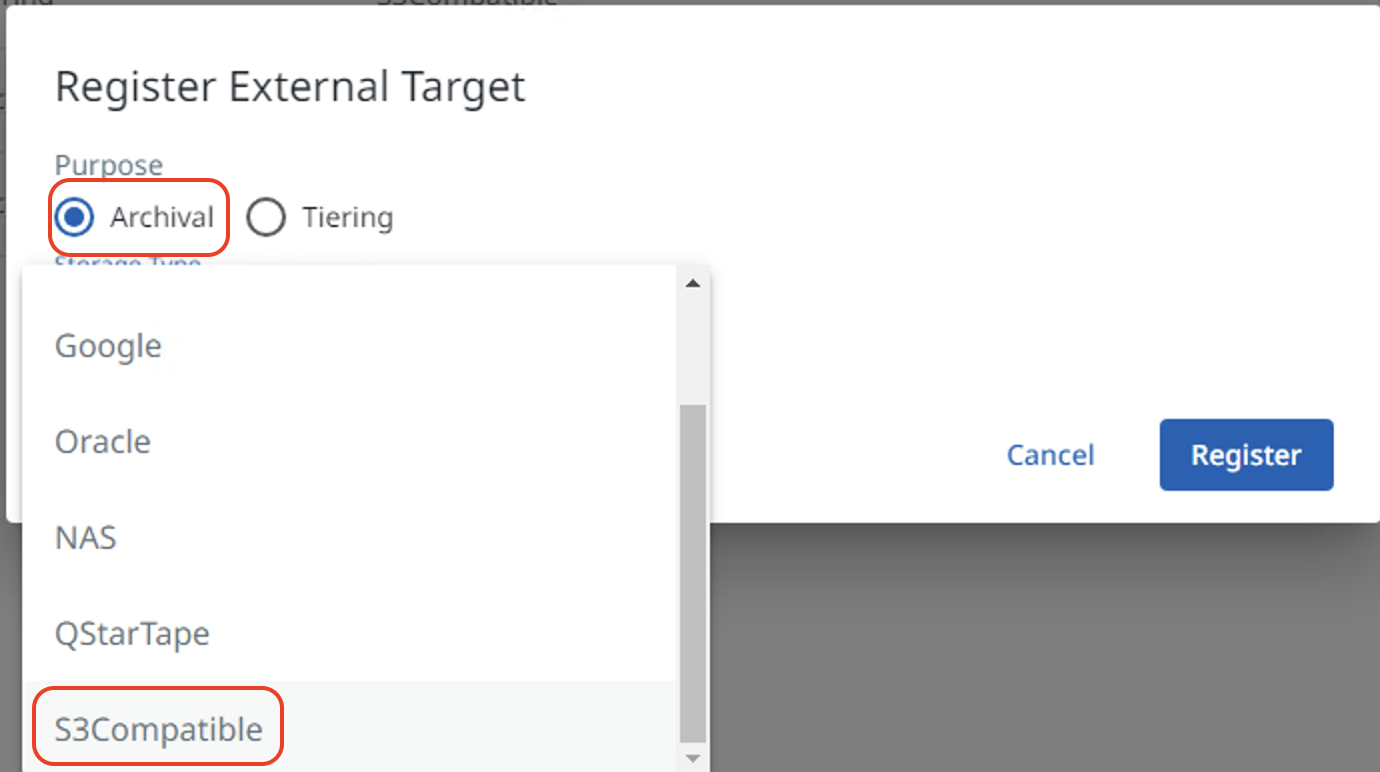
Click the checkbox to select Archival. Select S3 Compatible from the drop-down.
This example uses an Archival type for the External Target. Cohesity has two external Target types.
Cloud Archival—Archive’s benefits include long-term data retention on low-cost storage to meet compliance and retention requirements. Cohesity archive automatically copies an existing Snapshot created by Protection Groups located in a Cohesity cluster and stores it on a registered External Target.
Cloud Tier—Cohesity Cloud Tier provides an additional storage tier for cold data. You can enable Cloud Tier to move rarely used and inactive data to the cloud when HDD used capacity exceeds a set threshold.
Incremental Forever Archival Format
Per Cohesity, the Incremental Forever archival format is the only option available. Incremental with Periodic Full archival format is no longer supported.
With an incremental, forever archival format, the Cohesity cluster will download a portion of the data from the S3-compatible Standard-tier external target for the space reclamation process and re-upload it after compaction. This leads to increased network bandwidth usage. Before creating an Incremental Forever External Target with Wasabi, Cohesity recommends having sufficient network bandwidth between the cluster and the external target. If you need help determining whether your Network speed is sufficient, please reach out to Cohesity Support to discuss your environment.
In addition to Supporting Daily Archivals, the network should also support the daily transfer of data that will be garbage-collected. This is roughly equal to Daily Change Rate (DCR). For example, for a 1 PB Archive with 2% DCR, up to 20 TBs will be downloaded from the archive to the cluster every day and then uploaded back.
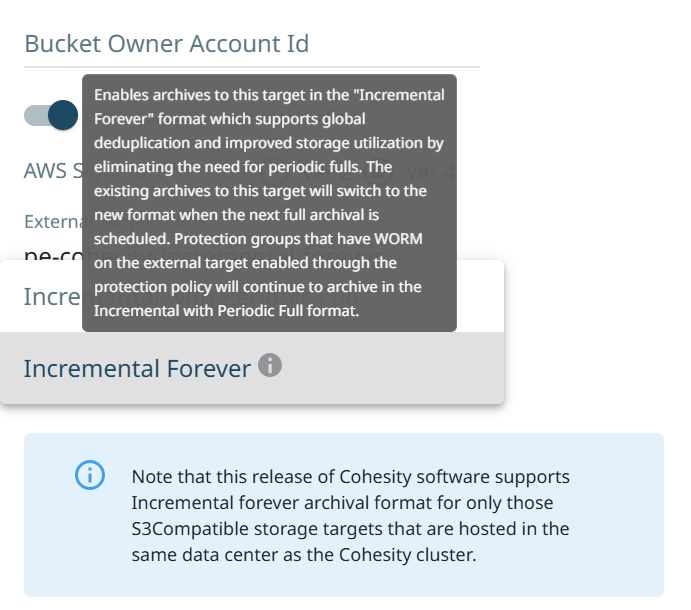
Enable this option to perform a first full archival, followed by an incremental, forever archival of data from the Cohesity cluster to an external target. Incremental forever archival eliminates the need for periodic full archives and supports global deduplication, thereby improving the target's storage utilization.
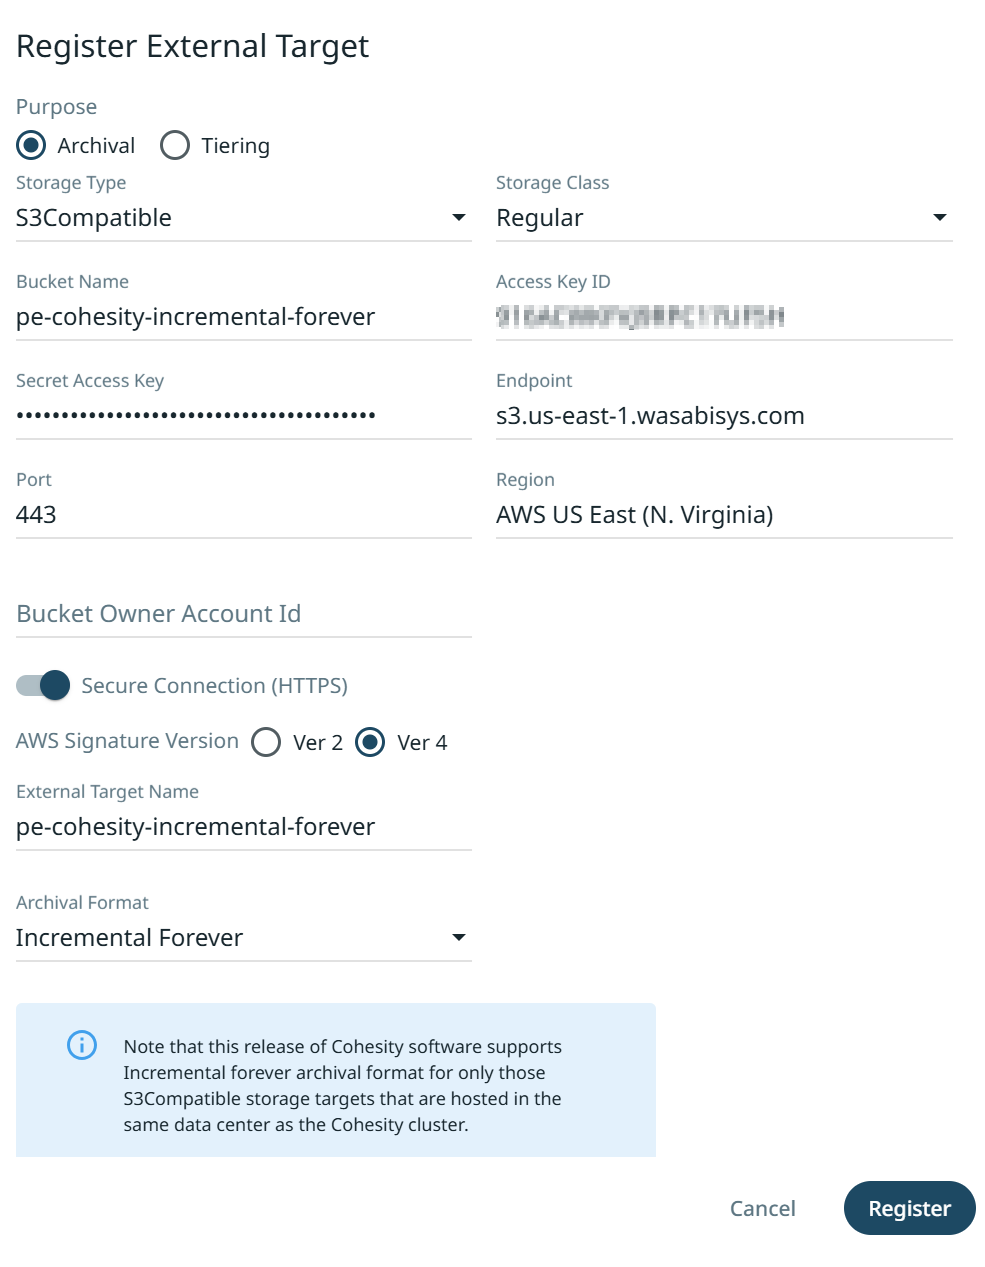
Enter the following details.
Bucket Name—Name of the Wasabi bucket created in section 3
Access Key ID—Access key for the Wasabi user
Secret Access Key—Secret key for the Wasabi user
Endpoint—This will vary depending on your bucket’s chosen region
Port—(optional) 443
Region—(optional)Region for your Wasabi bucket
External Target Name—Name for the external target that is being added
Archival Format—Use the default Incremental Forever
Once the details above are entered, click Register to add the External target.
This example uses Wasabi's 'us-east-1' storage region. To use other Wasabi storage regions, use the appropriate Wasabi service URL as described in Service URLs for Wasabi's Storage Regions.
The newly created External target can be viewed by clicking Infrastructure and then External Targets.
Creating a Protection Policy
A protection policy is a collection of reusable settings that define how and when sources are protected and archived. Follow the steps below to create a protection policy to archive backups to Wasabi.
Cloud Archive—Cloud Archive sends a copy of the backup data (it contains the backup data, metadata, dedupe fingerprint, and index) stored on the Cohesity Cluster to any registered external target. To perform Cloud Archive, at least one full copy of the primary data needs to be stored on the cluster.
Cloud Archive Direct—If you are running 7.1.2_u2 LTS or above and you created an external target with Incremental Forever Archival Format you can now archive directly to your Wasabi bucket using a Cloud Archive Direct (CAD) policy. CAD copies the data from any NAS or VMware directly to any registered external target such as Wasabi to reduce storage costs and eliminate the need to store a full backup copy on-premises.
Creating a Cloud Archive Policy
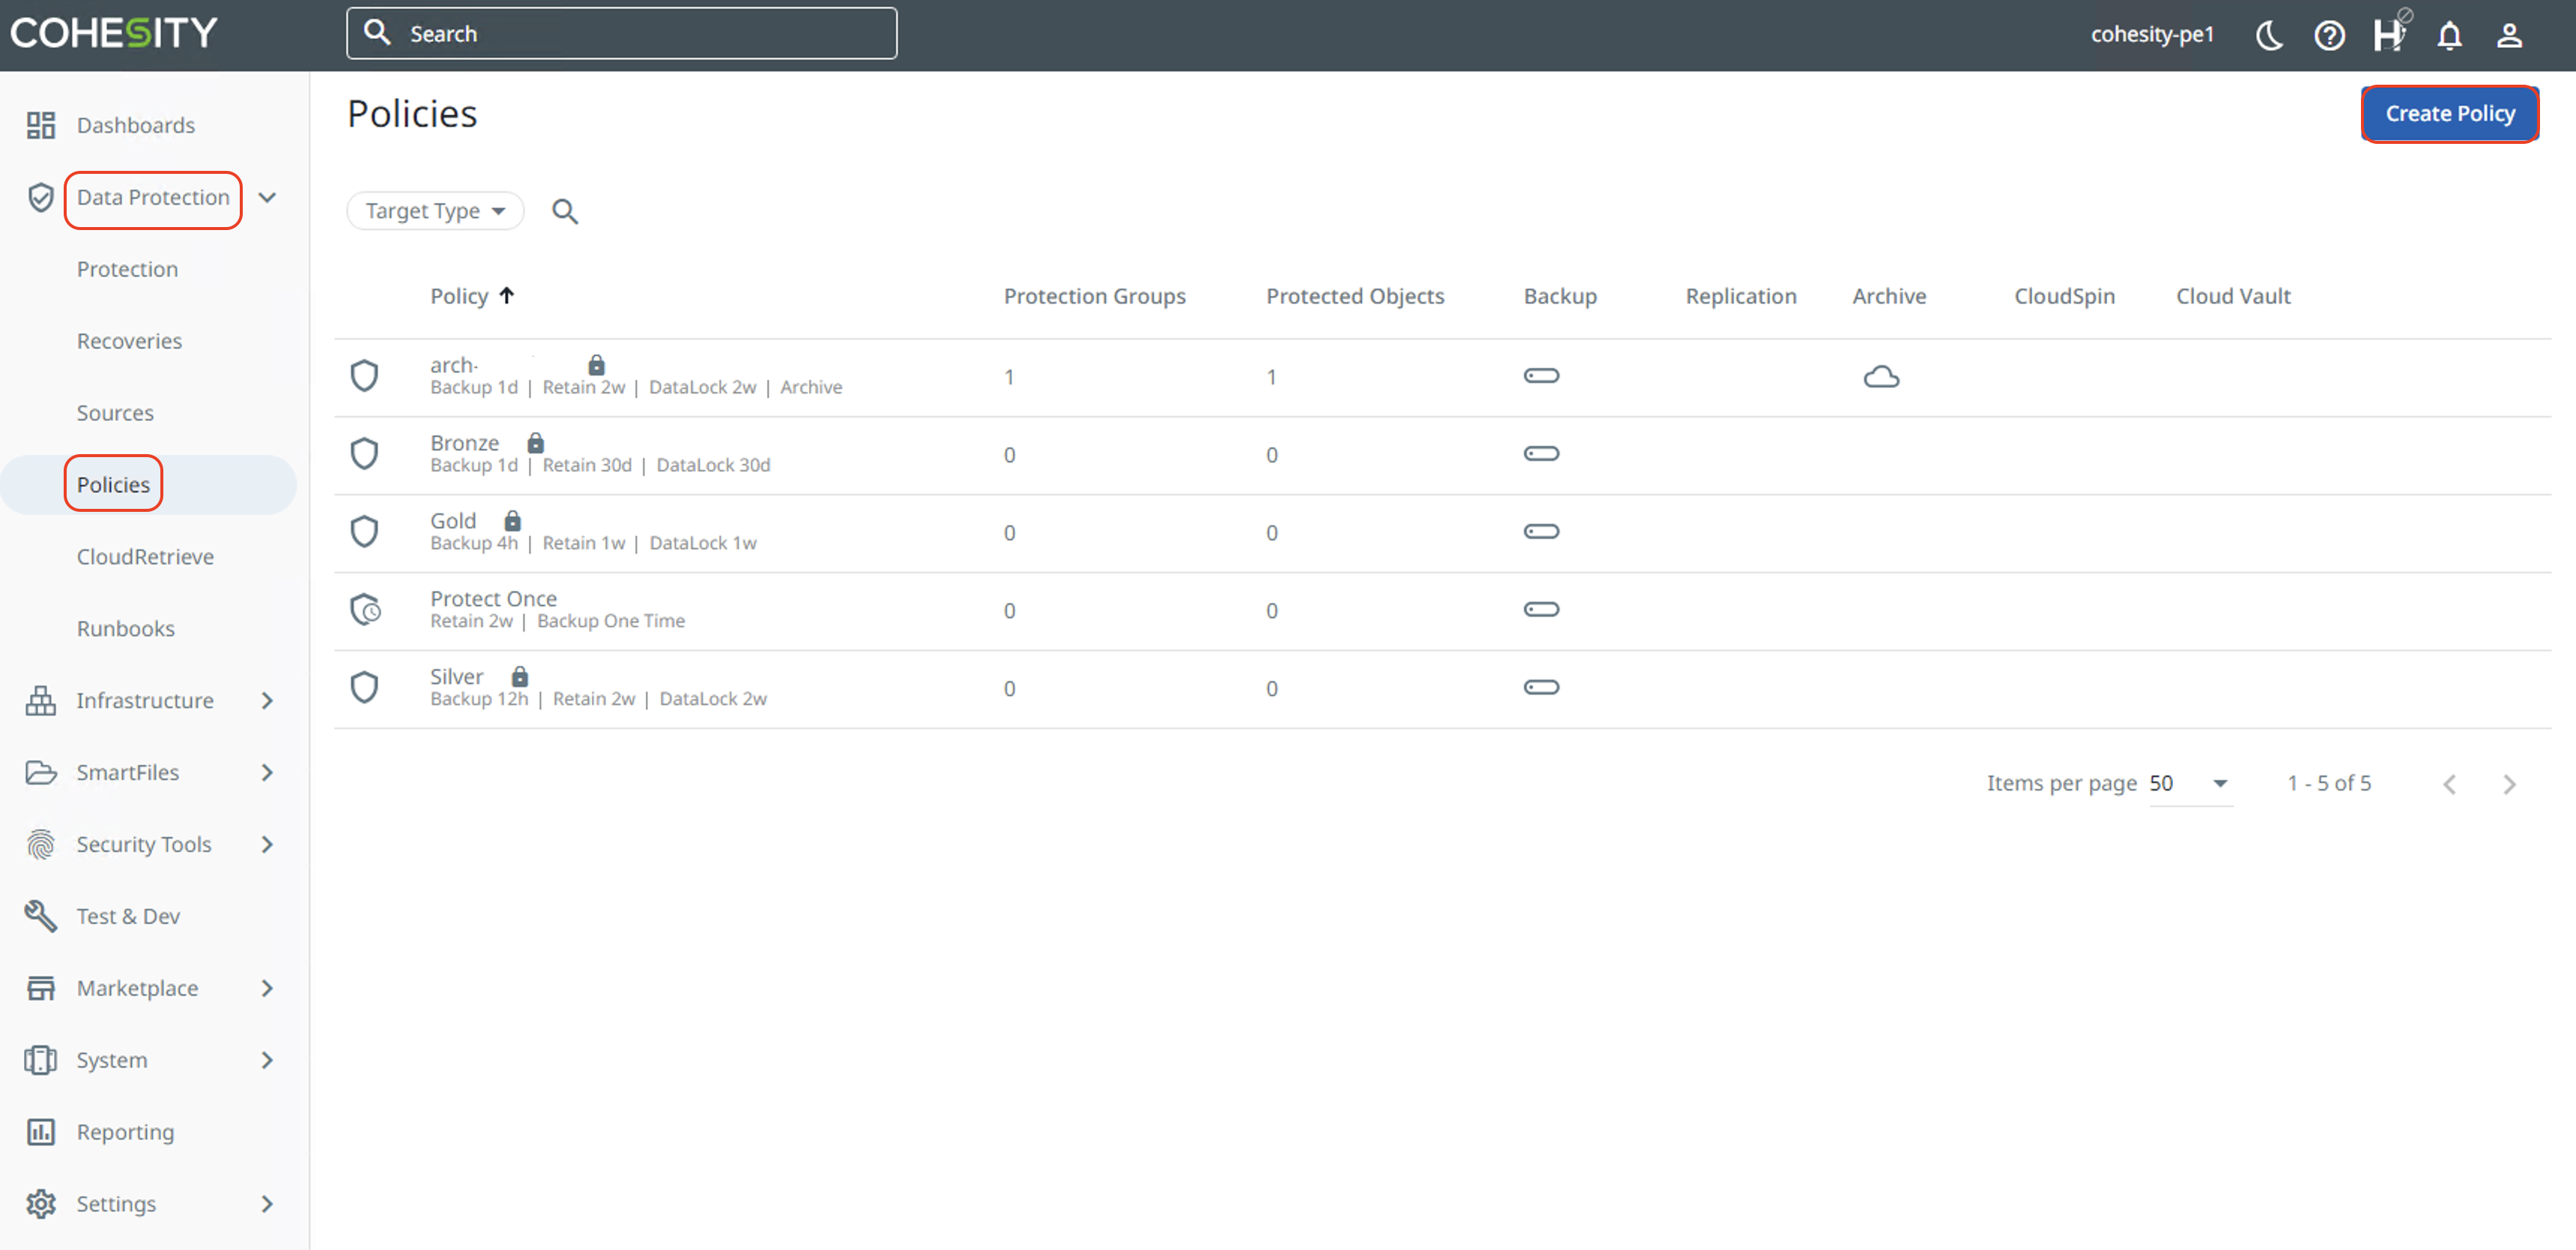
Click Data Protection and Policies. Then click Create Policy.
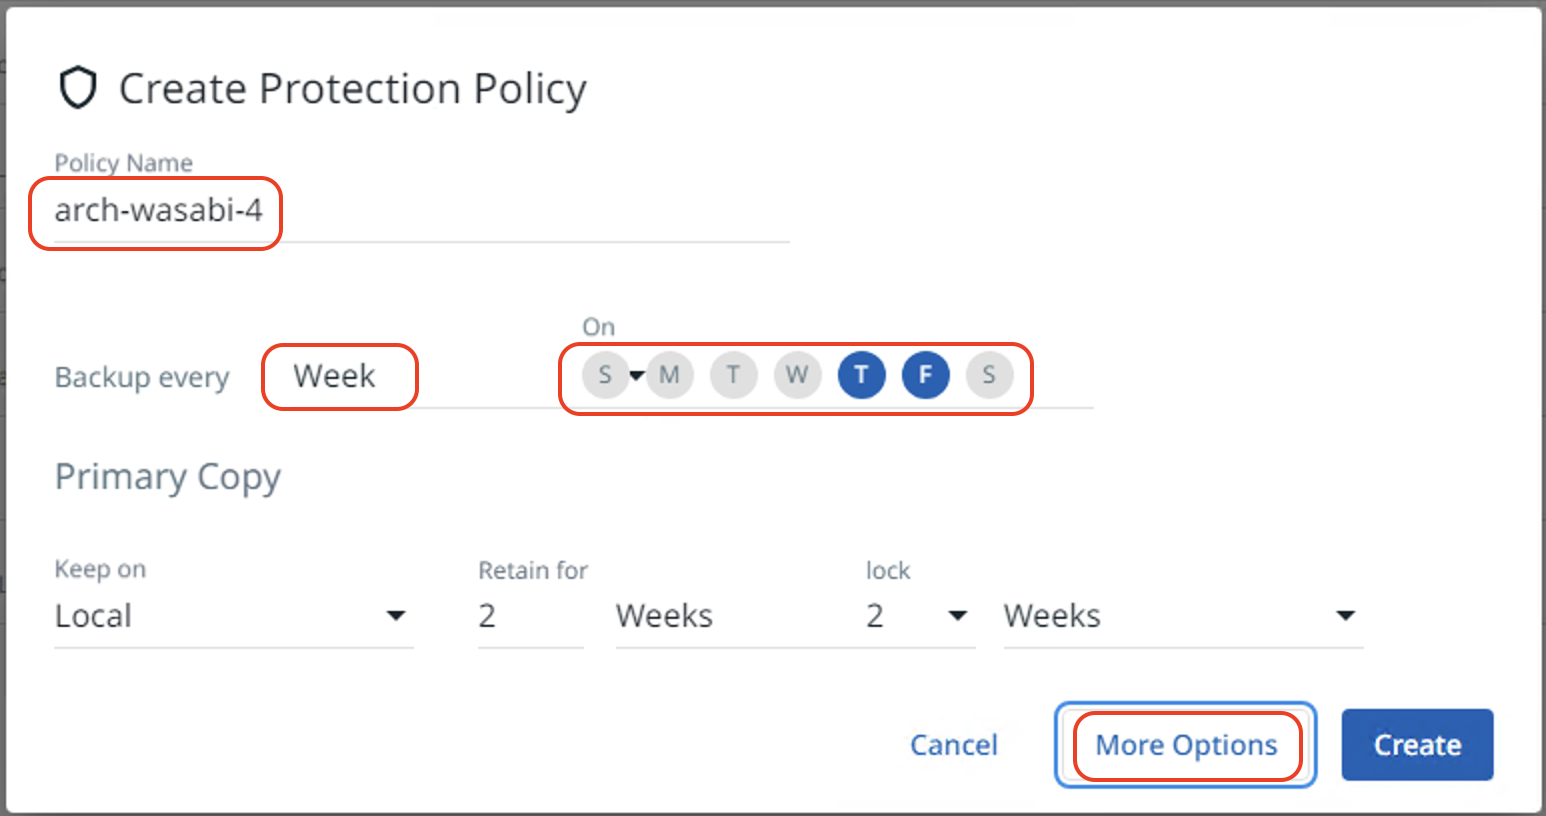
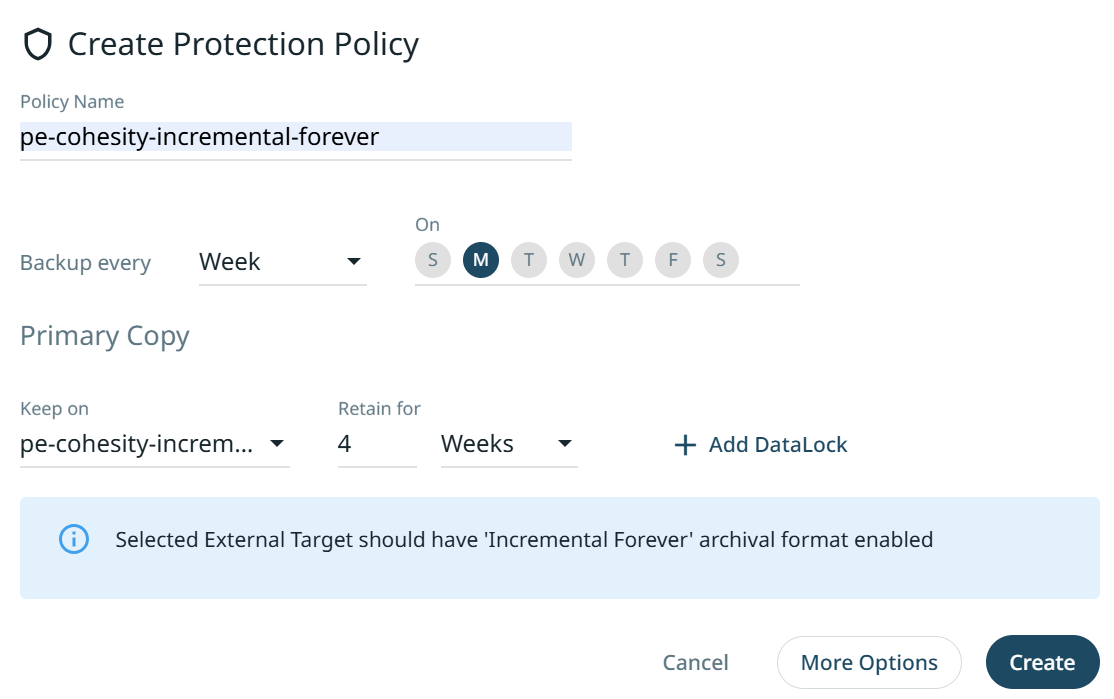
Input the Policy Name and configure the number of days/weeks to run backups and the retention period as per requirements. Click More Options.
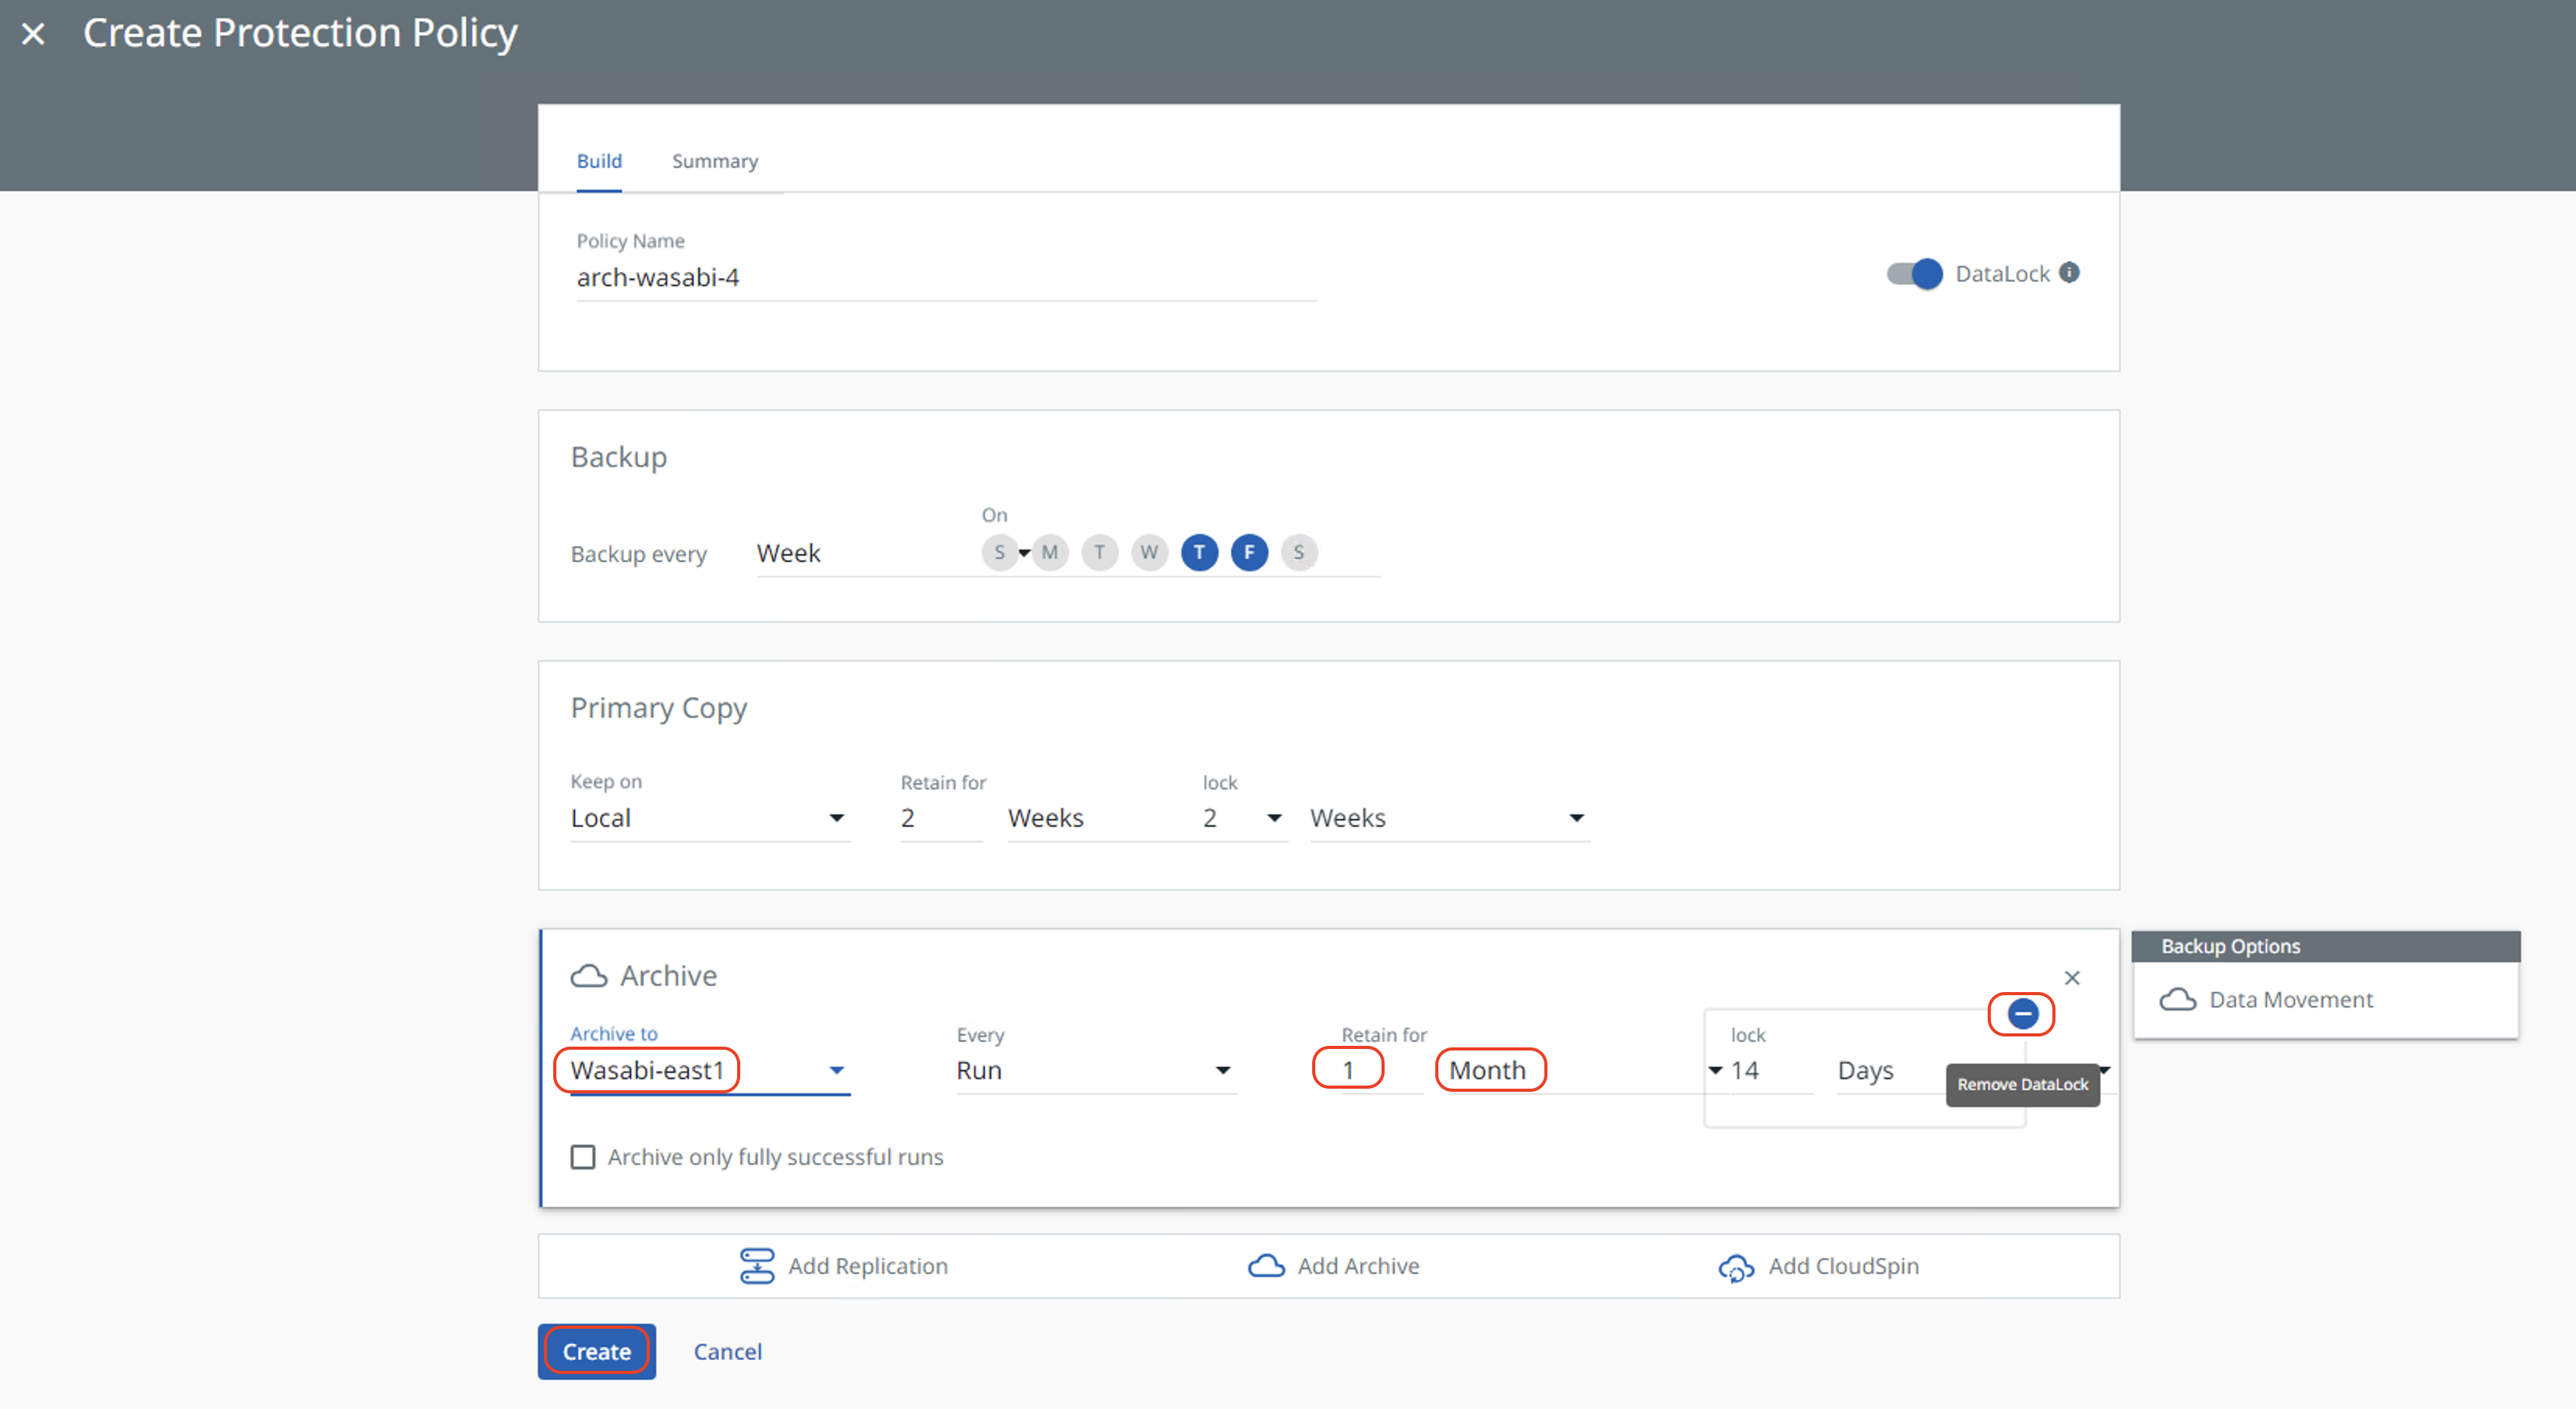
Click Add Archive to add the external target pointing to Wasabi as an archive.
Select the Archive target that was created above from the pull-down list under Archive to. Configure the retention period. Remove DataLock for Archive by clicking — beside the lock period. Then click Create to create the protection policy.
Creating a Cloud Archive Direct Policy
Click Data Protection and then Policies. Then click Create Policy.
Input the Policy Name and configure the number of days/weeks to run backups.
Select your Incremental Forever Wasabi Target.
Set your retention period as per requirements.
Click Create.
Creating a Backup
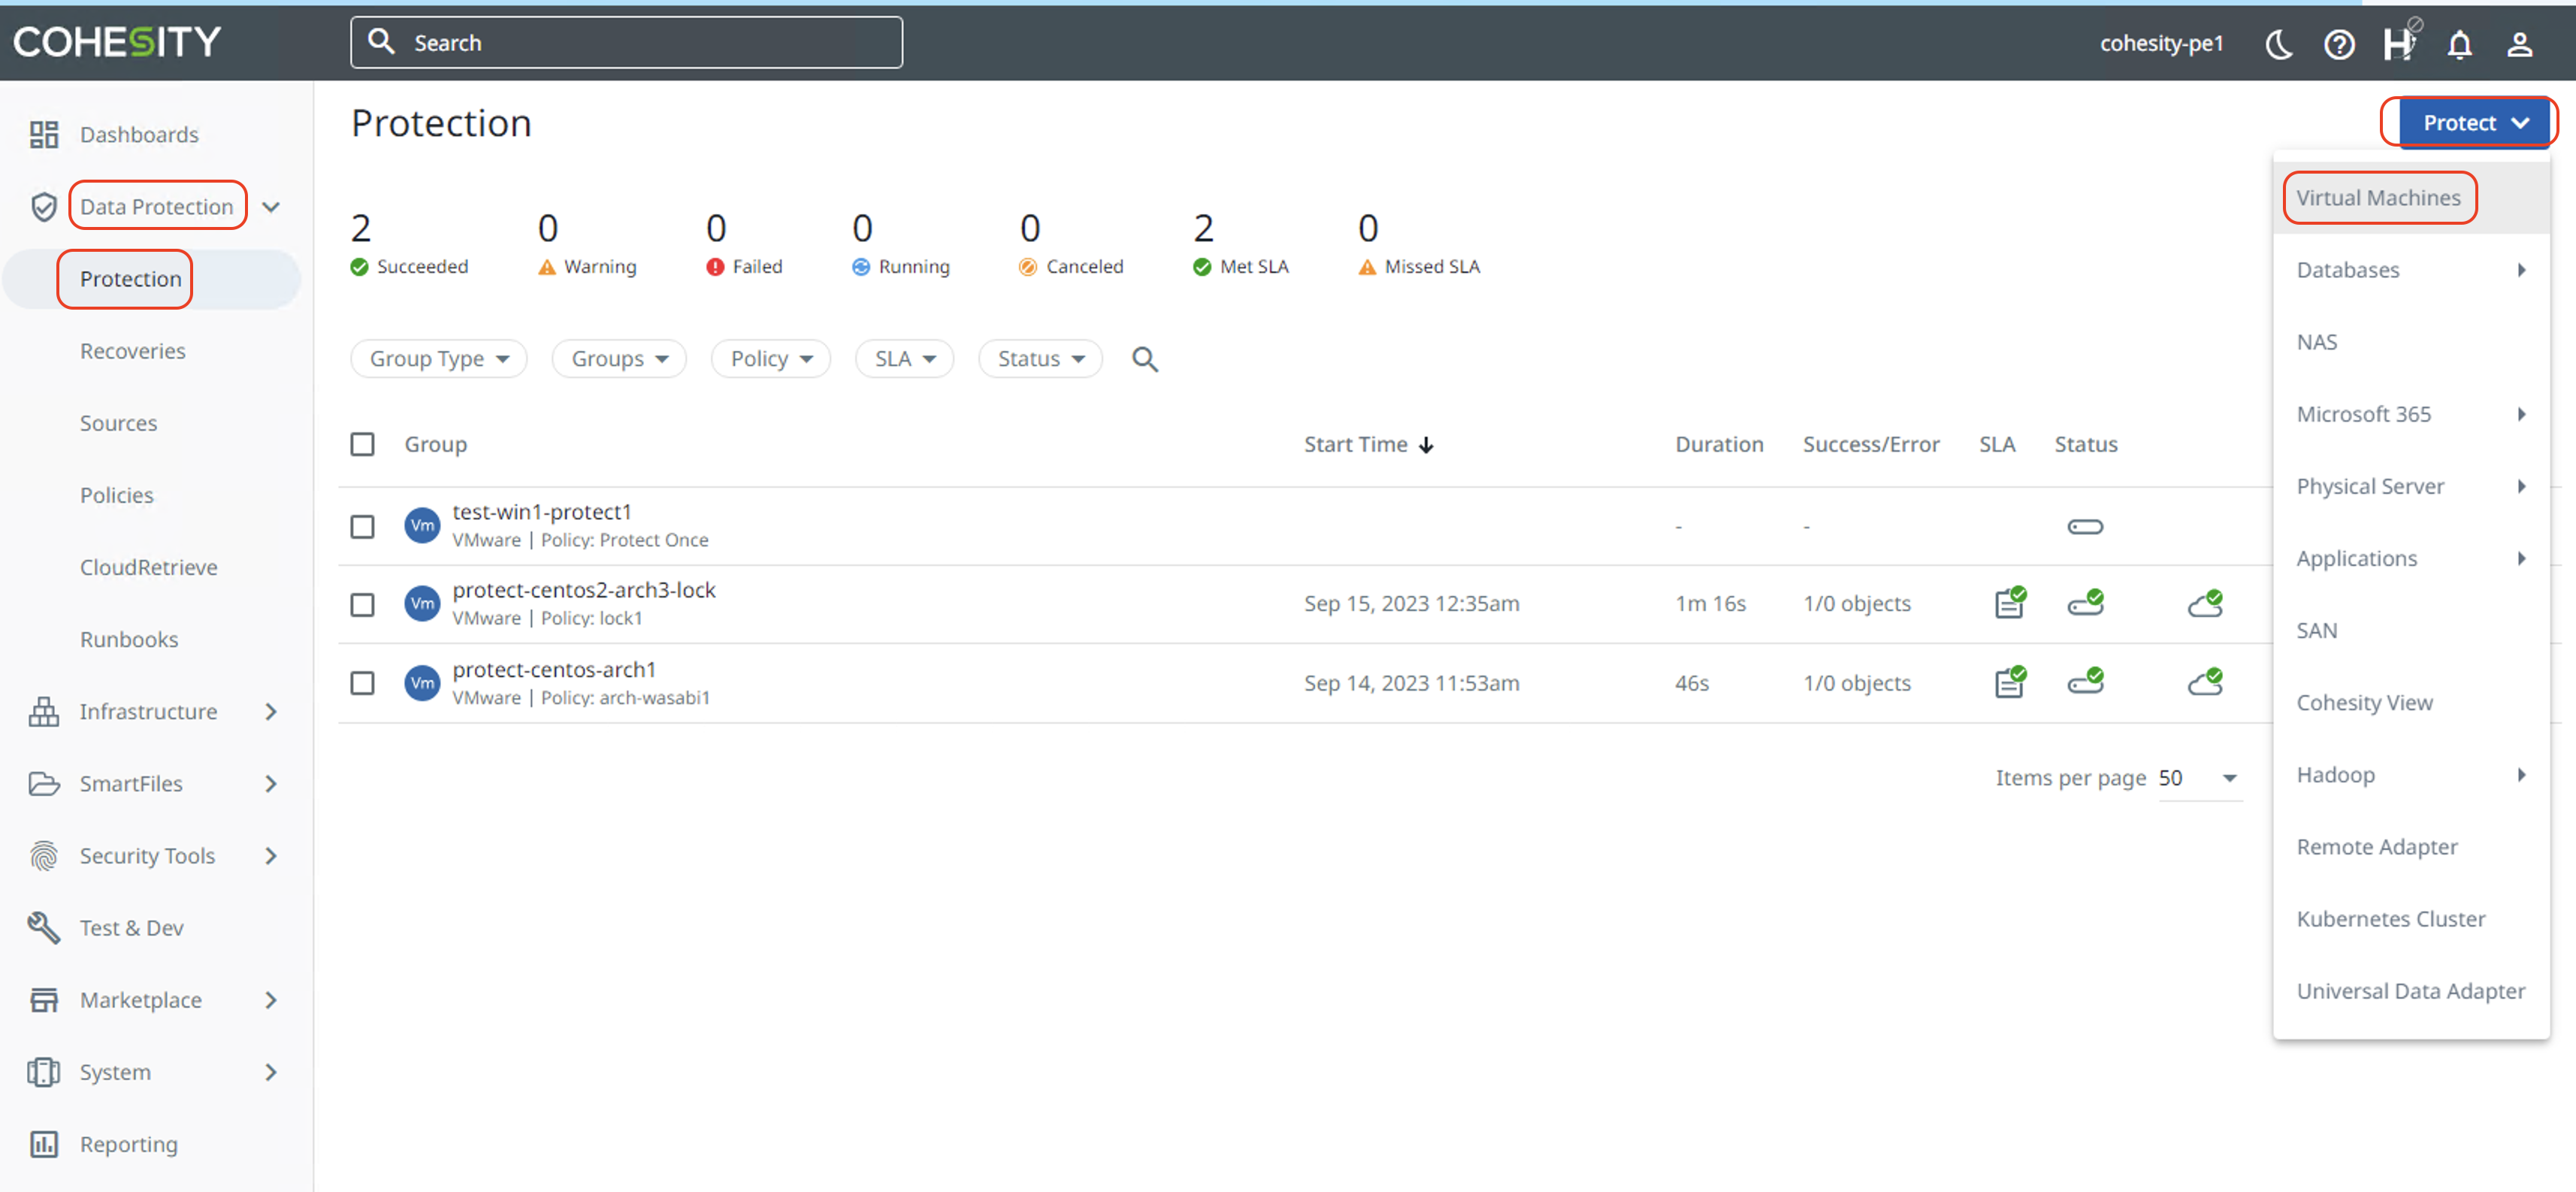
Click Protect. Click Virtual Machines.
In this example, we are protecting Virtual Machines. Refer to the Cohesity documentation for protecting other sources.
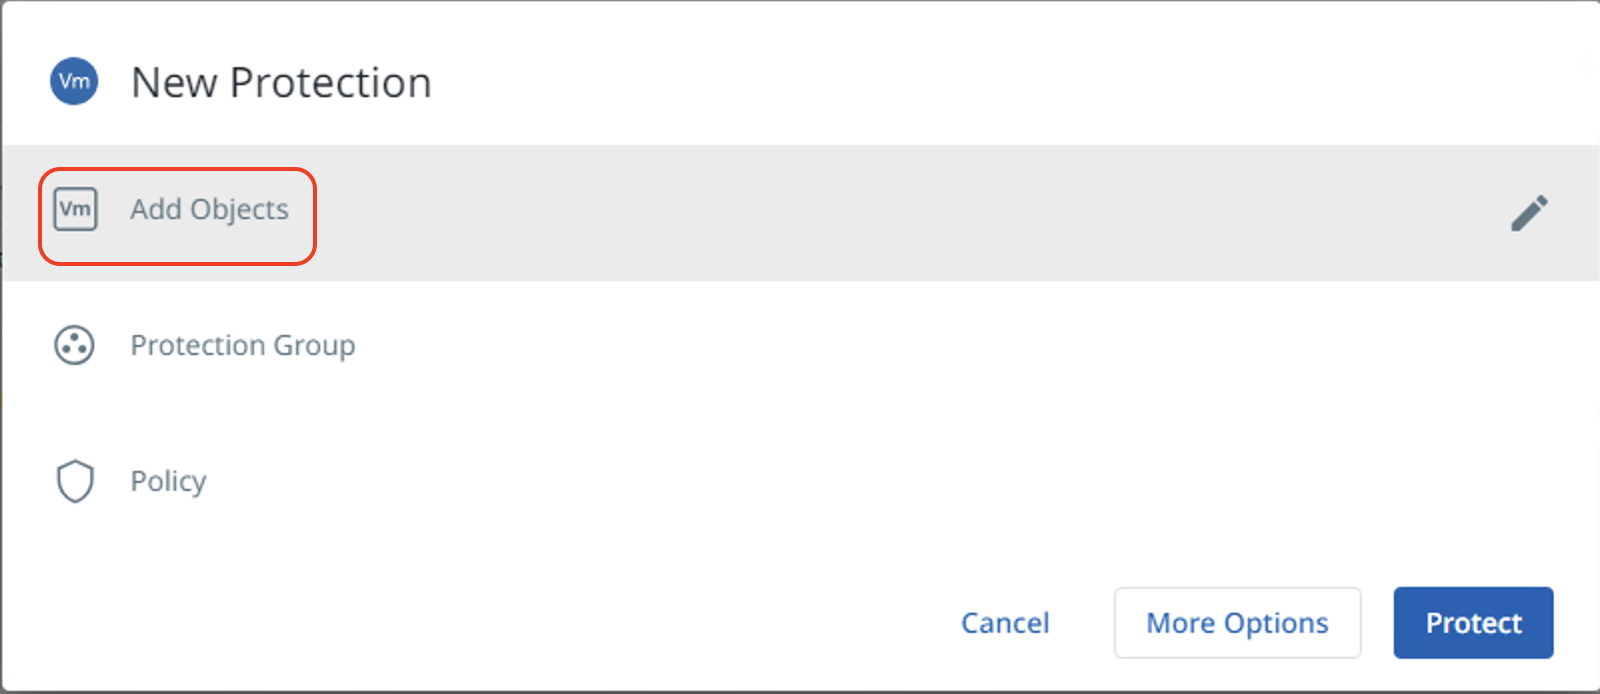
Click Add Objects to add the Virtual Machines for protection.
Select the Registered Source from the drop-down list, then select the checkbox next to each VM to be protected.
In this example, the source VMs are already discovered on Cohesity. Refer to Register or Edit a Hypervisor Source page on Cohesity documentation.

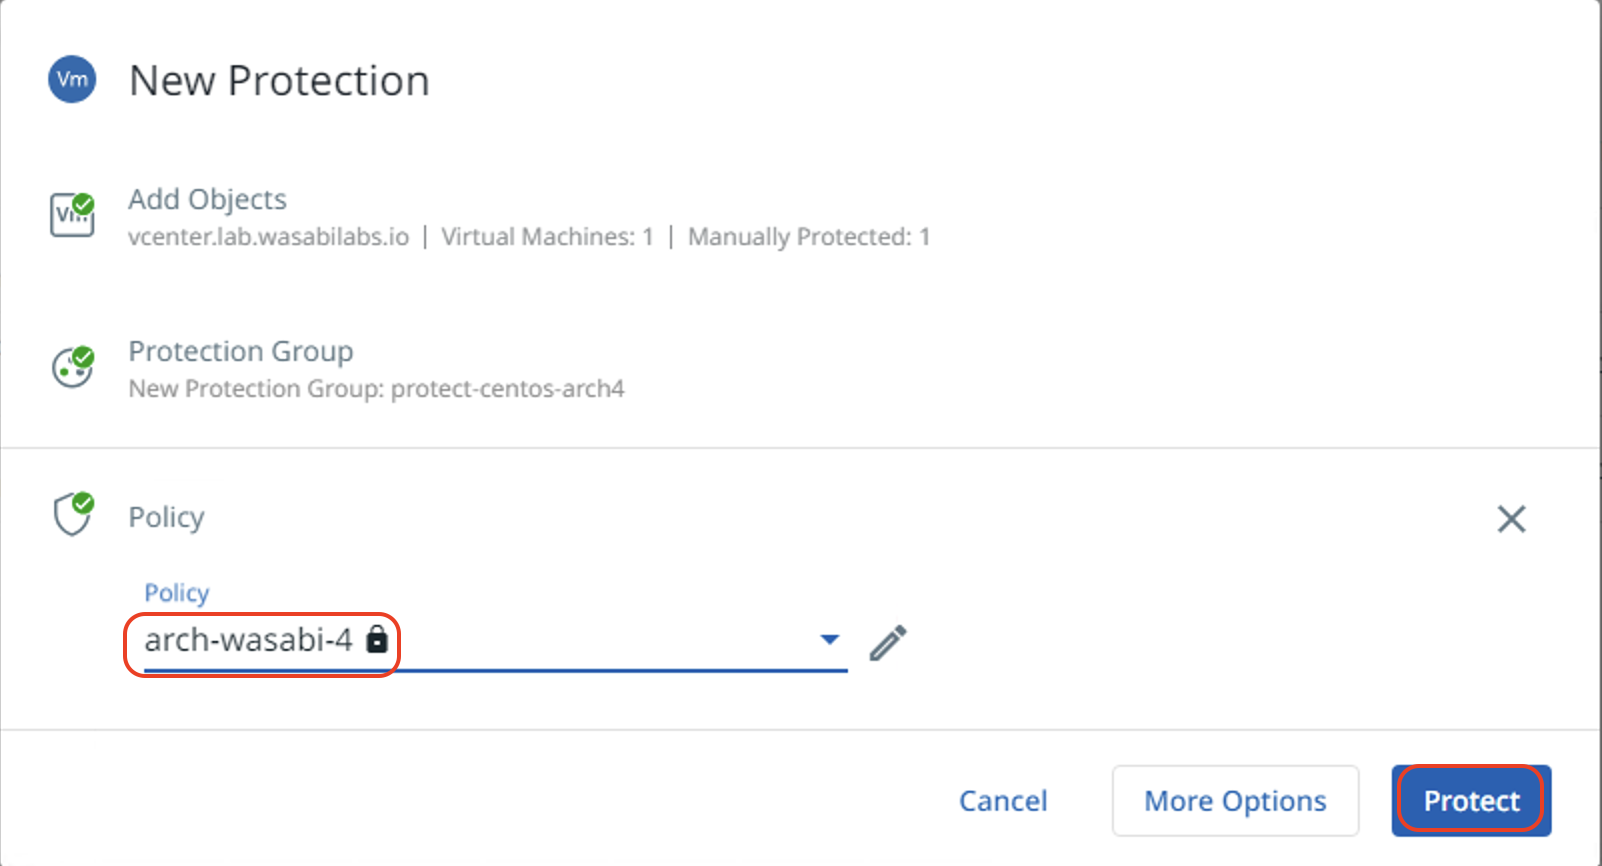
Input the name of the Protection Group if you want to create one. Then click Policy.
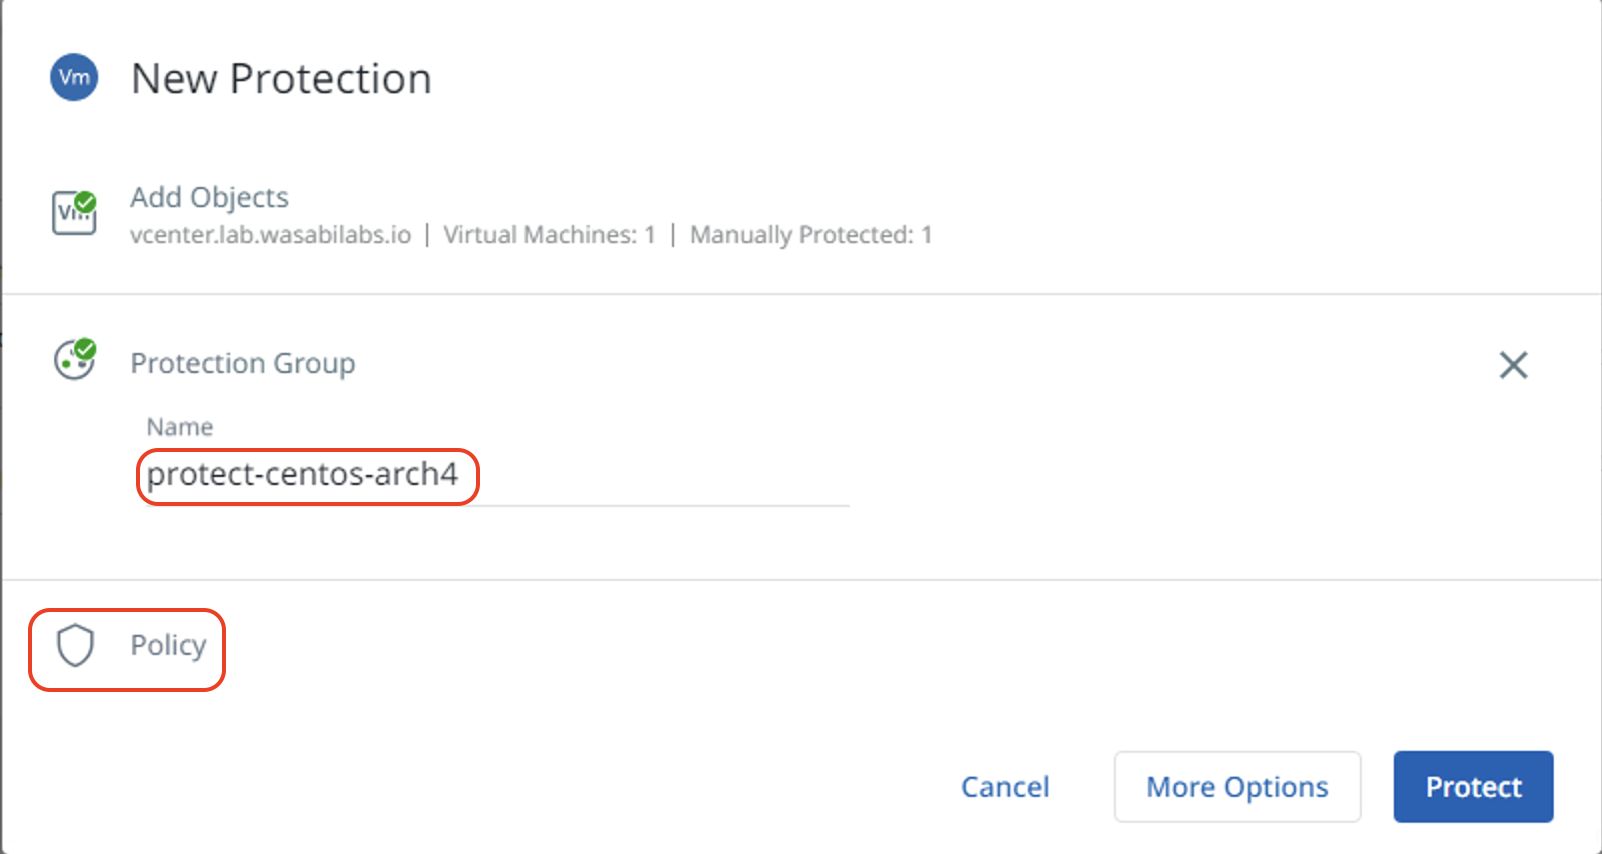
Select the protection policy created in Section 5 from the menu. Click Protect.
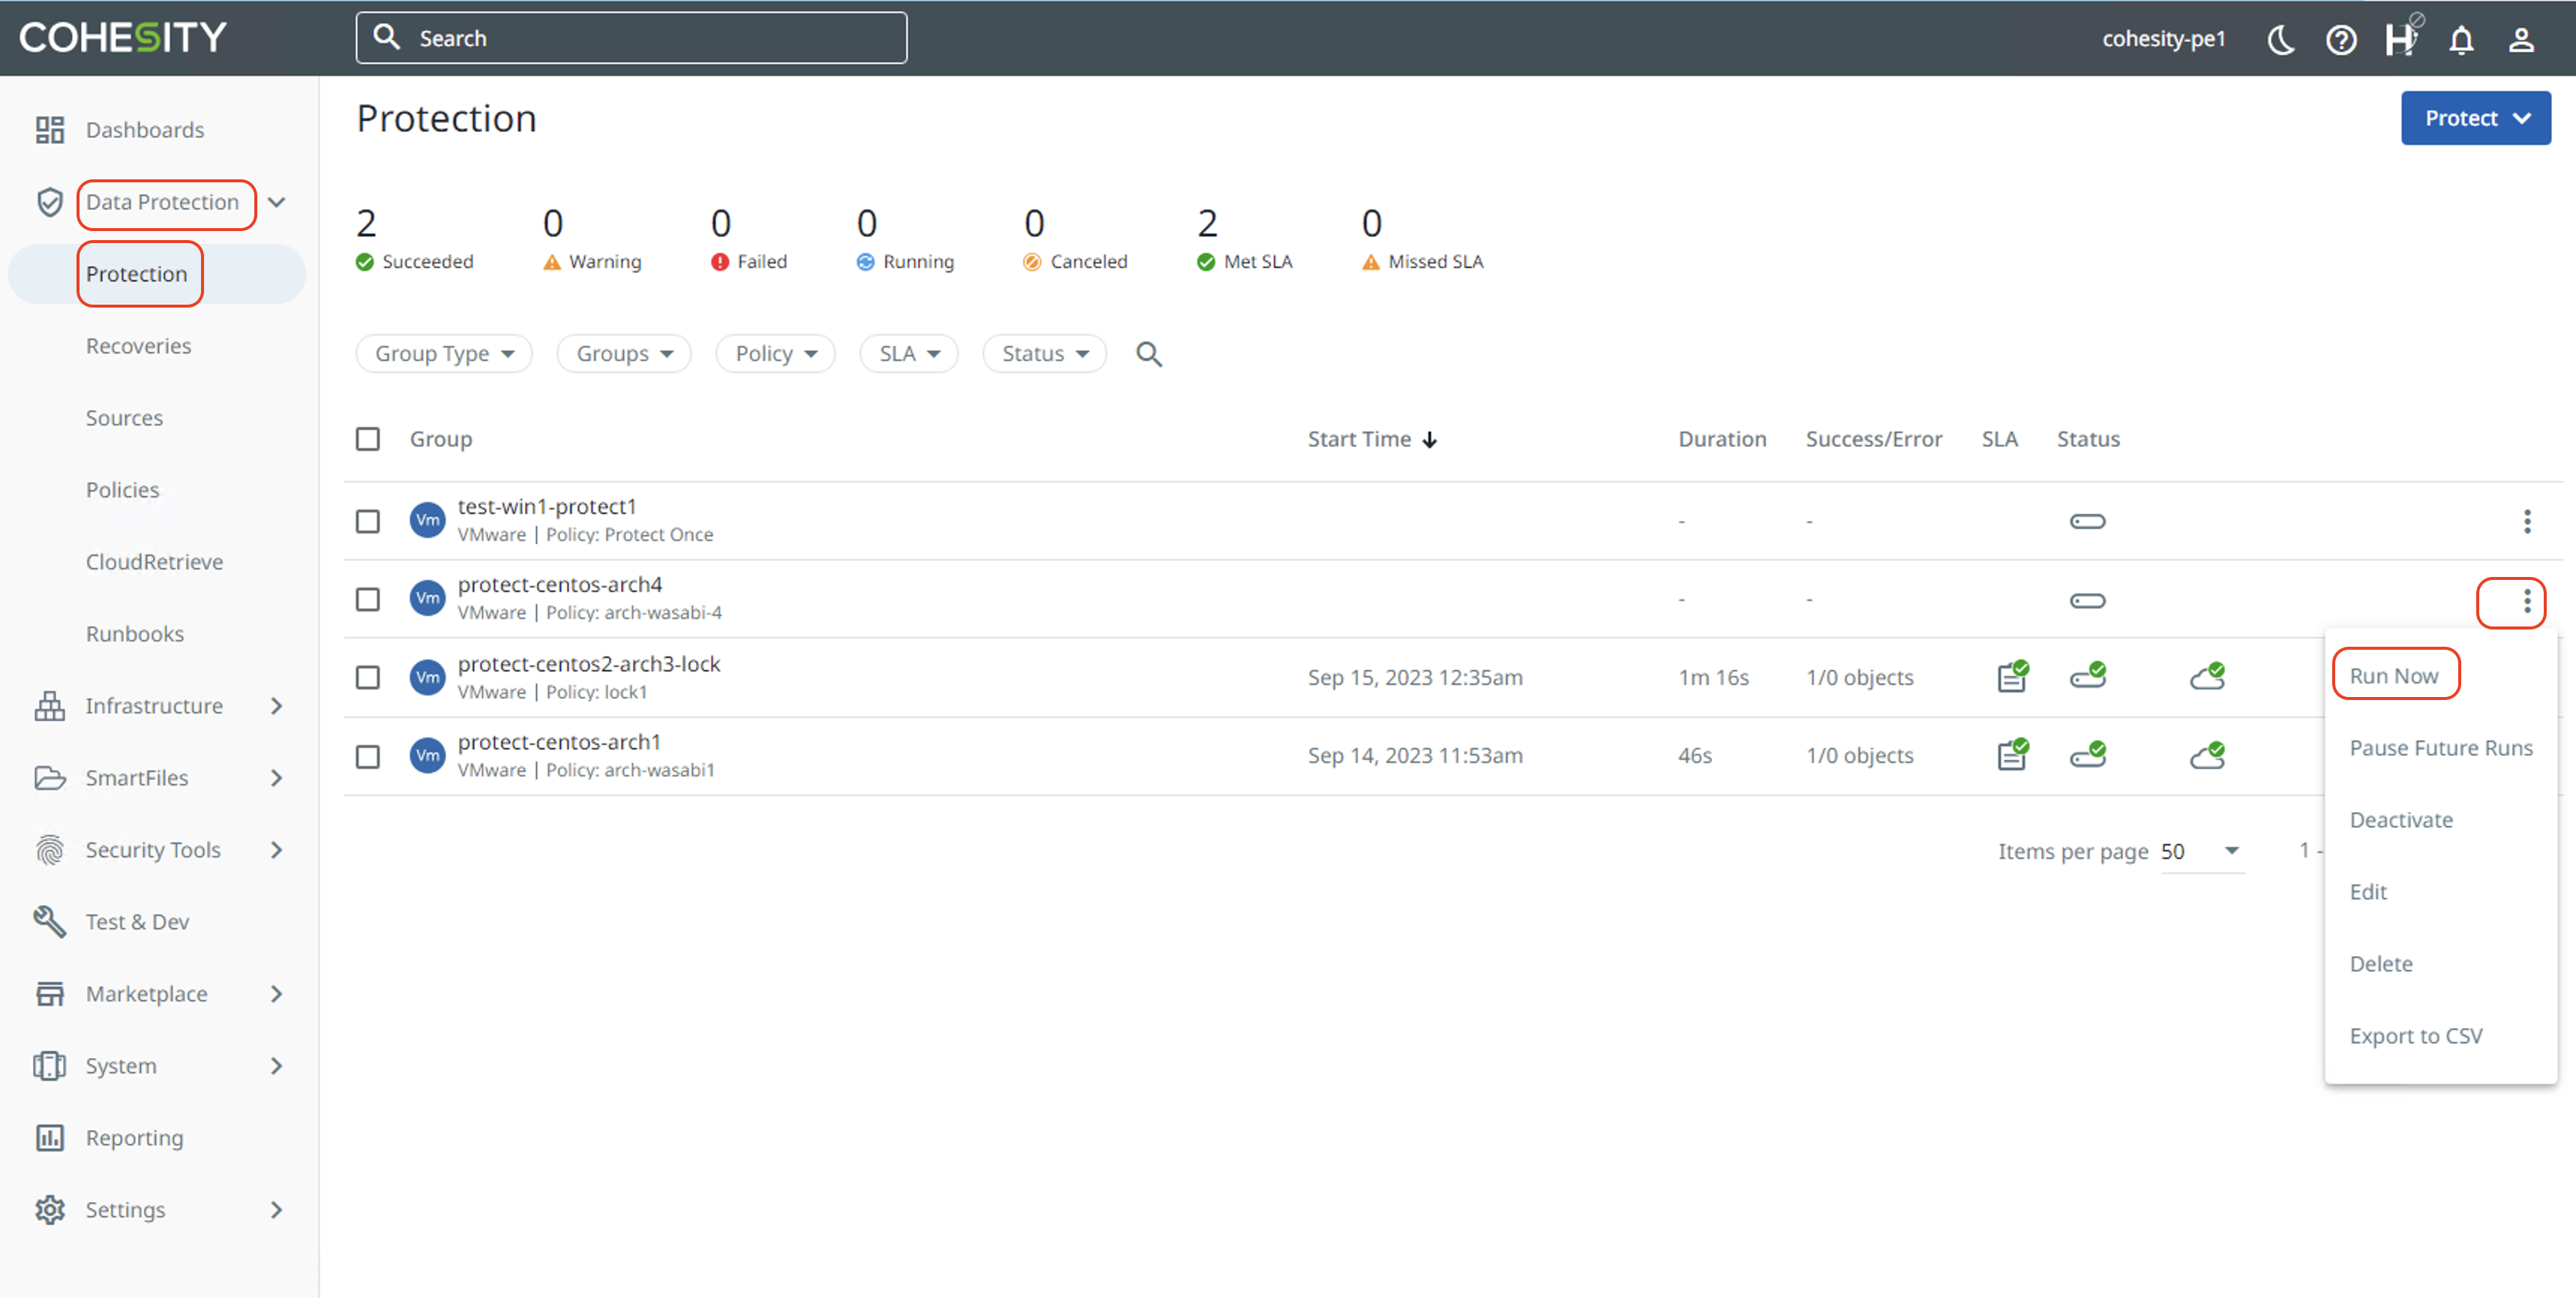
The Protection will now be added and can be viewed on the Protection page. You can run it manually by clicking the three dots next to the protection name, then selecting Run Now.
Recovering a VM From a Backup
This example details steps to recover a VM from a backup.
Click Data Protection and then Recoveries to open the Recoveries page. To start recovery of VMs, click Recover, then click Virtual Machines and VMs. To learn about other recovery types, refer to Cohesity documentation.

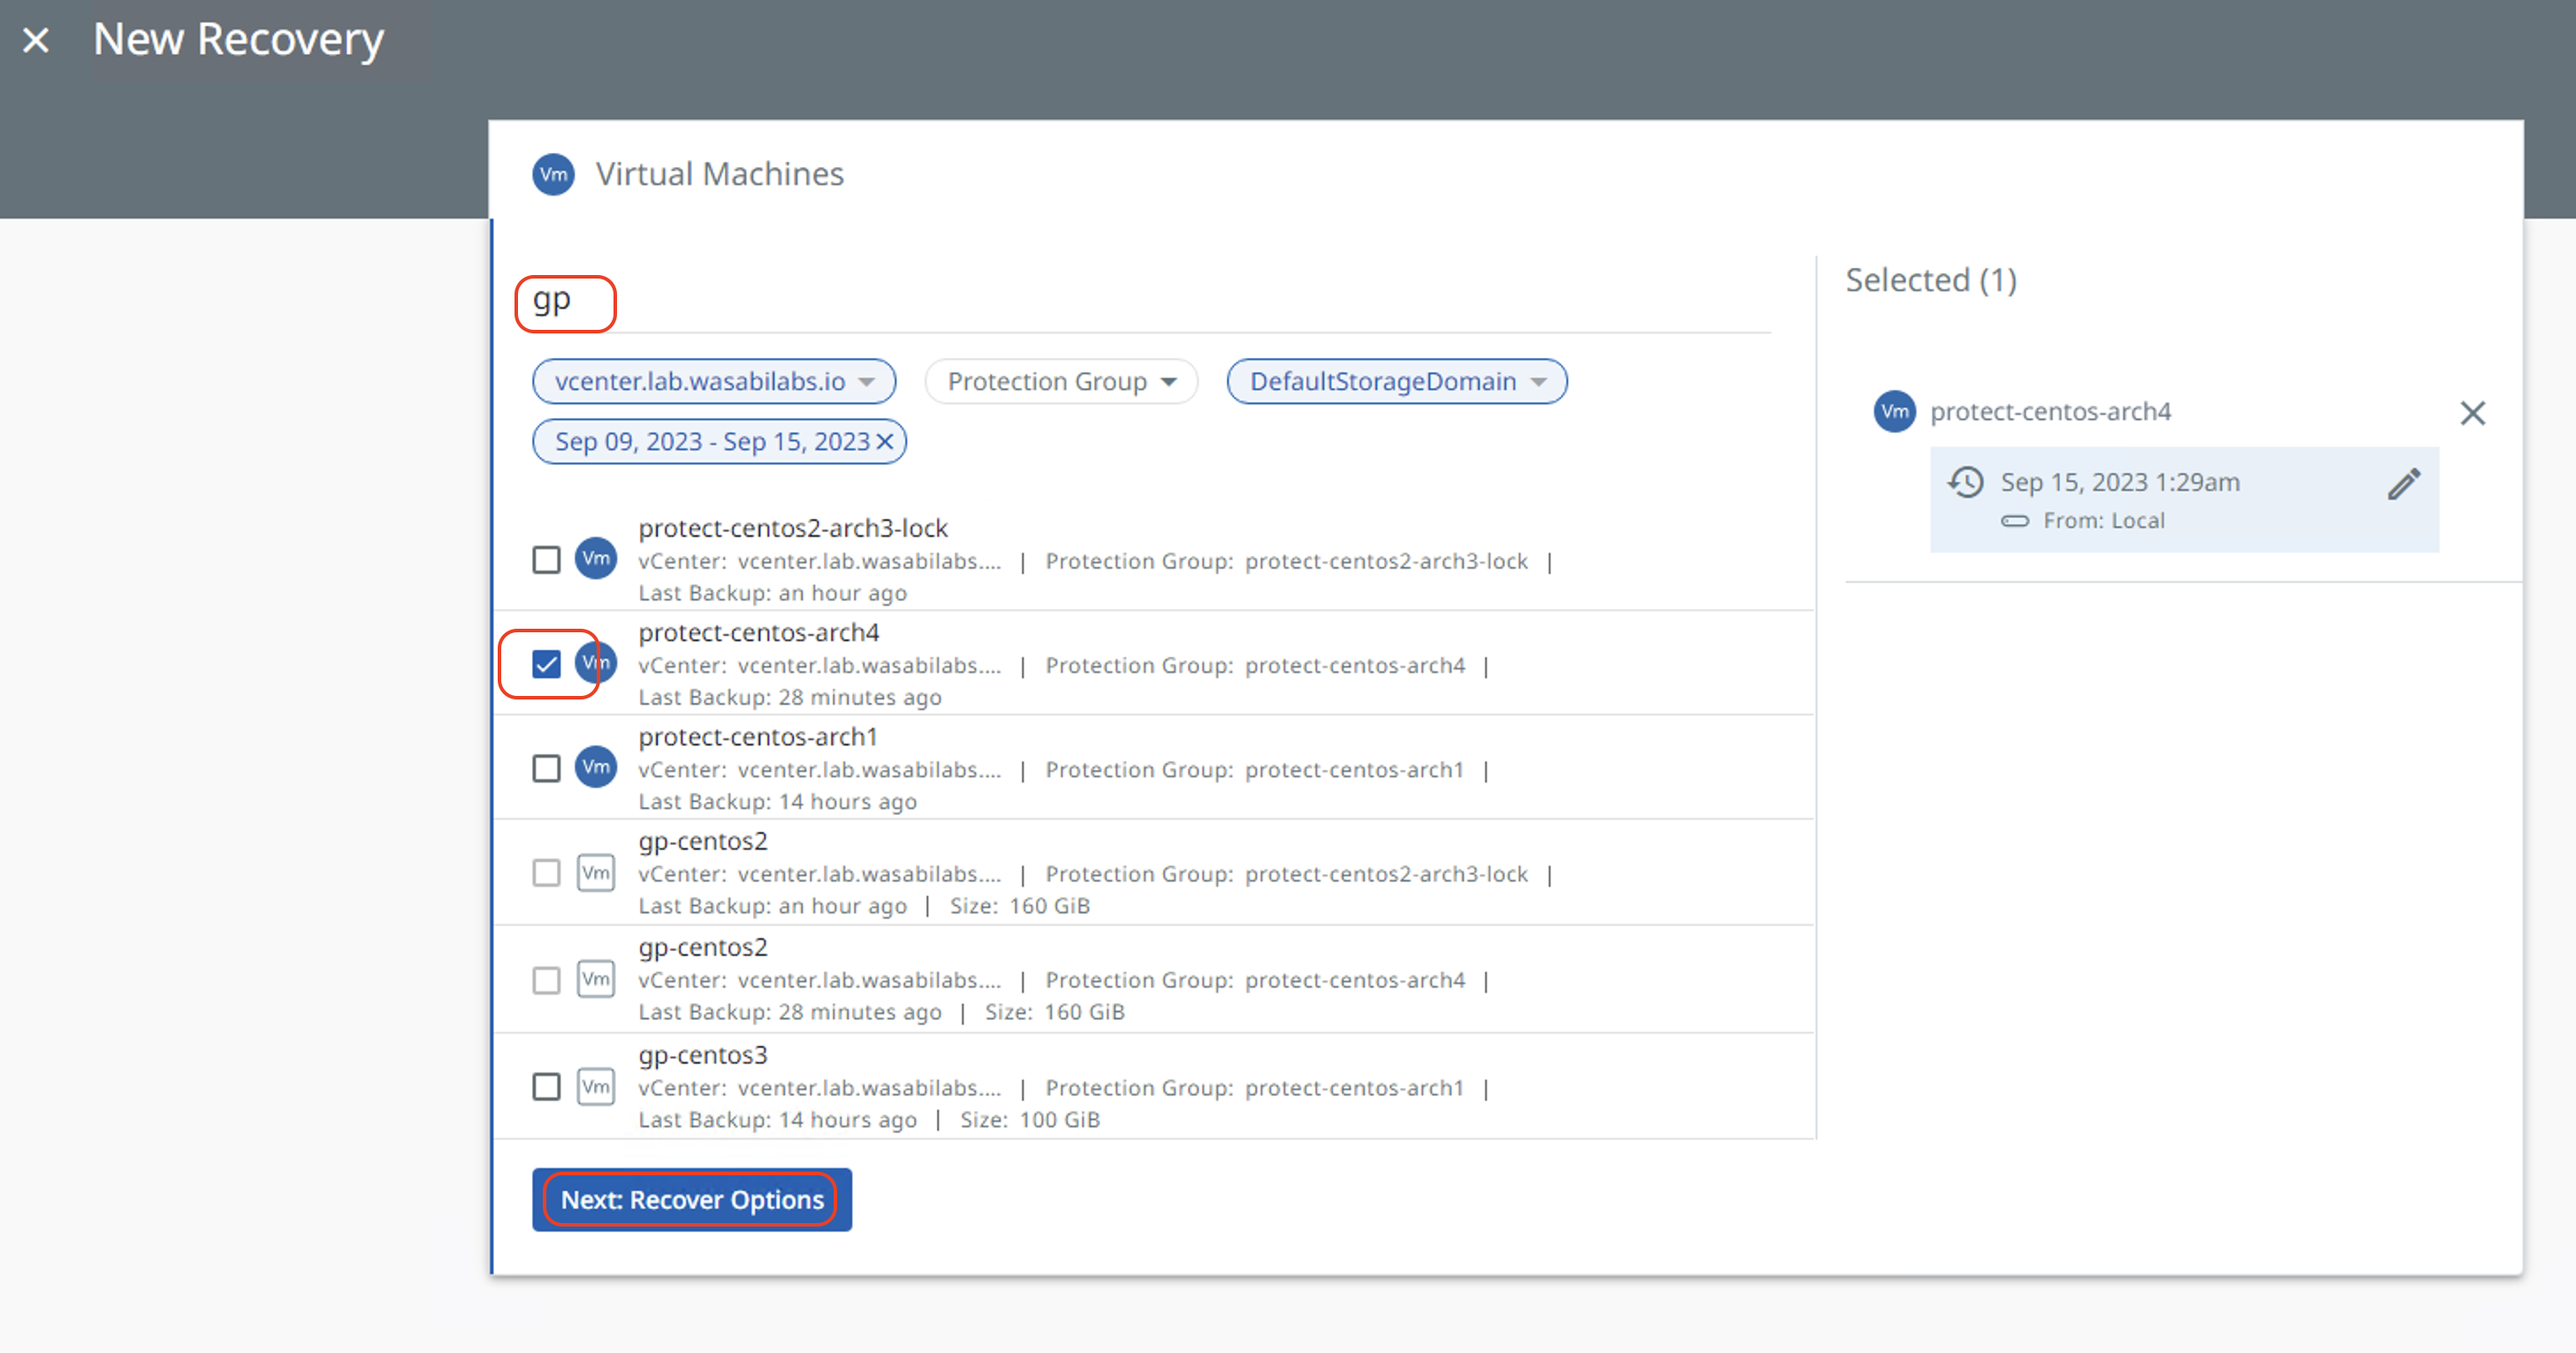
On the Virtual Machines window, search the virtual machine if you know the name or type "*" to list all VMs that are backed up. Then, select the VM you want to recover by checking the checkbox next to the VM.
Click Next: Recover Options to go to the next window.
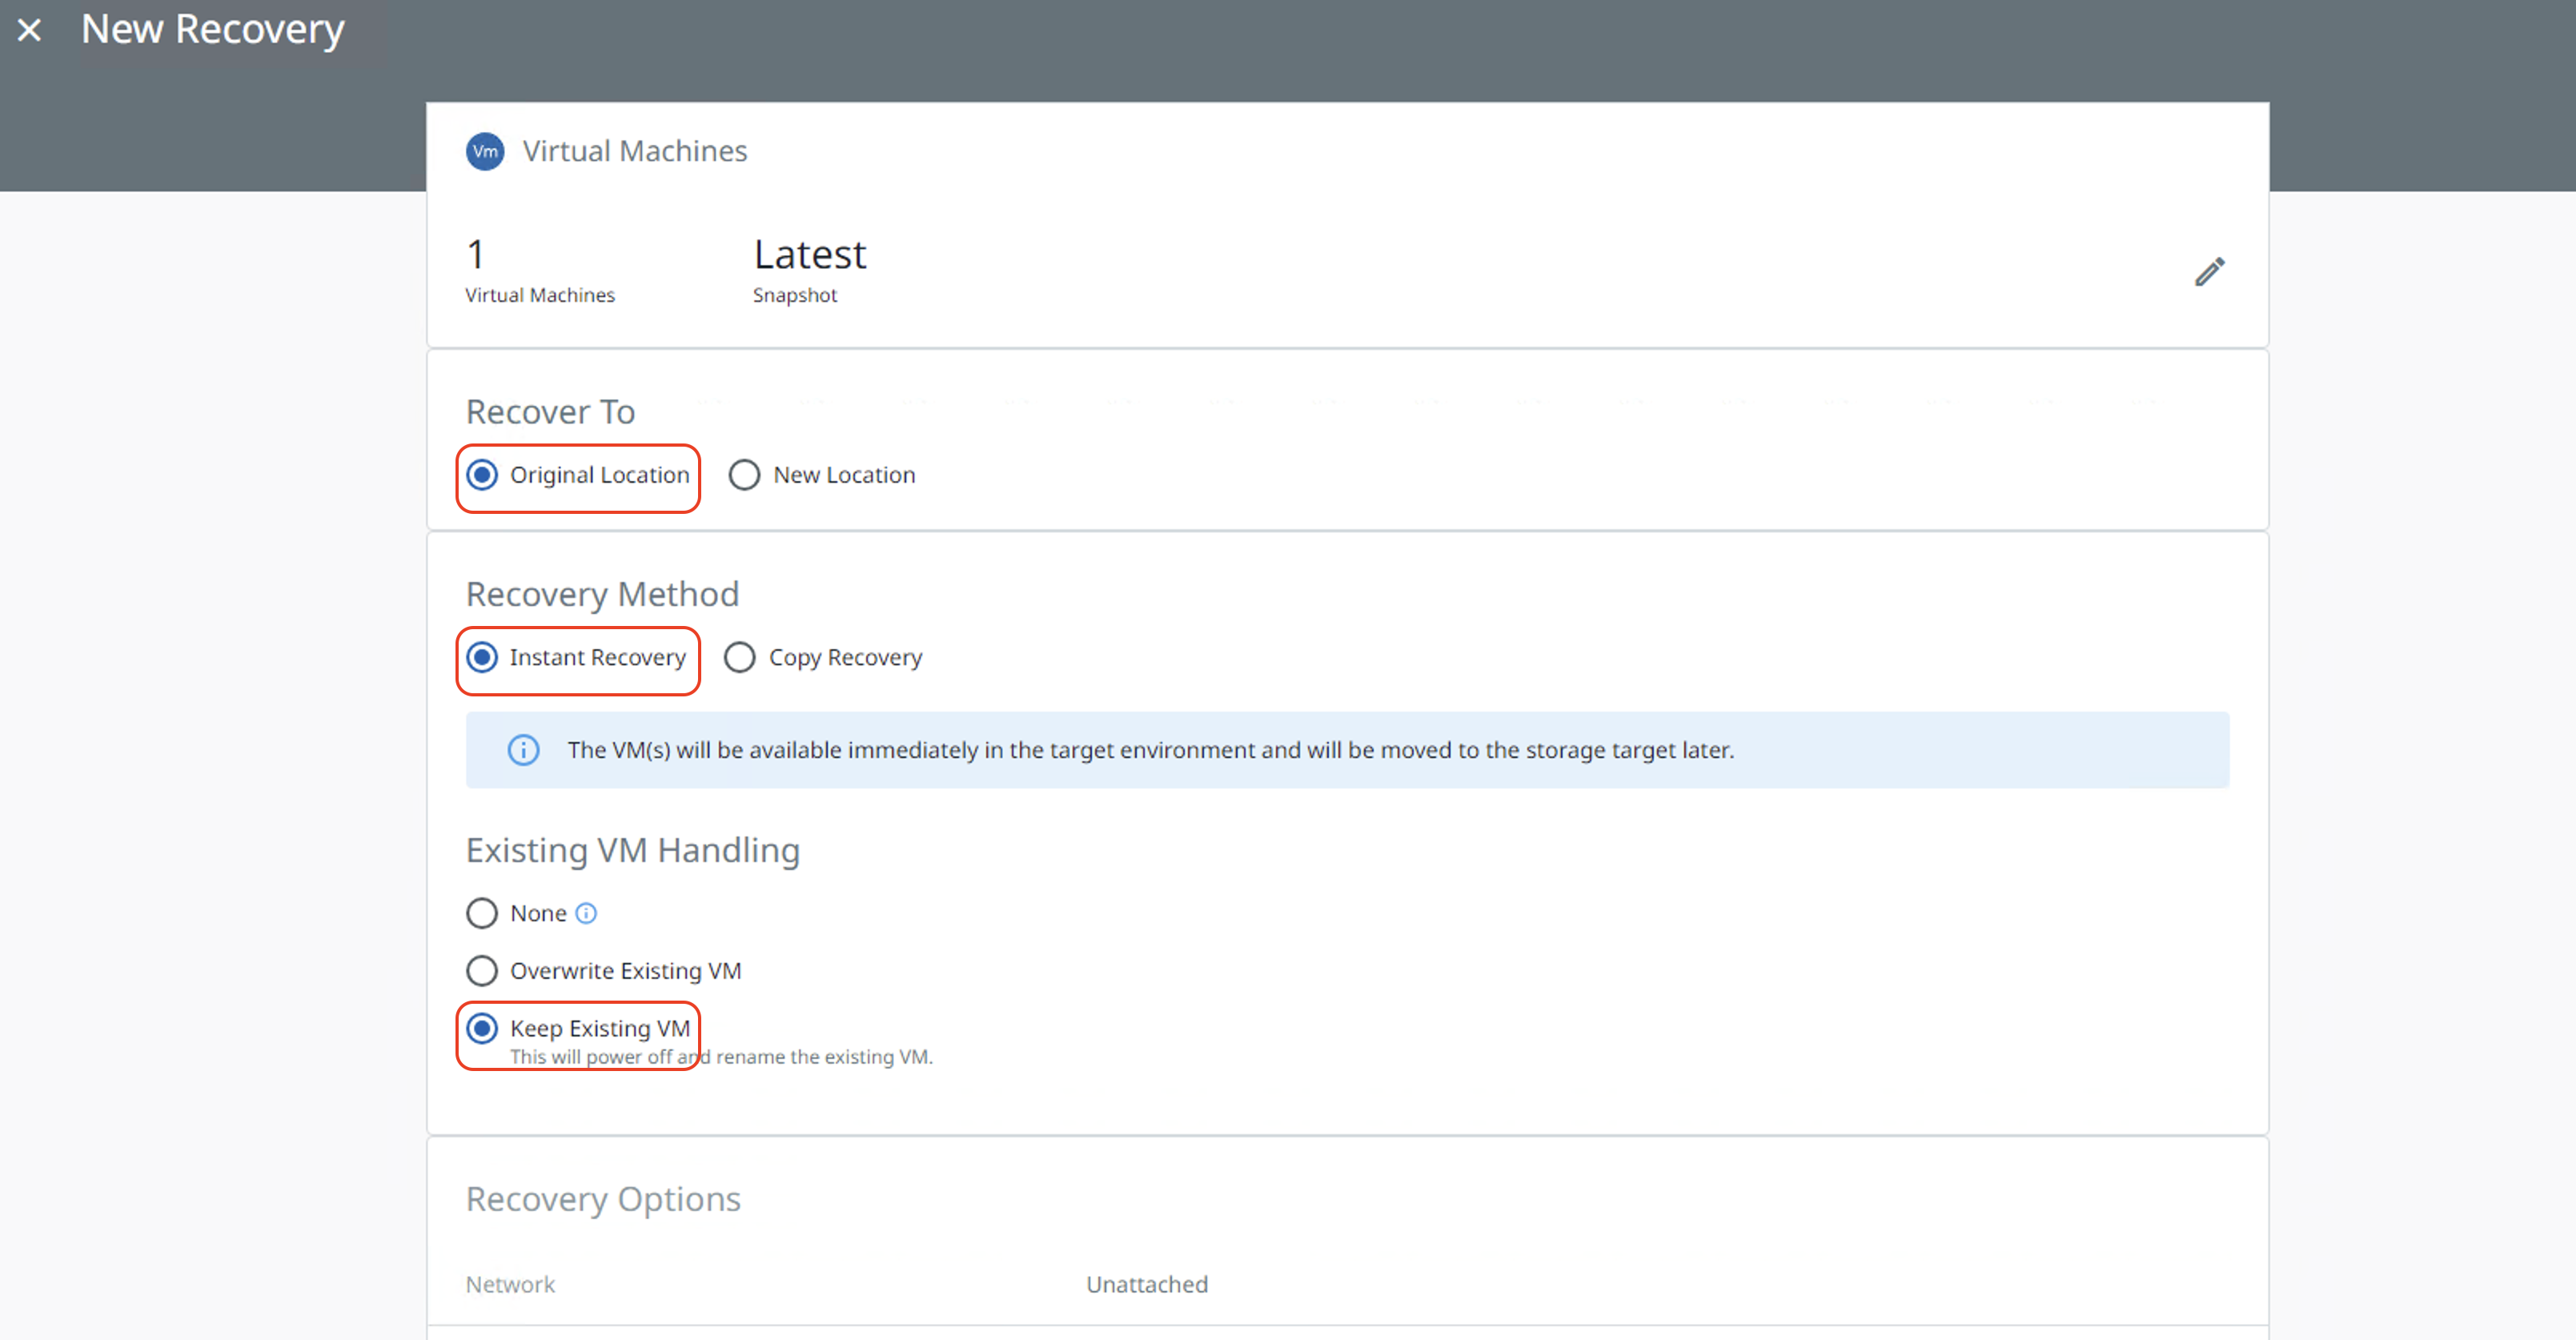
Select the Recover to location, recovery method, and Existing VM Handling option based on your requirement. Click Recover to start the recovery.
Recover to the Original Location—Recover the VM files (such as the VMDK files) to their original datastores and create new instances of the VMs in the original Resource Pool available in the original Source.
Recover to a New Location—Recover the VM files (such as the VMDK files) to an alternate datastore and create new instances of the VMs in an alternate Resource Pool of a registered Source.
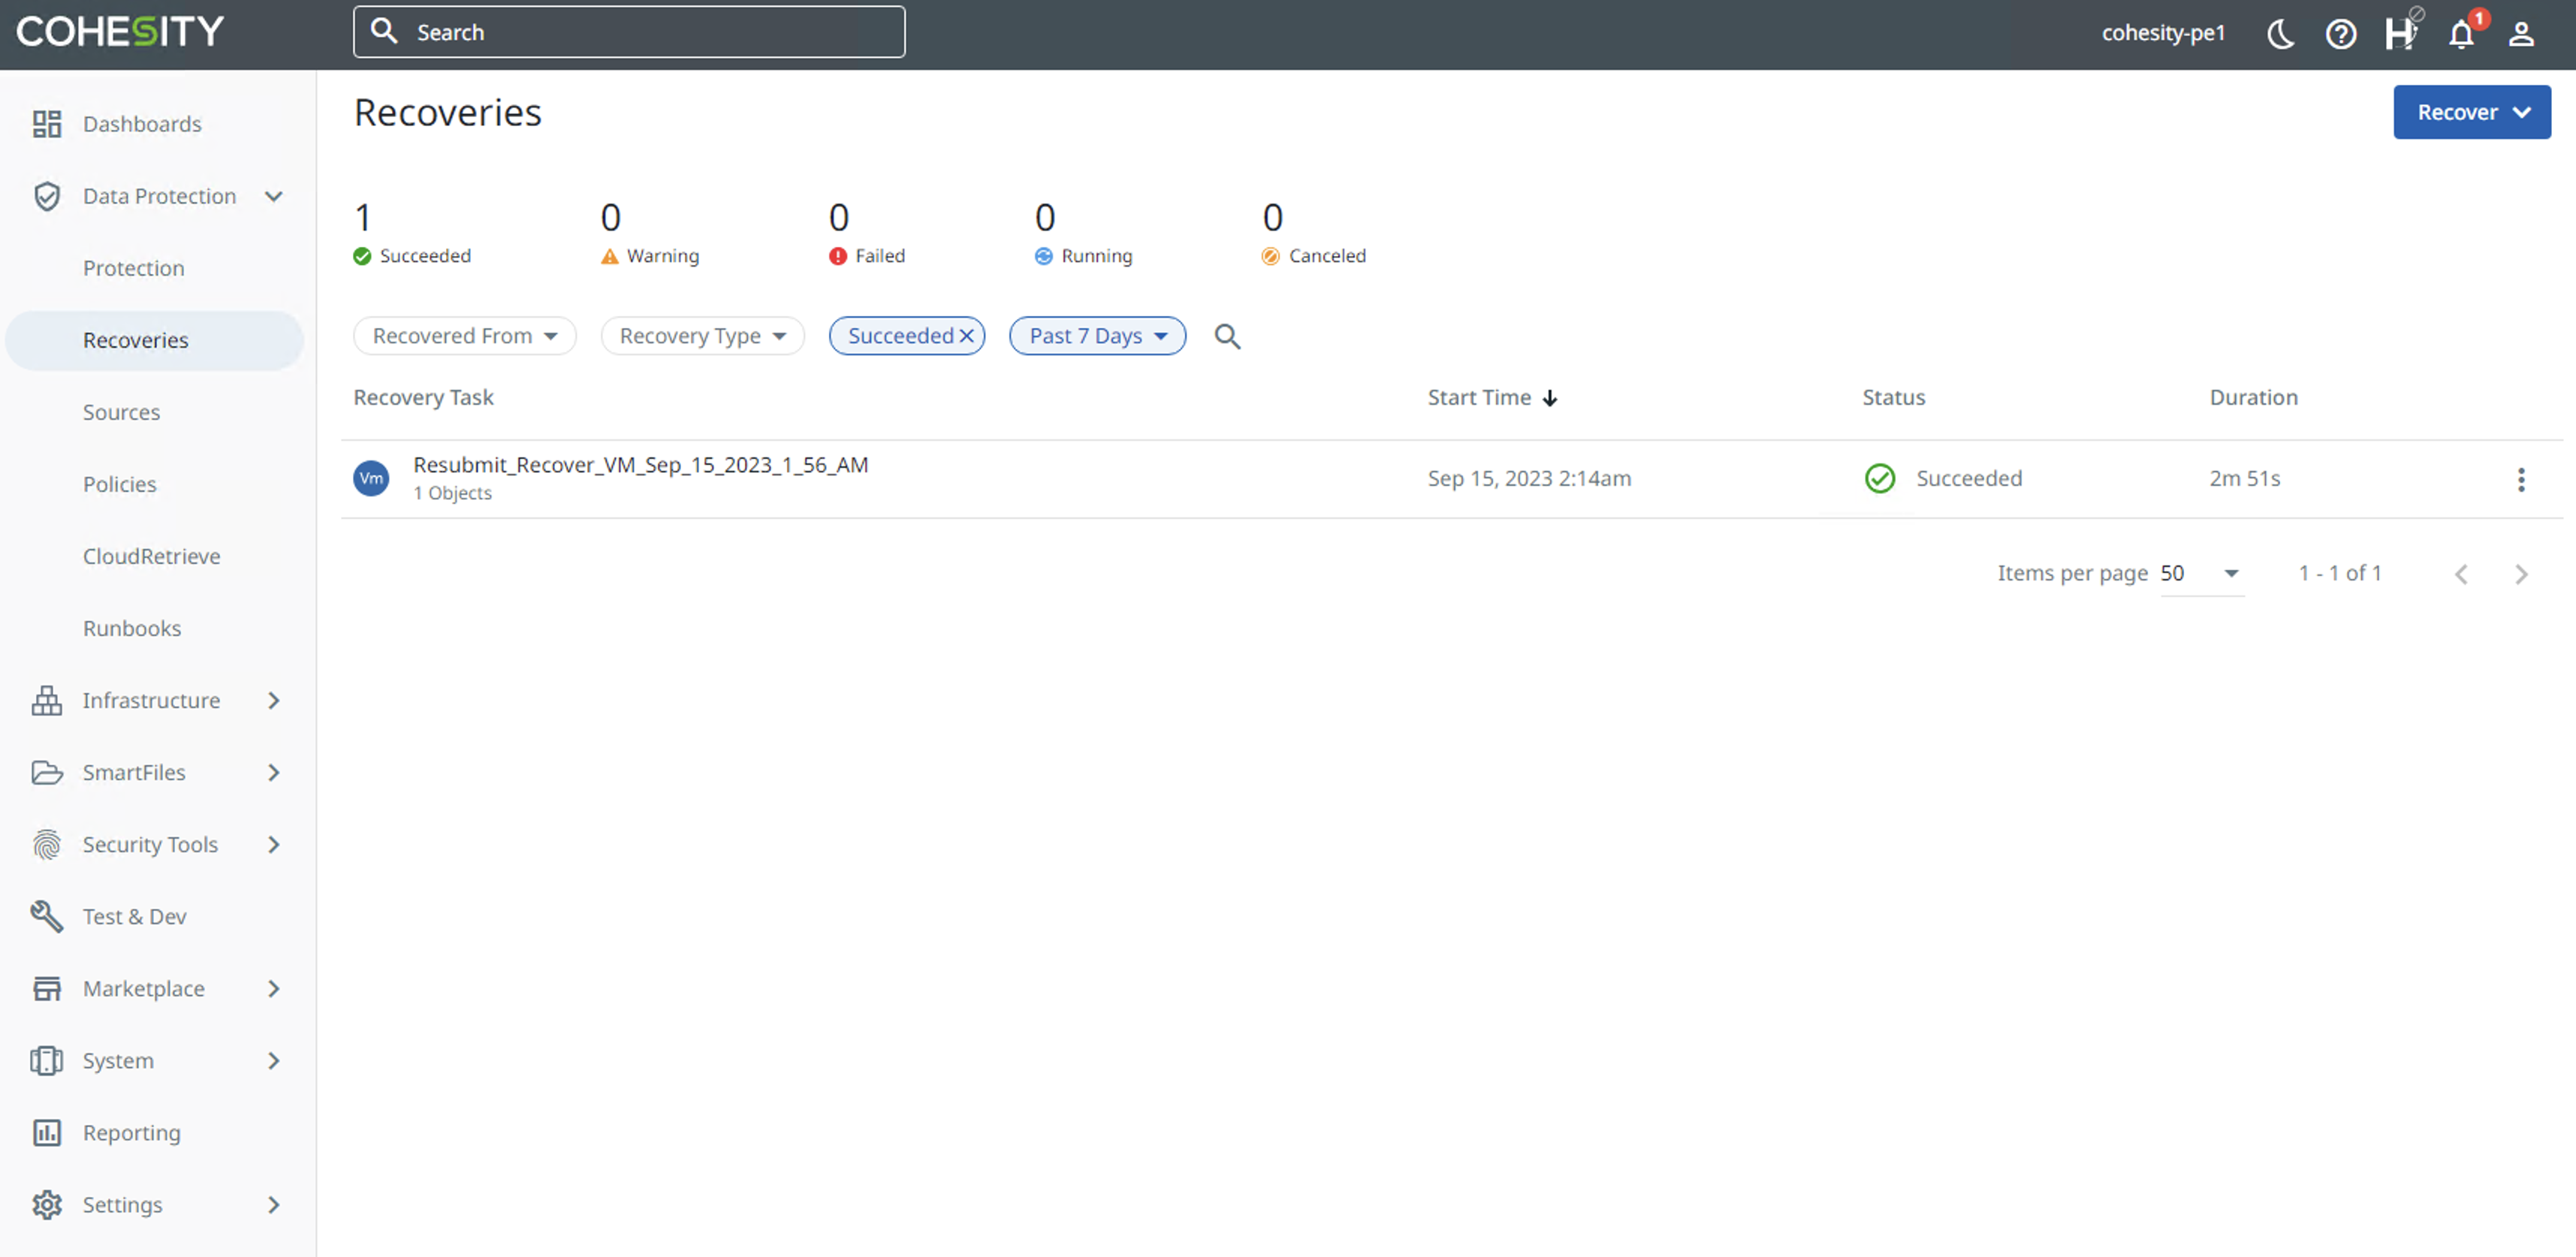
The progress of the recovery can be monitored from the Recoveries page.
Configuring Immutability (Object Lock)
You can now use Object Lock enabled buckets with Cohesity 7.2.1 and above.
By default when creating an Archive Object Lock enabled External Target the mode will be set to Governance that allows users with sufficient permissions to delete objects. If you want to use Compliance mode that does not allow object deletion, you will need to contact Cohesity Support and open a case. They will make Cluster Config modifications to enable Compliance mode on the External Target you create.
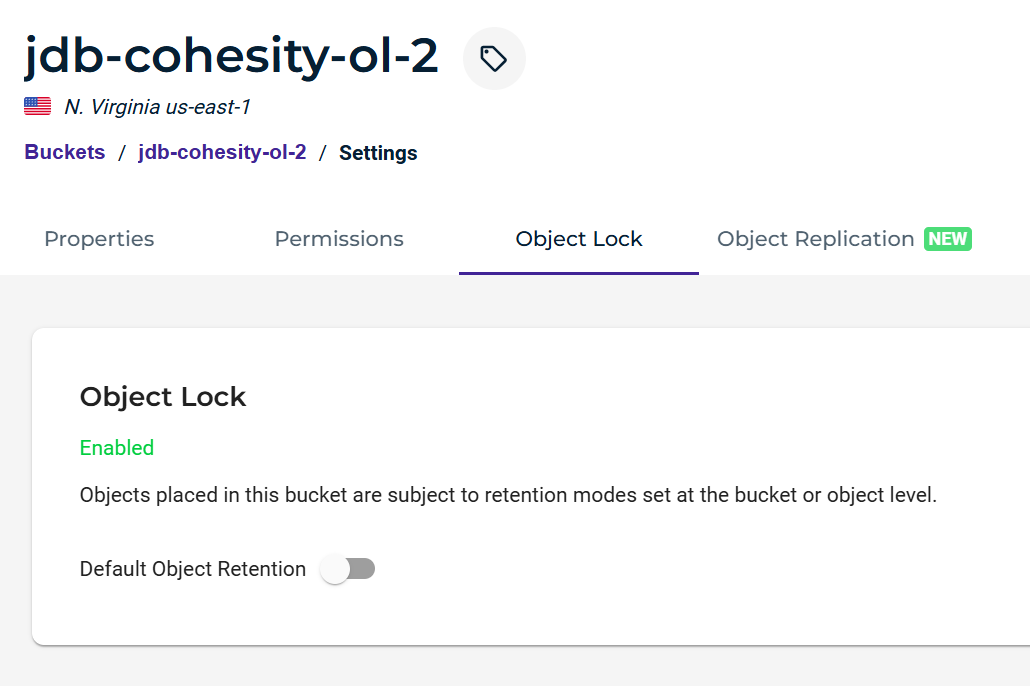
Log into your Wasabi Console and create an Object Lock enabled bucket as specified in Object Lock: Enabling.

In the bucket settings, be sure not to turn on Default Object Retention, as the Object Lock settings will be configured in Cohesity Protection Policy.
On the Cohesity web portal, click Infrastructure and then click External Targets.
Click Add External Target.

Select Archival, then from the Storage Type drop-down, select S3 Compatible.
Choose Regular from the Storage Class drop-down.

Enter the following information.
Bucket Name—Your Object-Lock-enabled Bucket
Access Key ID—Your Wasabi Access Key
Secret Key ID—Your Wasabi Secret Key
Endpoint—The Wasabi Service URL where you created your OL bucket
Port—(Optional) Port 443
Region—(Optional) The matching region with your endpoint
External Target Name—Unique name for the target
Archival Format—Incremental Forever

This configuration example discusses the use of Wasabi's us-east-2 storage region. To use other Wasabi storage regions, use the appropriate Wasabi service URL as described in Service URLs for Wasabi's Storage Regions.
Next you can now slide the selector on for Archive Object Lock.

Click Register.
Click Data Protection in the left-hand pane.
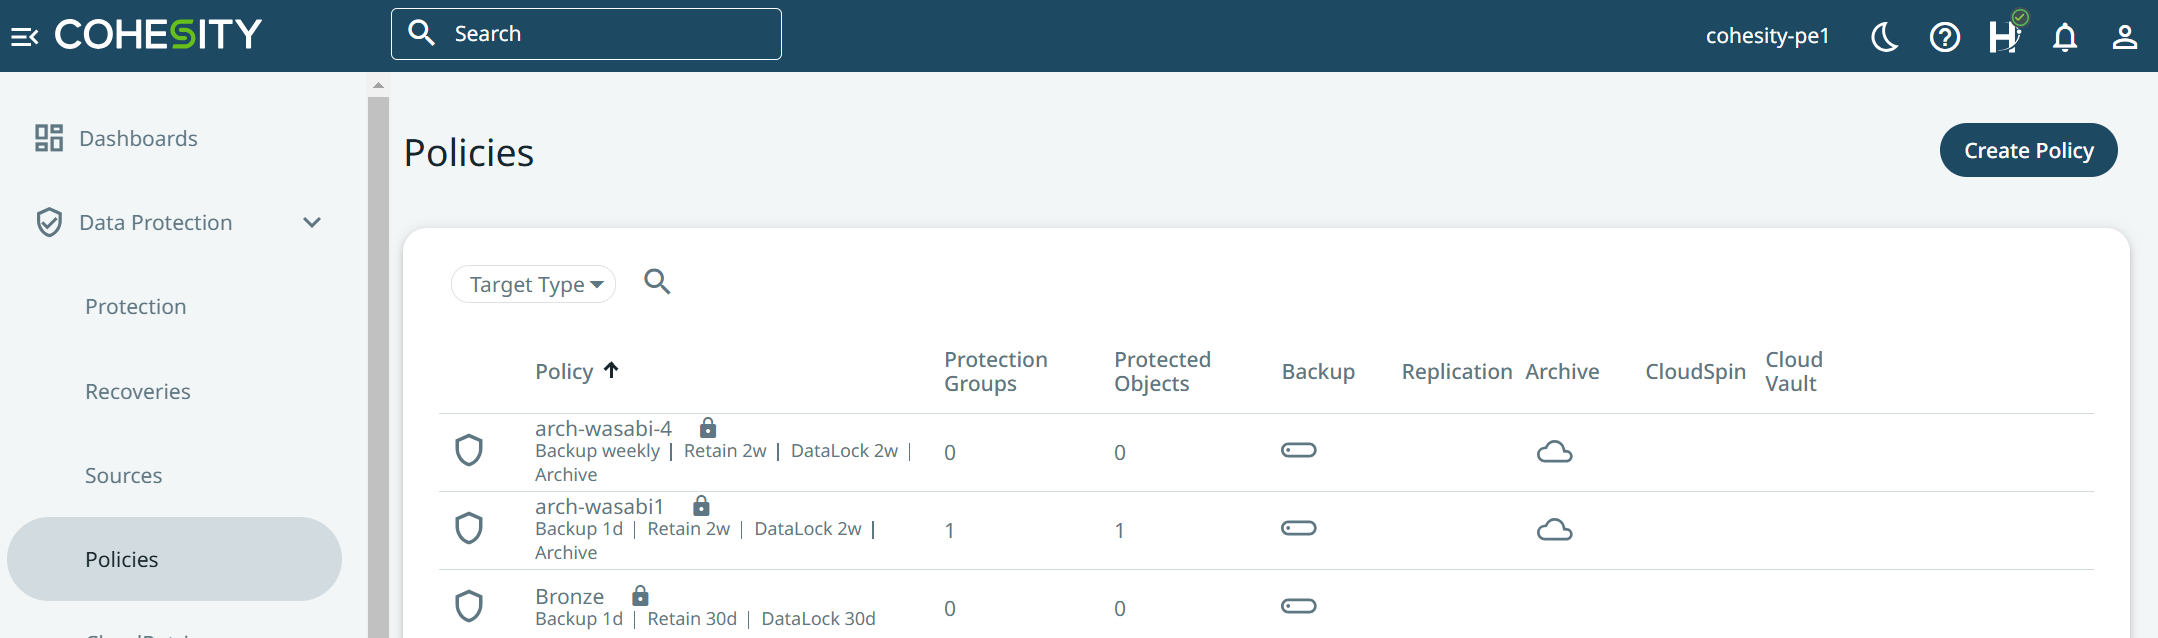
Click Policies. Click Create Policy.
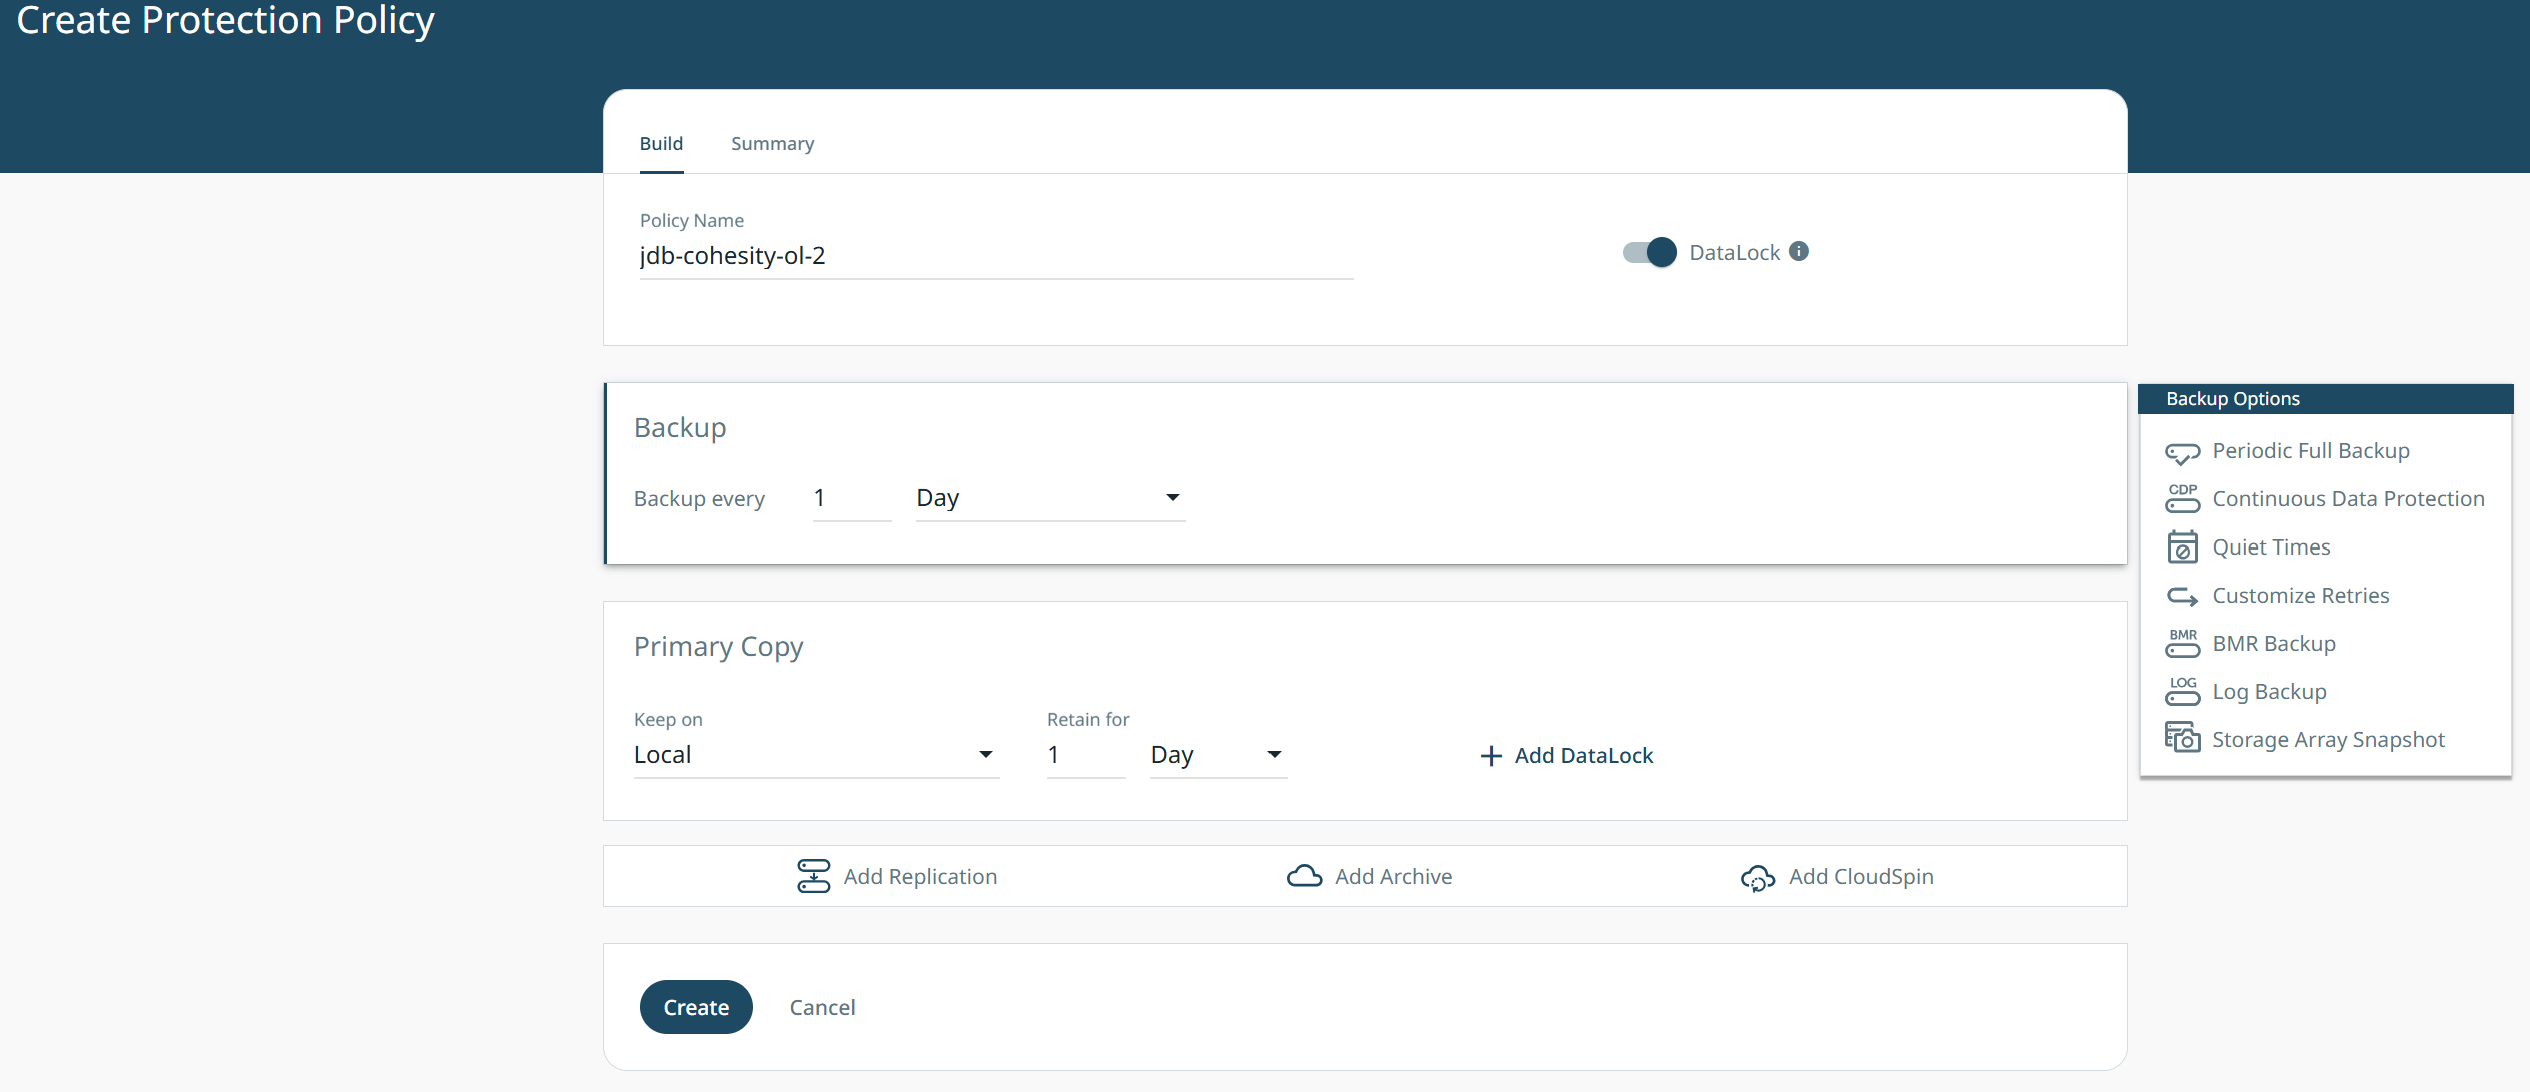
Give the Policy a unique name.
Turn off Data Lock as the Archive Target will automatically have OL settings applied.
Specify how often you want the backup to run.
Specify how long you want to keep the primary copy Locally.
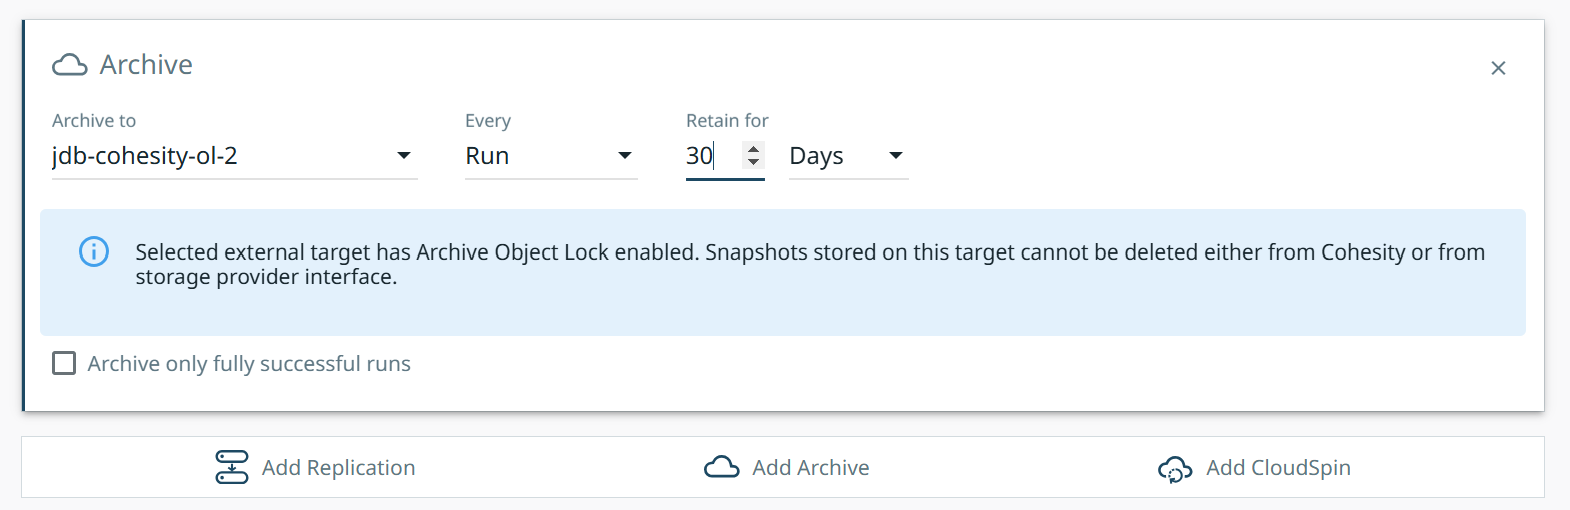
Click Add Archive.
Click the Archive To drop-down and select your Object-Lock-enabled Wasabi target.
You will now see the prompt about the External Target being Archive Object Lock enabled. The data will be locked for as long as you specify the retention period to be, and cannot be deleted until then.
You may now assign this policy to a Protection/Protection Group as shown in the Creating a Backup section. Once the backup job has run and protected the entity, you can go into the protection job and view those details. You can now see the Object Lock expiry details on when the backups will be deleted.

If you log into your Wasabi Console, go the data in the bucket, and enable Show Versions, you will see either Governance or Compliance mode now on the data versions.
