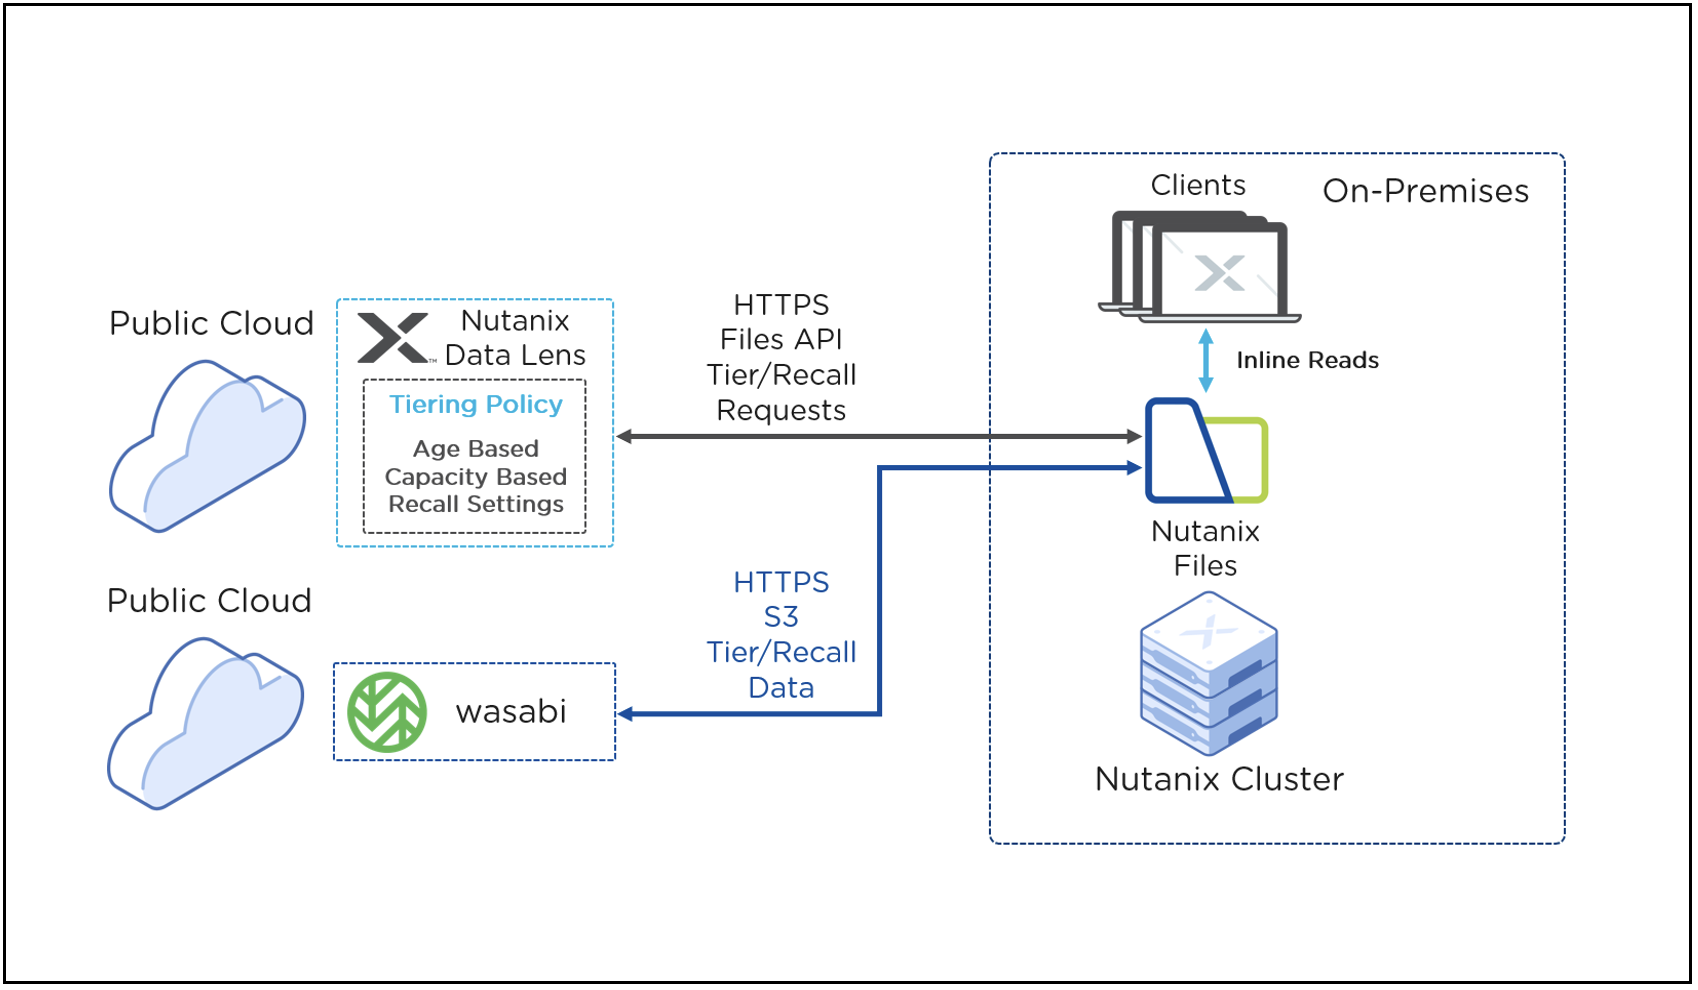
Nutanix Files is a software-defined, scale-out file storage solution that provides a repository for unstructured data, such as home directories, user profiles, departmental shares, application logs, backups, and archives. Wasabi has been validated for use with Nutanix Files. To use this product with Wasabi, please follow the instructions below.
Reference Architecture
Prerequisites
Nutanix Files v 4.0 and above
Nutanix Files and Nutanix Data Lens licenses
An active Wasabi account
Wasabi Configuration
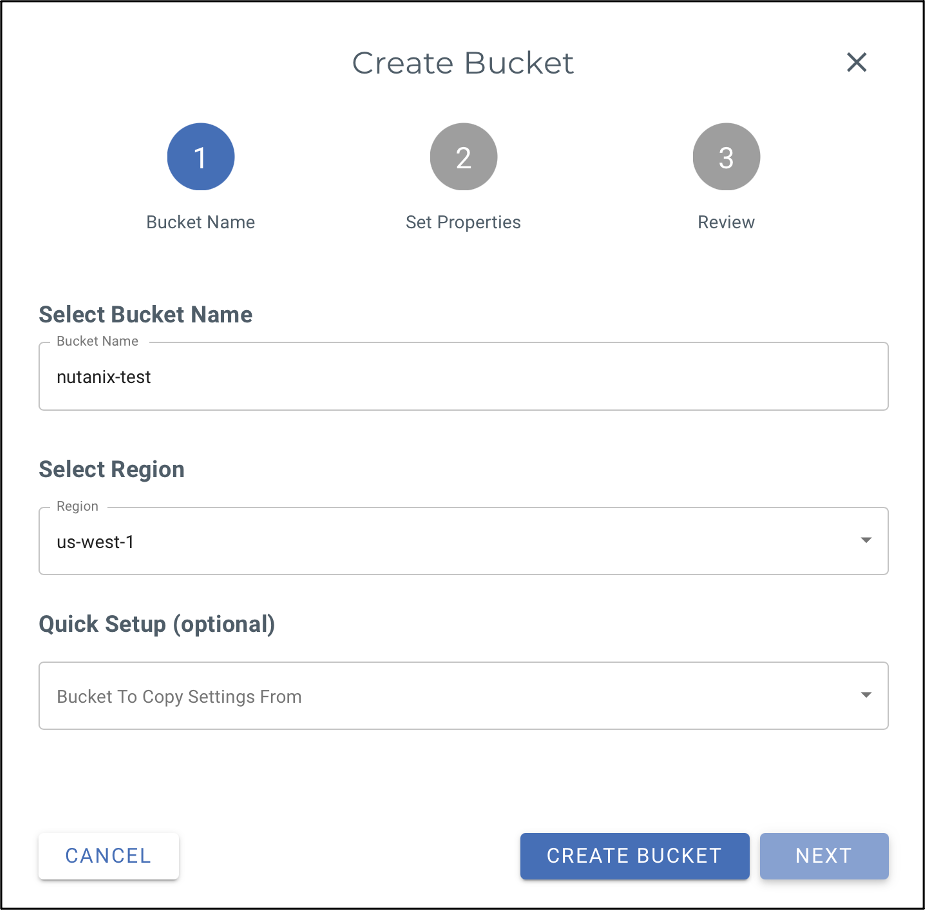
Login to your Wasabi account via Wasabi console (https://console.wasabisys.com) and click on Create Bucket option.
.png)
Enter a unique bucket name, select the appropriate region, and click "Next".
Note: Select the Wasabi region closest to the Nutanix Files deployment - recommended but not necessary.
In the Set Properties window, Enable Bucket Versioning and click Next, review the bucket setting and click Create Bucket.
.png)
Note: For more information on Bucket versioning, review Versioning: Enabling/Disabling and Showing.
Nutanix Configuration
Prerequisite
In Prism, enable Pulse Health Monitoring and onboard into Nutanix Data Lens
Refer Nutanix Document to enable Pulse Health Monitoring: https://portal.nutanix.com/page/documents/details?targetId=Web-Console-Guide-Prism-v6_0:wc-support-pulse-recommend-wc-c.html
.png)
Enable Tiering on Nutanix Files Server
Nutanix Data Lens on the Cloud provides a cloud-hosted analytics and monitoring service for all of your Nutanix Files file servers. Hosting File Analytics on premises limits the service to local file servers only.
Log on to https://my.nutanix.com by using your My Nutanix credentials.
On the My Nutanix dashboard, scroll down to Cloud Services, and search for Nutanix Data Lens, click Launch. The Global Dashboard appears, displaying the file servers associated with your account.
.png)
Select the File Server from the list of Files Servers owned by your account and enable it as shown above.
Manage hot and cold file server data
Use tiering to maximize the available file server space by moving cold data from the file server to an object store. Nutanix supports using Wasabi as the object storage with Nutanix Files and Nutanix Data Lens.
Tiered storage does not contain the full data set. The full metadata and pointers to tiered data remain on the primary storage. However, tiering cold data to Wasabi Object Storage does provide storage cost benefits, which you can calculate using the cost savings widget. You can recall tiered data from the object store by configuring an auto-recall policy during tiering policy creation, or by recalling data manually. You can also specify retention policies that indicate how long deleted data remains in Wasabi prior to permanent deletion.
Configuring a Tiering Profile
To tier data, configure a secondary storage object store. A tiering profile defines the secondary storage target, which is the object store.
In the Dashboard for the file server, click Tiering Dashboard in the Data Summary by Age and Storage Tier pane
.png)
In the Tiering Configuration pane, under Tiering Location, click Add/Update Tiering Location.
Name: Enter a name of the tiering profile.
Store type: Select a store type.
Service host: Enter a URL of the tiering service host.
Access key: Enter the access key ID for the object store.
Secret key: Enter the secret access key for accessing the object store.
Bucket configuration:
Bucket name: Enter the name of the bucket in the object store (you cannot change the name).
Retention period: Enter a period for data retention after deletion from the file server. (The default retention period is 5 years and the minimum is 6 months).
Certificate:
Certificate: Upload a secure sockets layer (SSL) certificate file.
Validate certificate: Check this box to enforce SSL certificate verification during tiering operations after profile creation.
.png)
Note: This config example discusses the use of Wasabi's us-west-1 storage region. To use other Wasabi storage regions, please use the appropriate Wasabi service URL as described in this article.
Set a Capacity Threshold - Specify when to tier data.
Configure % of Primary Storage to trigger tiering to Wasabi and tier schedule
In the Dashboard for the file server, click Tiering Dashboard in the Data Summary by Age and Storage Tier pane.
In the Tiering Configuration pane, click Set a Capacity Threshold.
To tier data based on a threshold of occupied capacity, check the Set a Capacity Threshold box. In the % of Primary Storage field, enter an integer that indicates the capacity percentage to trigger tiering.
Under When to tier, choose an option. » To trigger tiering manually after crossing the capacity threshold, select the Manual option. » To configure a schedule for tiering data, choose On a Schedule option
If you chose the On a Schedule option, do the following in the indicated fields.
Note: File Analytics sends tier requests to the file server until the scheduled time. However, due to bandwidth, the actual tiering operation on the file server can begin and end shortly after the scheduled time.
Frequency: Use the everyday option and do the following (or click set a custom window for each day).
Start time: Specify when to start tiering operations.
End time: Specify when to end tiering operations.
(Optional) to customize the tiering schedule, click set a custom window for each day, and do the following:
Select the desired tiering days.
For each day, specify the schedule for tiering operations in the start time and end time fields.
Click Save.
.png)
10. Creating a Tiering Policy - Configure & define what data is to be tiered to Wasabi and configure recalling tiered data from Wasabi
In the Dashboard for the file server, click Tiering Dashboard in the Data Summary by Age and Storage Tier pane.
In the Tiering Configuration pane, under Tiering Policy, click Edit.
Under Filters for Data to be tiered, do the following:
Data Access Age (older than)
Enter an integer to specify the data age.
In the dropdown, select the unit of measurement (days, weeks, months, years).
File Size (greater than):
Enter an integer for the minimum tiering file size (minimum 64 KB).
In the dropdown, select the unit of measurement (KB, MB, GB).
(Optional) under Shares, do the following:
To specify shares excluded from tiering, check the Exclude Shares box. Check the box next to shares to exclude.
Check the Enable auto-recall box to specify an auto recall policy, and do the following in the indicated fields.
In the Times field, to specify the recall trigger, enter the number of times Files can retrieve an object from the object store.
In the period field, specify an integer and unit of measurement (days, weeks, months, years).
Click Save.
.png)
Limitations
You can only have one tiering profile and tiering location per file server.
You can initiate only one manual tier job at a time.
You cannot evict tiered file data from the primary storage until all snapshots containing the file expire.
You cannot tier files that are smaller than 64 KB or larger than 5 TB.
You cannot write to tiered (offline) files.
Files cannot compress data while tiering data to the object store.
Files does not tier sparse files.
Security Recommendations
Do not use the same bucket for storing non-Nutanix Files data.
Do not manually delete or overwrite any object in the bucket, as this results in data loss.