Wasabi has been validated for use with OpenDrives Atlas. The OpenDrives Atlas platform drives ultra-high performance NAS storage. To use this platform with Wasabi, please follow the instructions below.
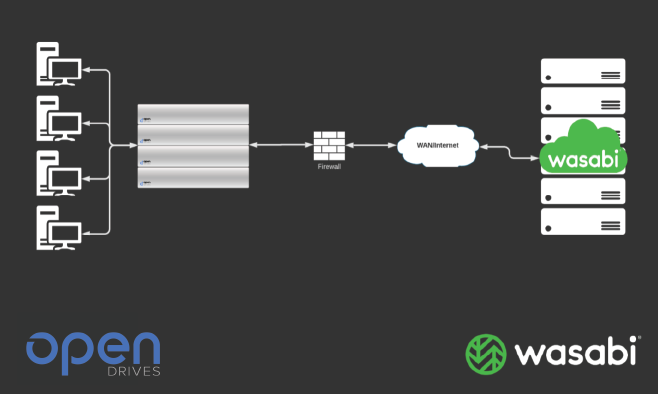
Reference Architecture
Prerequisites
Atlas v2.3 or above running on OpenDrives hardware platform
Standard Atlas license (no additional license required)
Active Wasabi account
Create S3 mount
Follow the steps outlined below to connect your OpenDrives system to your Wasabi S3 bucket.
Login to the OpenDrives system. In the left hand menu, navigate to Storage, then Mount Management. In the main pane, click the New Mount button.
.png)
From the FileSystem Type dropdown menu, select S3 as the type and provide the following information.
Enter your Wasabi bucket name in the Bucket field below.
Enter the Endpoint where the bucket can be reached.
For Example: https://s3.us-west-1.wasabisys.com.
Enter the local Mountpoint on the OpenDrives system where you want the bucket mounted.
.png)
Note: In addition to filling in the text fields for a simple mount, if you scroll down to the bottom of the page you will see a section for advanced parameters. These settings are an alternative to and in addition to the text fields.Note: This config example discusses the use of Wasabi's us-west-1 storage region. To use other Wasabi storage regions, please use the appropriate Wasabi service URL as described in this article.
Select your Mount Profile which you want to use for that connection. Select an existing profile from the dropdown menu or create a new profile per the instructions.
.png)
Profile Management
As required for security by every S3 instance, you need to add your key and the secret key. OpenDrives provides you with profile management which allows you to maintain multiple keys in your system.
Click Available Profiles under the Mount Profile option. Select Add Profile. Enter a profile name and your keys for your bucket.
.png)
If the mount should be persistent (will be available after a reboot of the OpenDrives system), leave the Persistent option active.
.png)
A successful mount will look like this.
.png)
As a verification procedure, you can Explore the bucket.
.png)
Create Samba/NFS share
Now that you have mounted your S3 bucket to the OpenDrives system, you can take further advantage by resharing the bucket and providing read/write access to your LAN clients via SMB and NFS.
In this example, we will be creating an SMB share for the S3 Mount.
Navigate to Network, then SMB on the left-hand menu. Click your system name to expand the panel.
.png)
This will reveal the Create Share button at the top right.
.png)
Enter your desired share name in the designed field. Click on Select A File Path to expand the dropdown.
If you don’t see your S3 mount point, enter the correct path into the field.
In our example, it is /mnt/mywasabi.
Press the enter key, and a Verify button will appear. Click the Verify button to validate the existence of the given path.
.png)
Select BASIC from the Recommended Settings dropdown. Select Save as a final step.
.png)
The final result will be displayed after the settings have been saved and resemble the image below.
.png)
You can now connect your clients to the Wasabi S3 bucket as if it was a NAS share