Wasabi has been certified for use with Cohesity NetBackup (previously Veritas NetBackup). Cohesity NetBackup is a backup and recovery solution for cloud-ready enterprises. Follow the steps outlined below to integrate NetBackup with Wasabi
Please Note: The data restoration process is handled by your specific backup software application. As there are many potential variables that will affect your unique environment, it is strongly recommended that you seek the guidance of your backup software's technical support team in the event that you encounter difficulty, or have application-specific inquiries.
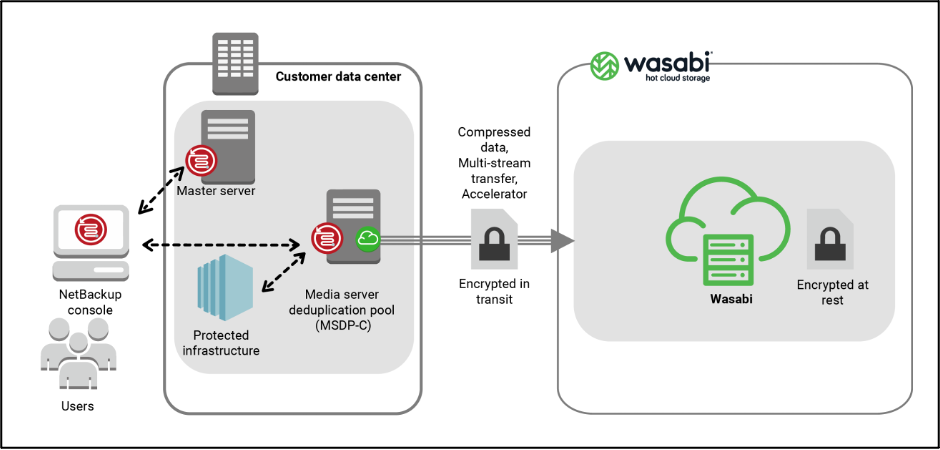
1. Reference Architecture
2. Prerequisites
Cohesity NetBackup v 8.3 and later
An active Wasabi account
A bucket created in the Wasabi account
3. Adding support for Wasabi
In order to use Wasabi with NetBackup v8.0 and above, two configuration packages need to be downloaded and installed on the NetBackup Server. This will display Wasabi as a dropdown option.
- A device mappings package file v1.168
For Linux/UNIX version of NetBackup, the file and instructions can be found here.
For Windows version of NetBackup, the file and instructions can be found here.
- Cloud configuration package v 2.8.6, the file and instructions can be found here.
For more information, please refer to the NetBackup HCL document.
4. Configuring MSDP Cloud with Wasabi
With NetBackup’s built-in MSDP Cloud (MSDP-C) feature, certified for use with Wasabi, you can deduplicate data to Wasabi for backup service optimization.
To configure MSDP-C with Wasabi, you will need to configure a Media Server Deduplication Pool (MSDP) storage server, a Disk pool and a Storage unit. This section walks through the configuration of each element.
Note: MSDP-C feature can only be configured on the NetBackup servers running on Red Hat Linux Enterprise or CentOS platforms
Configuring Media Server Deduplication Pool (MSDP) storage server
4.1. Log in to the NetBackup Web UI.
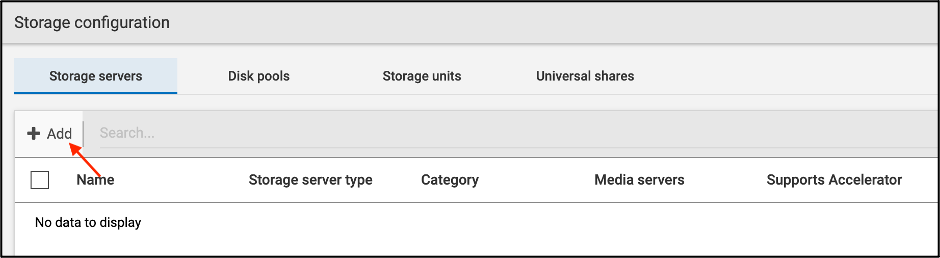
4.2. On the left, navigate to "Storage" --> "Storage Configuration".

4.3. In the Storage Servers tab, click "+ Add" to create a Media Server Deduplication Pool storage server.
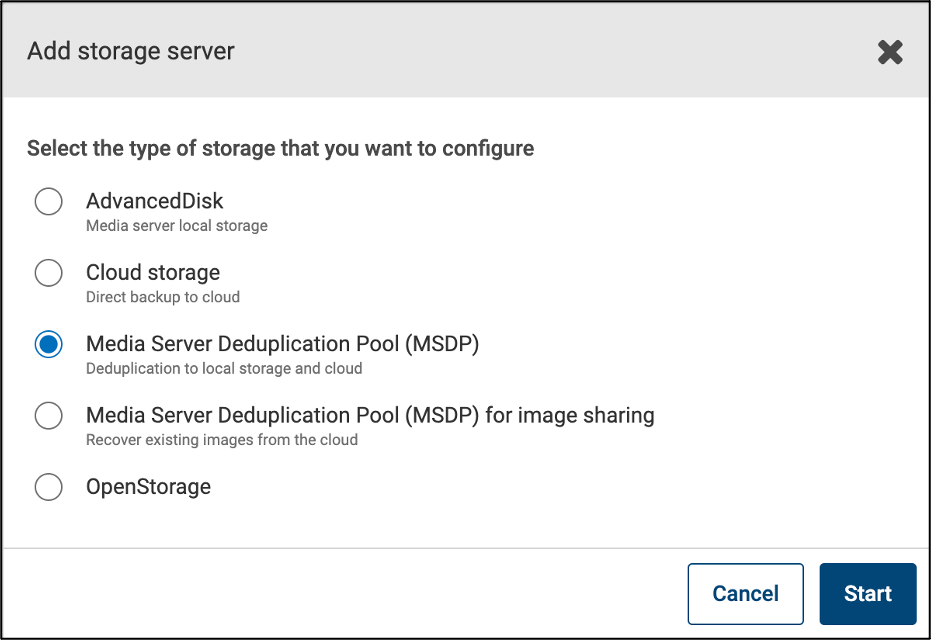
4.4. In the Add Storage dialog box, select "Media Server Deduplication Pool" option and click "Start".
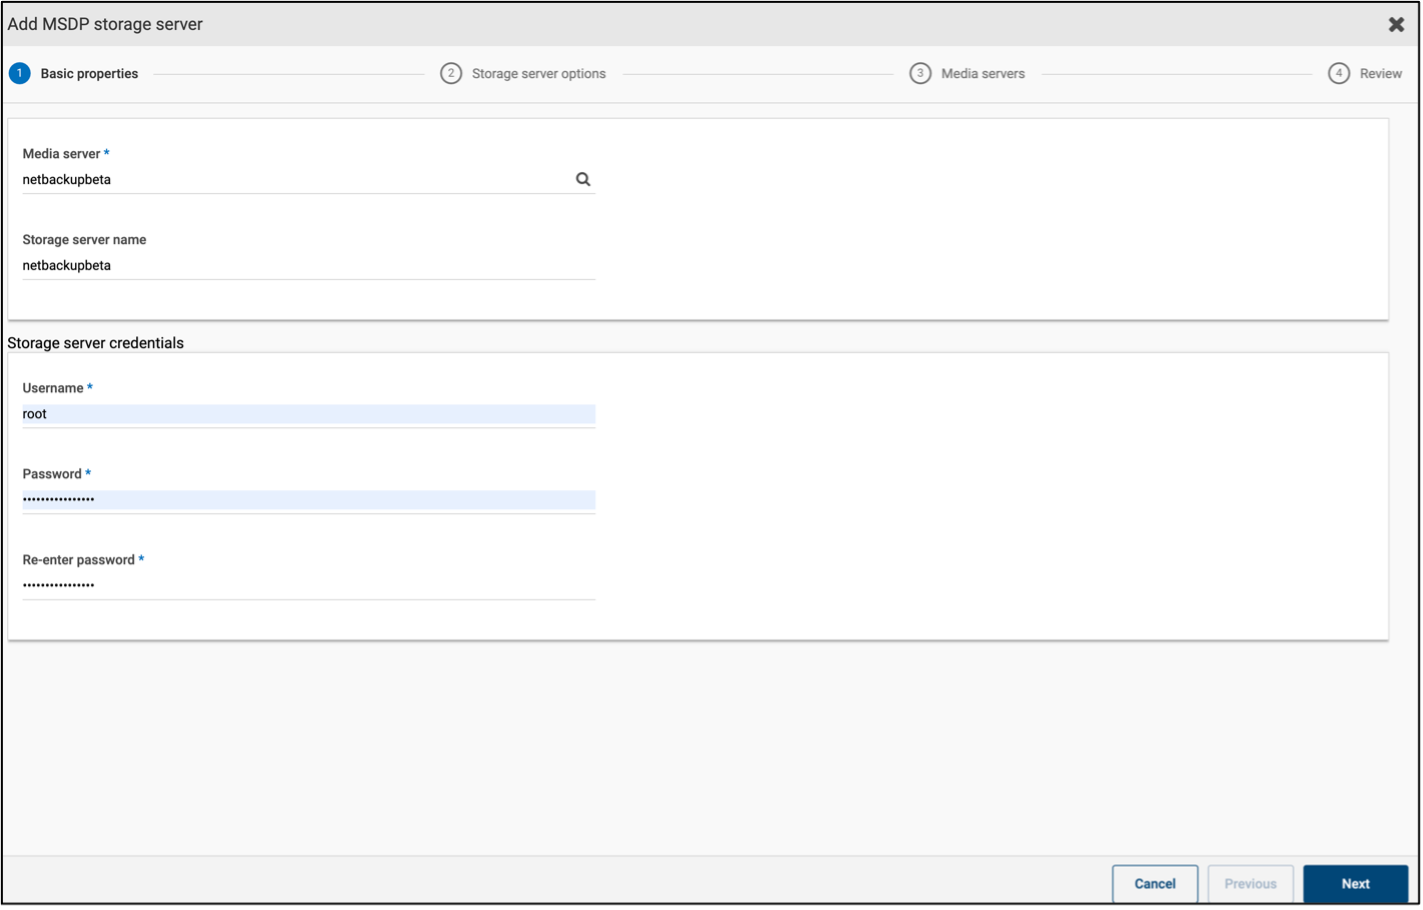
4.5. In the Basic properties section, select your media server, the credentials of the storage server and click "Next".
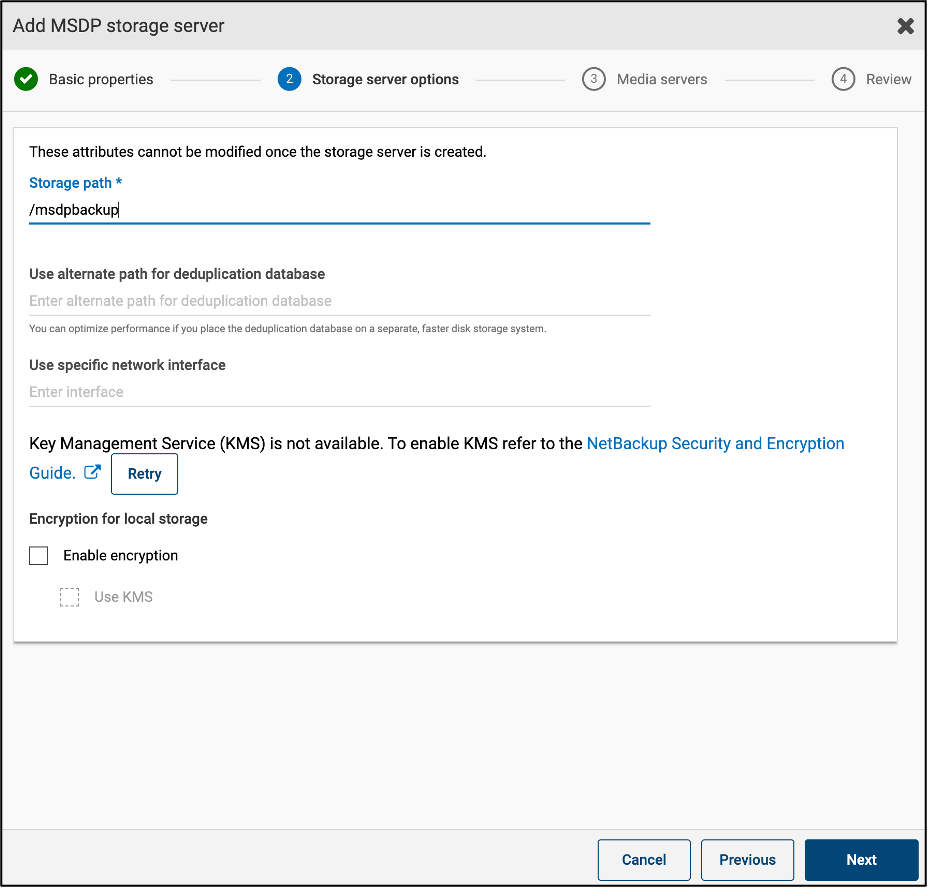
4.6. In the Storage server options section, provide the required information and click "Next".
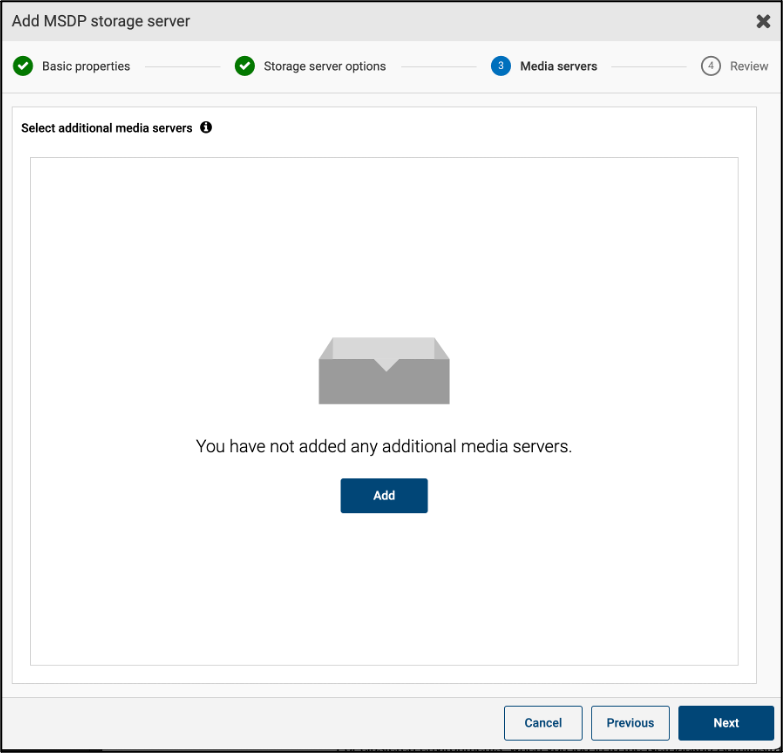
4.7. In the Media servers section, select any additional media servers if required and click "Next".
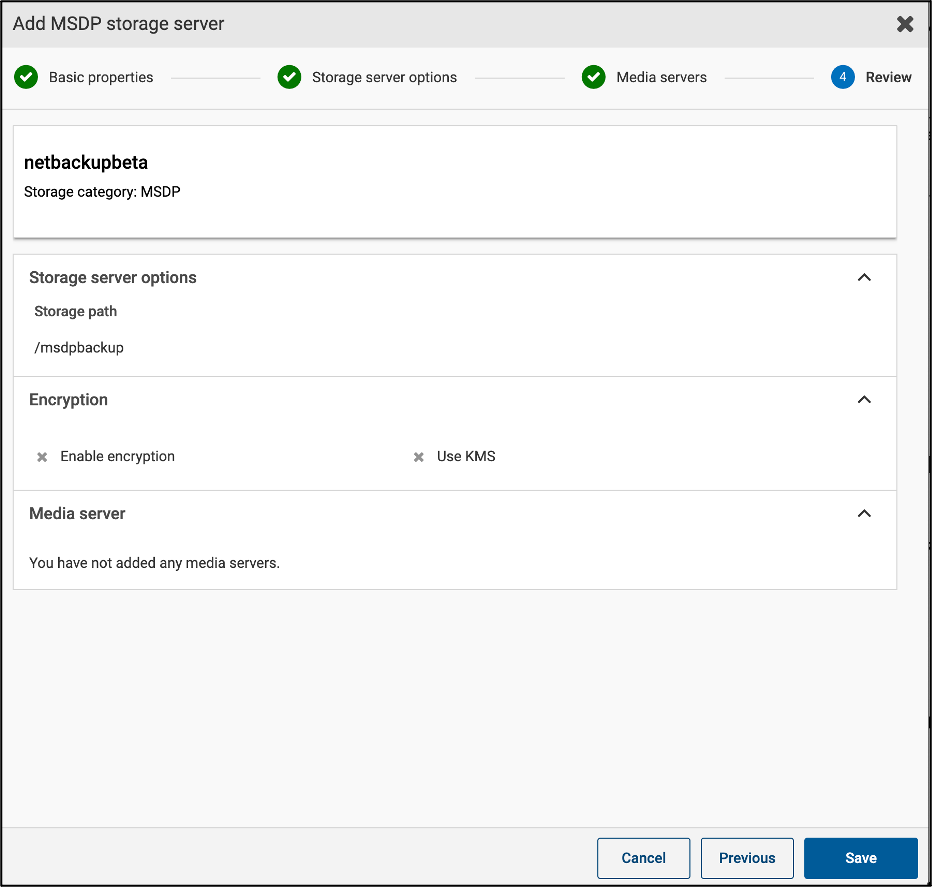
4.8. In the next section, confirm all the options and click "Save".
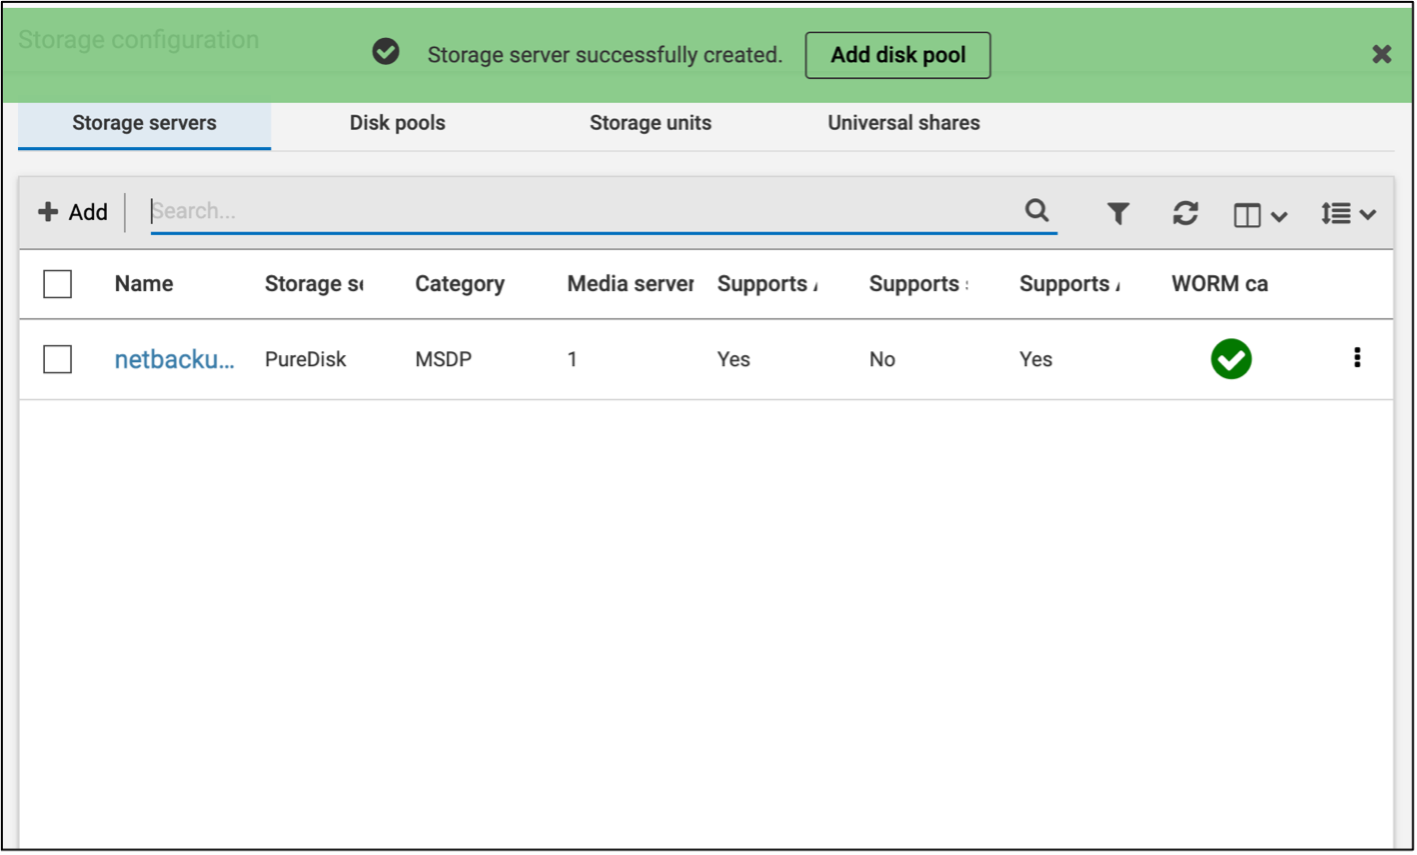
4.9. The Storage Server tab displays the newly added MSDP server.
Configuring a Disk Pool
4.10. Navigate to the Disk pools tab and click on "+ Add" to add a new disk pool.
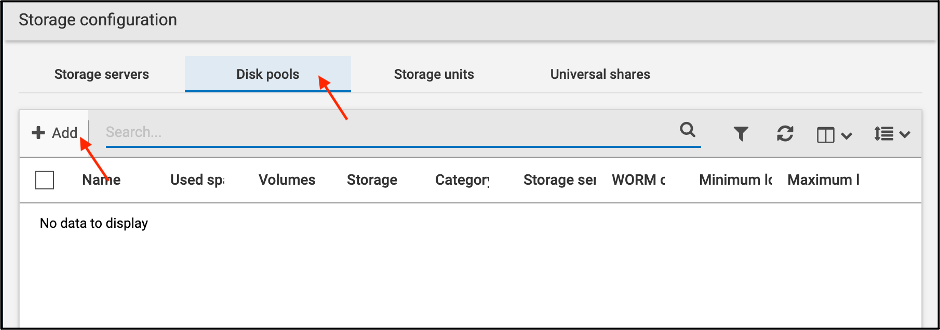
4.11. In the Disk pool options section, click "Change" to select a storage server.
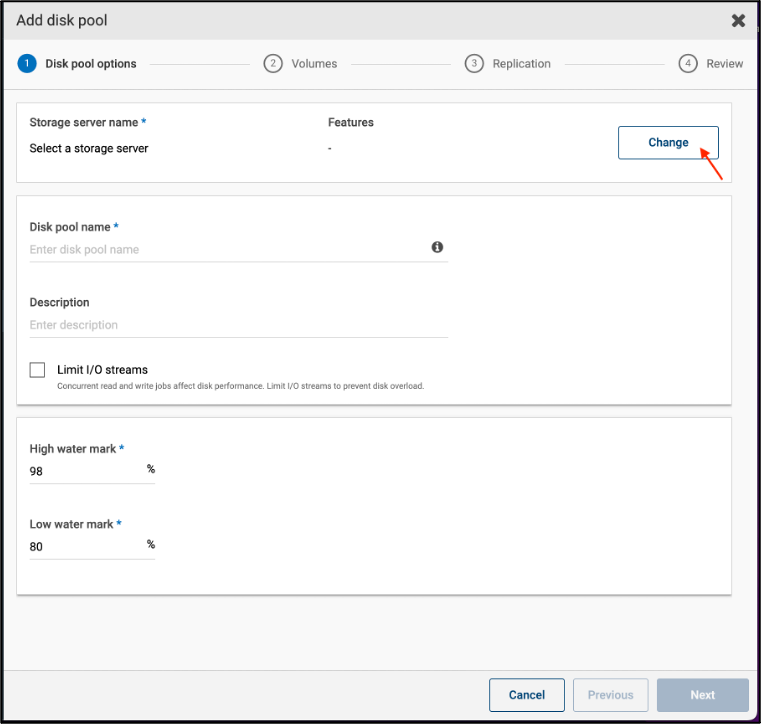
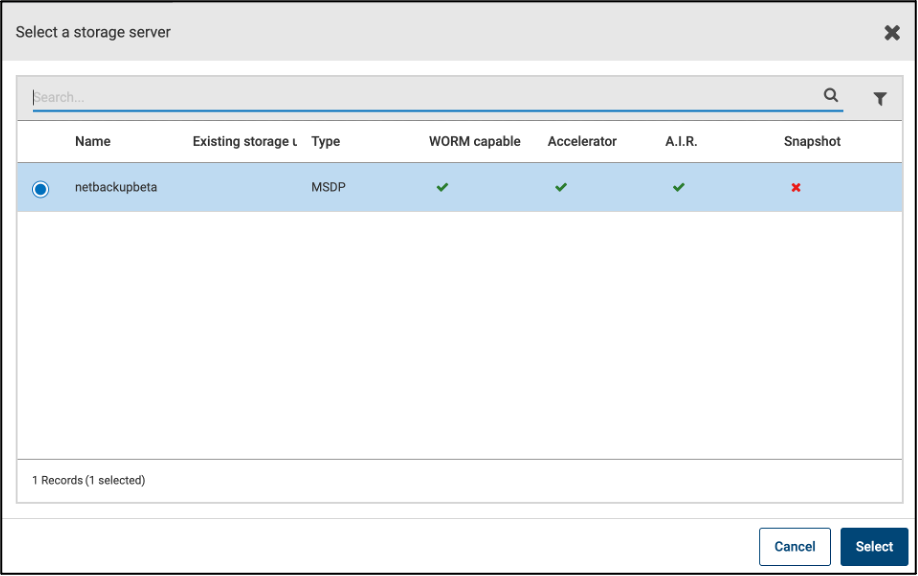
4.12. Click on the MSDP storage server created earlier and click "Select".
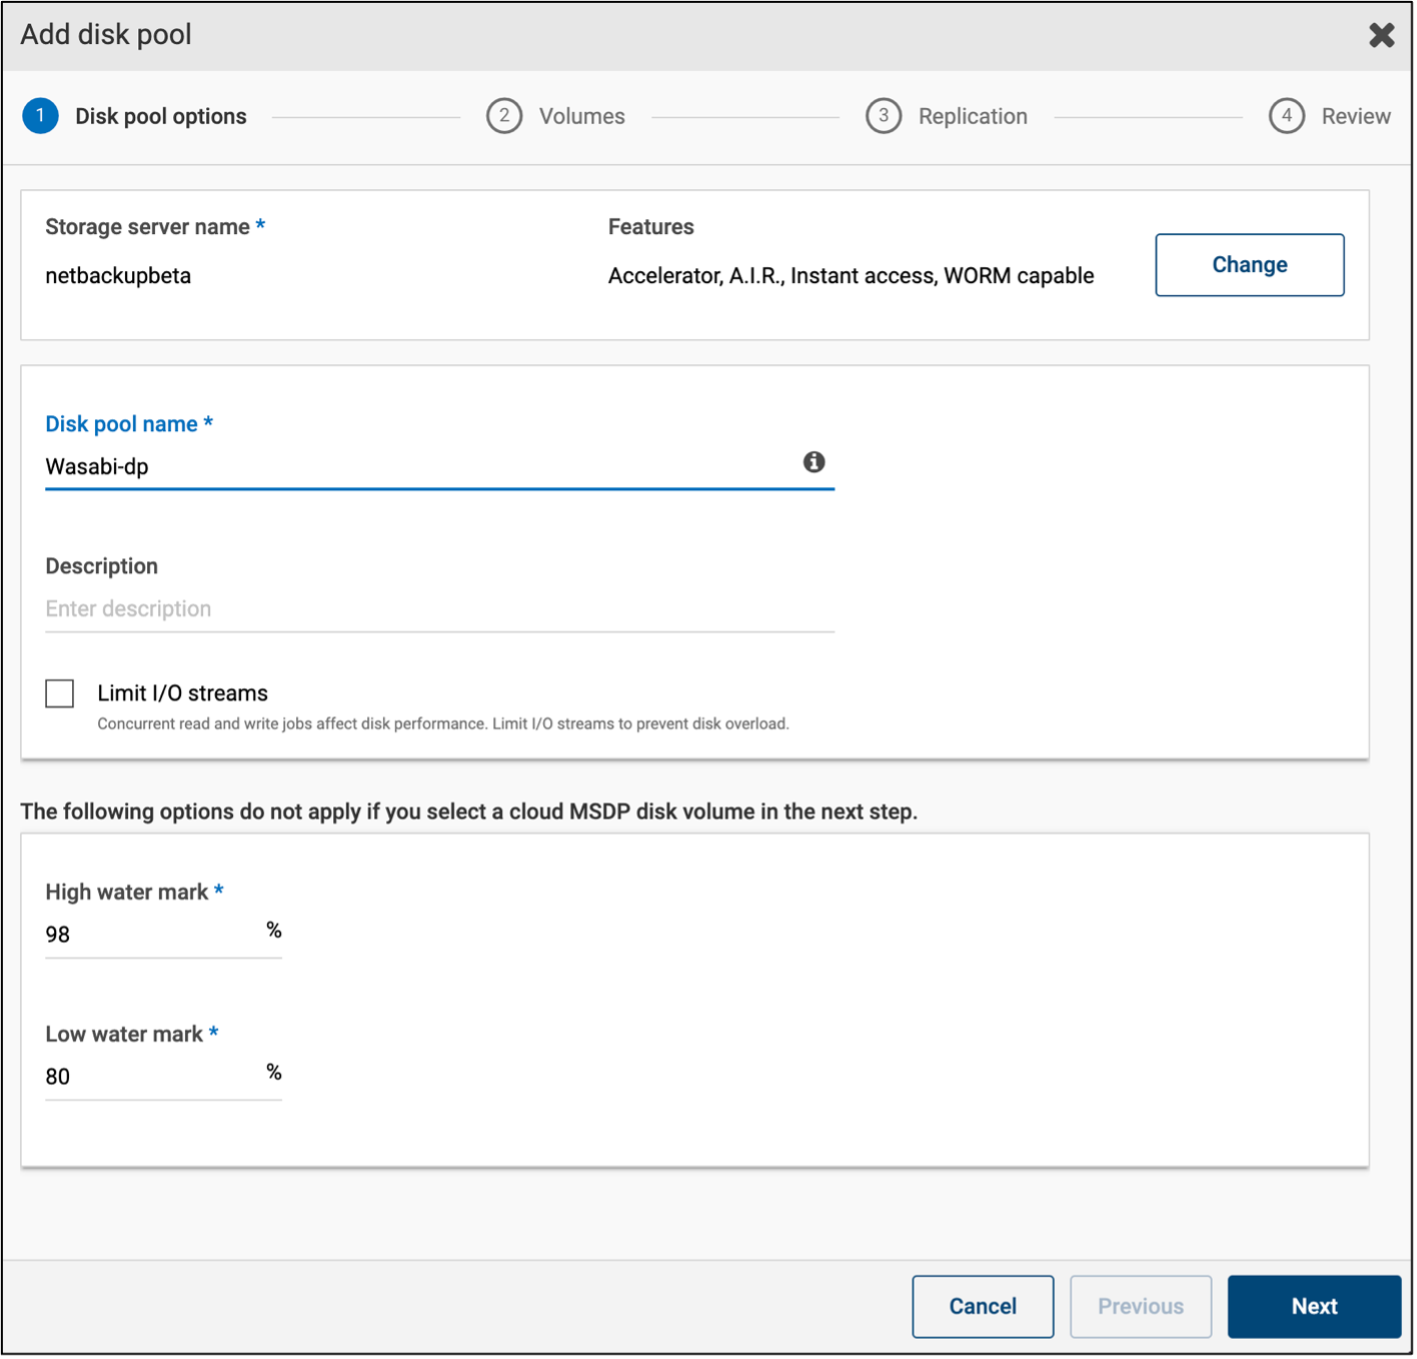
4.13. Provide a name for the Disk Pool and click "Next".
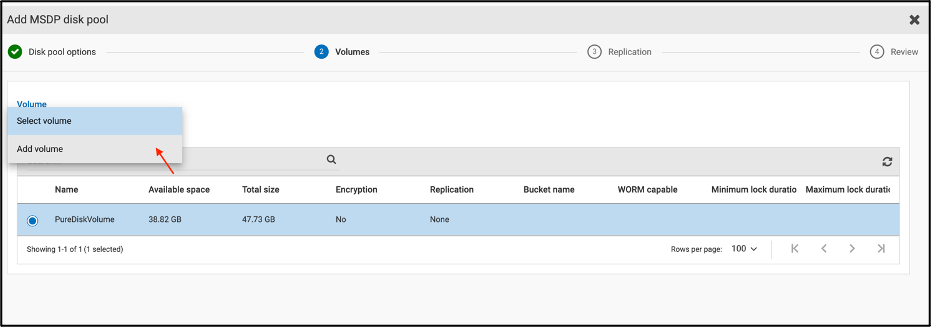
4.14. In the Volumes section, expand the Volumes dropdown menu and select Add Volume.
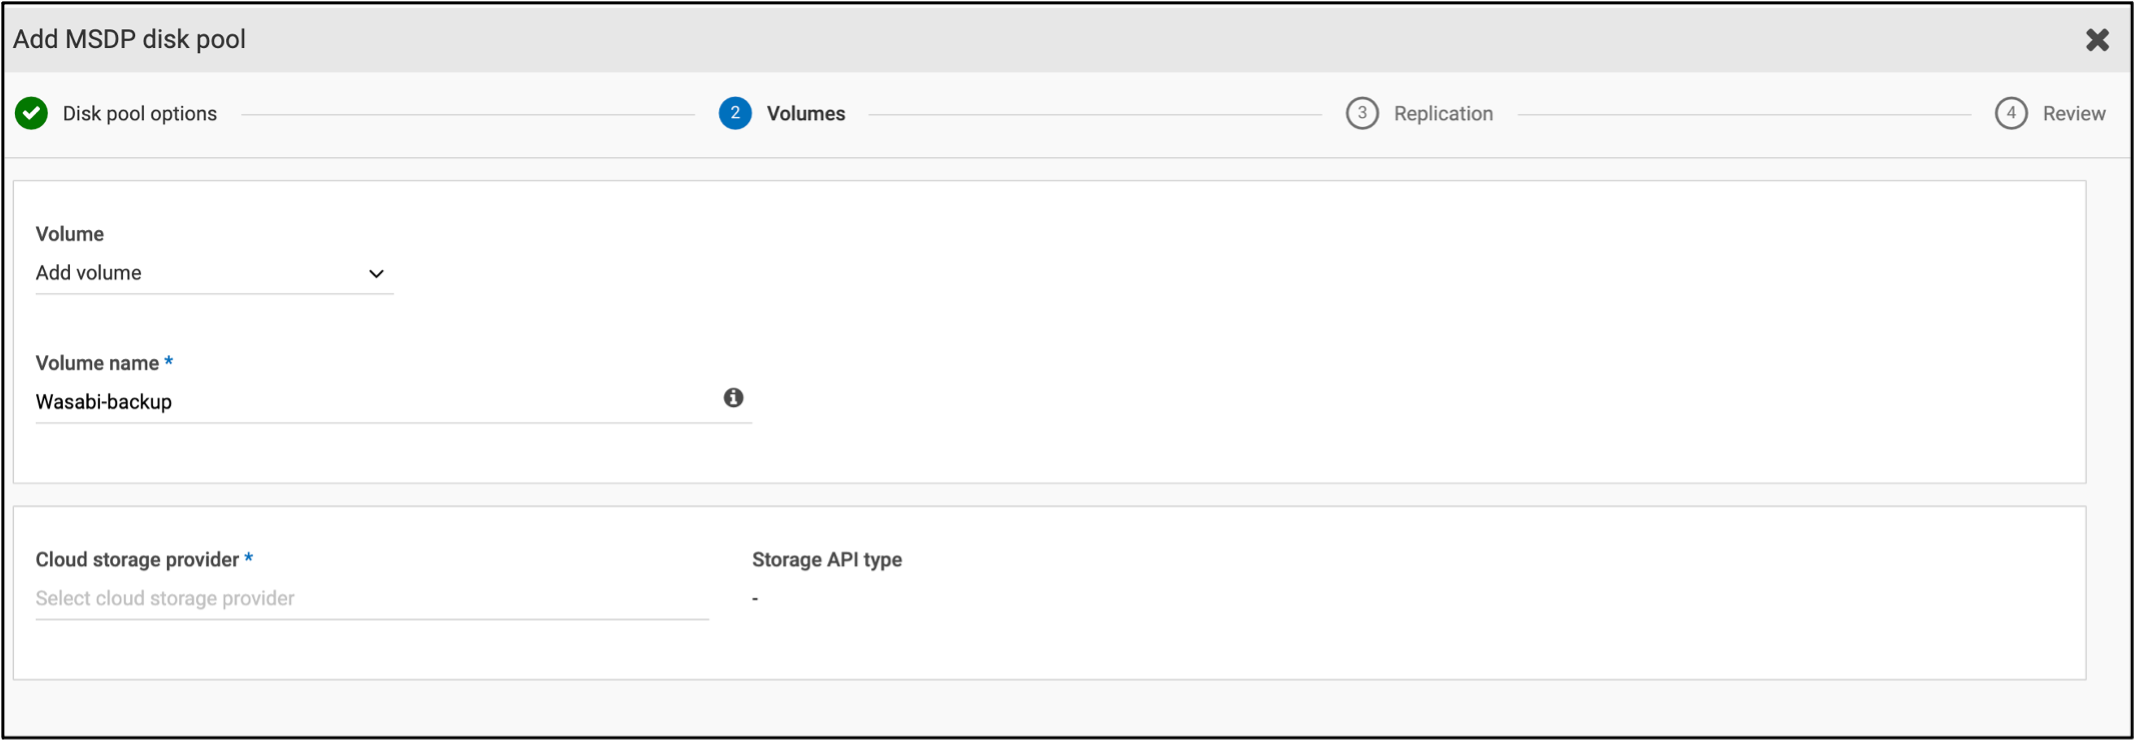
4.15. Provide a name for the Volume and click on the Cloud Storage Server field.
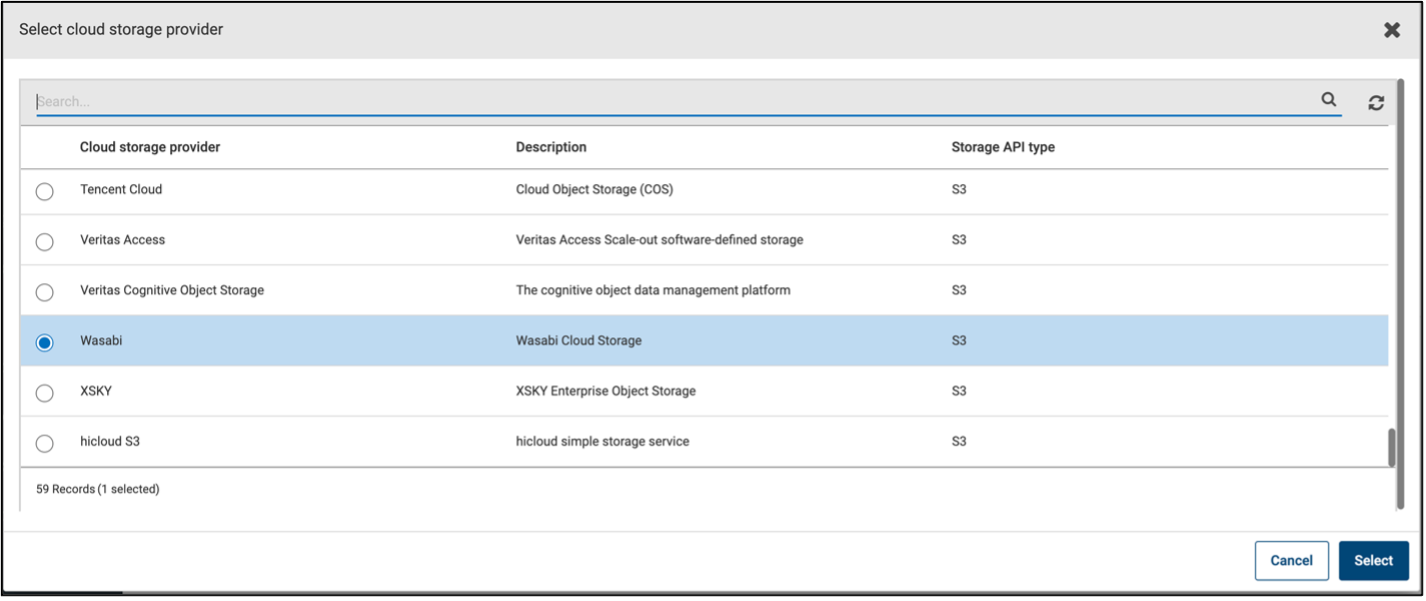
4.16. In the Select cloud storage provider dialog box, select Wasabi and click "Next".
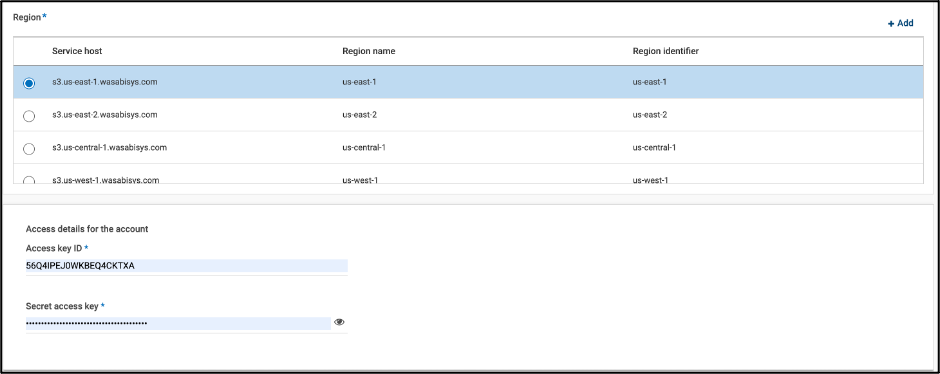
4.17. In the Region section, select the region in which your bucket is located and provide the Access details of the Wasabi account - the Access key and the secret key.
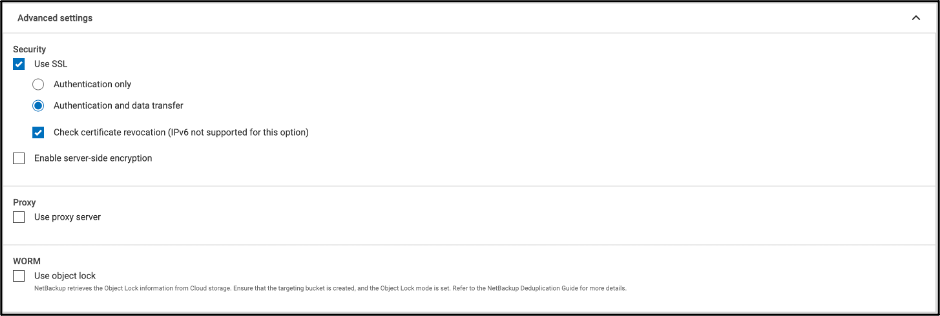
4.18. Scroll down to the Advanced Settings section and configure the desired settings.
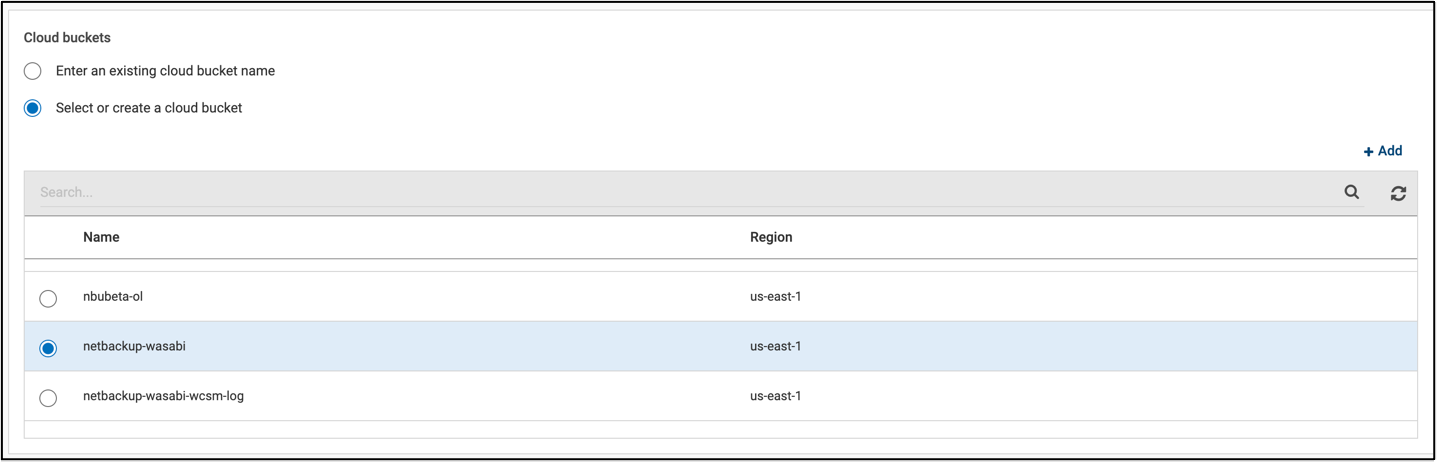
4.19. Under Cloud bucket, select Select or create cloud bucket and click Retrieve list. Select a bucket from the list. You can also provide the bucket name.
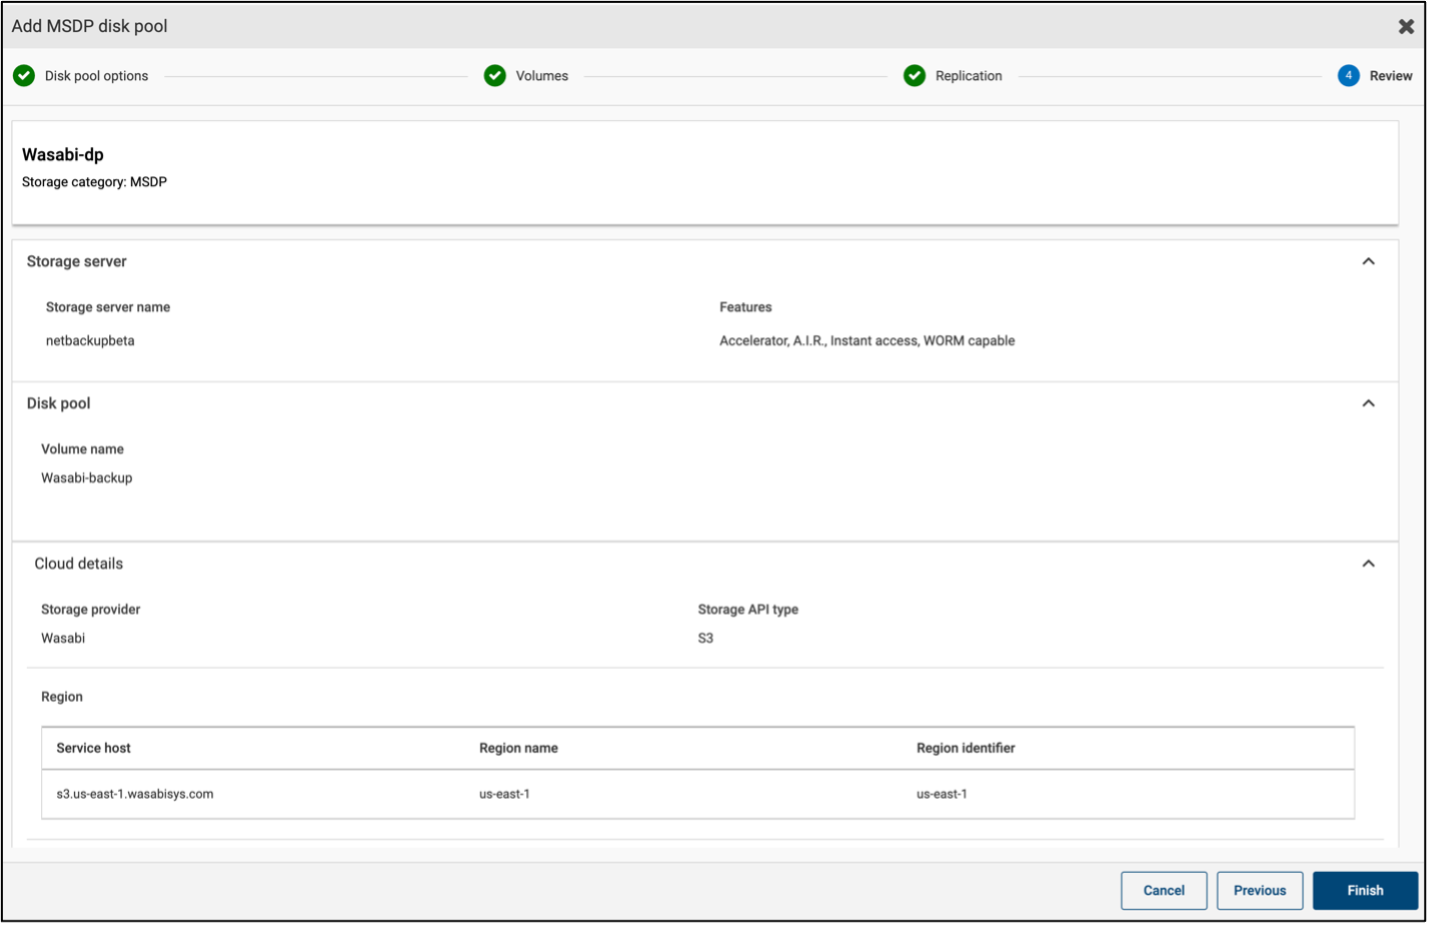
4.20. Click "Next" on the Replication tab. On the Review tab, confirm all the settings and click "Finish".
4.21. The disk pool is now listed in the Disk Pools tab.

Configuring a Storage unit
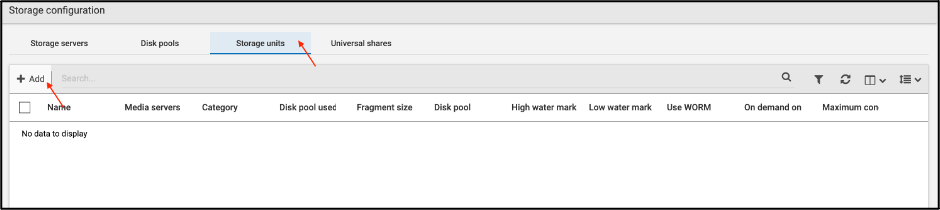
4.22. Next, we need to create a Storage unit. Navigate to the Storage Units tab and click "+ Add".
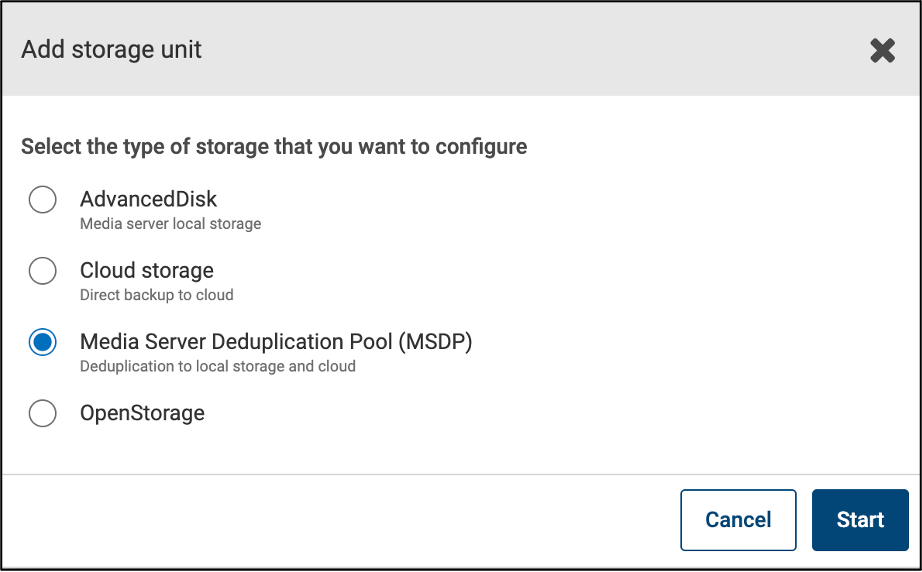
4.23. In the Add storage unit dialog box, select "Media Server Deduplication Pool (MSDP)" and click "Start".
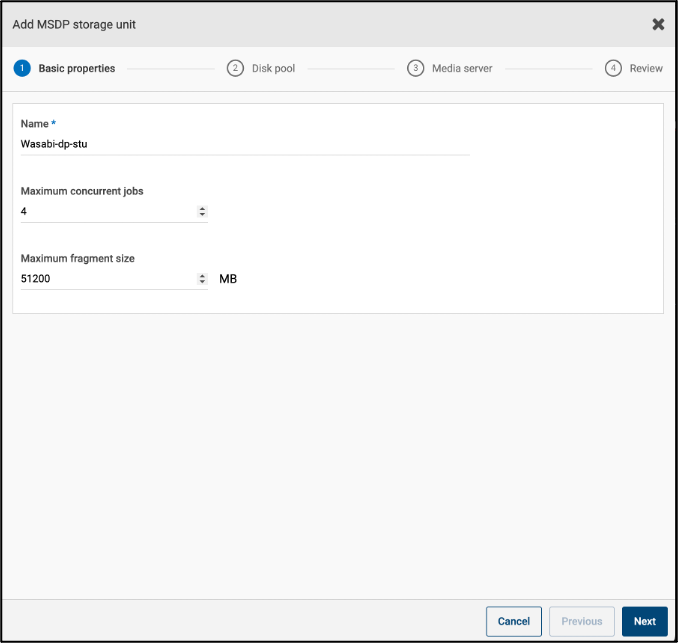
4.24. The "Add MSDP storage unit" dialog box is displayed. In the Basic properties tab, provide a name for the storage unit and click "Next".
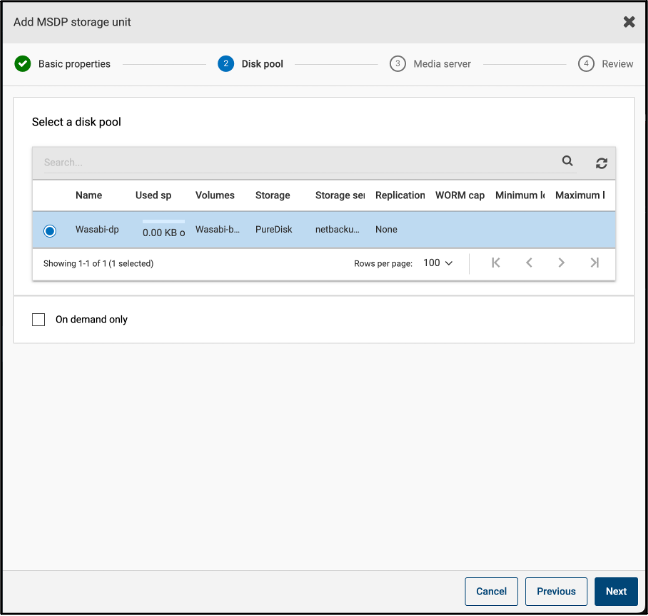
4.25. In the Disk pool tab, select the disk pool created earlier and click "Next".
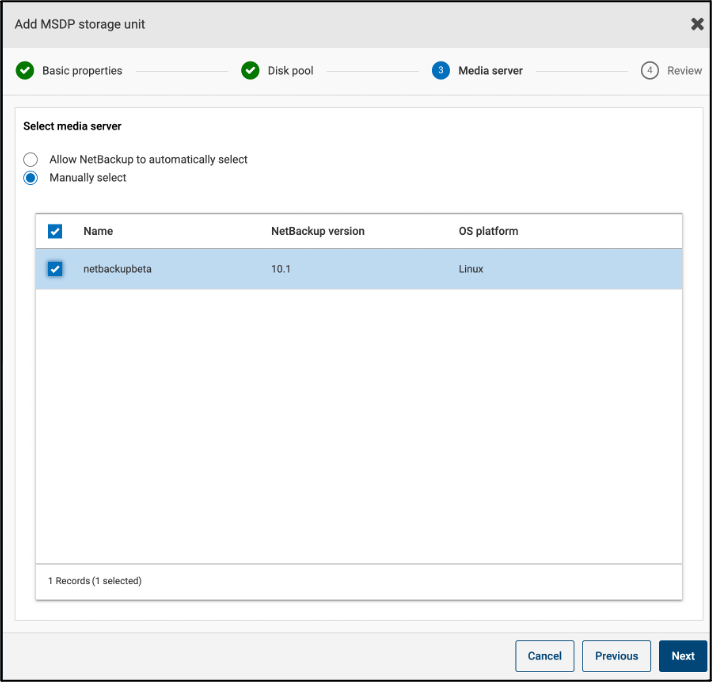
4.26. In the Media server tab, select the media server and click "Next".
4.27. In the Review tab, confirm all the selections and click "Save".
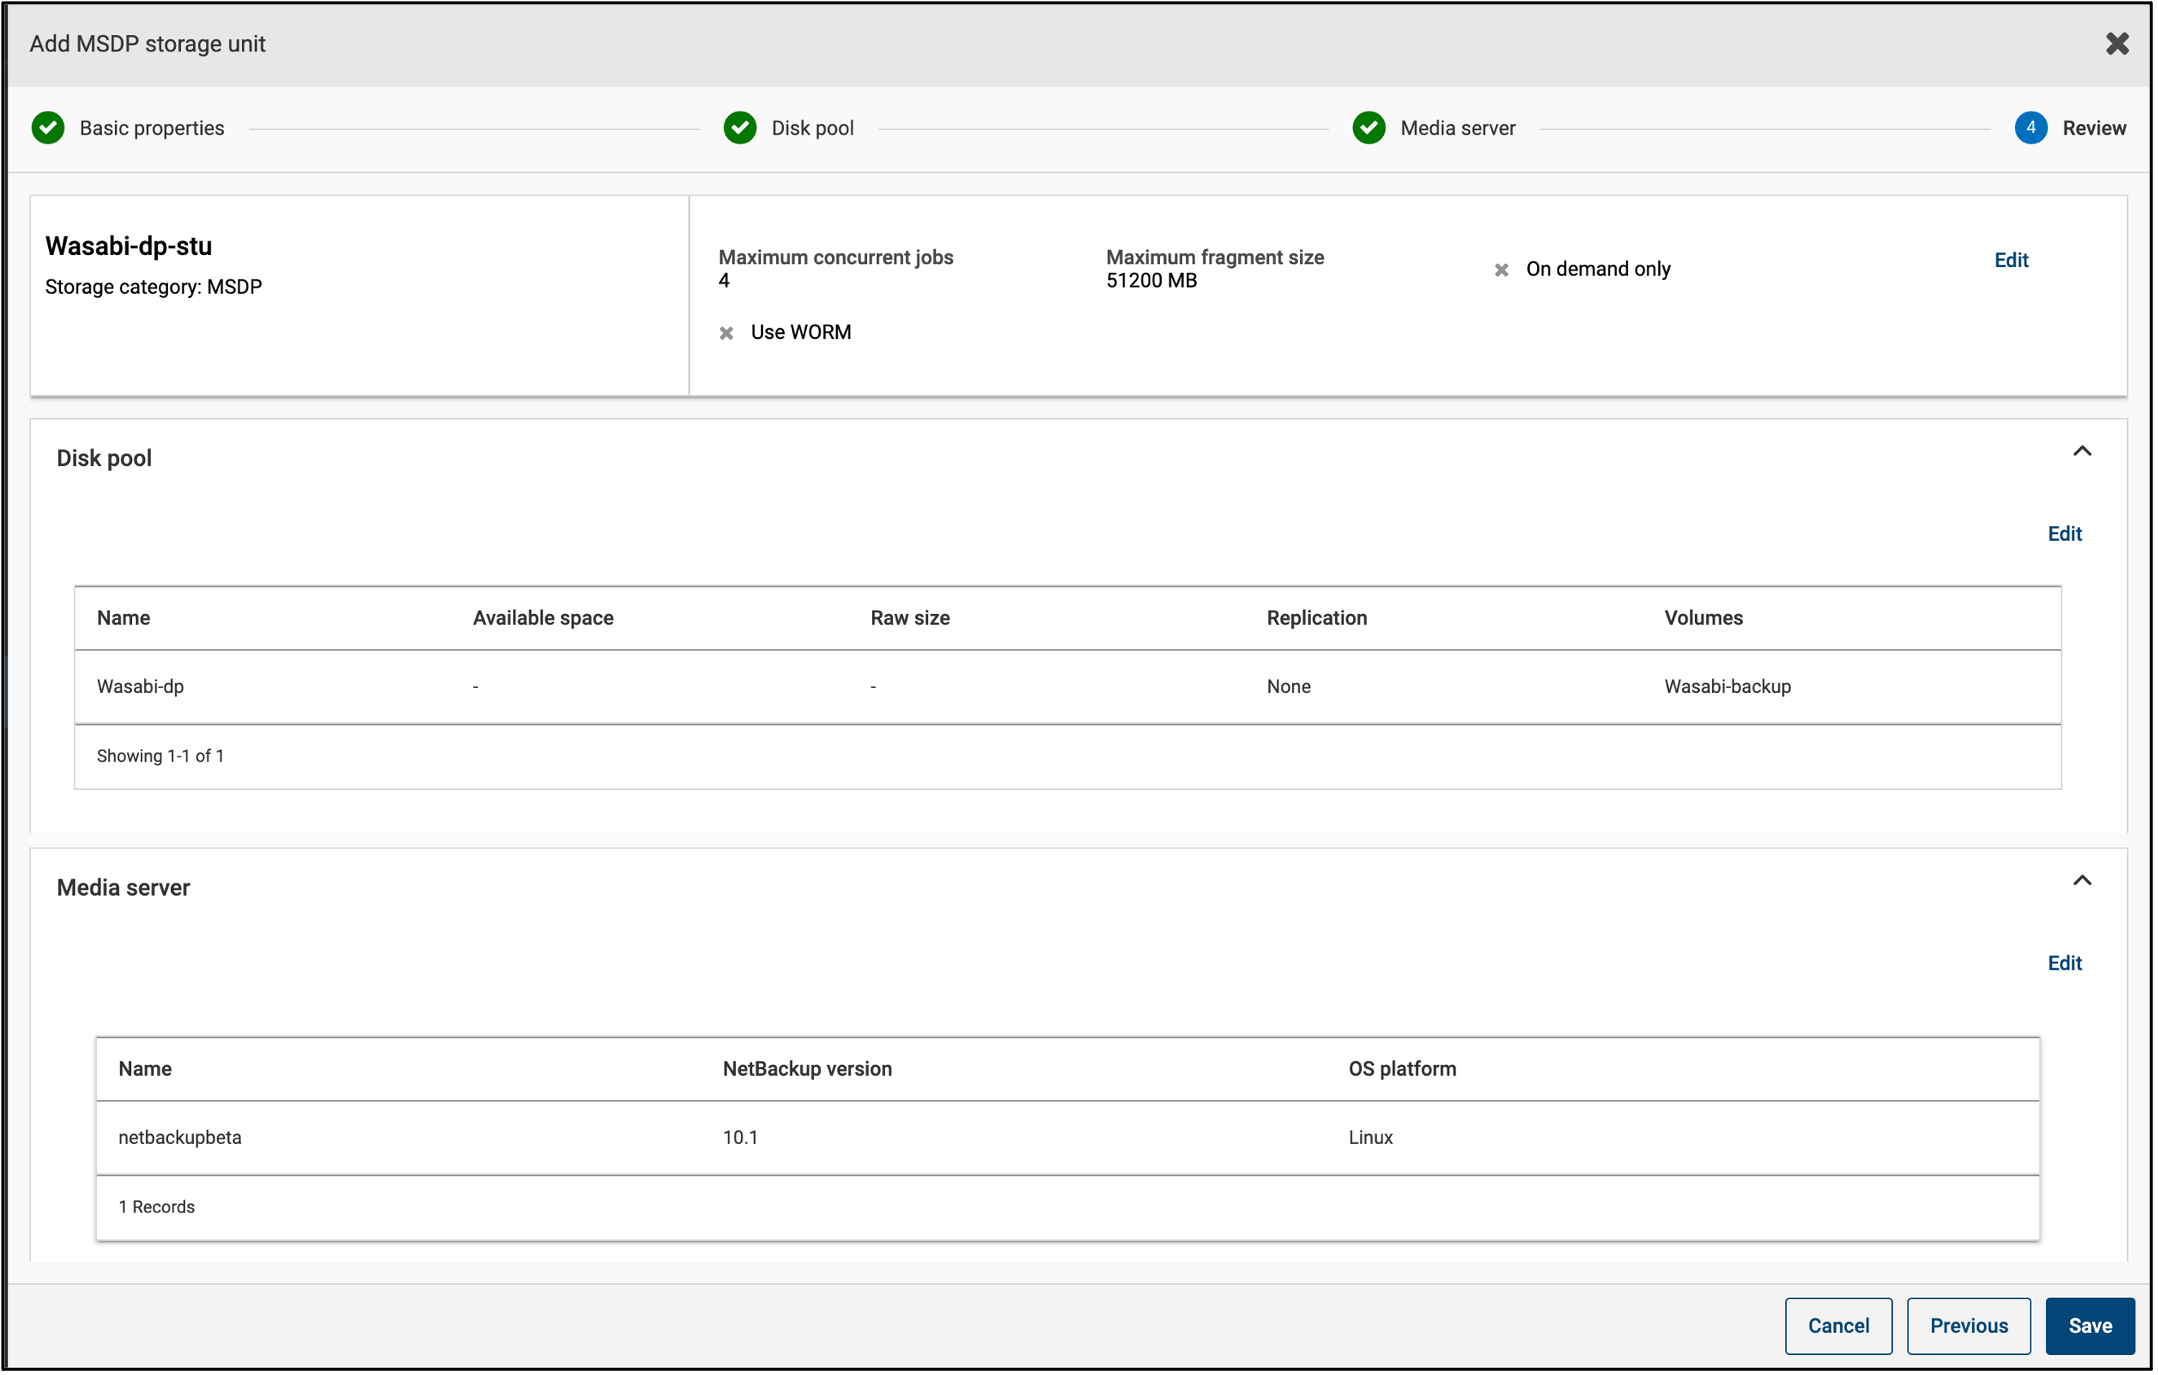
4.28. The Storage units tab displayed the new storage unit.

Our storage unit is now ready to be used in a policy.
5. Assigning the storage unit to the backup policy
We need to assign the newly created storage unit as Policy Storage in the backup policy. Follow the steps below to modify the policy.
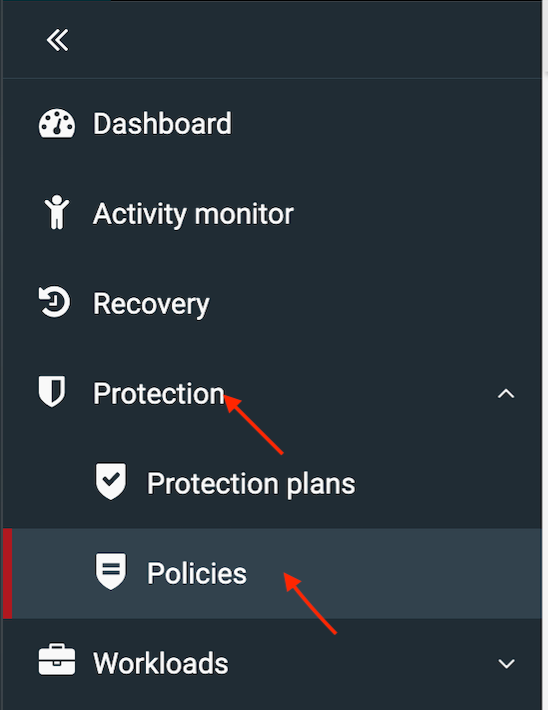
5.1. On the left, navigate to Protection --> Policies.
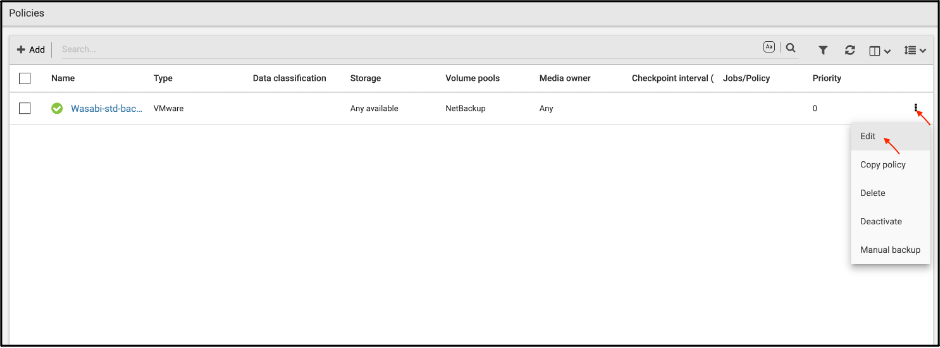
5.2. In the Policies tab, select the policy you want to modify and click Edit.
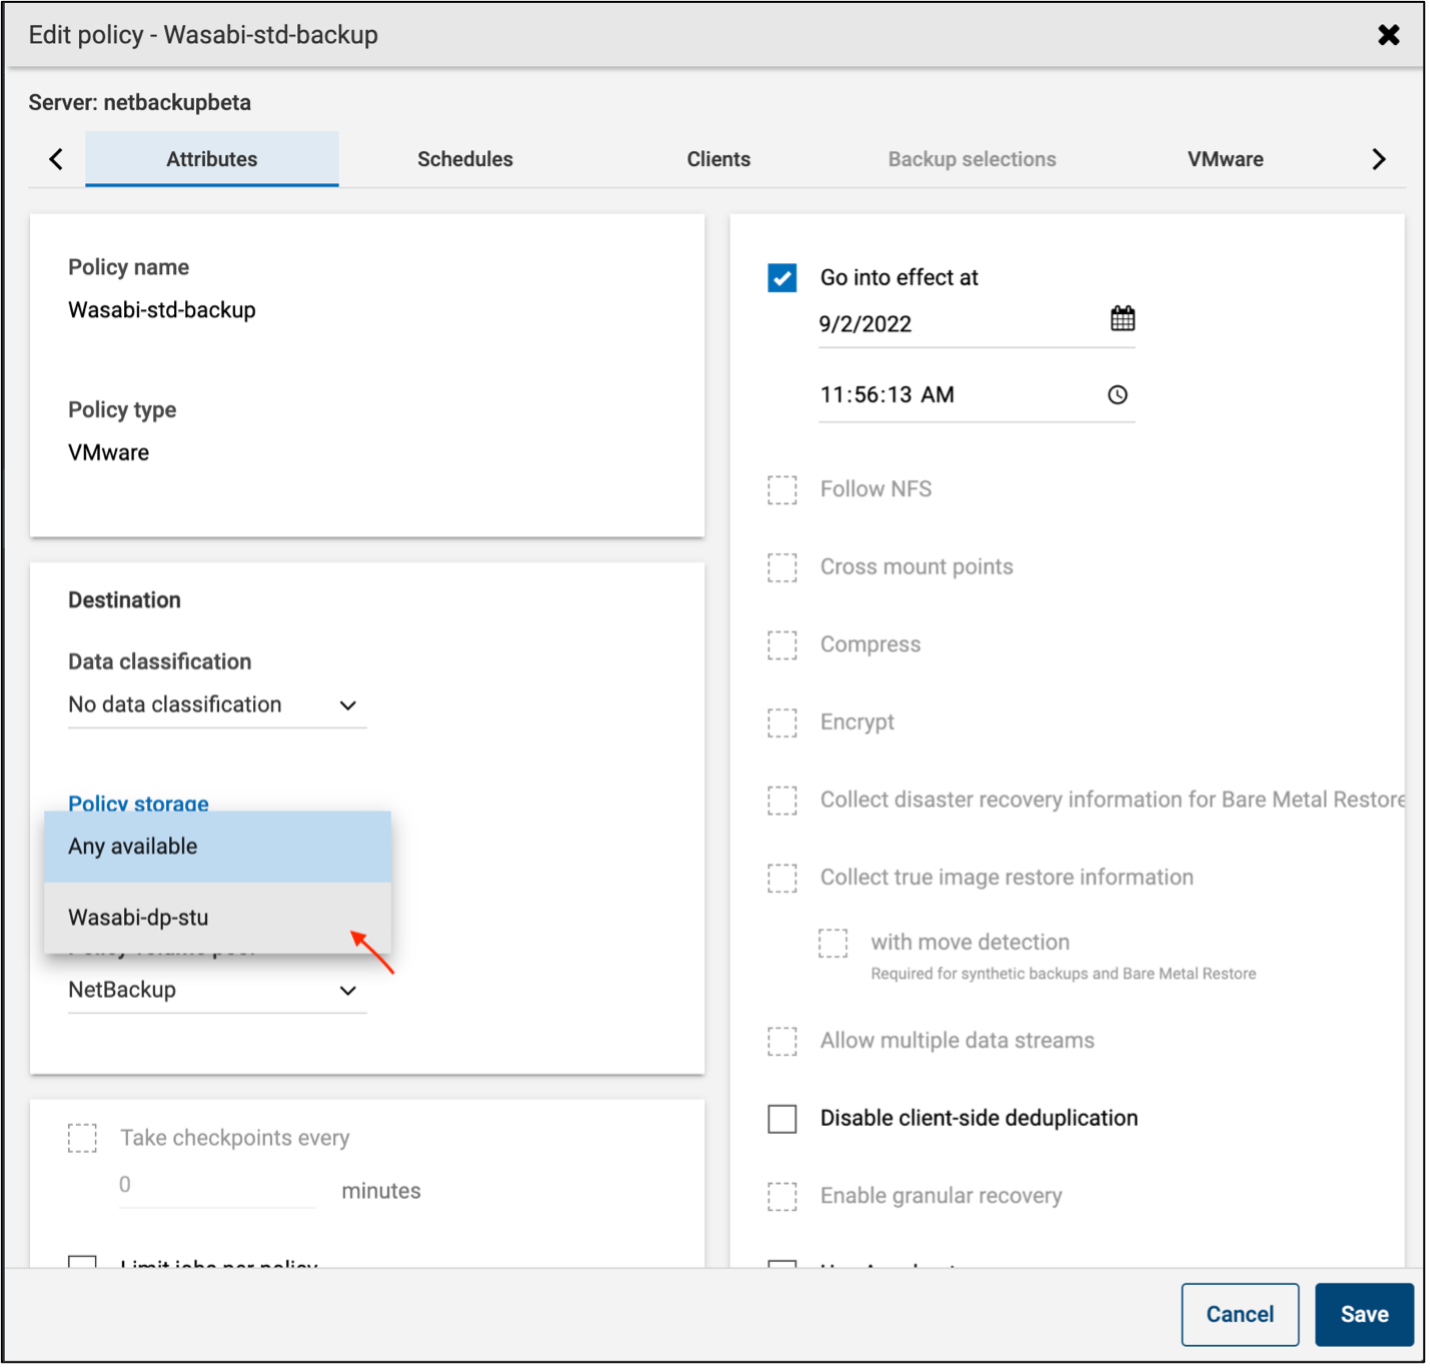
5.3. In the Edit policy dialog box is displayed. In the Attributes section, expand Policy Storage dropdown menu, select the storage unit configured earlier and click "Save".
Now all the clients protected by this policy will backed up to the Wasabi bucket.
6. Configuring immutable backups to Wasabi
From NetBackup 10.1 release, NetBackup supports cloud immutable (WORM) storage with Wasabi. The immutable cloud storage is supported only with MSDP-C configuration (it can be configured only on the Netbackup servers running on Red Hat Linux Enterprise or CentOS platforms).
For more information, please refer to the NetBackup HCL document.
Netbackup supports both Compliance and Governance modes.
Follow the instructions below to configure immutable backups to Wasabi.
6.1. A MSDP server is required to configure create MSDP cloud immutable storage. if you do not have a MSDP server, please create one following the steps 4.1 - 4.9 in Configuring Media Server Deduplication Pool (MSDP) storage server
6.2. Log in to the NetBackup CLI. Set the following environment variables.
export MSDPC_ACCESS_KEY=56Q4IPE**************
export MSDPC_SECRET_KEY=*************************
export MSDPC_REGION=us-east-1
export MSDPC_PROVIDER=Wasabi
export MSDPC_ENDPOINT=s3.us-east-1.wasabisys.com
Note: This config example discusses the use of Wasabi's us-east-1 storage region. To use other Wasabi storage regions, please use the appropriate Wasabi service URL as described in our Wasabi Service URLs article.
6.2. Create an object lock enabled bucket using the MSDP cloud admin utility. It is located at /usr/openv/pdde/pdcr/bin/msdpcldutil. The command is as follows -
#/usr/openv/pdde/pdcr/bin/msdpcldutil create -b bucketname -v volumename --mode COMPLIANCE --min 1D --max 30D --live 2021-12-3
Note: It is necessary to create the object lock enabled bucket using this tool (not from the Wasabi console) in order to configure WORM storage and write immutable backups to the cloud volume (bucket).
The command entered in our example is below -
[root@netbackupbeta ~]# /usr/openv/pdde/pdcr/bin/msdpcldutil create -b netbackup-wasabi-worm -v Wasabi-worm --mode COMPLIANCE --min 1D --max 30D --live 2022-12-13
Volume: Wasabi-worm in bucket: netbackup-wasabi-worm is created successfully
Note: This example uses the Compliance retention mode. If you wish to use Governance mode, set the --mode parameter to Governance.
The minimum and maximum retention periods are defined by the min and max options. Both values must be between 1 day and 30 years. Please configure the appropriate values as required.
6.3. Next, create a disk pool using the object lock enabled bucket by follow steps 4.10 - 4.14 in the section Configuring a disk pool.
6.4. Provide the volume name created in step 6.2 by msdpcldutil (it is important that the Volume name match the volume created using the "-v volumename" parameter earlier).

6.5. Under Region, select the appropriate region. Enter the credentials to complete the setup.
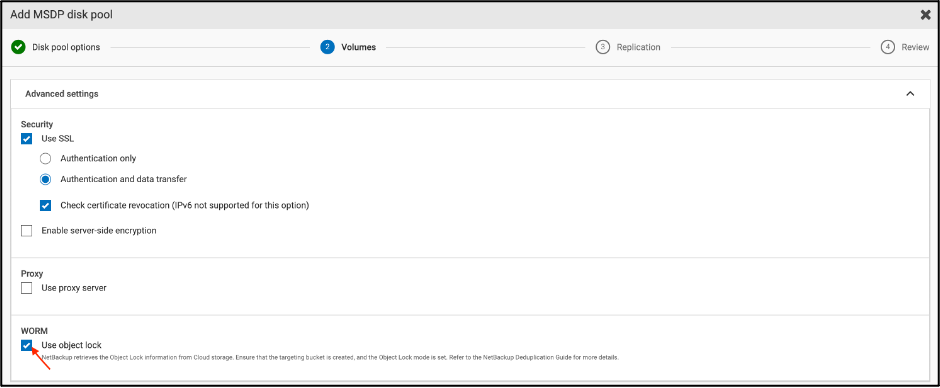
6.6. Scroll down to the Advanced Settings section and select the "Use object lock" checkbox under WORM.
6.7. Under Cloud bucket, select Select or create cloud bucket and click Retrieve list. Select a bucket created in Step 6.2 from the list (You can also provide the bucket name) and click Next,.

6.8. Review the settings and click Finish. The new disk pool will be listed as WORM capable.

6.9. Navigate to the Storage Units tab and click "+ Add". In the Add storage unit dialog box, select "Media Server Deduplication Pool (MSDP)" and click "Start".
The "Add MSDP storage unit" dialog box is displayed. In the Basic properties tab, provide a name for the storage unit and click "Next".
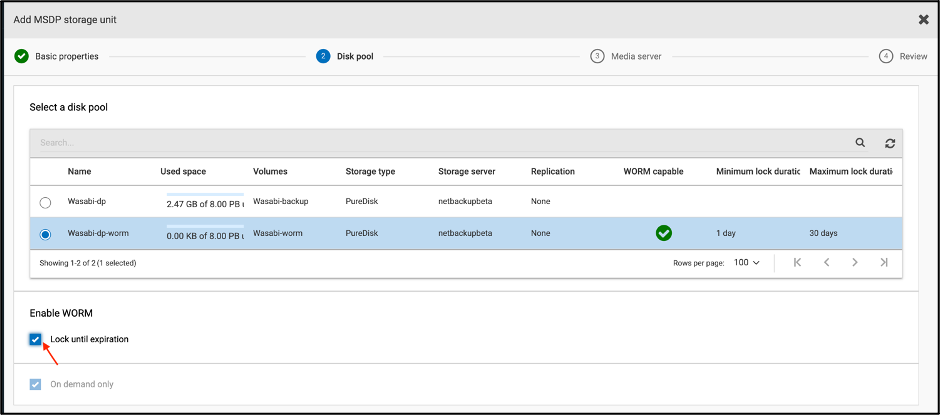
6.10. In the Disk pool tab, select the WORM capable disk pool created earlier. In the Enable WORM section. select the "Lock until expiration" checkbox and click "Next".
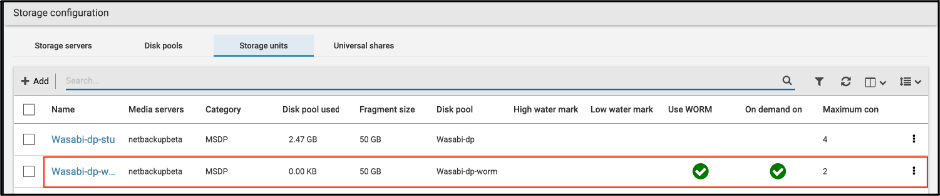
6.11. In the Media server tab, select the media server and click "Next". In the Review tab, confirm all the selections and click "Save". The new storage unit configured to use WORM will be list under the Storage Units tab.
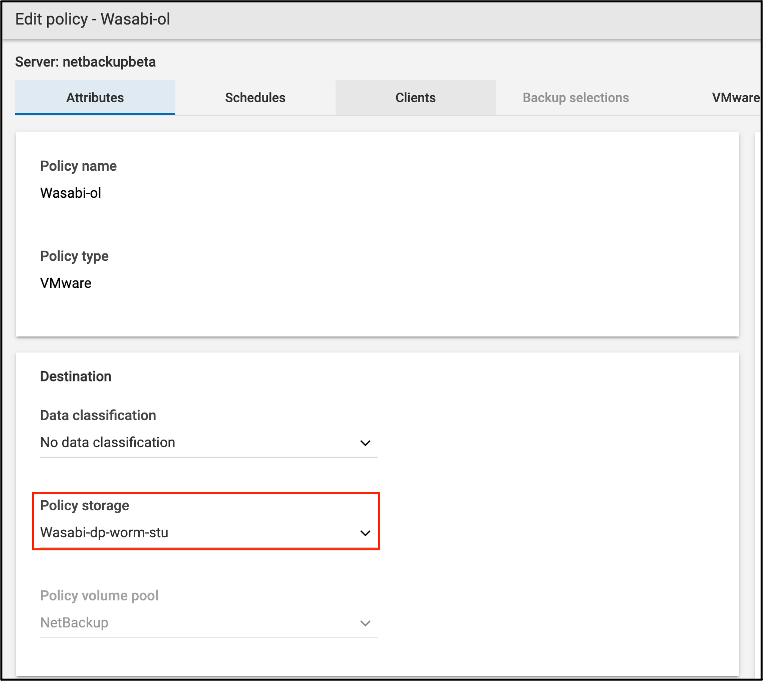
6.12. Assign the WORM enabled storage unit as Policy Storage in the required backup policy by following the steps outlined in section - Assigning the storage unit to the backup policy.
In the Edit policy dialog box is displayed. In the Attributes section, expand Policy Storage dropdown menu, select the WORM enabled storage unit configured earlier and click "Save".
Please ensure that the retention periods assigned to the backup schedules are within the minimum and maximum retention periods specified in Step 6.2.
All the backups written using this policy will be immutable