SolarWinds Security Event Manager (SEM) is a Security Information and Event Management (SIEM) application that can be used to ingest Wasabi bucket logs to see S3 events affecting your bucket's data, such as when an object is uploaded or deleted. This requires the use of an on-premise server running Rclone to retrieve the logs from your Wasabi bucket and Logstash to send them to SEM, both of which are open-source.
This article details the procedure to configure your Wasabi buckets, Rclone, Logstash, and SEM.
Requirements
An active Wasabi Cloud Storage account.
Wasabi access and secret keys. It is recommended to create a sub-user with their own set of keys for this purpose rather than using your root keys. See Creating a User for more details. You may also restrict what access the sub-user has, such as read-only access to a specific bucket, using IAM policies. See IAM and Bucket Policies for details.
Access to the Wasabi Console as the account's root user or a sub-user with WasabiFullAccess permissions.
A Linux server or virtual machine (VM). This solution was tested using Ubuntu Linux 24.04.4 LTS, Rclone v1.72.1, and Logstash 8.19.10.
SolarWinds Security Event Manager (SEM) is licensed and installed. We tested with version 2025.4.0.
High-Level Configuration Steps
Create a Wasabi logging bucket for storing logs from other buckets that store your data.
Create a test bucket and configure it to send logs to the new logging bucket.
Install and configure Rclone to run as a service.
Install and configure Logstash.
Upload, download, and delete test objects to/from your test bucket.
Observe Logstash creating a sample output on your Linux server.
Configure SEM to accept incoming syslog from your Linux server.
Configure Logstash to run as a service and send logs to SEM via syslog.
Create more test uploads and downloads to generate Wasabi bucket logs.
Observe your bucket logs in SEM.
Configure your other buckets to log to your logging bucket.
Creating a Wasabi Logging Bucket
Log in to the Wasabi Console.
Create a Wasabi logging bucket for storing logs from other buckets. See Creating a Bucket for details on this procedure. Enable Object Lock and Versioning on this bucket during creation to make your logs immutable for a configurable period. Note the name of this bucket and the region it is located in.
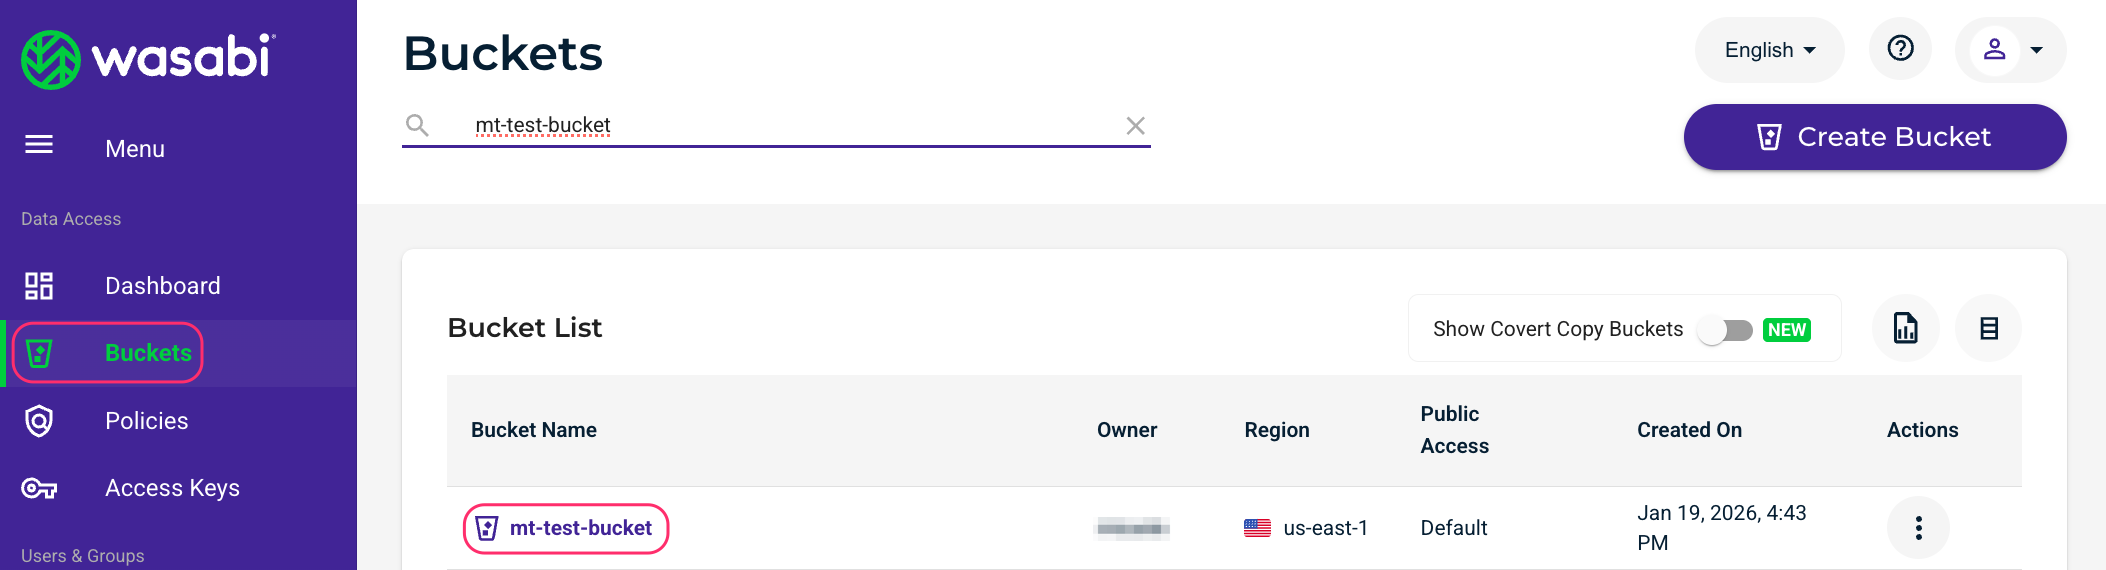
Click Buckets and then click the name of your logging bucket.
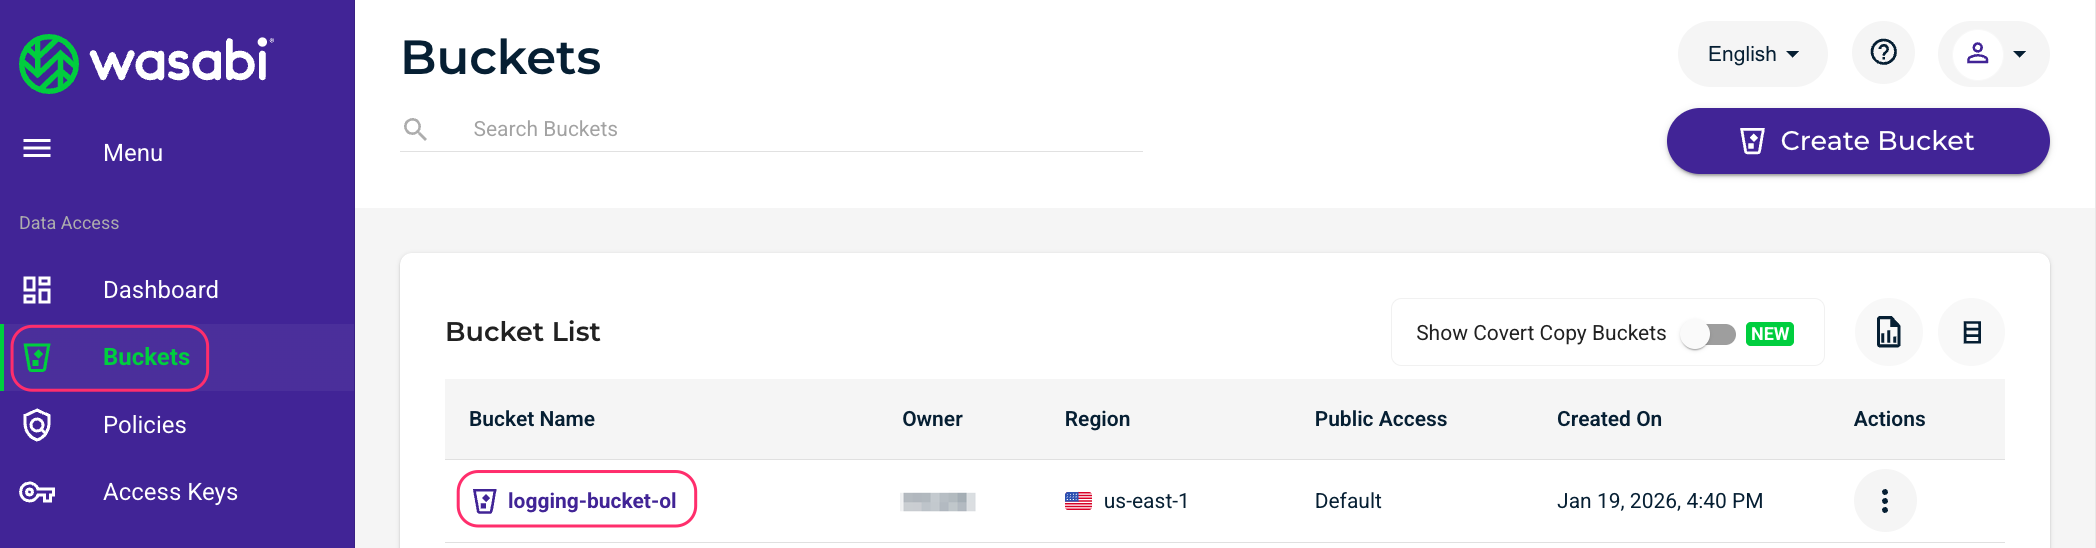
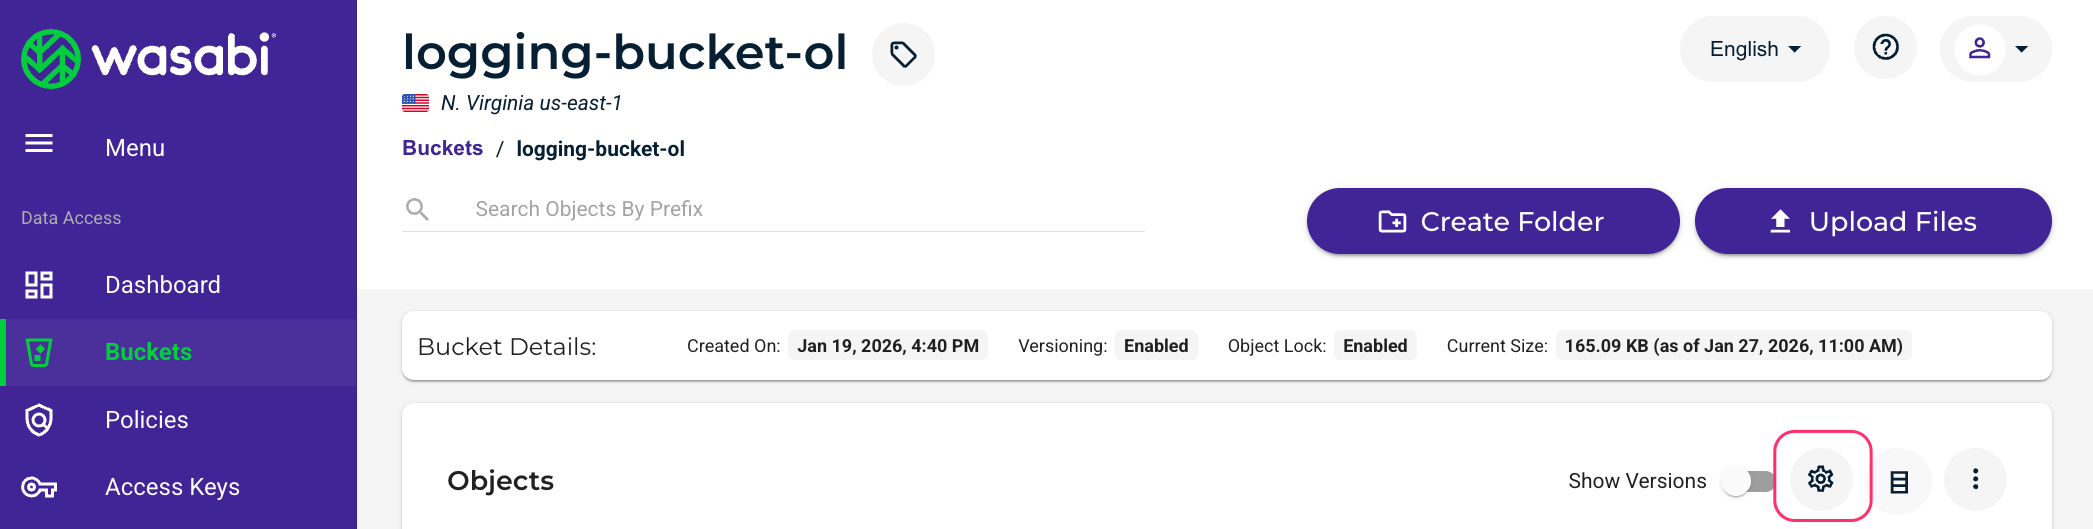
Click the gear icon on the right to open the bucket’s settings.
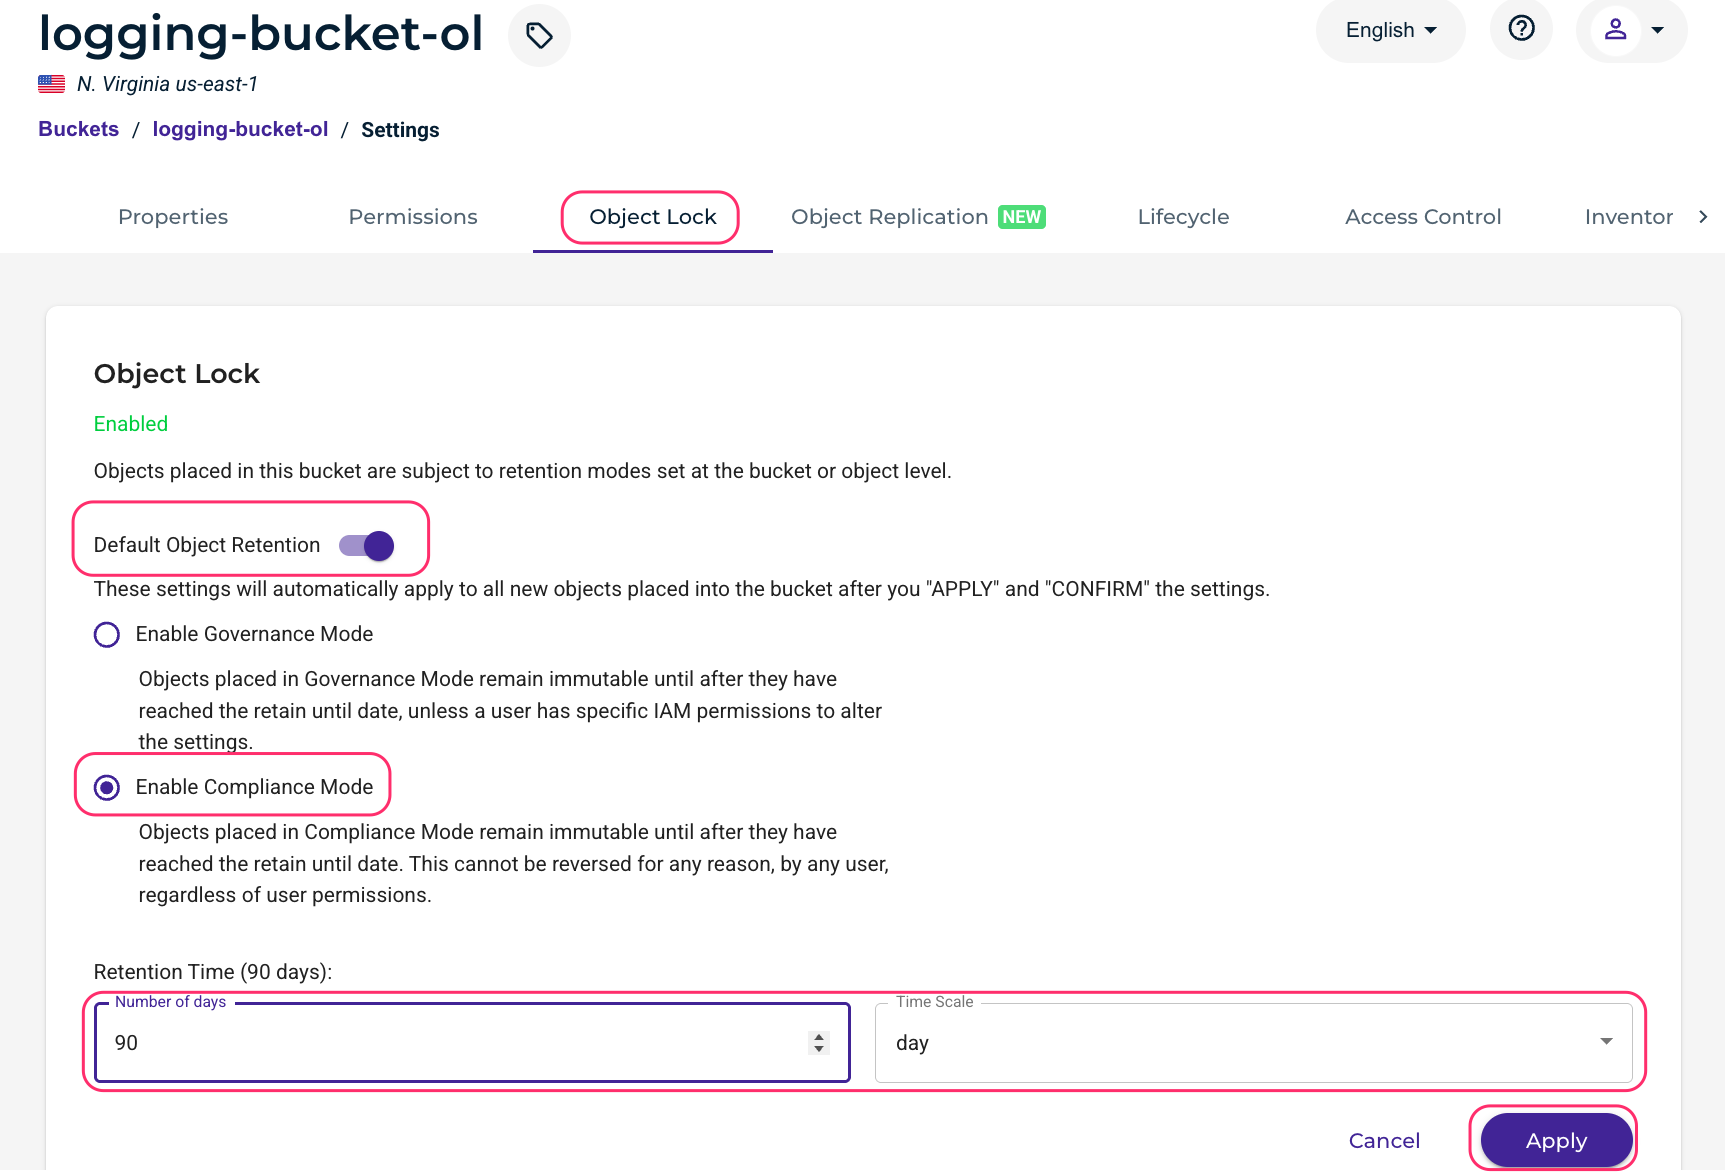
Click the Object Lock tab. Enable Default Object Retention, select the Enable Compliance Mode radio button, and enter the number of days and time scale for which you wish logs to be immutable ( for example, they cannot be deleted). Click Apply.
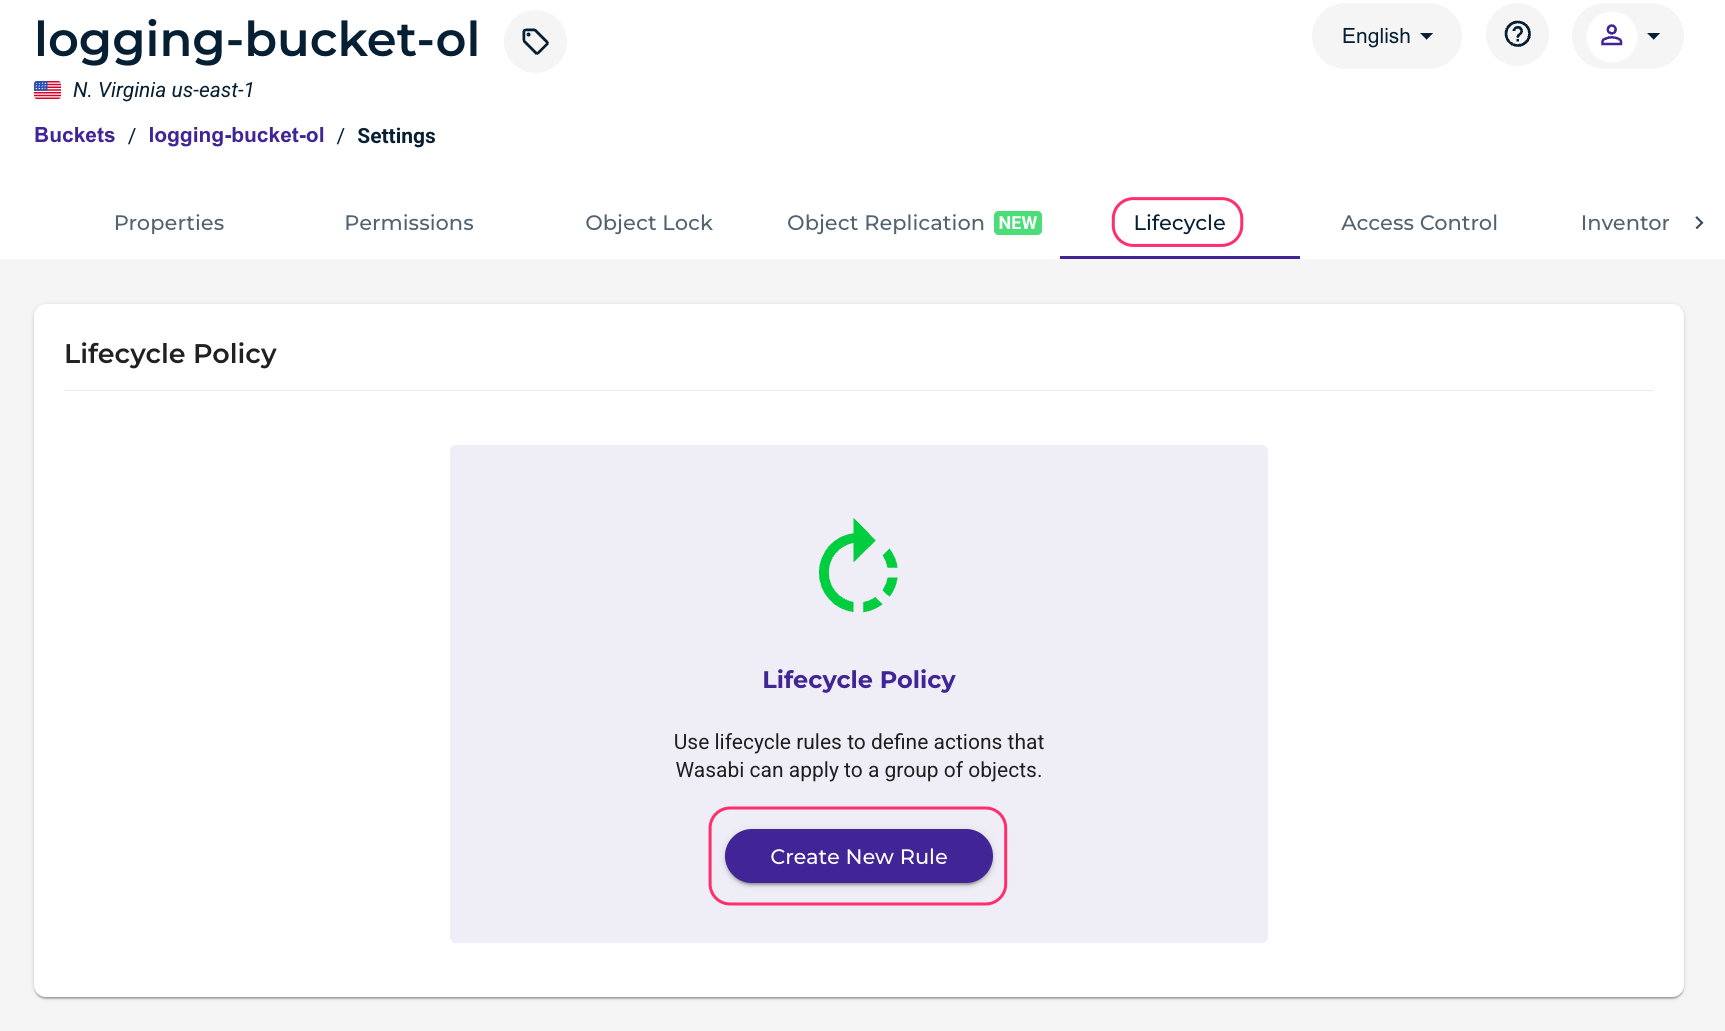
It is recommended to create a Lifecycle Policy to delete older log files. Click Lifecycle. Click Create New Rule.
Give the rule a name and select the radio button next to Apply to all objects in the bucket. Scroll down.
.png)
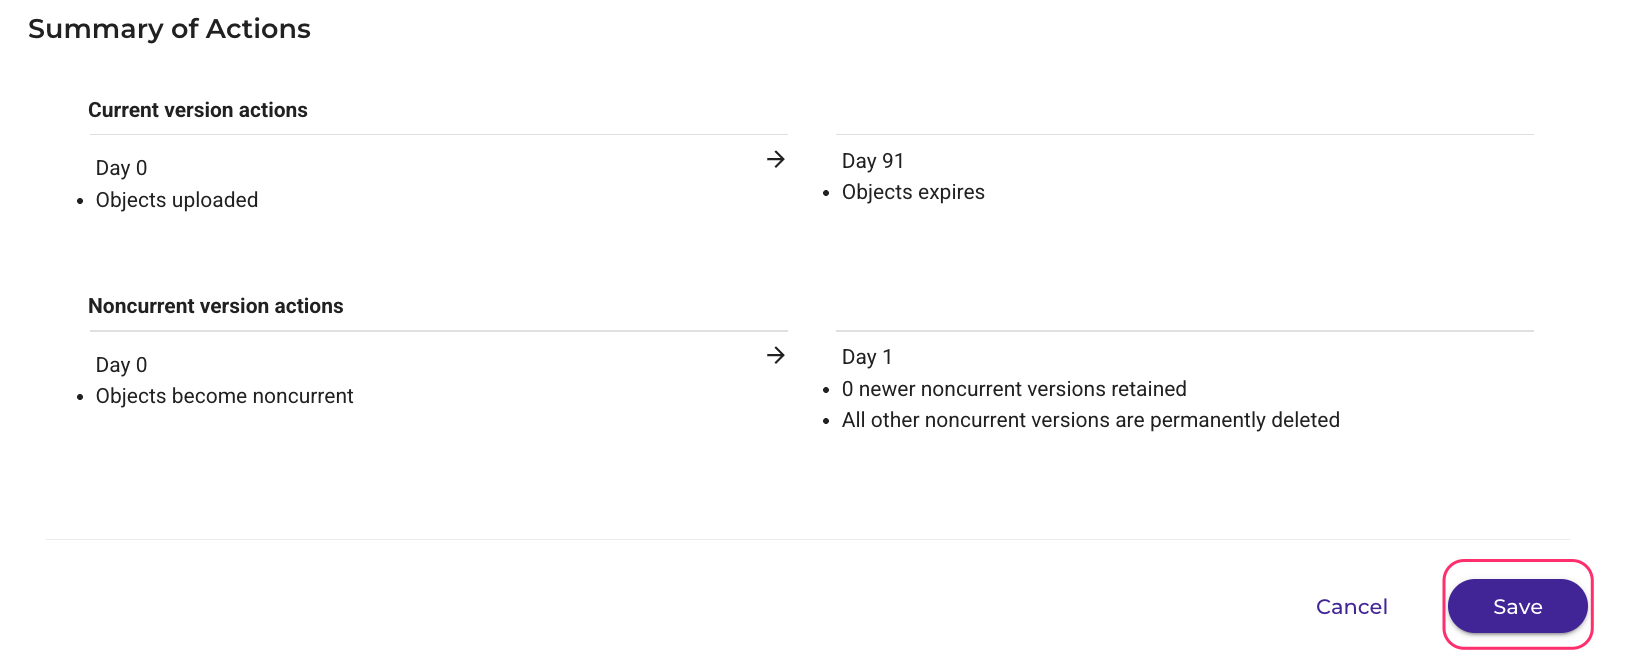
Under Actions, check the boxes next to Expire current version of objects and Permanently delete noncurrent versions of objects. Enter the number of days after the object creation (for example, 91 days) and the days after the object becomes non-current (1 day). This will fully delete a log file 92 days after it was created, which is two days after a log file’s immutability period is up since we previously configured a 90-day Object Lock Retention Time. Scroll down.
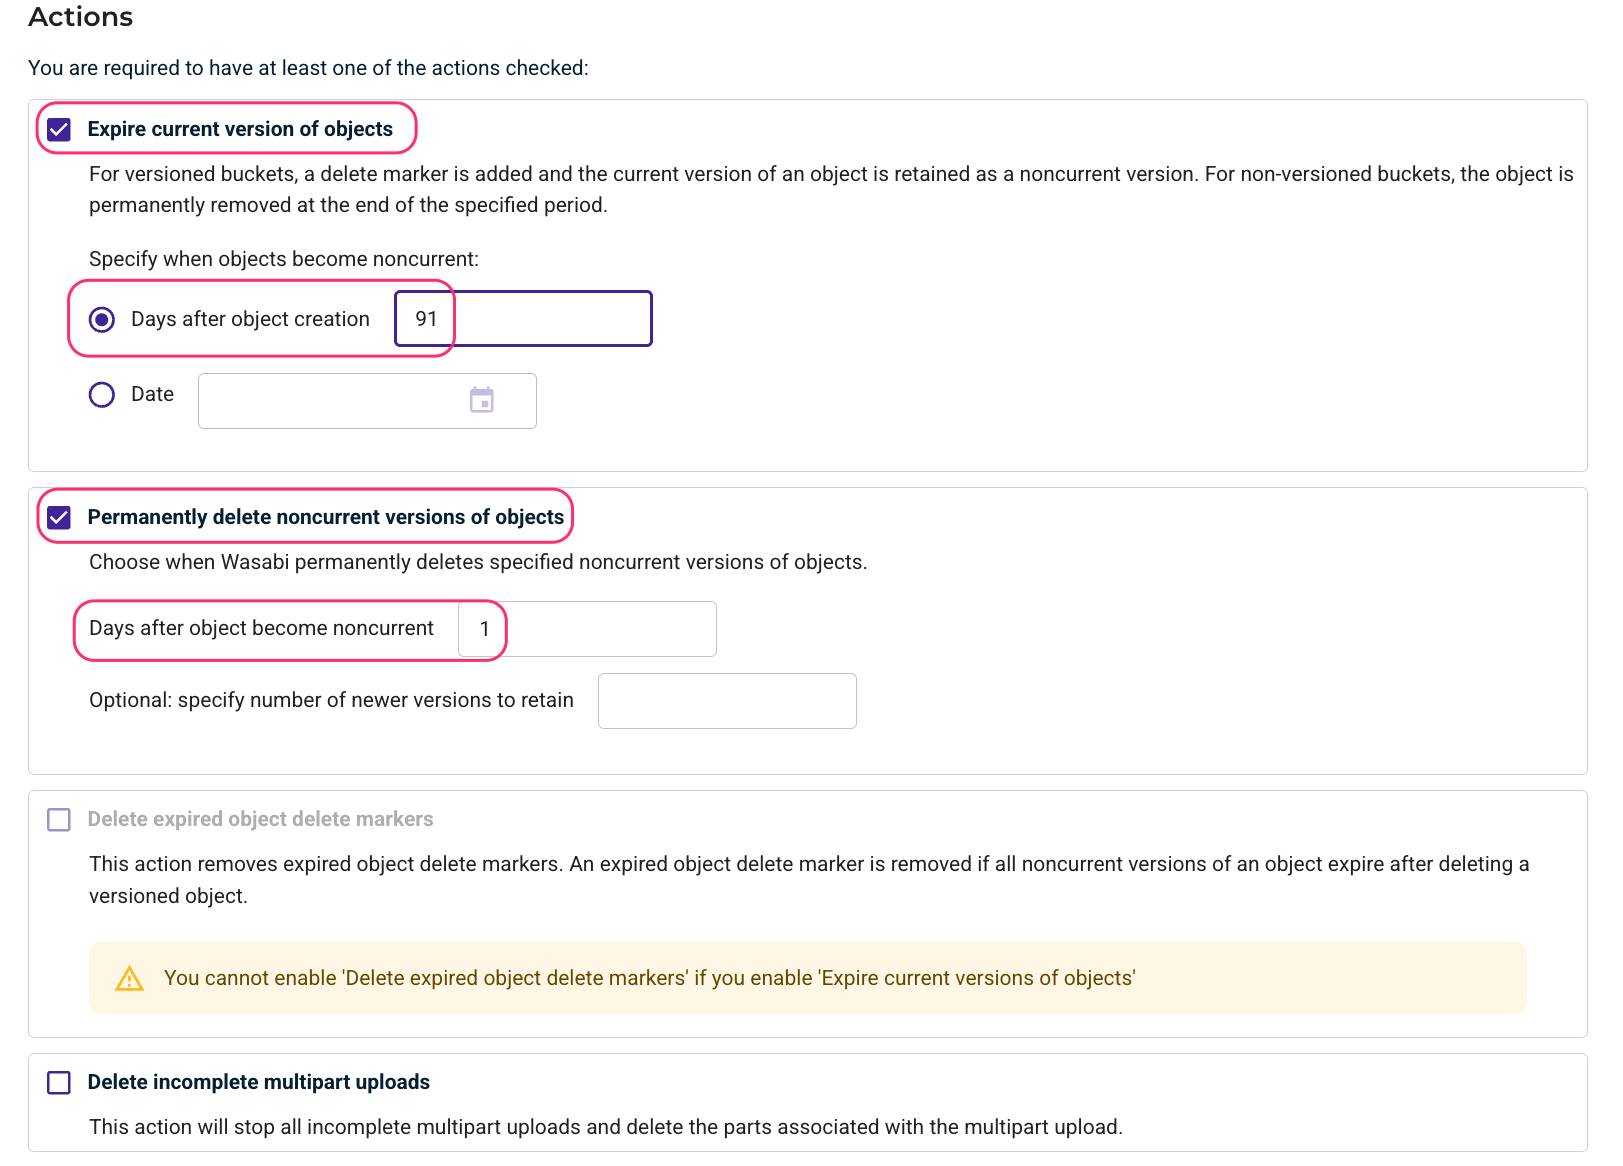
Click Save.
Creating a Wasabi Test Bucket
Create a test bucket. It does not have to have Object Lock or versioning enabled. This will be used for test object uploads, downloads, and deletions.
In the Wasabi console, click Buckets, then select the name of the bucket.
Click the settings gear wheel.
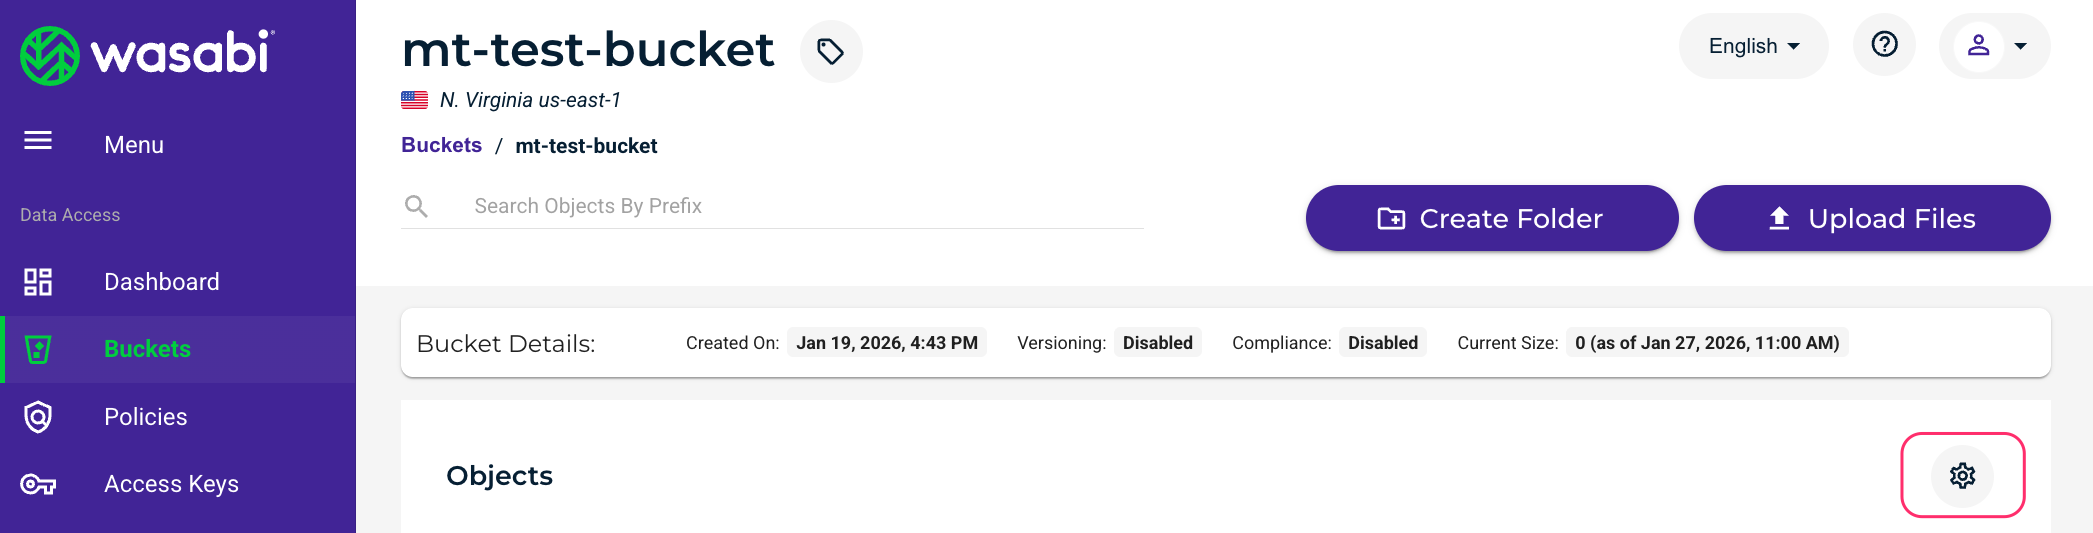
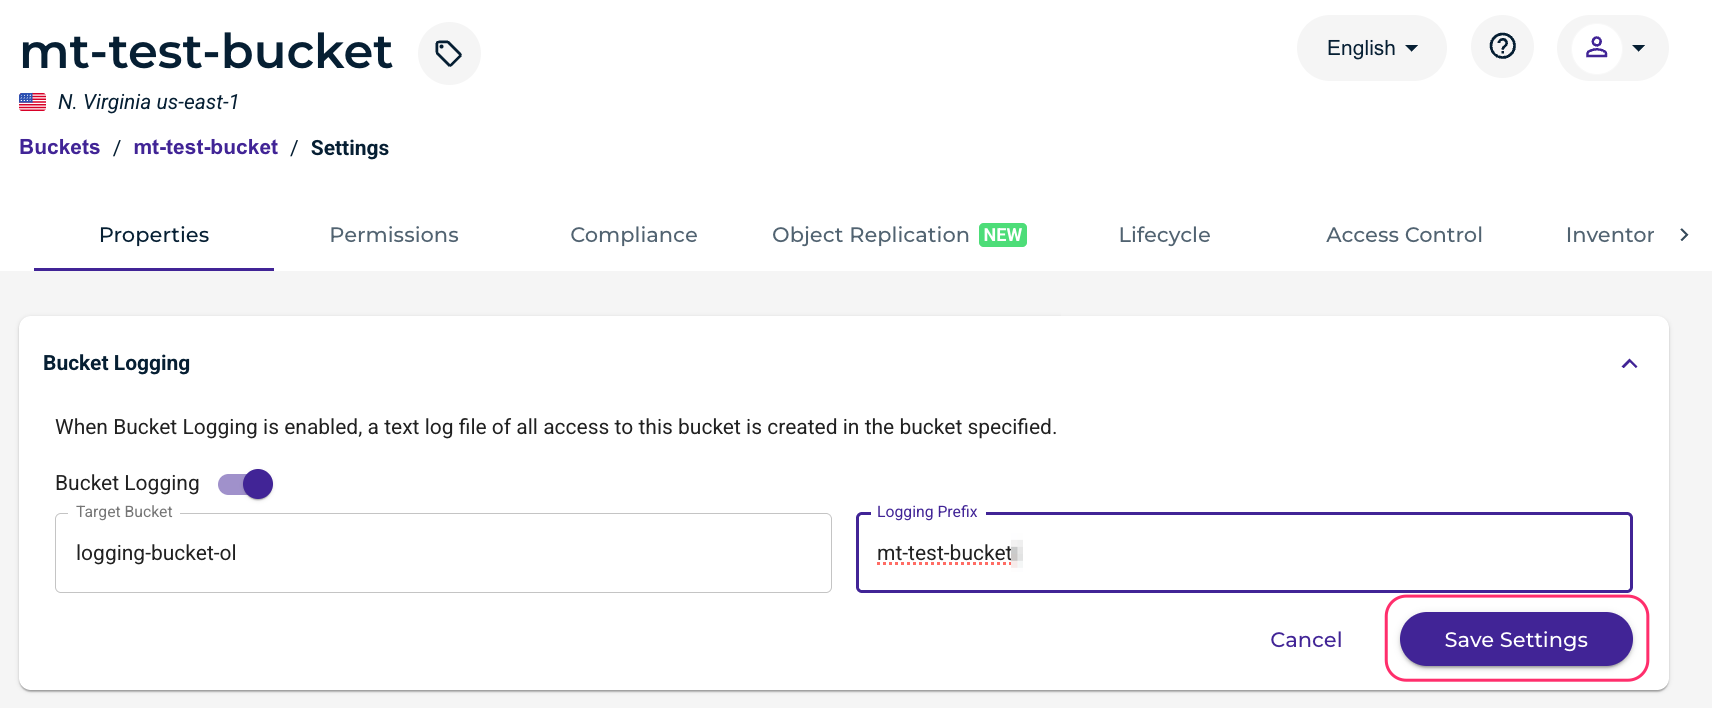
Under Properties, enable Bucket Logging. Select the previously created logging bucket, and give a logging prefix (the name of the bucket works well).
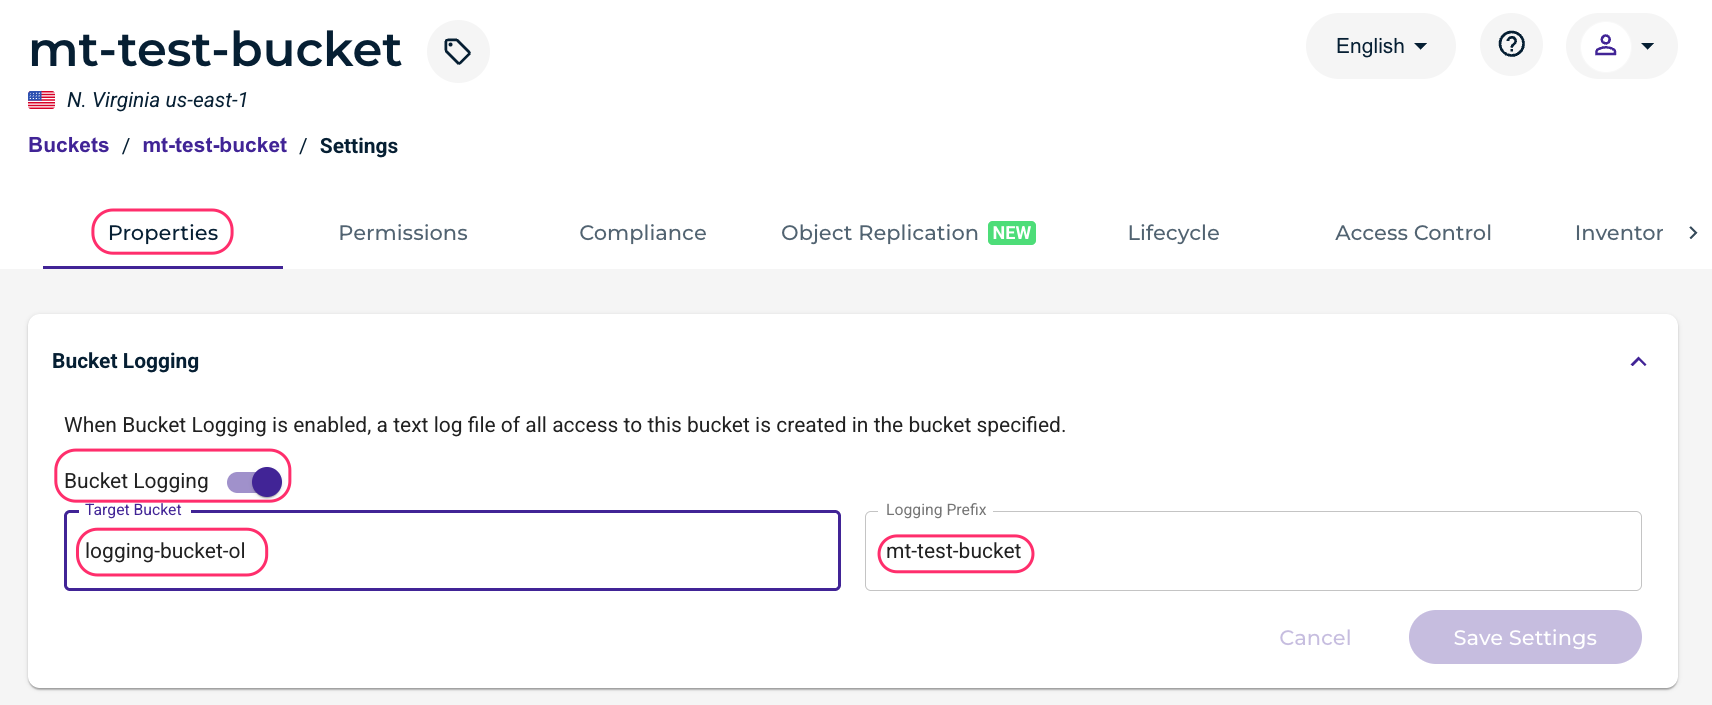
Click Save Settings.
Installing and Configuring Rclone
Log in to your Linux server via Secure Shell (SSH). The commands given here were executed on Ubuntu 24.04.4 LTS.
Install Rclone.
sudo apt install rcloneConfigure Rclone.
rclone configCreate a new remote by entering “n”.
$ rclone config
Current remotes:

Name Type
==== ====
wasabi s3

e) Edit existing remote
n) New remote
d) Delete remote
r) Rename remote
c) Copy remote
s) Set configuration password
q) Quit config
e/n/d/r/c/s/q> n
Name the remote wasabi.
Enter name for new remote.
name> wasabi
Enter the number associated with Amazon S3 Compliant Storage Providers (4 in our example).
Option Storage.
Type of storage to configure.
Choose a number from below, or type in your own value.
1 / 1Fichier
\ (fichier)
2 / Akamai NetStorage
\ (netstorage)
3 / Alias for an existing remote
\ (alias)
4 / Amazon S3 Compliant Storage Providers including AWS, Alibaba, ArvanCloud, Ceph, ChinaMobile, Cloudflare, Cubbit, DigitalOcean, Dreamhost, Exaba, FileLu, FlashBlade, GCS, Hetzner, HuaweiOBS, IBMCOS, IDrive, Intercolo, IONOS, Leviia, Liara, Linode, LyveCloud, Magalu, Mega, Minio, Netease, Outscale, OVHcloud, Petabox, Qiniu, Rabata, RackCorp, Rclone, Scaleway, SeaweedFS, Selectel, Servercore, SpectraLogic, StackPath, Storj, Synology, TencentCOS, Wasabi, Zata, Other
...
Storage> 4
Enter the number associated with Wasabi. This is 44 in our example, but this number changes over time.
Option provider.
Choose your S3 provider.
Choose a number from below, or type in your own value.
Press Enter to leave empty.
...
44 / Wasabi Object Storage
\ (Wasabi)
provider> 44
Enter “1” to enter your Wasabi access and secret keys in the next step.
Option env_auth.
Get AWS credentials from runtime (environment variables or EC2/ECS meta data if no env vars).
Only applies if access_key_id and secret_access_key is blank.
Choose a number from below, or type in your own boolean value (true or false).
Press Enter for the default (false).
1 / Enter AWS credentials in the next step.
\ (false)
2 / Get AWS credentials from the environment (env vars or IAM).
\ (true)
env_auth> 1
Enter your Wasabi access and secret keys. It is recommended to use a subuser’s keys rather than the root user’s keys.
Option access_key_id.
AWS Access Key ID.
Leave blank for anonymous access or runtime credentials.
Enter a value. Press Enter to leave empty.
access_key_id> 8X9HK***************

Option secret_access_key.
AWS Secret Access Key (password).
Leave blank for anonymous access or runtime credentials.
Enter a value. Press Enter to leave empty.
secret_access_key> vu6vZ3**********************************
Enter “1” to use v4 signatures.
Option region.
Region to connect to.
Leave blank if you are using an S3 clone and you don't have a region.
Choose a number from below, or type in your own value.
Press Enter to leave empty.
/ Use this if unsure.
1 | Will use v4 signatures and an empty region.
\ ()
/ Use this only if v4 signatures don't work.
2 | E.g. pre Jewel/v10 CEPH.
\ (other-v2-signature)
region> 1
This configuration example discusses the use of Wasabi's us-east-1 storage region. Use the region your logging bucket is located in. For a list of regions, see Available Storage Regions.
Select the number corresponding to the region your logging bucket is located in.
Option endpoint.
Endpoint for S3 API.
Required when using an S3 clone.
Choose a number from below, or type in your own value.
Press Enter to leave empty.
1 / Wasabi US East 1 (N. Virginia)
\ (s3.wasabisys.com)
2 / Wasabi US East 2 (N. Virginia)
\ (s3.us-east-2.wasabisys.com)
3 / Wasabi US Central 1 (Texas)
\ (s3.us-central-1.wasabisys.com)
4 / Wasabi US West 1 (Oregon)
\ (s3.us-west-1.wasabisys.com)
5 / Wasabi CA Central 1 (Toronto)
\ (s3.ca-central-1.wasabisys.com)
6 / Wasabi EU Central 1 (Amsterdam)
\ (s3.eu-central-1.wasabisys.com)
7 / Wasabi EU Central 2 (Frankfurt)
\ (s3.eu-central-2.wasabisys.com)
8 / Wasabi EU West 1 (London)
\ (s3.eu-west-1.wasabisys.com)
9 / Wasabi EU West 2 (Paris)
\ (s3.eu-west-2.wasabisys.com)
10 / Wasabi EU South 1 (Milan)
\ (s3.eu-south-1.wasabisys.com)
11 / Wasabi AP Northeast 1 (Tokyo) endpoint
\ (s3.ap-northeast-1.wasabisys.com)
12 / Wasabi AP Northeast 2 (Osaka) endpoint
\ (s3.ap-northeast-2.wasabisys.com)
13 / Wasabi AP Southeast 1 (Singapore)
\ (s3.ap-southeast-1.wasabisys.com)
14 / Wasabi AP Southeast 2 (Sydney)
\ (s3.ap-southeast-2.wasabisys.com)
endpoint> 1
Click Enter to leave the location constraint empty.
Option location_constraint.
Location constraint - must be set to match the Region.
Leave blank if not sure. Used when creating buckets only.
Enter a value. Press Enter to leave empty.
location_constraint>
Enter “1” in the Option acl step.
Option acl.
Canned ACL used when creating buckets and storing or copying objects.
This ACL is used for creating objects and if bucket_acl isn't set, for creating buckets too.
For more info visit https://docs.aws.amazon.com/AmazonS3/latest/dev/acl-overview.html#canned-acl
Note that this ACL is applied when server-side copying objects as S3
doesn't copy the ACL from the source but rather writes a fresh one.
If the acl is an empty string then no X-Amz-Acl: header is added and
the default (private) will be used.
Choose a number from below, or type in your own value.
Press Enter to leave empty.
/ Owner gets FULL_CONTROL.
1 | No one else has access rights (default).
\ (private)
/ Owner gets FULL_CONTROL.
2 | The AllUsers group gets READ access.
\ (public-read)
/ Owner gets FULL_CONTROL.
3 | The AllUsers group gets READ and WRITE access.
| Granting this on a bucket is generally not recommended.
\ (public-read-write)
/ Owner gets FULL_CONTROL.
4 | The AuthenticatedUsers group gets READ access.
\ (authenticated-read)
/ Object owner gets FULL_CONTROL.
5 | Bucket owner gets READ access.
| If you specify this canned ACL when creating a bucket, Amazon S3 ignores it.
\ (bucket-owner-read)
/ Both the object owner and the bucket owner get FULL_CONTROL over the object.
6 | If you specify this canned ACL when creating a bucket, Amazon S3 ignores it.
\ (bucket-owner-full-control)
acl> 1
Enter “n” for the Advanced configuration.
Edit advanced config?
y) Yes
n) No (default)
y/n> n
Enter “y” to keep the remote configuration.
Configuration complete.
Options:
- type: s3
- provider: Wasabi
- access_key_id: 8X9HK***************
- secret_access_key: vu6vZ3**********************************
- endpoint: s3.wasabisys.com
- acl: private
Keep this "wasabi" remote?
y) Yes this is OK (default)
e) Edit this remote
d) Delete this remote
y/e/d> y
Enter “q” to quit the configuration.
Current remotes:

Name Type
==== ====
wasabi s3

e) Edit existing remote
n) New remote
d) Delete remote
r) Rename remote
c) Copy remote
s) Set configuration password
q) Quit config
e/n/d/r/c/s/q> q
Start Rclone with the following commands to create a local directory and test connectivity to your Wasabi bucket. Replace YOUR_USER and YOUR_GROUP with your Linux user and group, and YOUR_LOGGING_BUCKET with the name of your logging bucket.
sudo mkdir /mnt/wasabi-logs/
sudo chown YOUR_USER:YOUR_GROUP /mnt/wasabi-logs/
rclone mount wasabi:/YOUR_LOGGING_BUCKET/ /mnt/wasabi-logs/
Perform some test uploads, downloads, and deletions on your test bucket (not the logging bucket). After a short period of time (approximately 30 minutes or so), a log file should be generated in your logging bucket.
Log in to your Linux server with another SSH session and issue the following command. You should see a bucket log listed.
ls -la /mnt/wasabi-logs/Go back to your original SSH session and issue a “Ctrl+C” command to stop Rclone.
Create an “rclone.service” file in /etc/systemd/system with the following contents. You can use
sudo vi /etc/systemd/system/rclone.serviceto create the file, or use whatever your preferred Linux text editor is (for example, vi, vim, nano). Replace YOUR_USER and YOUR_GROUP with your Linux user and group and YOUR_LOGGING_BUCKET with the name of your logging bucket.[Unit] Description=Startup script for Rclone to mount Wasabi logs bucket as /mnt/wasabi-logs After=network-online.target Wants=network-online.target [Service] ExecStart=/usr/bin/rclone mount wasabi:/YOUR_LOGGING_BUCKET/ /mnt/wasabi-logs/ --dir-cache-time 10s --poll-interval 10s --allow-other ExecStop=/bin/fusermount -u /mnt/wasabi-logs Restart=always RestartSec=10 User=YOUR_USER Group=YOUR_GROUP Type=simple [Install] WantedBy=multi-user.targetEdit /etc/fuse.conf file by issuing the
sudo vi /etc/fuse.confcommand or by using another text editor. Uncomment (remove the preceding # from the line) the following line.user_allow_otherIssue the following commands to run Rclone as a service that persists across reboots.
sudo systemctl daemon-reload
sudo systemctl enable rclone.service
sudo systemctl start rclone.service
Test to make sure Rclone is running by issuing the following command. You should see your bucket log file(s) after a few seconds.
ls -la /mnt/wasabi-logs/
Installing and Configuring Logstash
Log in to your Linux server via SSH.
Issue the following commands to install Logstash.
wget -qO - https://artifacts.elastic.co/GPG-KEY-elasticsearch | sudo gpg --dearmor -o /usr/share/keyrings/elastic-keyring.gpg
echo "deb [signed-by=/usr/share/keyrings/elastic-keyring.gpg] https://artifacts.elastic.co/packages/8.x/apt stable main" | sudo tee /etc/apt/sources.list.d/elastic-8.x.list
sudo apt update
sudo apt install logstash
Issue the following command to install the Logstash syslog output plugin.
/usr/share/logstash/bin/logstash-plugin install logstash-output-syslogIn /etc/logstash/logstash.yml uncomment (remove the preceding # character from the line) and set the following. This affects all pipelines, but it may instead be set for individual pipelines if desired. Use the command
sudo vi /etc/logstash/logstash.ymlto edit the file, or use your favorite text editor.pipeline.ecs_compatibility: disabledCreate a sample config file for testing purposes using your favorite Linux text editor. For example,
sudo vi /etc/logstash/conf.d/wasabi-to-stdout-sample.conf
Download and open the attached wasabi-to-stdout-sample.conf file, copy and paste the contents into the file, and save the file.To test with a log file from your bucket, execute the following command.
/usr/share/logstash/bin/logstash -f /etc/logstash/conf.d/wasabi-to-stdout-sample.confUpload, download, and delete files from your test bucket several times and then wait for a log file to appear in your logging bucket and in /mnt/wasabi-logs/. It can take approximately 30 minutes or so for a log file to show up.
You will see output similar to the following in the SSH session used to issue the command above.

Press Ctrl+C to stop Logstash.
Configuring SEM to Accept Incoming Syslog from Logstash
Log in to your SEM web console.
Click Configure. Click Manager connectors.

Search for syslog, select the checkbox next to Syslog Generic. Click Add Connector.

Change the Log File to be /var/log/local3.log and click Add. “local3” defines the syslog facility number that will be used to listen for incoming syslog messages from Logstash.
Note that the syslog facility number may need to be changed later depending on what Logstash actually sends.

You will now see Syslog Generic under Configured connectors. Select the checkbox, and click Start.

Creating a New Logstash Configuration File
Remove the previously created temporary Logstash configuration file.
sudo rm /etc/logstash/conf.d/wasabi-to-stdout-sample.confCreate a new /etc/logstash/conf.d/wasabi-logs-to-sem.conf file by issuing the following command, or by using your favorite text editor.
sudo vi /etc/logstash/conf.d/wasabi-logs-to-sem.conf
Download and open the attached wasabi-logs-to-sem.conf file, copy and paste the contents into the file, replace the IP of your SEM server, and save the file.Start Logstash as a service and ensure it persists across reboots by running the following commands. Logstash will automatically use the new configuration file. The status command will show if the service is running.
sudo systemctl start logstash
sudo systemctl enable logstash
sudo systemctl status logstash
Generating New Bucket Logs and Observing in SEM
Generate new bucket logs by performing test uploads, downloads, and deletions in your test bucket. It may take about 30 minutes for logs to appear in your logging bucket and SEM.
Observe the new log files in SEM by clicking Live Events and enabling the Live slider. Here is an example screenshot of Wasabi bucket logs in SEM.

Click one of the entries, then scroll down to see the ExtraneousInfo. Click how more.

You will see details about the log entry, such as the bucket name (bucket), request-uri (uri), TLS version (tls), User Agent (ua), and so on.
Troubleshooting Lack of Log Entries in SEM
If you do not see any syslog entries for bucket logs in SEM, it is recommended to check the syslog facility number being sent by Logstash by using tcpdump on the Logstash server. For example, issue the following command, replacing 10.1.2.3 with your SEM server IP, and note that Logstash is sending syslog facility number 1 from the local1 output.
sudo tcpdump host 10.1.2.3
[sudo] password for xxxxx:
tcpdump: verbose output suppressed, use -v[v]... for full protocol decode
listening on ens18, link-type EN10MB (Ethernet), snapshot length 262144 bytes
02:56:39.290839 IP xxxxx-logstash-2.44646 > 10.1.2.3.syslog: SYSLOG local1.notice, length: 512
If this differs from the facility number configured in step 4 of the Configure SEM to Accept Incoming Syslog from Logstash section above, change the facility number on SEM by repeating step 4 and restarting the Syslog Generic connector.
Configuring Other Buckets to Log to Your Logging Bucket
Repeat steps 2-5 of the Creating Wasabi Test Bucket section on your other existing buckets to log to your logging bucket.
Observe new bucket log entries as they appear in SEM.
Appendix A - Example SEM Entry and Bucket Log
Below is an example of ExtraneousInfo from a SEM log entry, along with the original bucket log as it appears in a logging bucket before it is modified by Logstash.
Sample ExtraneousInfo from a SEM syslog entry.
Raw message: "LOGSTASH[-]: bucket_owner=49147859625EDC969DDAB60F1069DFA737576CF81F72FD97CCCDA1F9F8867C7E bucket=mt-veeam-iam-sts-test ts=20/Feb/2026:05:57:16 +0000 ip=173.237.197.67 requester=W1T2L6NNH34F3FAABJ4E1 request_id=3E989BC100BFE406:B op=REST.GET.OBJECT key=Veeam/Backup/Veeam/Clients/{288511a9-a21e-48c7-9960-51d1227808f4}/cb7e504b-29d8-48c9-80a2-60caa39eb0f5/CloudStg/Data/{d29775b7-a4e2-4782-b963-2a28b4d6a089}/{284d88d0-01fb-492b-86f4-5ad2fc9661ff}/10231_05f955ef64954a280e2292d987b288e1_00000000000000000000000000000000 uri="GET /mt-veeam-iam-sts-test/Veeam/Backup/Veeam/Clients/{288511a9-a21e-48c7-9960-51d1227808f4}/cb7e504b-29d8-48c9-80a2-60caa39eb0f5/CloudStg/Data/{d29775b7-a4e2-4782-b963-2a28b4d6a089}/{284d88d0-01fb-492b-86f4-5ad2fc9661ff}/10231_05f955ef64954a280e2292d987b288e1_00000000000000000000000000000000?versionId=001769040550066770039-_K2MdOrKe1" status=200 error=- bytes_sent=5716 object_size=5716 total_time=42 turn_around_time=0 referrer="" ua="APN/1.0 Veeam/1.0 Backup/13.0" tls="TLSv1.3" version_id=001769040550066770039-_K2MdOrKe1"
Original log entry.
49147859625EDC969DDAB60F1069DFA737576CF81F72FD97CCCDA1F9F8867C7E mt-veeam-iam-sts-test [20/Feb/2026:05:57:16 +0000] 173.237.197.67 W1T2L6NNH34F3FAABJ4E1 3E989BC100BFE406:B REST.GET.OBJECT Veeam%2FBackup%2FVeeam%2FClients%2F%7B288511a9-a21e-48c7-9960-51d1227808f4%7D%2Fcb7e504b-29d8-48c9-80a2-60caa39eb0f5%2FCloudStg%2FData%2F%7Bd29775b7-a4e2-4782-b963-2a28b4d6a089%7D%2F%7B284d88d0-01fb-492b-86f4-5ad2fc9661ff%7D%2F10231_05f955ef64954a280e2292d987b288e1_00000000000000000000000000000000 "GET /mt-veeam-iam-sts-test/Veeam/Backup/Veeam/Clients/%7B288511a9-a21e-48c7-9960-51d1227808f4%7D/cb7e504b-29d8-48c9-80a2-60caa39eb0f5/CloudStg/Data/%7Bd29775b7-a4e2-4782-b963-2a28b4d6a089%7D/%7B284d88d0-01fb-492b-86f4-5ad2fc9661ff%7D/10231_05f955ef64954a280e2292d987b288e1_00000000000000000000000000000000?versionId=001769040550066770039-_K2MdOrKe1" 200 - 5716 5716 42 0 "" "APN/1.0 Veeam/1.0 Backup/13.0" "TLSv1.3" 001769040550066770039-_K2MdOrKe1