Wasabi offers Single Sign-On (SSO) functionality for Wasabi Console access using OpenID Connect (OIDC) integration with Microsoft Entra ID (formerly Azure Active Directory) as the Identity Provider (IdP).
This article provides configuration instructions for both the IdP administrator and the SSO user to properly configure and complete a Wasabi Console login using the organization's Microsoft Entra ID SSO service.
Configuring the OIDC App in Microsoft Entra ID (IdP Side)
Registering the Application
Sign in to the Microsoft Entra admin center (https://entra.microsoft.com) as an administrator.
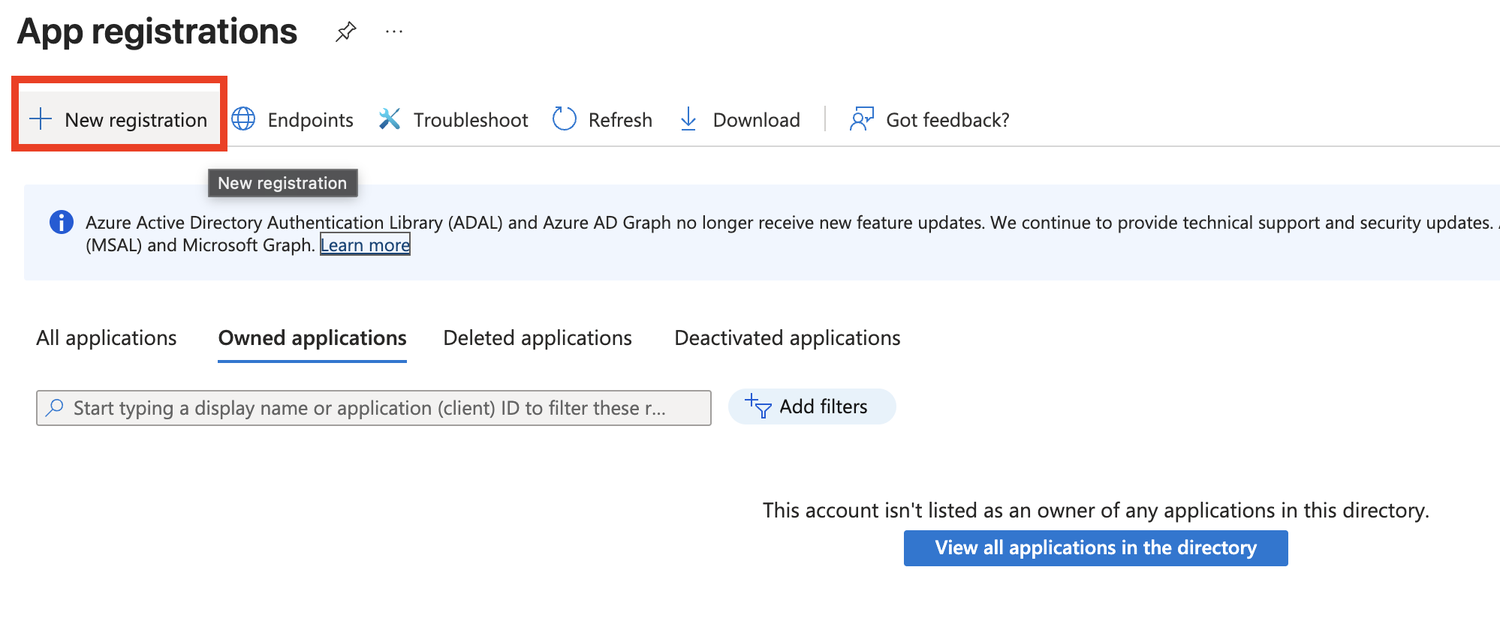
Navigate to Entra ID, select App registrations, and then click the + New registration tab. The Register an application page is displayed.
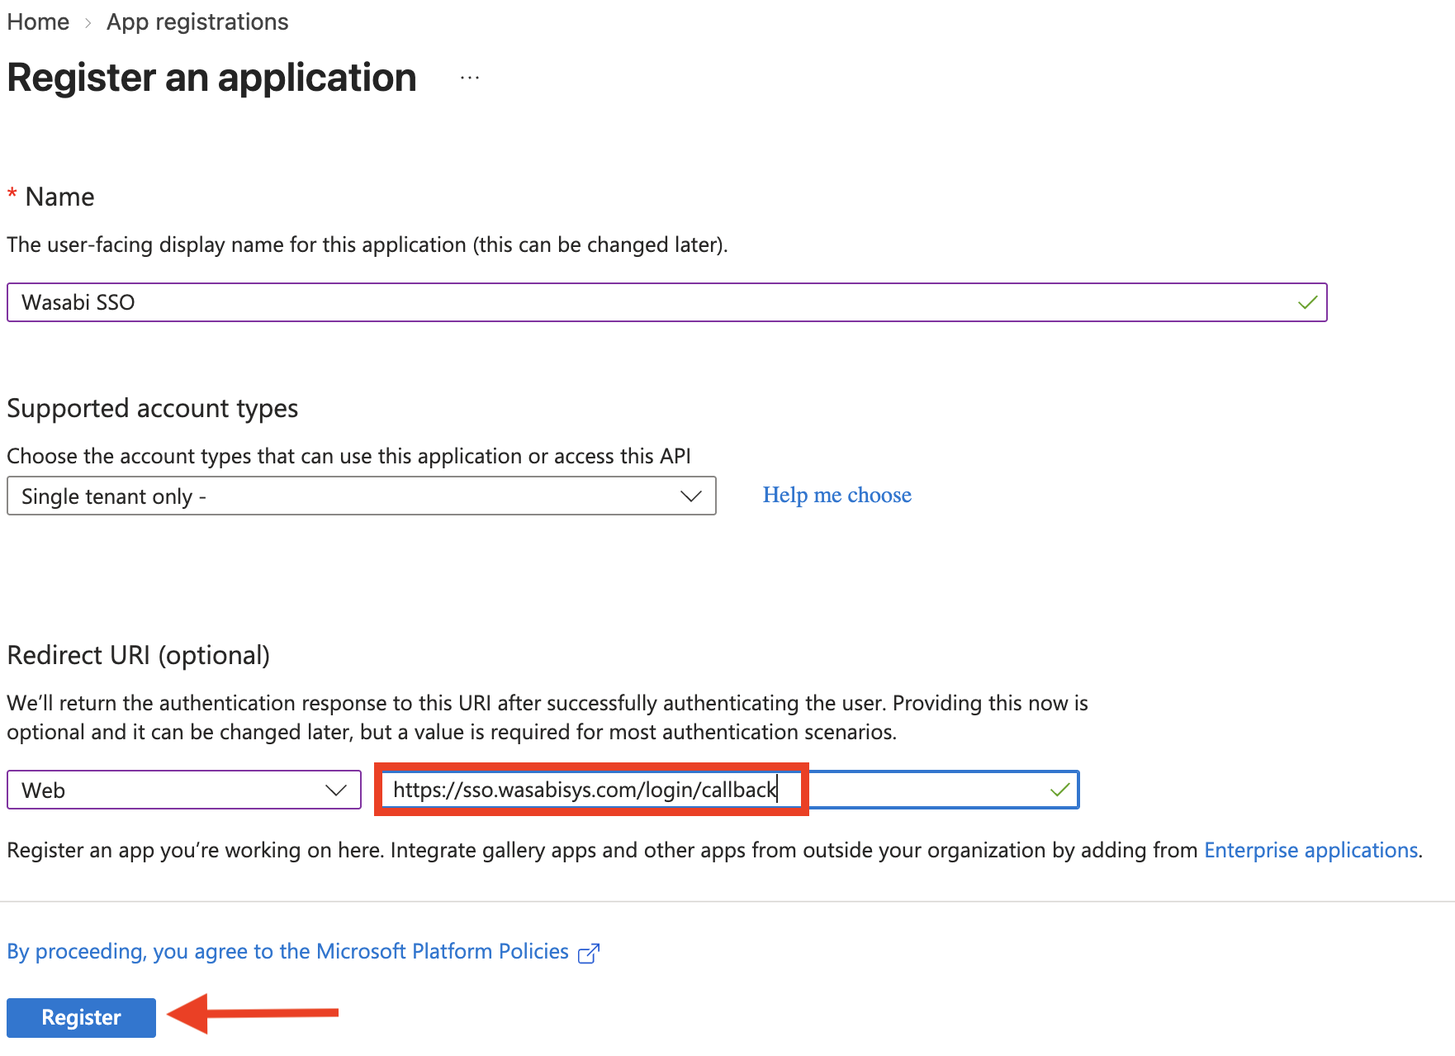
On the Register an application page, enter the following information, and then click Register.
Name—Wasabi SSO
Supported account types—Single tenant only
Redirect URI platform—Web
Redirect URI—
https://sso.wasabisys.com/login/callback
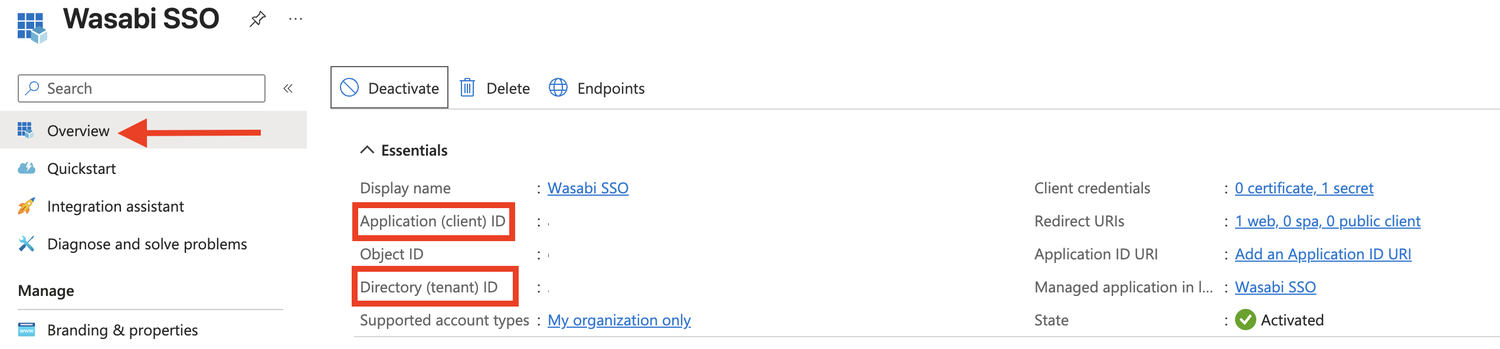
On the application Overview page, copy the Application (client) ID and the Directory (tenant) ID values for later use.
Configuring Authentication Settings
Navigate to Manage and select Authentication (Preview).
On the Redirect URI configuration tab, verify that the Web Redirect URI is
https://sso.wasabisys.com/login/callback.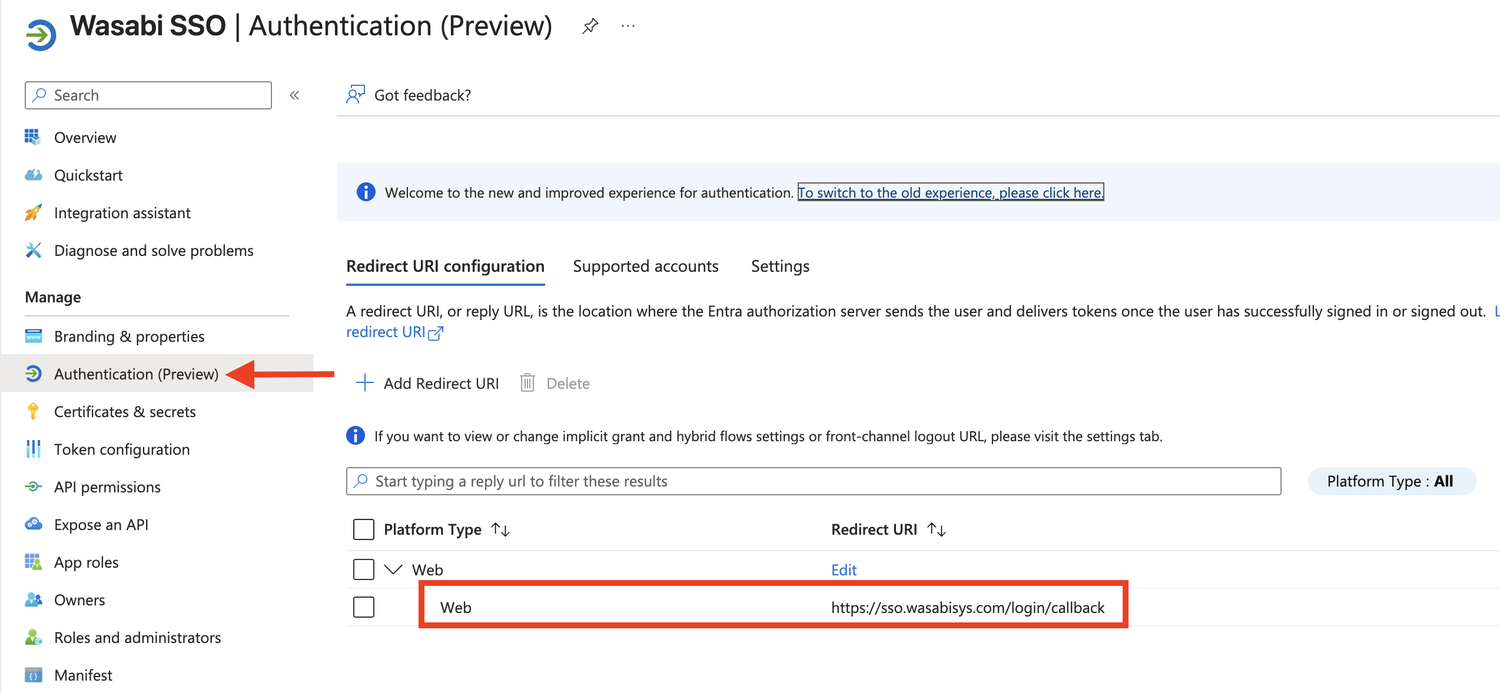
Select the Settings tab. Under Implicit grant and hybrid flows, keep Access tokens and ID tokens unchecked. Click Save if you made changes.
This configuration uses the Authorization Code flow, which corresponds to the Back Channel option in Wasabi Console. Implicit grant settings are not required.
Creating a Client Secret
Navigate to App registrations, select Wasabi SSO, then select Certificates & secrets, and click the Client secrets tab.
Under Client secrets, click + New client secret. The Add a client secret dialog is displayed.
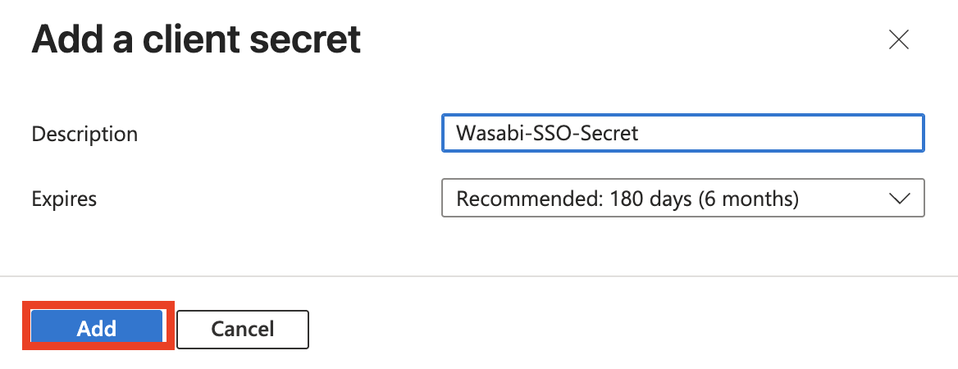
Enter the following information:
Description—Wasabi-SSO-Secret, for example.
Expires— Select an expiration period that meets your organization's security policies.
Click Add.
Record the client secret Value for use in your client application code. This secret value will not be displayed again.
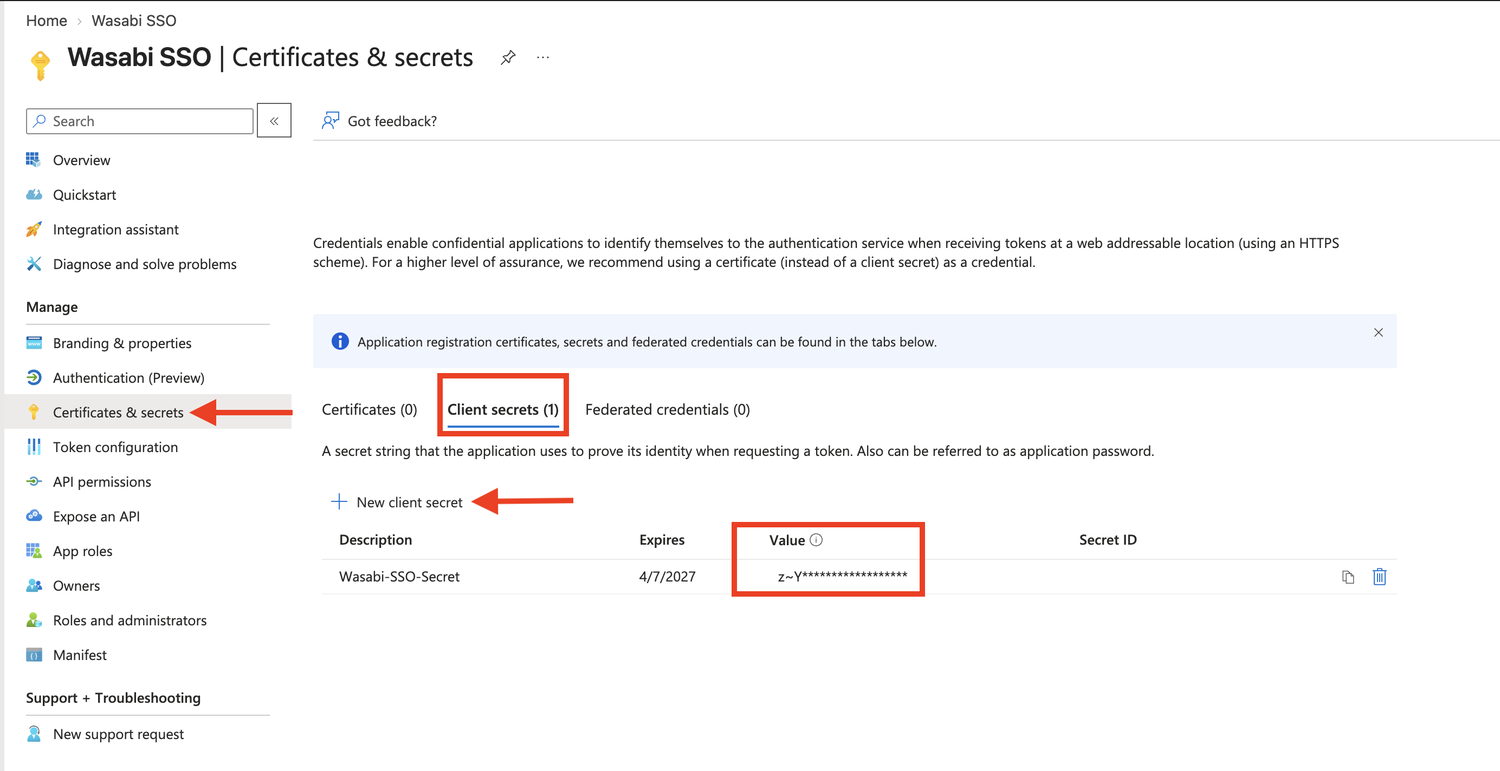
Important: Use the secret Value, not the Secret ID. Microsoft Entra ID displays the Value only when you create the secret.
Configuring API Permissions (If Required)
API permissions determine the information the application can request during authentication.
Navigate to App registrations, select Wasabi SSO, then select API permissions, and click + Add a permission.
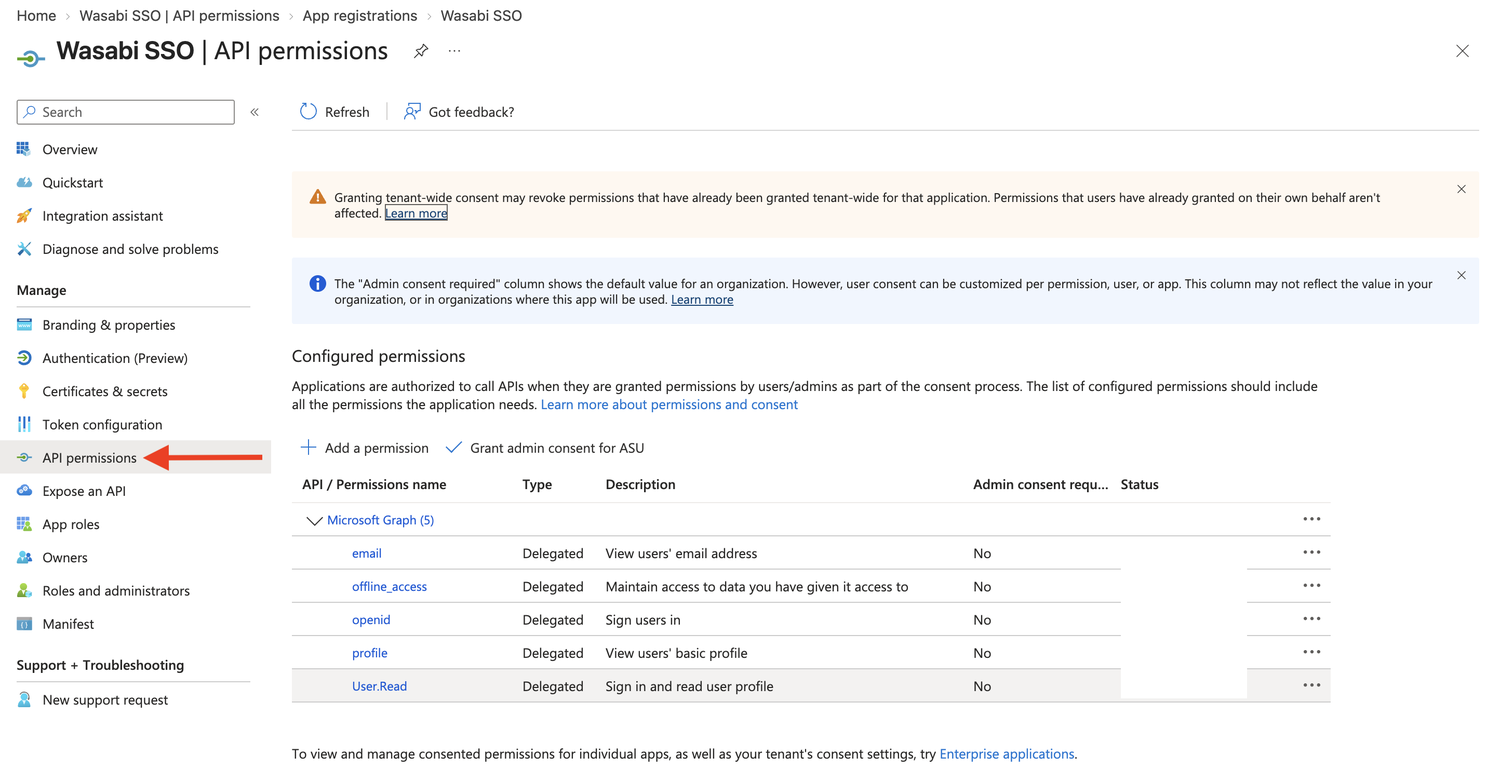
Select Microsoft Graph, and then select Delegated permissions.
Search for and select the following permissions, and then click Add permissions.
openid—Enables OpenID Connect authentication and allows the application to request an ID token.
profile—Allows the application to request basic profile information, such as the user's name.
email—Allows the application to request the user's email address.
offline_access—Allows the application to request refresh tokens, when applicable.
User.Read—Allows the application to read the signed-in user's basic profile through Microsoft
Graph, if needed.
If your organization's consent policies require it, click Grant admin consent for [Organization Name] and confirm. Verify that the permissions show Granted for [Organization Name].
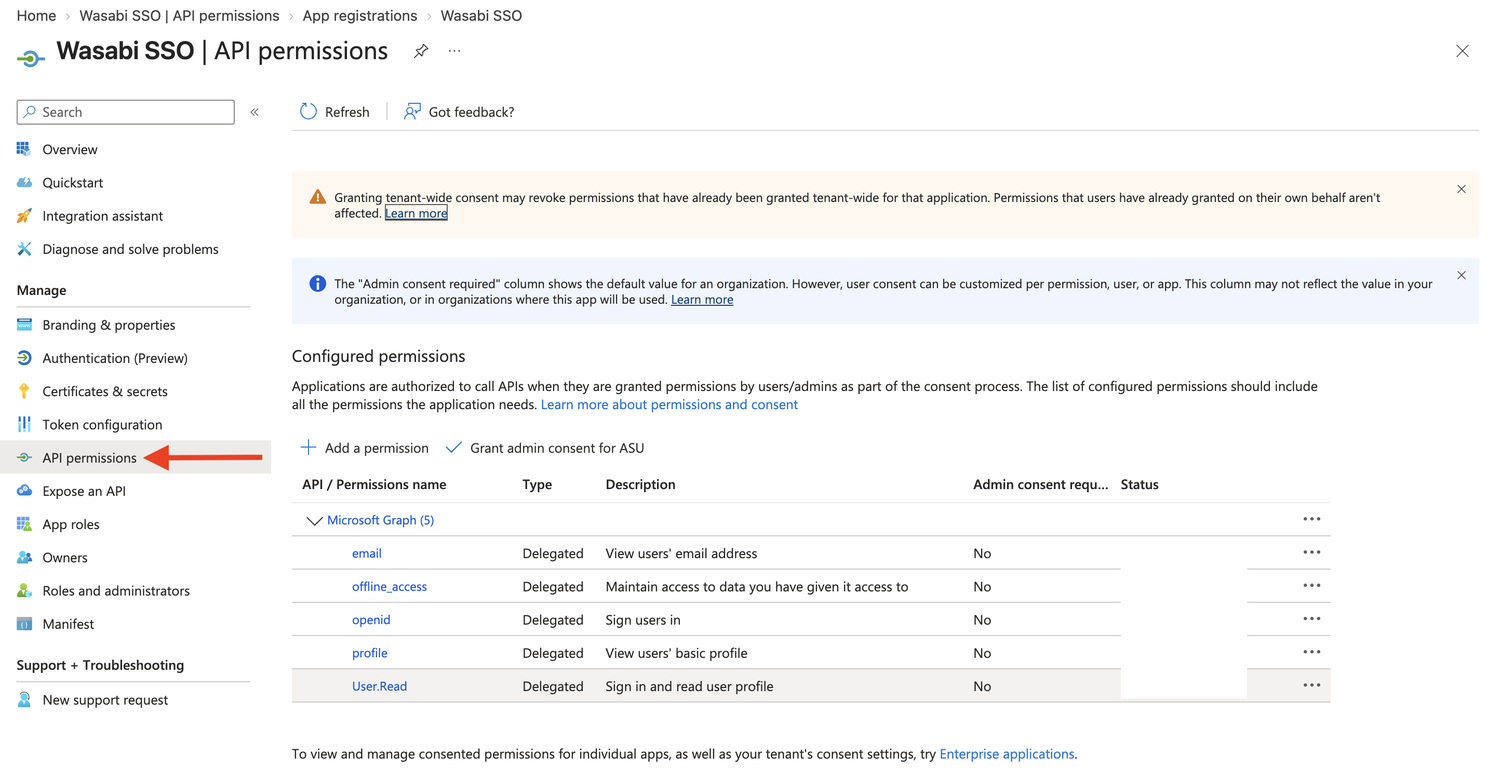
Configuring Microsoft Graph API permissions is optional for this integration. Depending on your organization's consent policies, users may be prompted to consent upon sign-in, or an administrator may need to grant consent for the application.
Creating a Security Group
A security group organizes the users who need access to Wasabi Console. Microsoft Entra ID includes the group in the OIDC token, and Wasabi uses it to match users to an SSO role.
In Entra ID, select Groups, then select All groups, and click + New group.
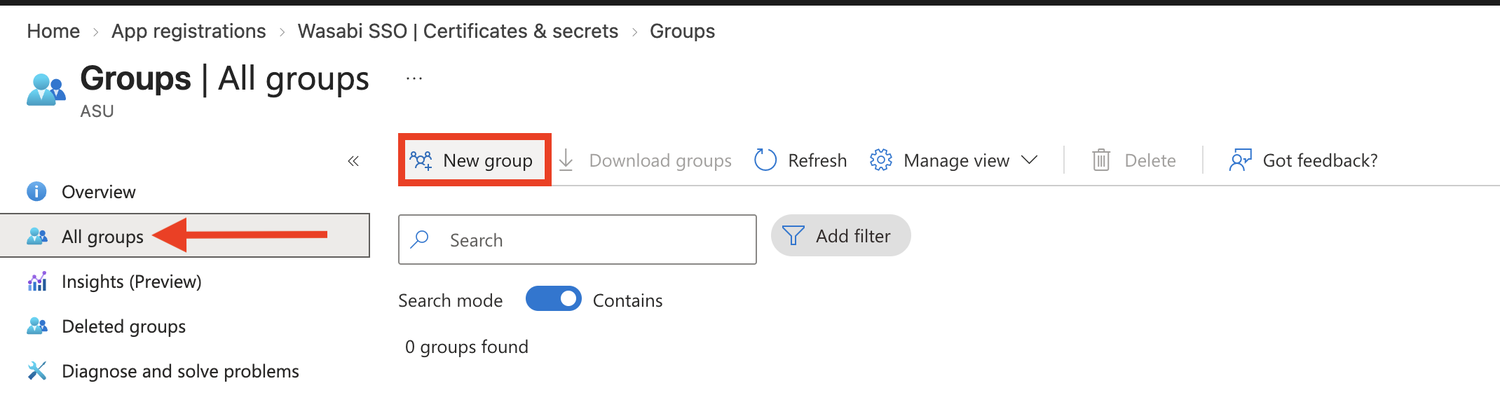
On the New Group page, enter the security group settings:
Group type—Select Security.
Group name—Type WasabiAdmin.
Group description—Type Wasabi Console SSO Administrators.
Microsoft Entra roles can be assigned to the group—Toggle Disabled.
Membership type—Select Assigned.
Members—Select the users who require access to the Wasabi Console.
Click Create.
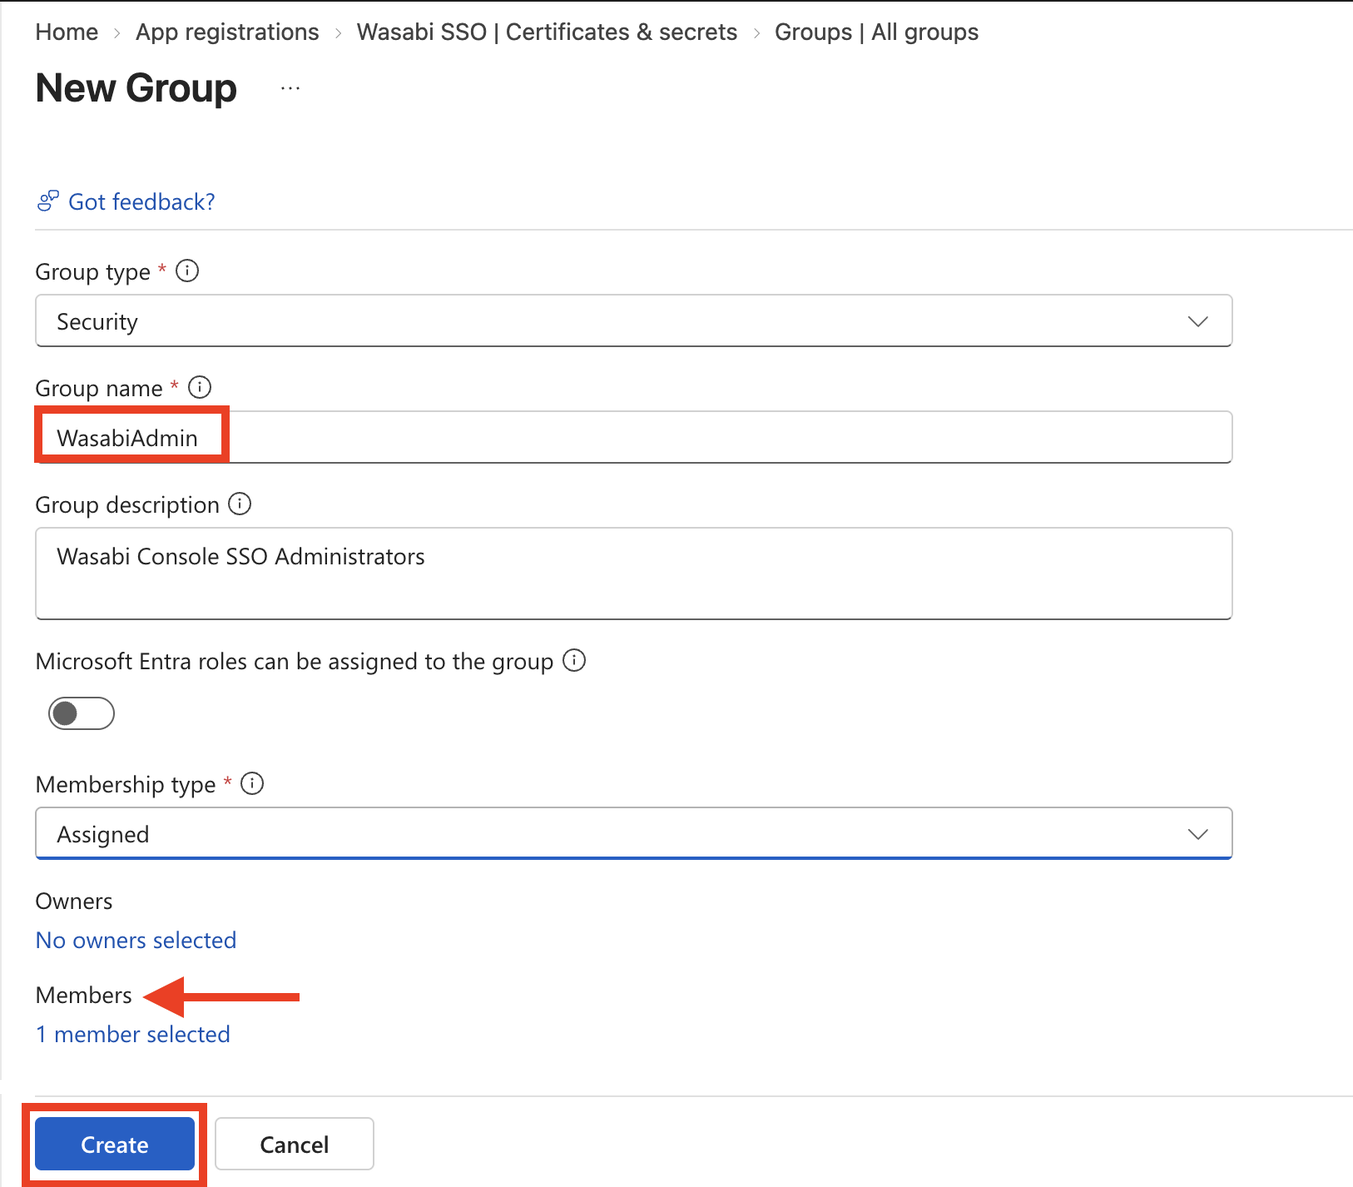
The Group Name WasabiAdmin is used as an example. You can use a different name or an existing security group, as long as you create a matching SSO role in the Wasabi Console.
Assigning the Group to the Application
In Entra ID, select Enterprise applications, then All applications, and select Wasabi SSO.
Under Manage, select Users and groups, then click + Add user/group.
Select the WasabiAdmin group, select Default Access under Select a role, and then click Assign.
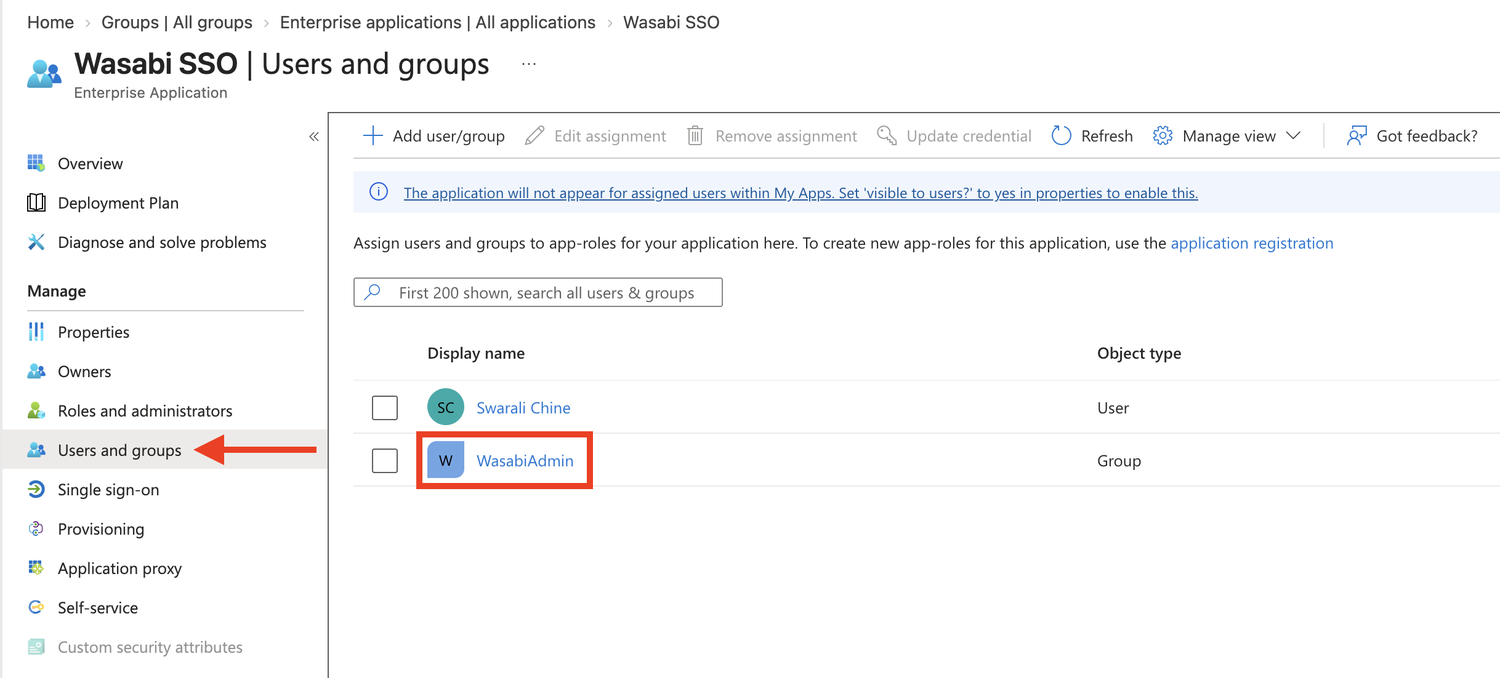
This example uses security group membership for role mapping, so you do not need to create a Microsoft Entra App Role. Availability of Group assignment may depend on your Microsoft Entra licensing.
Configuring Optional Claims
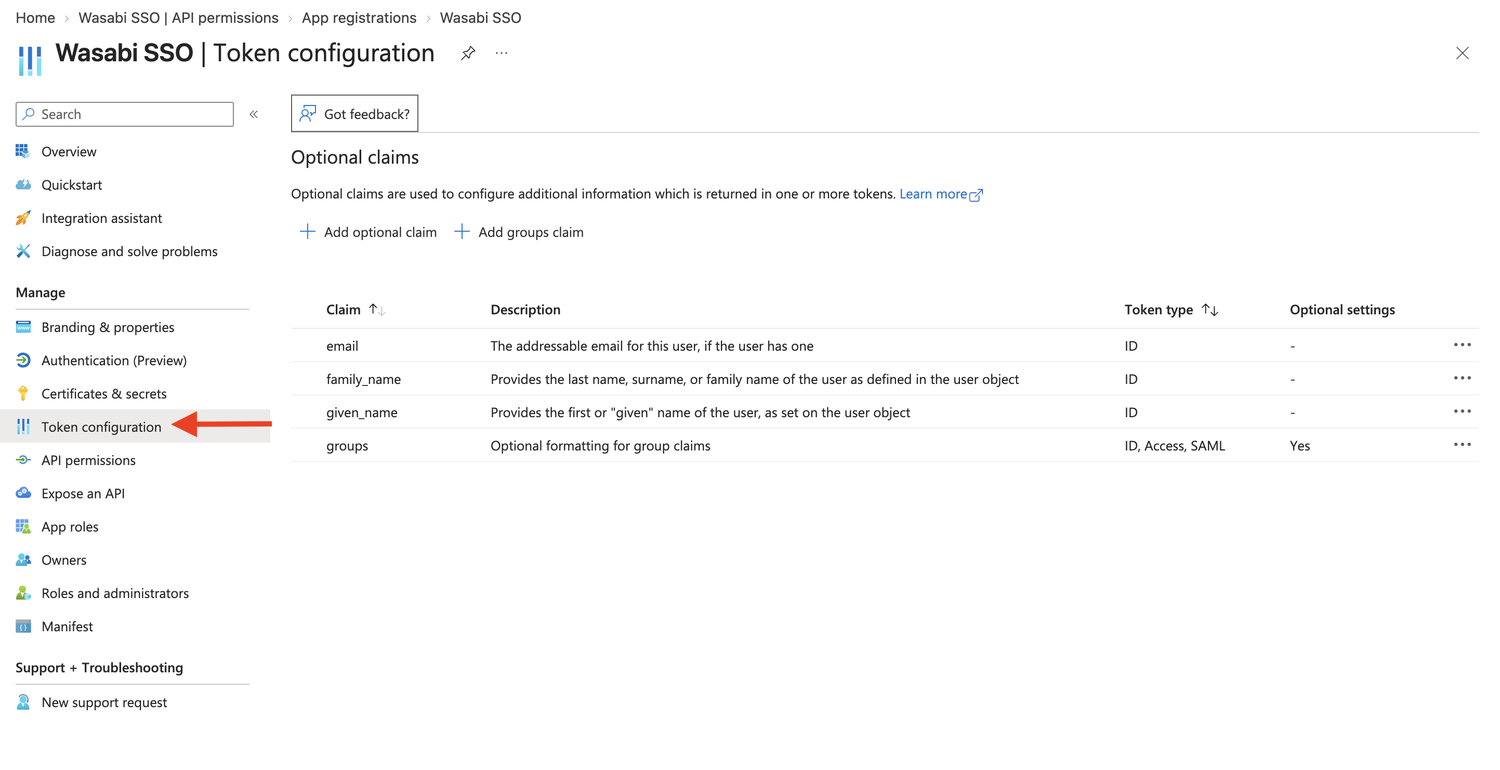
Optional claims add information to the tokens that Microsoft Entra ID issues. Wasabi Console uses these claims to identify the user and map the user to an SSO role. The email, given_name, and family_name claims provide user identity information, while the groups claim provides group membership information for SSO role mapping.
Navigate to App registrations, select Wasabi SSO, then select Token configuration under Manage.
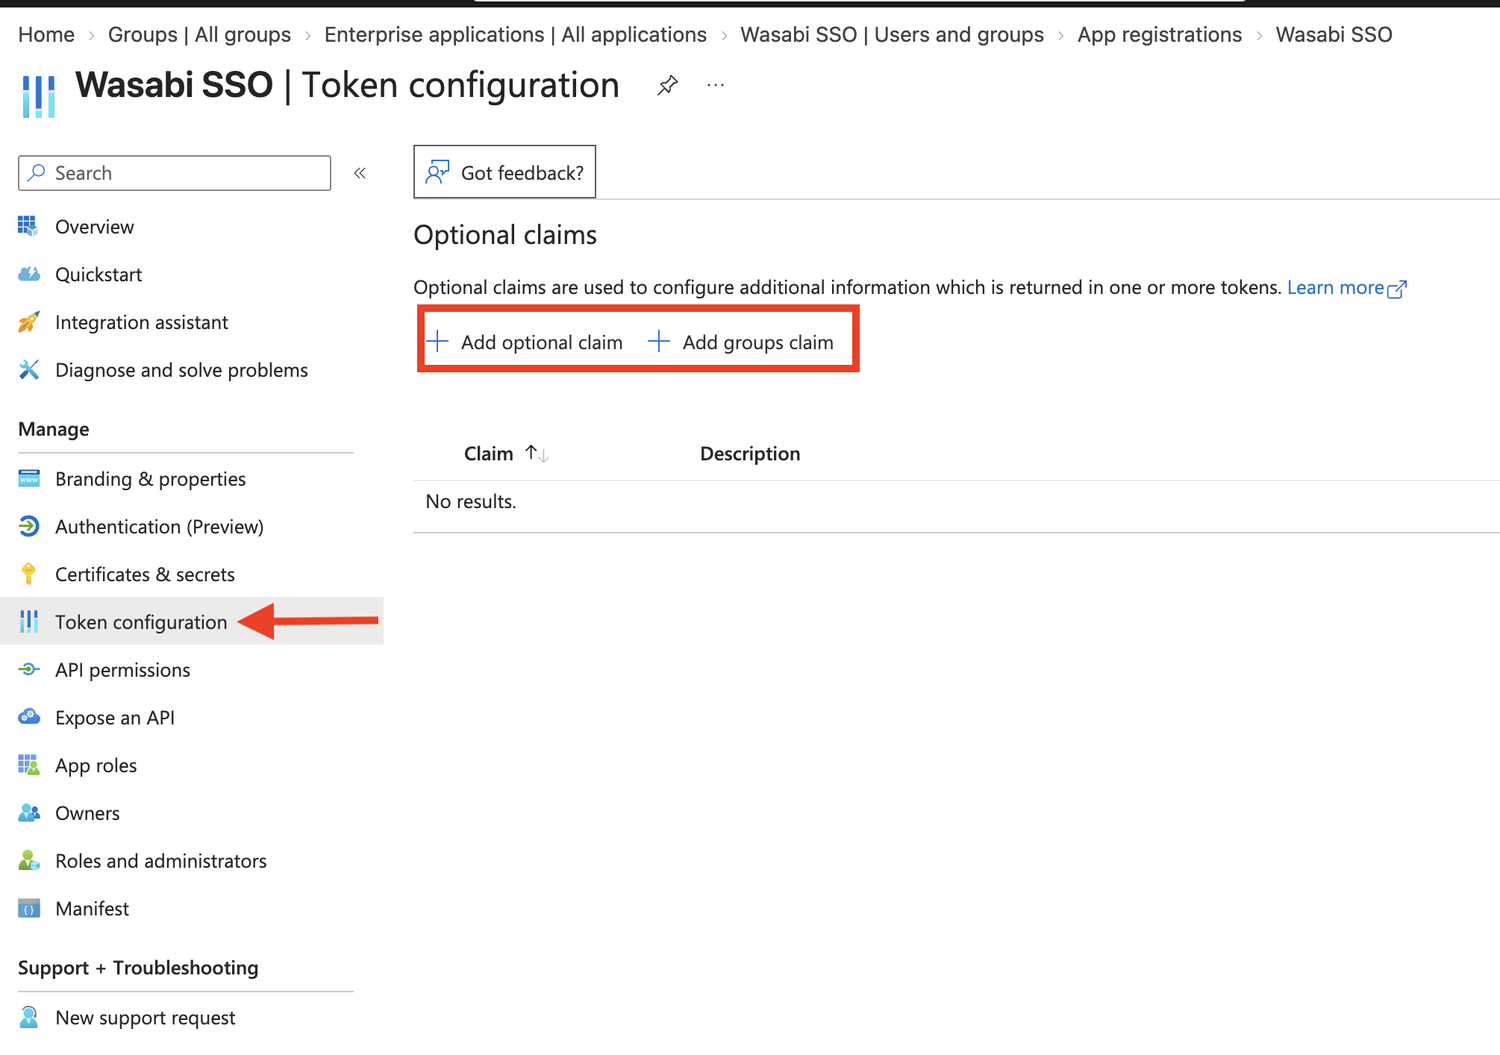
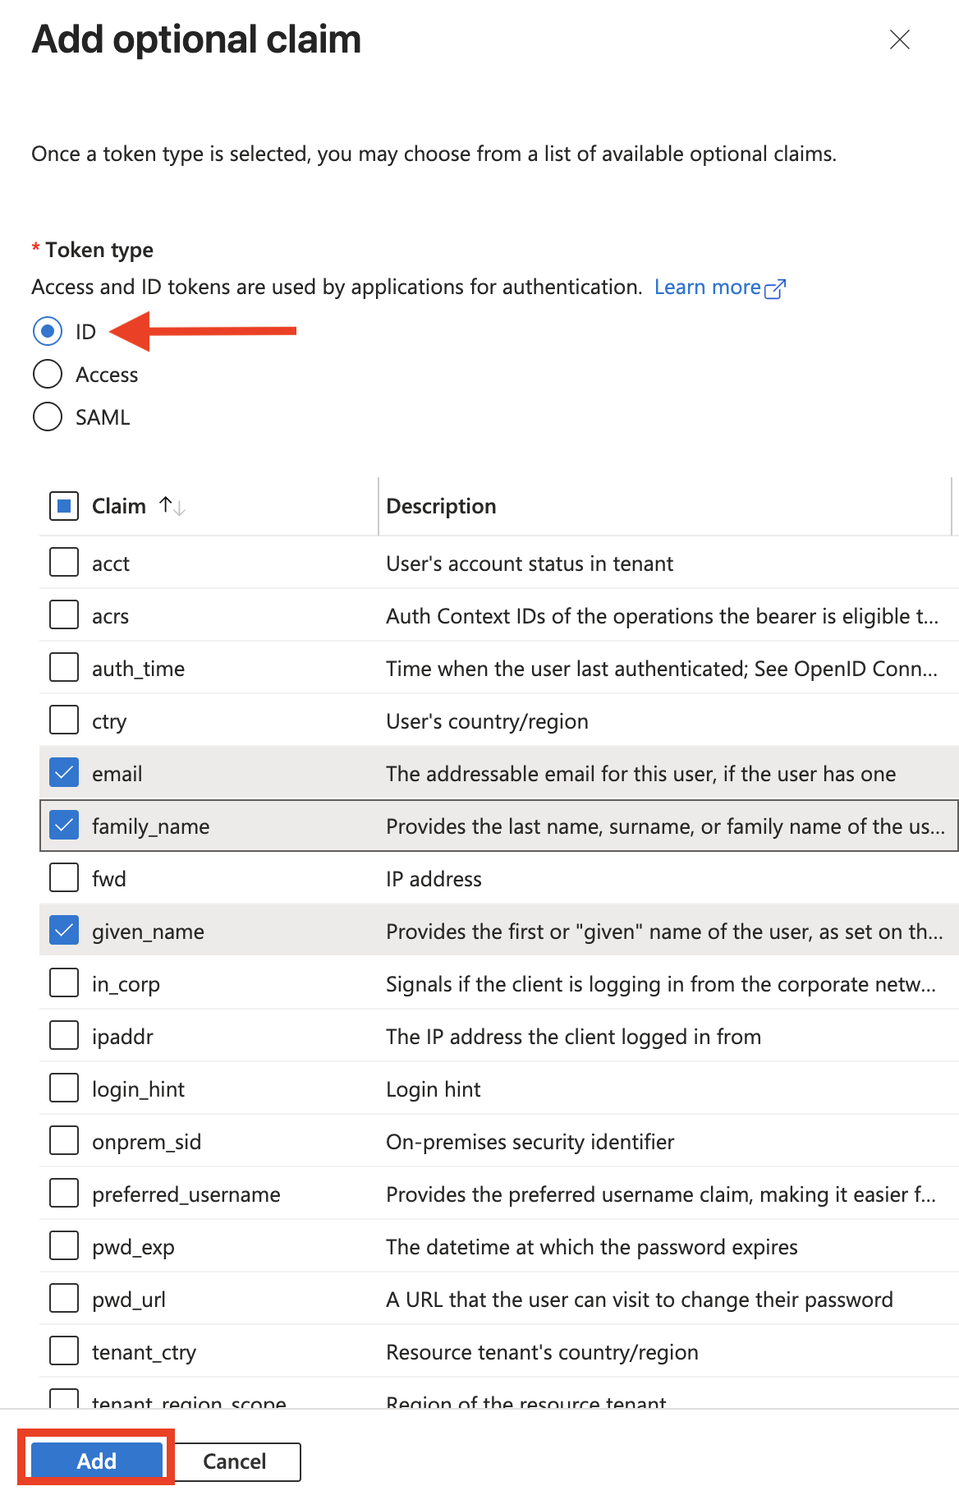
In the Optional claims section, click + Add optional claim. The Add optional claim dialog displays.
In the Add optional claim dialog, select the following:
Token type—Select ID.
Optional claims—Select email, family_name, and given_name.
Click Add.
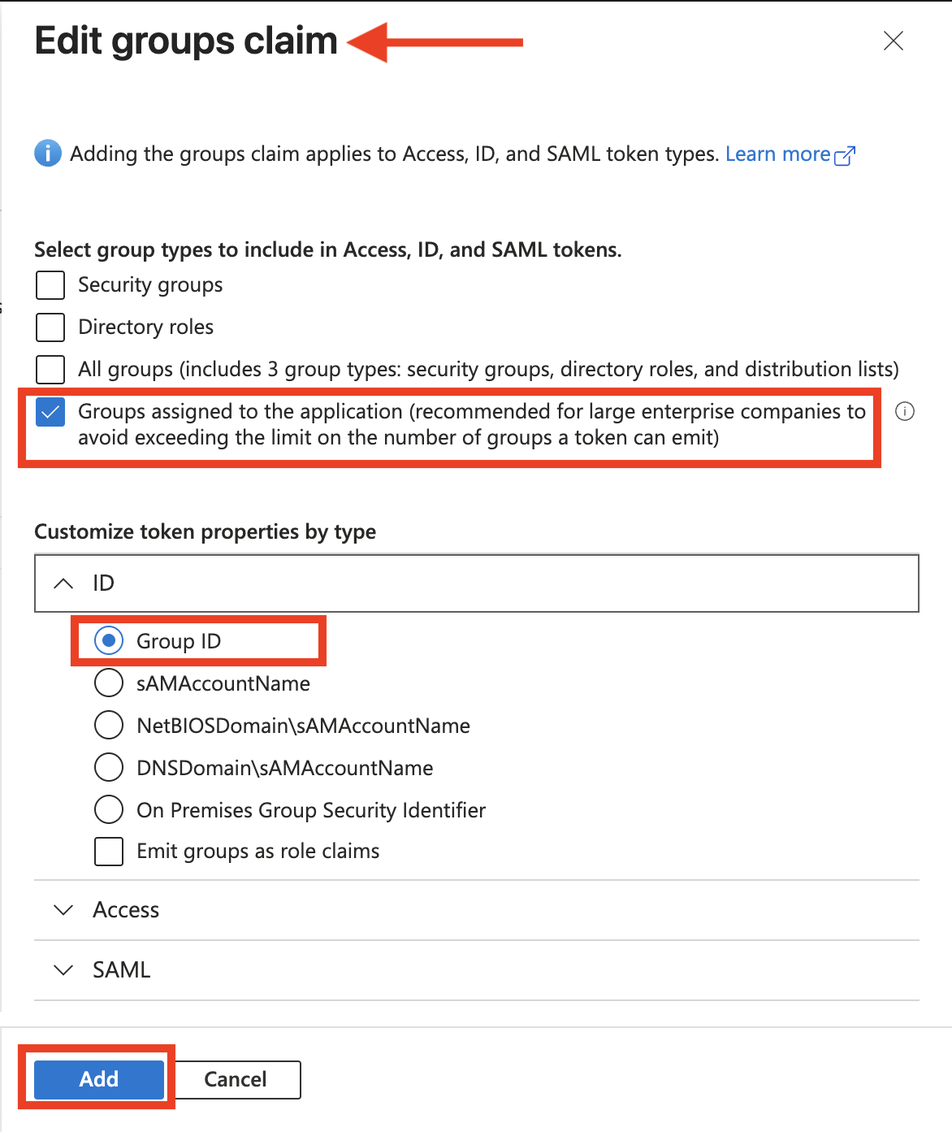
In the Optional claims section, click + Add groups claim. The Edit groups claim dialog is displayed.
In the Edit groups claim dialog, select the following:
group type—Select Groups assigned to the application…
Customize token properties by type—Expand ID and select Group ID.
Emit groups as role claims checkbox—Leave unchecked.
Click Add.
Ensure each user's email address, first name, and last name are populated in Microsoft Entra ID. Optional claims appear in the token only if the information is available.
Configuring Group Display Names in the Application Manifest
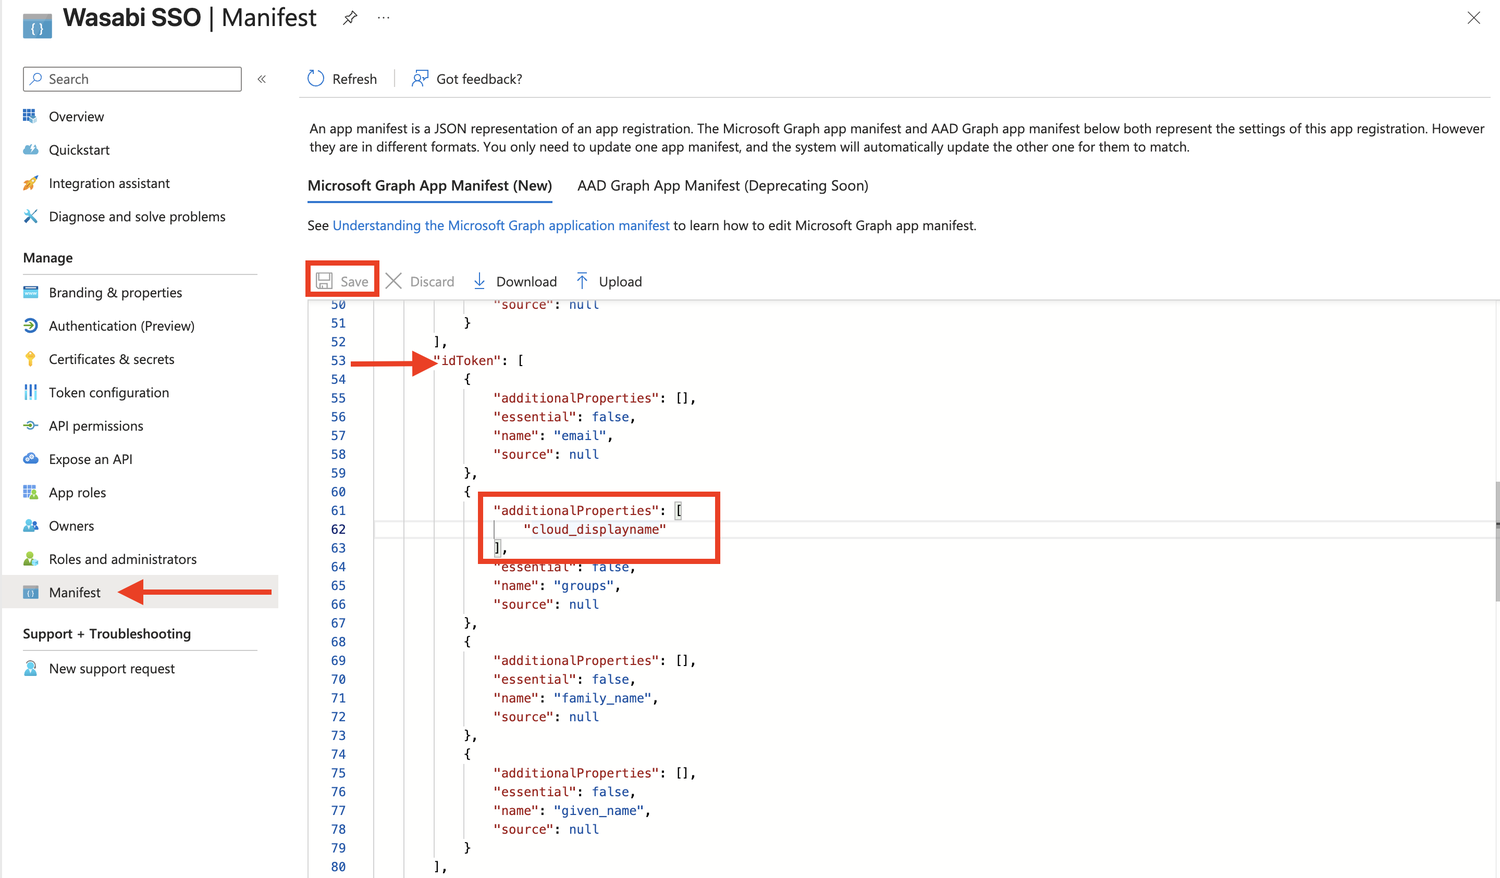
By default, Microsoft Entra ID may return group Object IDs rather than group display names. To map users by group name, configure the cloud_displayname property on the cloud-only security groups assigned to the application. For example, the WasabiAdmin group returns the value WasabiAdmin.
Navigate to App registrations, select Wasabi SSO, then select Manifest.
Locate groupMembershipClaims and verify that it is set as follows:

Under optionalClaims, locate the idToken section and configure the following claims. Leave all
other manifest properties unchanged.
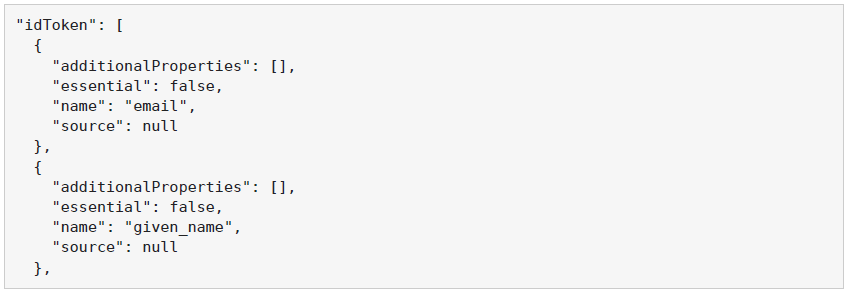
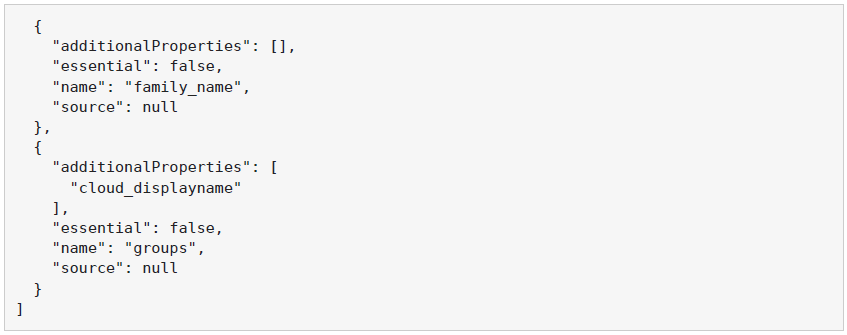
Click Save.
Return to the Token configuration page. In the Optional claims section, verify that email, family_name, given_name, and groups appear, and that groups show Yes under Optional settings.
Important: The cloud_displayname setting tells Microsoft Entra ID to send the group's display name (for example, WasabiAdmin) instead of its Object ID, so it matches the SSO role name in Wasabi Console. It works only for security groups that you create in Microsoft Entra ID (cloud-only) and assign to the Wasabi SSO application.
The group value returned by Microsoft Entra ID must match the SSO role name in Wasabi Console.
Obtaining the OpenID Connect Discovery Endpoint
Navigate to App registrations, select Wasabi SSO, then select Overview and copy the Directory (tenant) ID.
Build the discovery endpoint using the following format, replacing {tenant-id} with your Directory (tenant) ID.

Alternatively, click Endpoints on the application Overview page, then copy the OpenID Connect metadata document URL. Use this endpoint in Wasabi Console.
Configuring OIDC Settings in Wasabi Console (SP / Client Side)
Configuring the SSO Connection
Sign in to the Wasabi Console
https://console.wasabisys.com/loginusing an account authorized to manage SSO settings.In the left menu, select Security, then SSO (Single Sign-On), and click Start SSO Configuration.
In the Add an Organization Name dialog, enter a unique name for your organization, such as wasabi-entra-sso, and then click Add Organization.
In the SSO Connection list, select OPEN ID.
In the Open ID Connect Connection section, enter the following information:
Discovery Endpoint—The OpenID Connect discovery endpoint from Microsoft Entra ID.
Client ID—The Application (client) ID you copied from Microsoft Entra ID.
Client Secret—The client secret Value you created in Microsoft Entra ID.
Channel—Select Back Channel.
Verify that the Callback URL is
https://sso.wasabisys.com/login/callback, then click Save.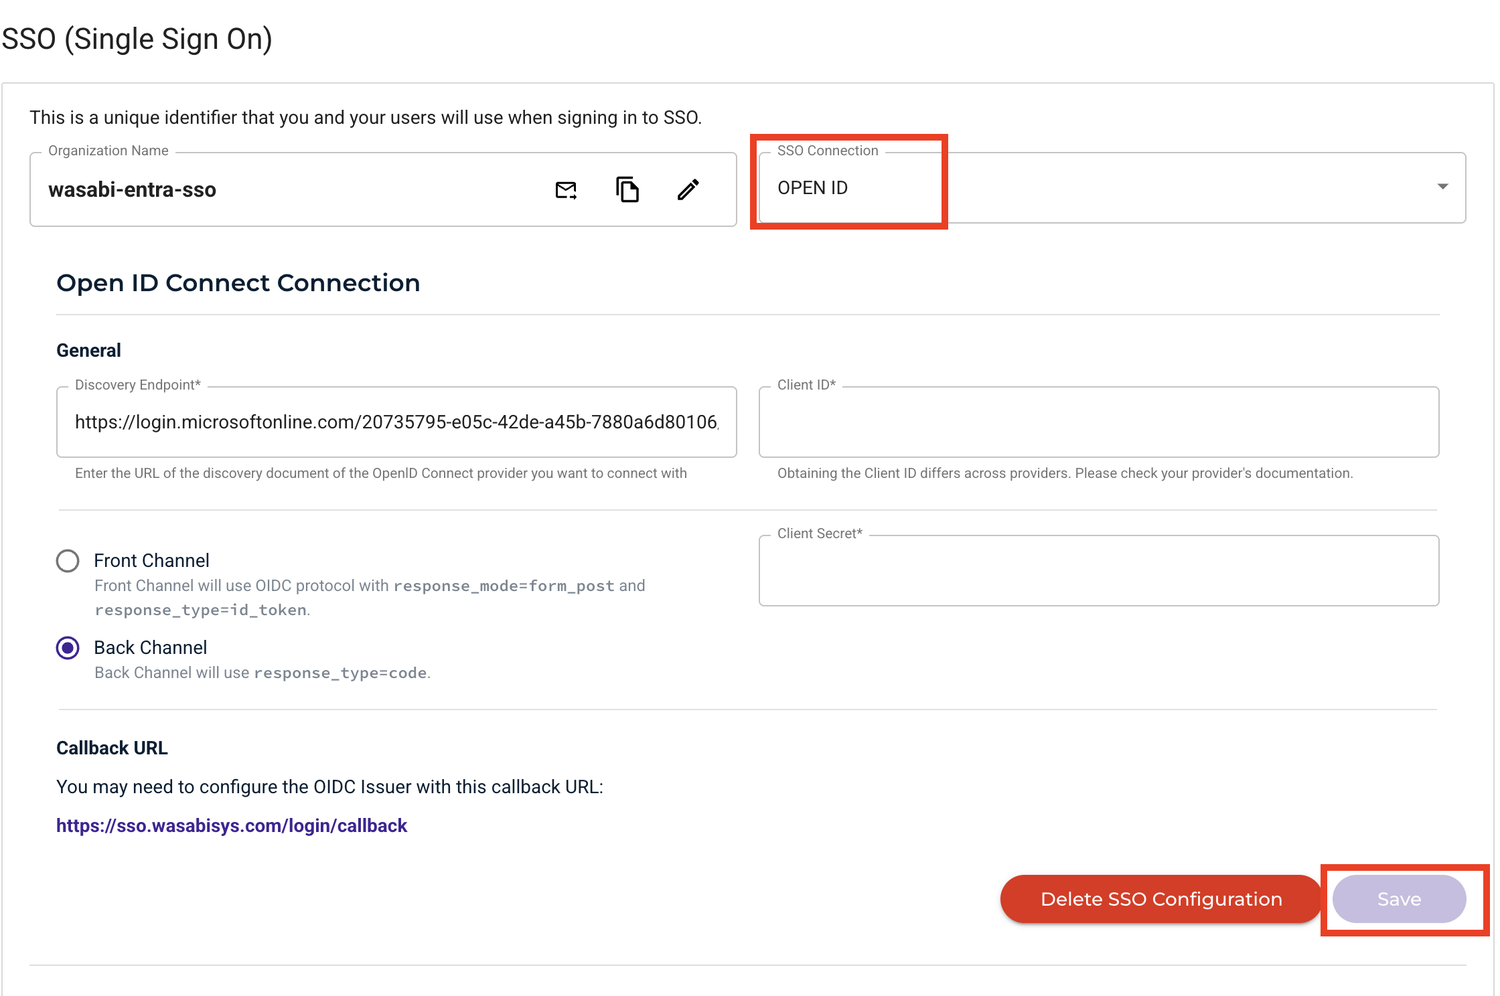
Important: The discovery endpoint must belong to the Microsoft Entra tenant where you registered the application. An endpoint from another tenant causes authentication errors.
Creating an SSO Role
Important: A Wasabi role is required for SSO users. Do not create the role through the Roles tab on the left. Create SSO roles in the SSO (Single Sign-On) section.
In the SSO (Single Sign-On) section, select Settings, then click Create Role.
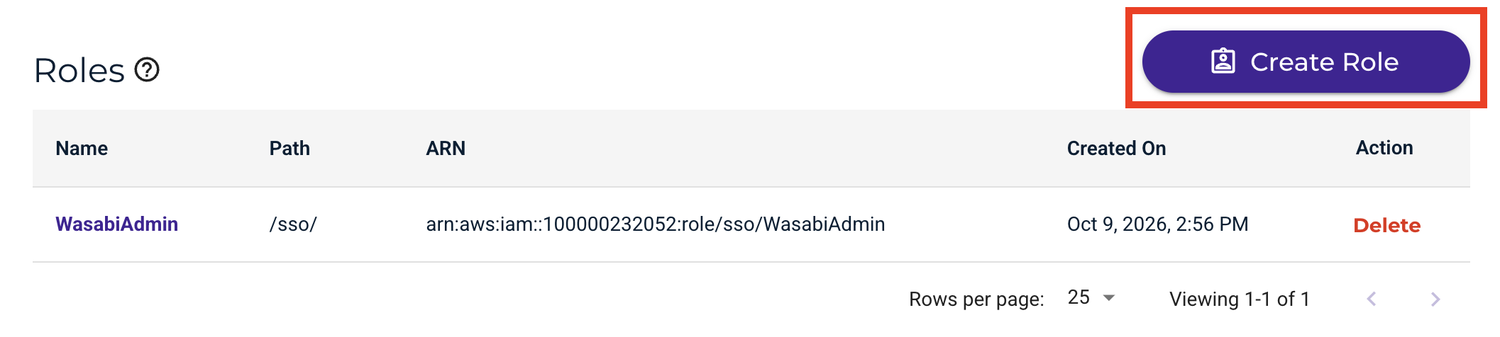
In the Name field, enter the Microsoft Entra group name you created earlier, such as WasabiAdmin, then click Next. The role name must match the group value that Microsoft Entra ID returns.
In the Assign Role Policies section, select one or more policies for this role, and then click Create Role. For example, select WasabiAdministratorAccess for administrative permissions. You can attach any Wasabi-managed or user-managed policy that meets your requirements. For more information, see Policies in Wasabi Hot Cloud Storage.
Verify that the new role appears in the Roles list in the SSO Settings section.
Testing the Integration
Open a private or incognito browser window and navigate to the Wasabi Console
https://console.wasabisys.com. Click Sign In with SSO.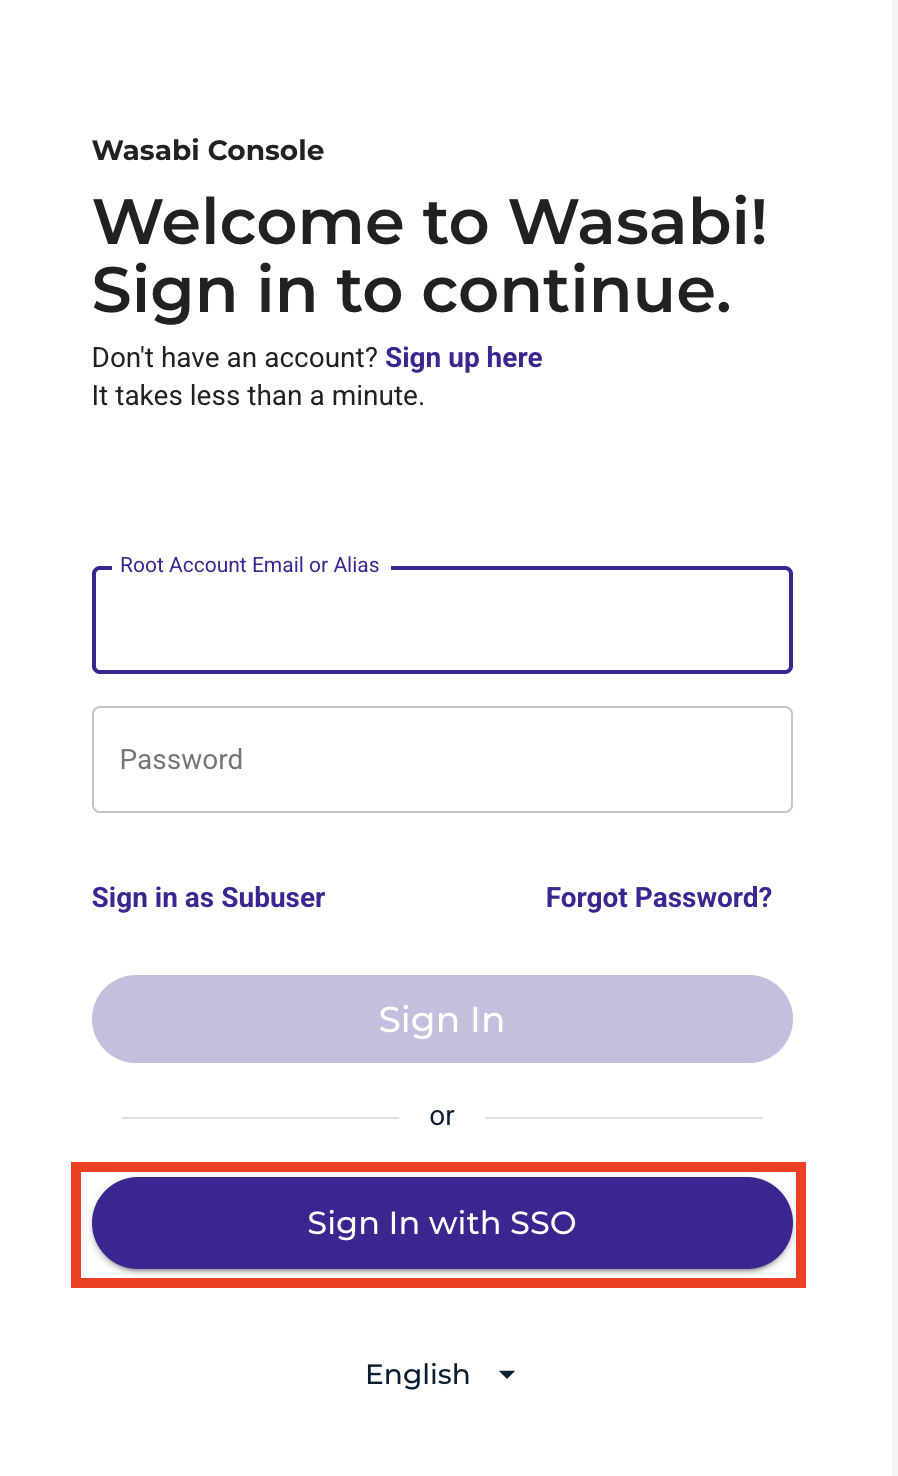
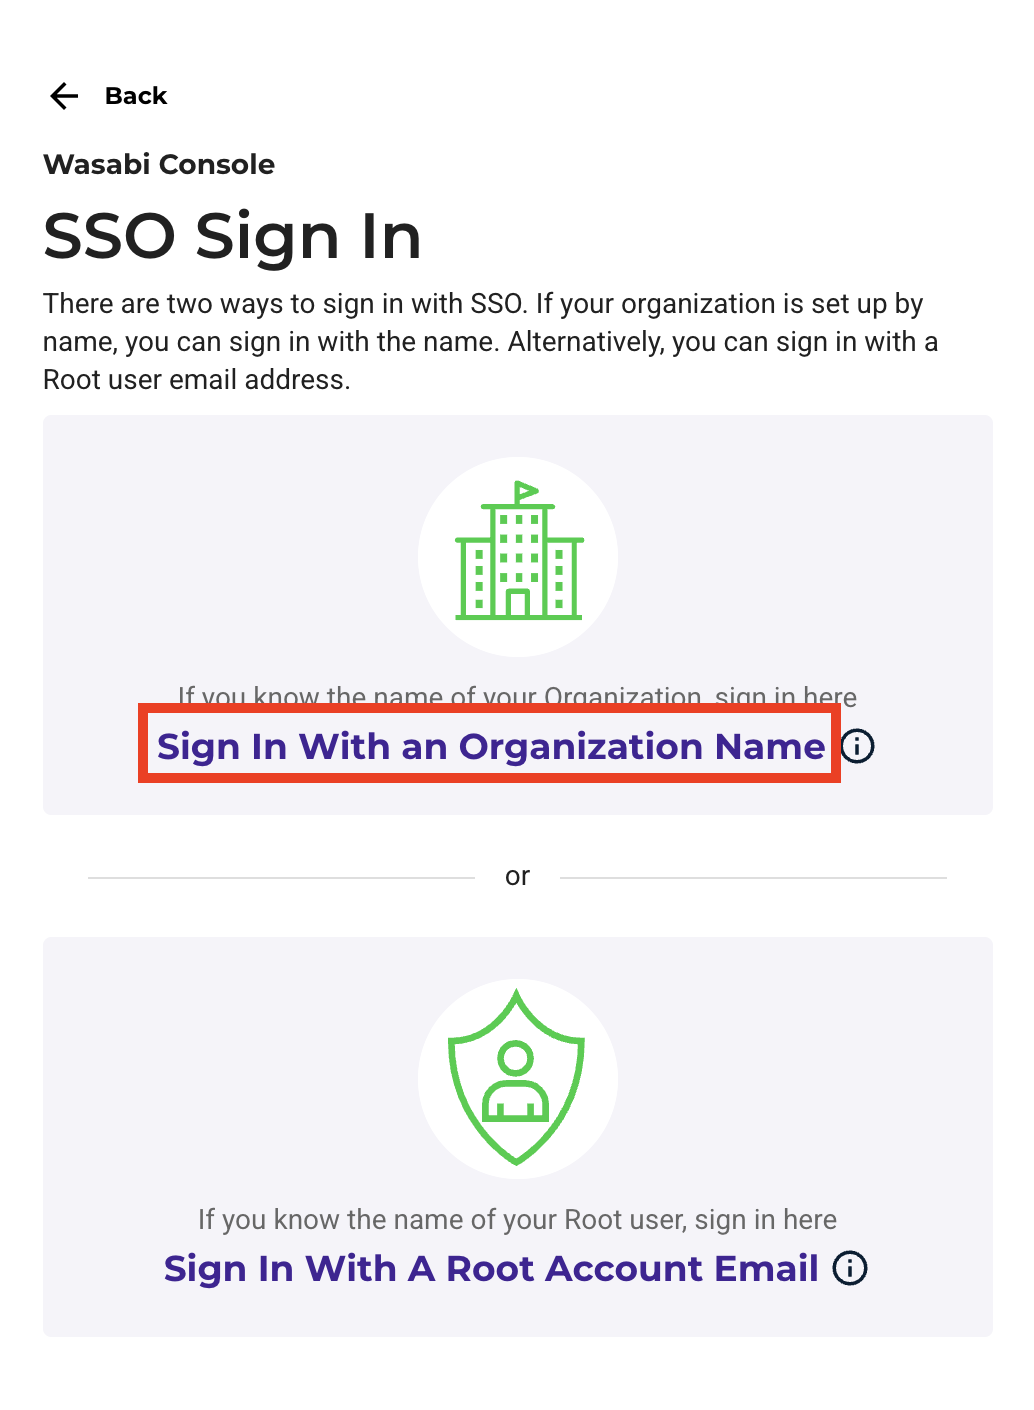
Click Sign In With an Organization Name. Alternatively, click Sign In With A Root Account Email.
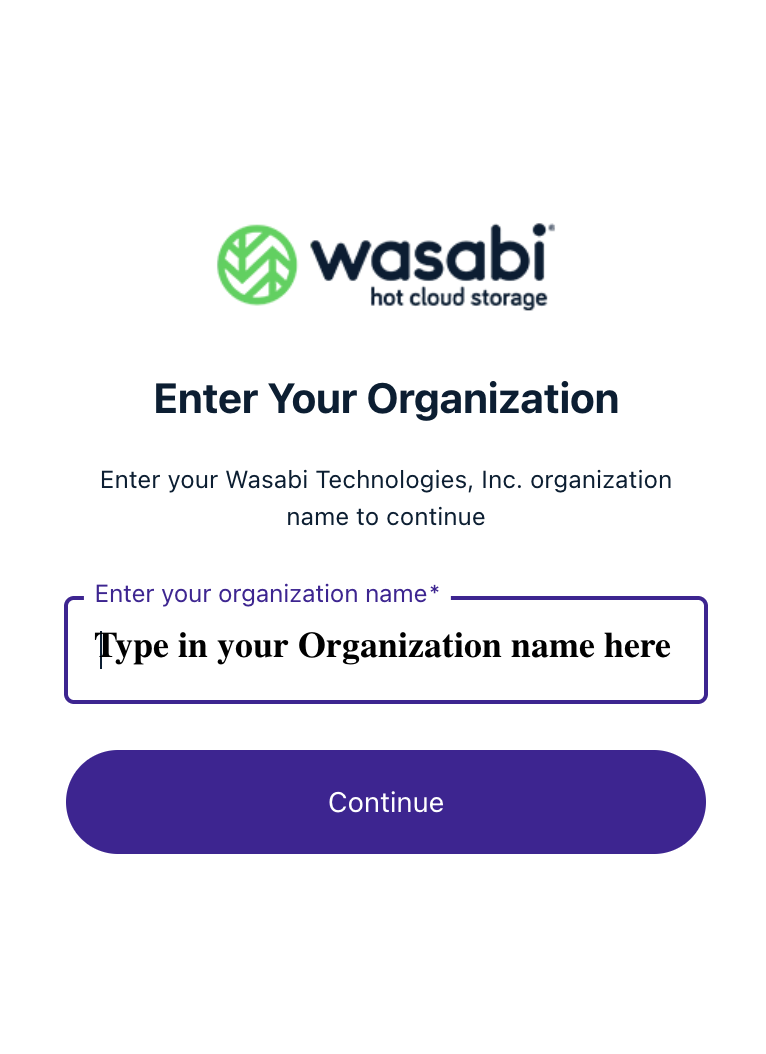
Type your organization’s name, and then click Continue.
Wasabi redirects you to the Microsoft Entra ID sign-in page
https://login.microsoftonline.com. Enter the credentials of a user who belongs to the WasabiAdmin group and complete any additional authentication that your organization requires.After you sign in, Microsoft Entra ID redirects you back to the Wasabi Console. Verify that you can perform the operations allowed by the SSO role.
Your view of Wasabi Console may differ depending on the IAM policy attached to the SSO role.