With WACM, you can access a sub-account's historical usage and bucket consumption data, invoices, and account information.
On the Sub-Accounts page, click the sub-account for which you want to access the consumption data. Four tabs of information are available:
Usage
Buckets
Invoices
Account
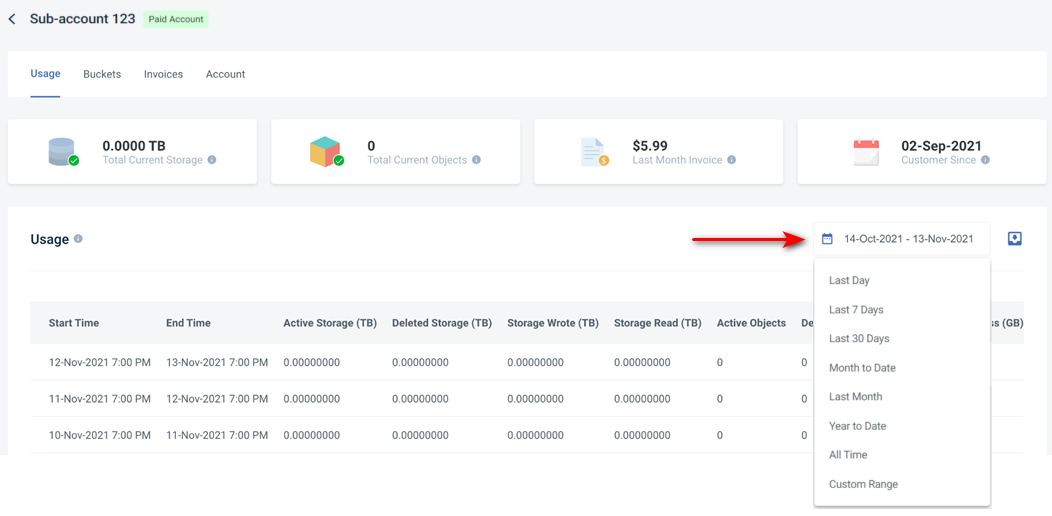
Each page of information is described in this section. Here is an example of the Usage page.

For details on exporting data, see Exporting Data From WACM, later on this page.
Displaying Usage Data
The Usage page is displayed automatically when you select a sub-account. It includes:
Total current storage (TB)—The sum of the most recent day's active storage and deleted storage values.
Total current number of objects—The sum of the most recent day's active objects and deleted objects values.
Last month invoice—A value based on Wasabi's TB cost, not including discounts or credits.
Customer service date—The date your sub-account was converted from a trial account to a paid customer account.
Each individual record represents a single day. Active Storage and Deleted Storage list the amount of active and deleted storage that the account has at the end of the day.
A table of usage data provides:
Start and end times
Amount of active storage
Amount of delete storage
Amount of storage written
Amount of storage read
Number of active objects
Number of delete objects
Amount of egress
Amount of ingress
Number of API calls
Filtering Usage Data
You can choose a time range from the Date Range Selector drop-down to query historical usage data.
Click the date selection drop-down to choose a time period.
Optionally, you can export the results to CSV, Excel, or JSON file format:

Displaying Historical Usage Based on Bucket Data
The Buckets page provides the latest consumption data for each bucket stored in the sub-account.
Click the Buckets tab to display a list of buckets stored in the account.

The Buckets list includes:
Bucket name—Unique bucket name
Region—Location where the bucket is stored
Active Storage—Amount of active storage in TB
Deleted Storage—Amount of deleted storage in TB
Active Objects—Number of active objects per bucket
Deleted Objects—Number of objects deleted
Bucket Number—Unique bucket number
Record Date—Date selected from the calendar
Status—Account status
Click on a bucket name in the list to display additional information for that bucket. For example:
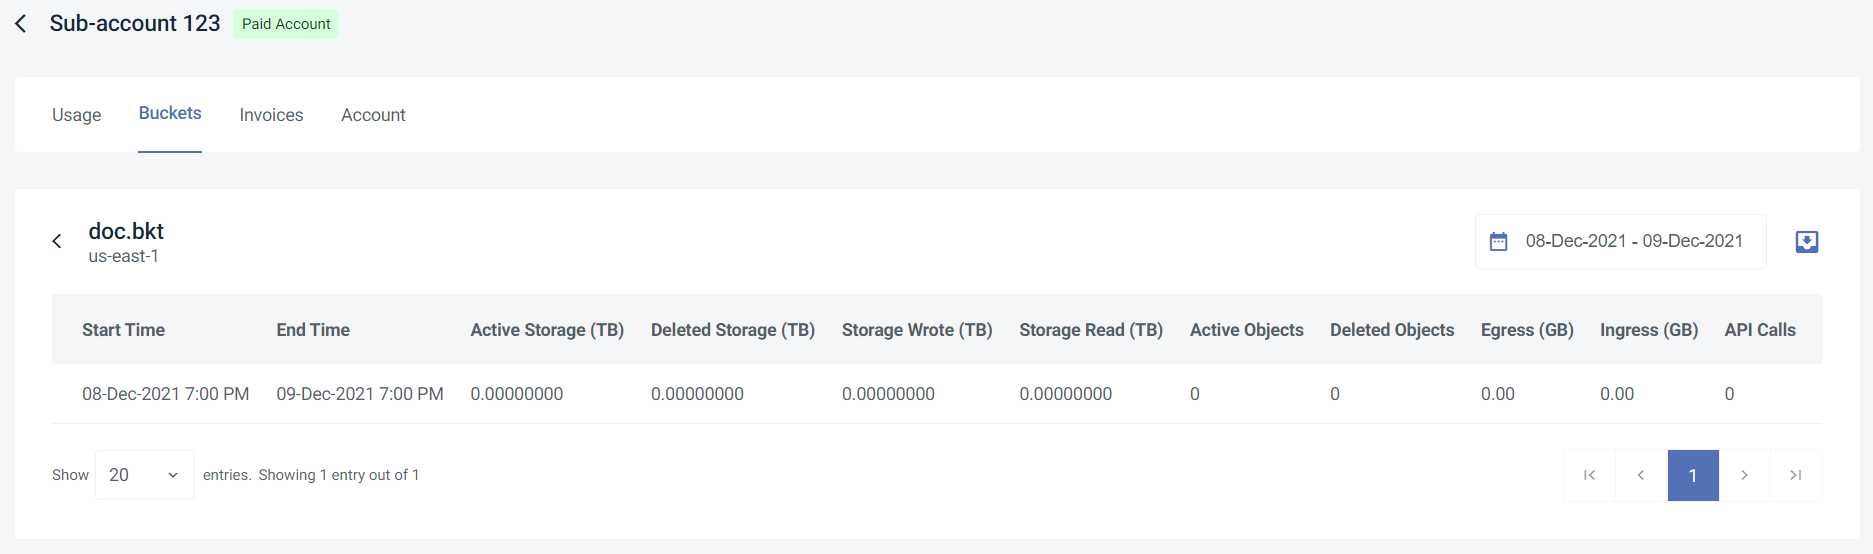
The Buckets page lists usage data on a per bucket basis and provides:
Start and end time
Amount of active storage
Amount of deleted storage
Amount of storage written
Amount of storage read
Number of active objects
Number of deleted objects
Amount of egress
Amount of ingress
Number of API calls
Optionally, you can export the results to CSV, Excel, or JSON file format:
Displaying Historical Invoices for an Account
WACM allows users of the platform to access all of the historical sub-account invoices.
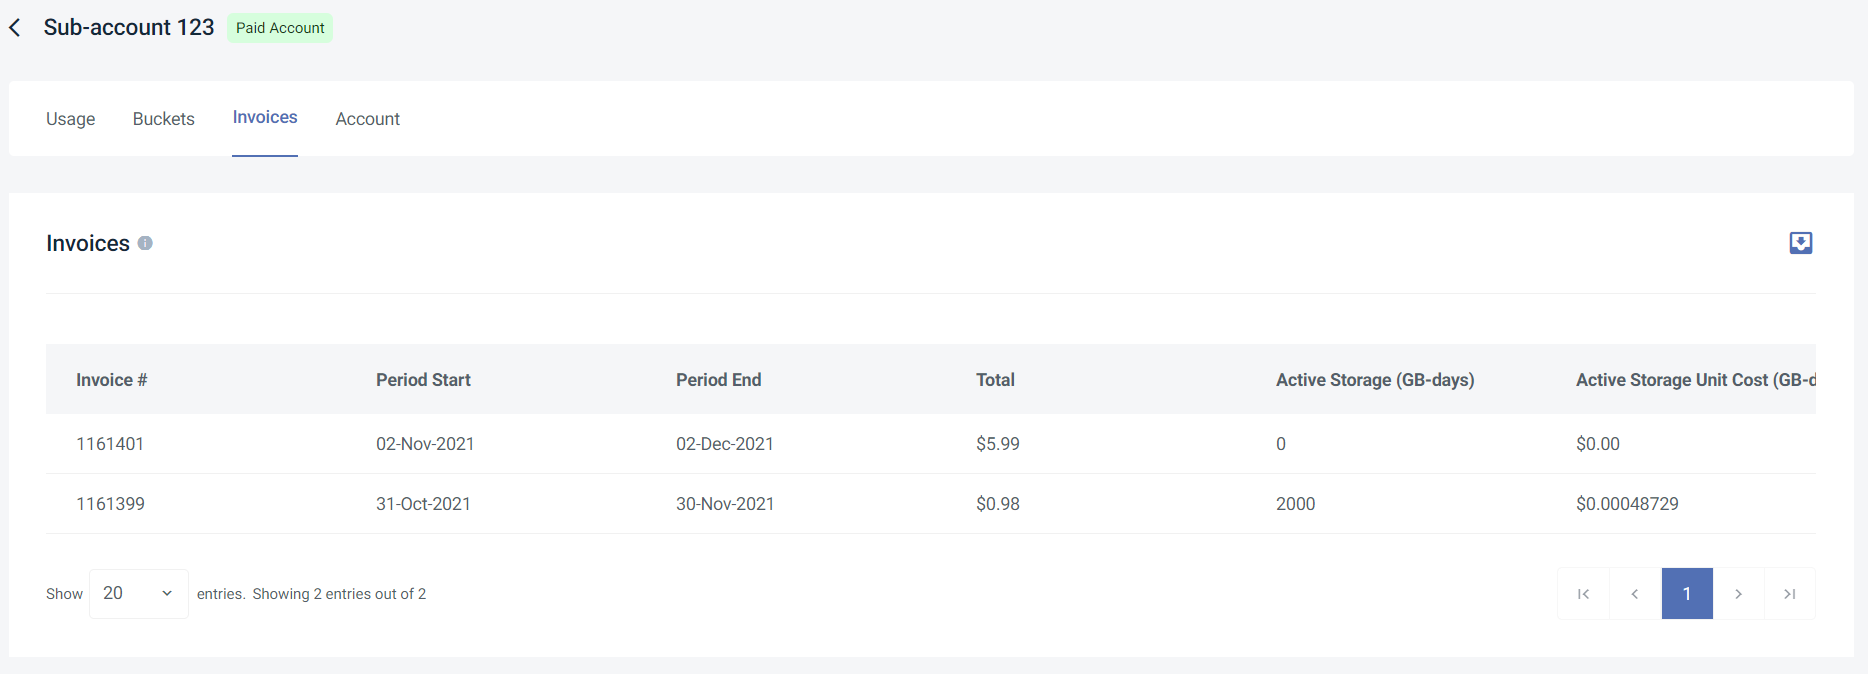
With the Sub-Accounts page displayed for the selected account, click the Invoices tab to display a list of invoices for that sub-account.
Hover your cursor at the bottom of the list.
The Historical invoices created for the sub-account are listed. The Invoices list includes:
Invoice number
Start and end period dates
Total amount due
Amount of active storage
Cost of active storage unit
Total cost of active storage
Amount of deleted storage
Cost of a deleted storage unit
Total cost of deleted storage
Number of API calls
Cost of an API call unit
Total cost of API calls
Amount of ingress
Cost of an ingress unit
Total cost of ingress
Amount of egress
Cost of an egress unit
Total cost of egress
Minimum amount of active storage
Cost of a minimum active storage unit
Total cost of minimum active storage
Optionally, you can export the results to CSV, Excel, or JSON file format:
Displaying Account Data
Sub-Account profiles exist for User accounts to better identify their customers/users. A user should fill in the available sections.
Sub-accounts cannot see or access any of the information you input here.
With the Sub-Accounts page displayed for the selected account, click the Account tab. The sub-account Account Information page displays account information and usage tracking. For example:
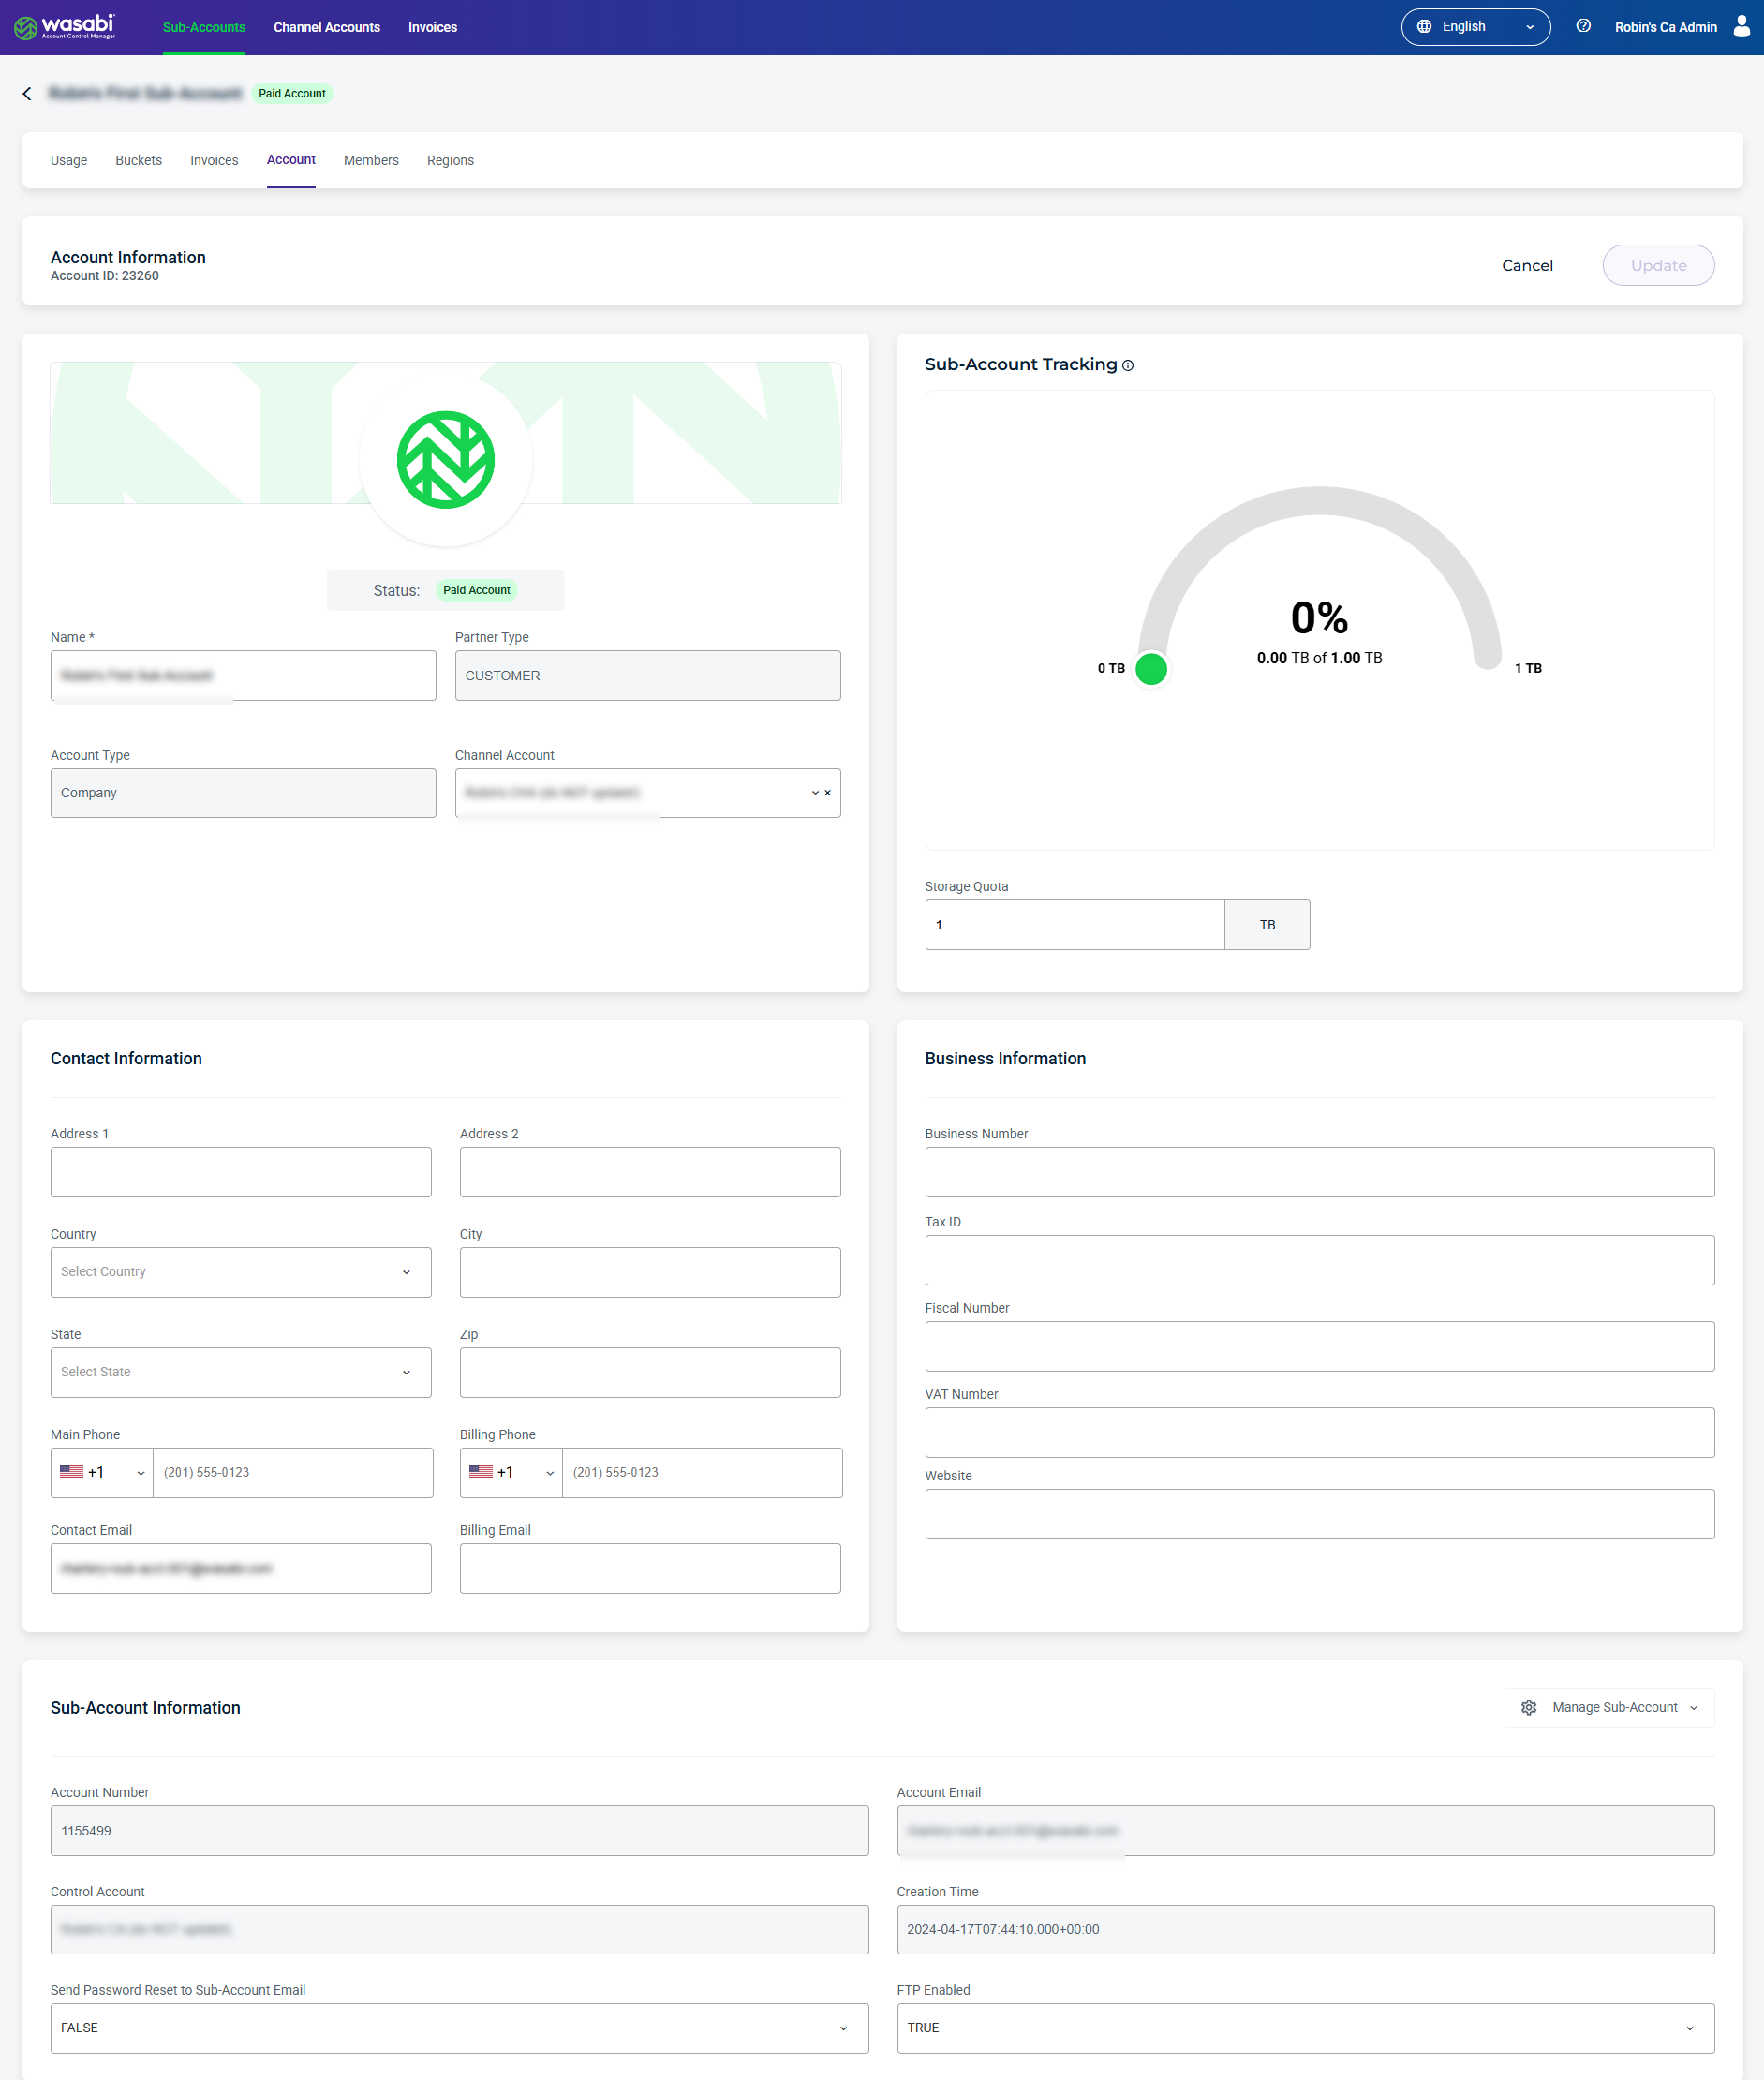
In the Profile section, you can enter/change the name of the sub-account and upload a profile picture (or remove it). However, the following fields are filled automatically and cannot be changed:
Partner Type
Account Type
In the Sub-Account Tracking section, you can enter the Storage Quota for the sub-account. The Storage Quota is used to calculate the storage utilization value. This amount can be modified at any time in the Sub-Account profile.
In the Contact Information and Business Information sections, you can enter/change any of the fields.
Click Update to save the information.
Exporting Data From WACM
You can export the following data:
List of all sub-accounts under management.
Usage data per sub-account.
Usage data per bucket on the Sub-Accounts page.
Invoice data on the Sub-Accounts page.
All sub-accounts invoice data.
Invoice data for a single Sub-Account.
Invoice data for a single Control Account invoice or invoice period.
To export data:
Filter and/or search for data, as described in Filtering and Searching Sub-Accounts.
Click the Export button when it is available on the Sub-Accounts or Invoices page (often in conjunction with a search or filter):
The currently displayed data will be exported.
Select the file format (CSV, Excel, JSON) used to export the data.
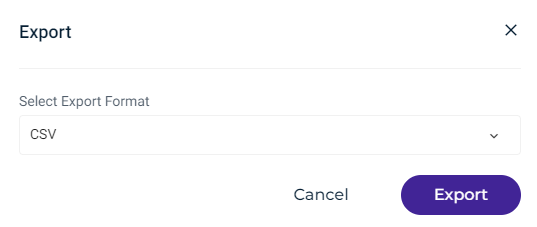
Click Export.