One common request Wasabi receives is how to set up the Wasabi system configuration to user access separation at the sub-user, bucket, and/or folder level.
Separate User Access at the Sub-User Level
In some scenarios, you may want to separate users from accessing the data of other users by limiting access to their buckets. Separation at the sub-user level means:
While sub-users can see the names of all the buckets present in the account, they should only be allowed to create/delete their buckets and upload/delete objects to their buckets.
Sub-users should not have access to see or change the content of other users' buckets.
Follow the steps below to separate user access at the sub-user level. We will use an example with:
A policy named "Sub-User Policy"
One sub-user named "user-john" who will 1) be able to create/delete his buckets, 2) be allowed all S3 actions (read/write/update/delete) inside the buckets, and 3) not be able to view other users’ buckets or make any change to them
Create a Wasabi Root account (if one does not already exist).
Create an IAM policy (click Policies and then Create Policy) for each sub-user. The policy should limit access to each sub-user's storage buckets. For example, a policy named "Sub-User Policy" applies to one sub-user named "user-john." Adjust the policy according to your needs. The complete policy is provided after the example below. For additional information, refer to Creating a Policy.
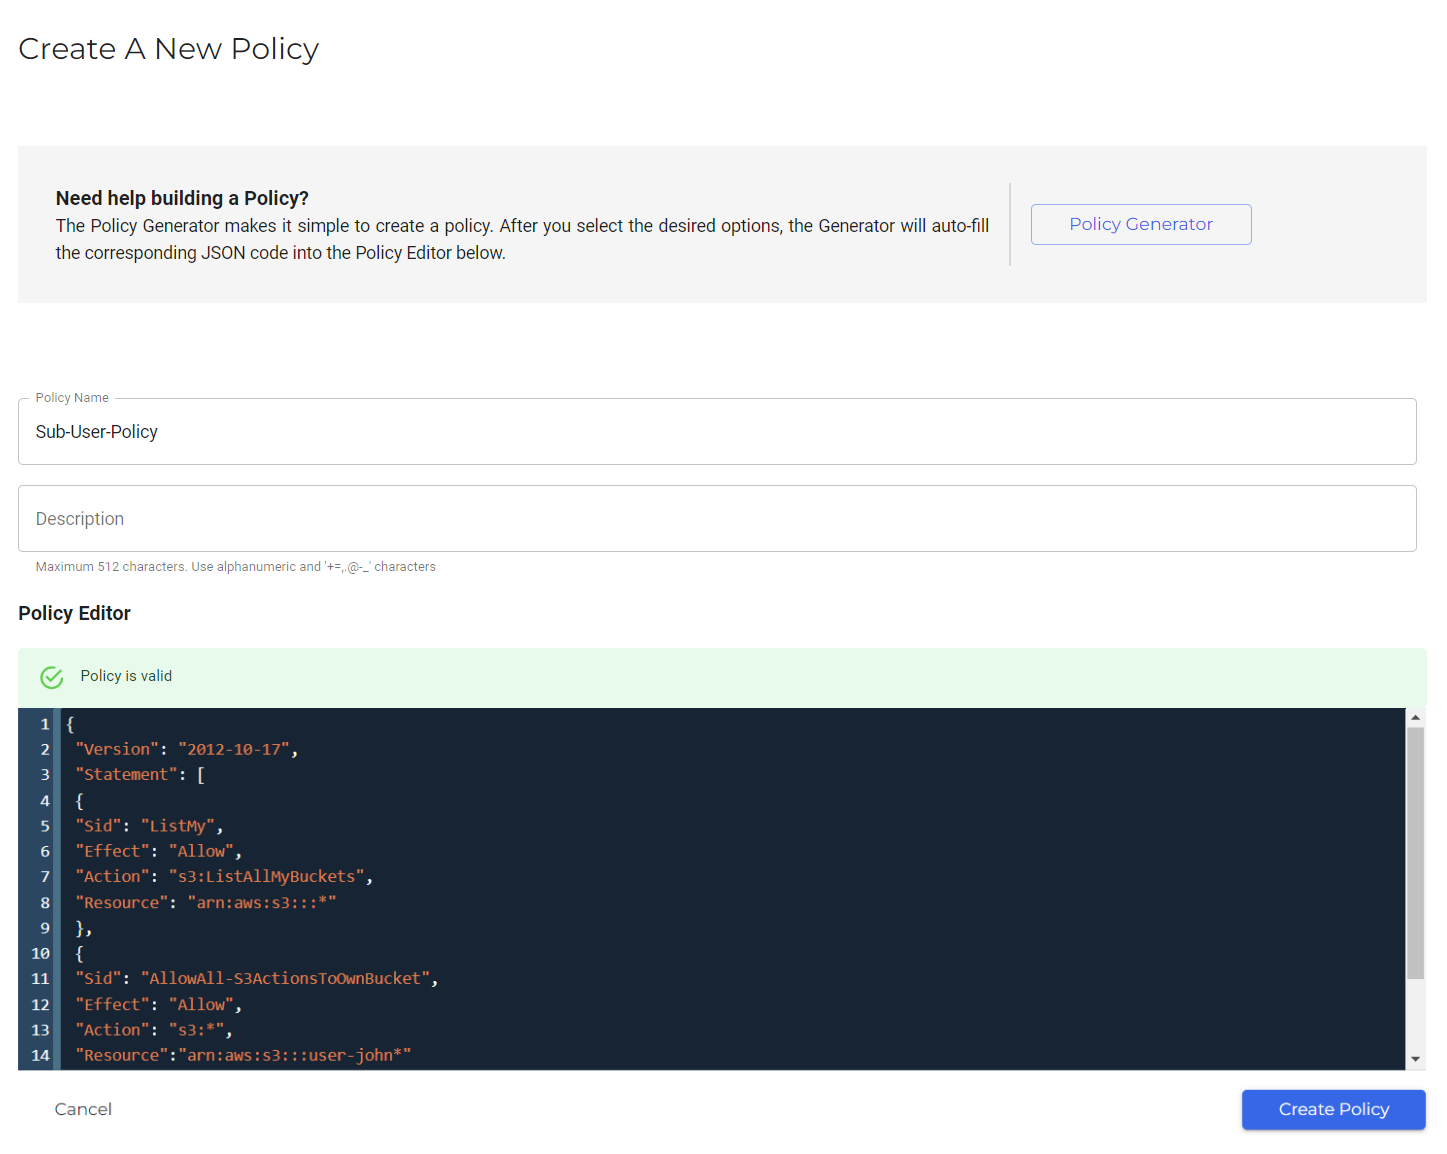
In the Resource section, this policy defines the prefix "user-john" followed by a wildcard "*", meaning John can create as many buckets as he would like as long as they have the prefix "user-john." In addition, John will be able to exercise all S3 rights on those buckets. John cannot access buckets that do not start with this prefix.
To perform any bucket/object operations through the Console, the sub-user MUST have "ListAllMyBuckets" permission. This will allow the sub-user to list all the buckets when logged into the Console, but the sub-user can access and see contents only from the bucket for which that sub-user has permission.
{
                 "Version": "2012-10-17",
                 "Statement": [
                 {
                 "Sid": "ListMy",
                 "Effect": "Allow",
                 "Action": "s3:ListAllMyBuckets",
                 "Resource": "arn:aws:s3:::*"
                 },
                 {
                 "Sid": "AllowAll-S3ActionsToOwnBucket",
                 "Effect": "Allow",
                 "Action": "s3:*",
                 "Resource":"arn:aws:s3:::user-john*"
                 }
                 ]
                }
Create a sub-user account for each customer.
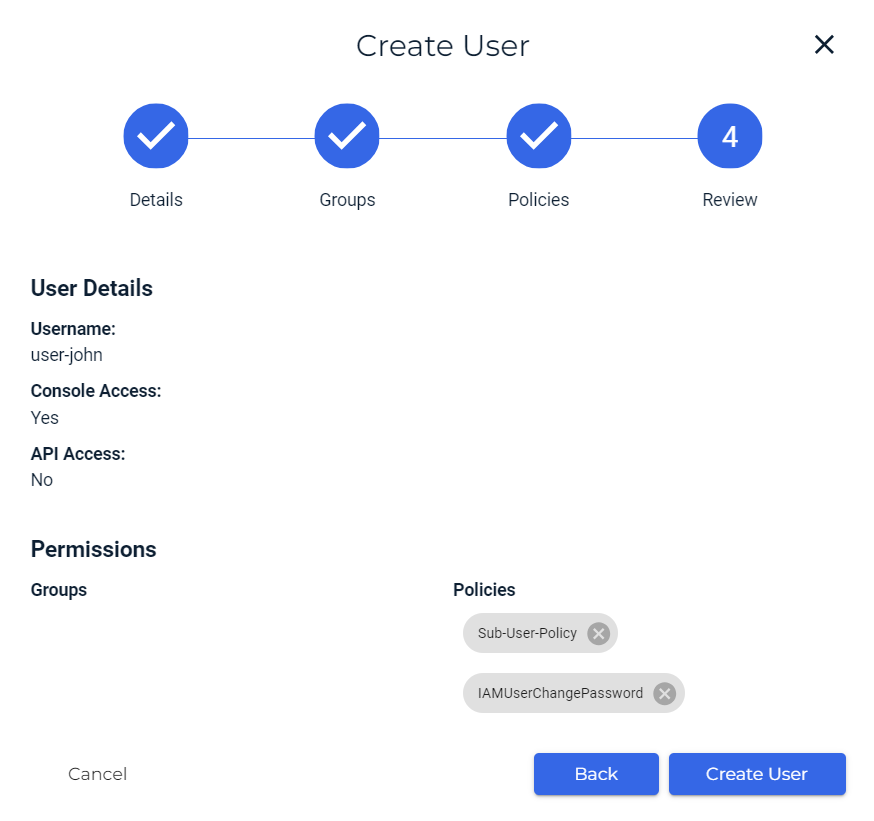
For each customer, create a sub-user account that leverages the bucket policy (Users > Create User). For additional information, refer to Creating a User.
Attach "Sub-User-Policy" along with the "IAMUserChangePassword" policy to the sub-user. This will give Console access and require that the sub-user change the password. You can attach more policies to the user according to your use case.
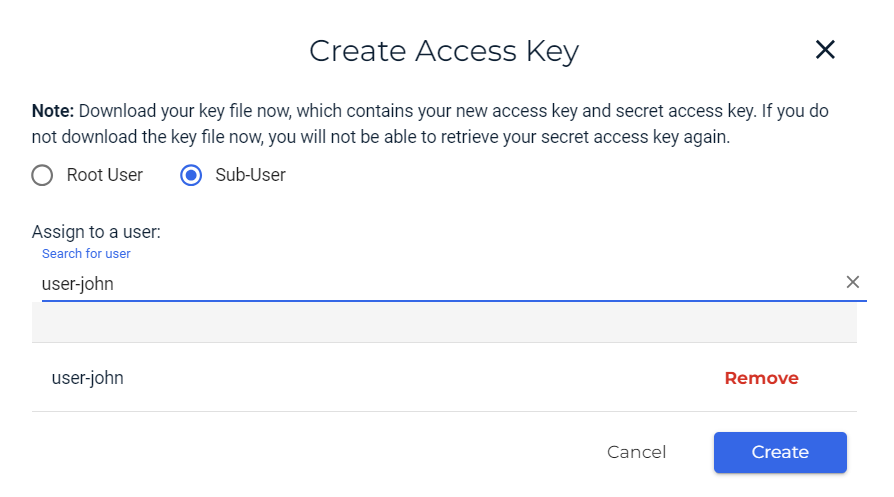
Create an API key set for each sub-user/customer for use with their third-party storage application used to send data to Wasabi. Use the standard Wasabi process of creating API keys (click Access Keys and then Create Access Keys), except apply it to the sub-user, not the Root user. For additional information, refer to Creating a New Access Key.
Repeat Steps 3 and 4 to create additional sub-users.
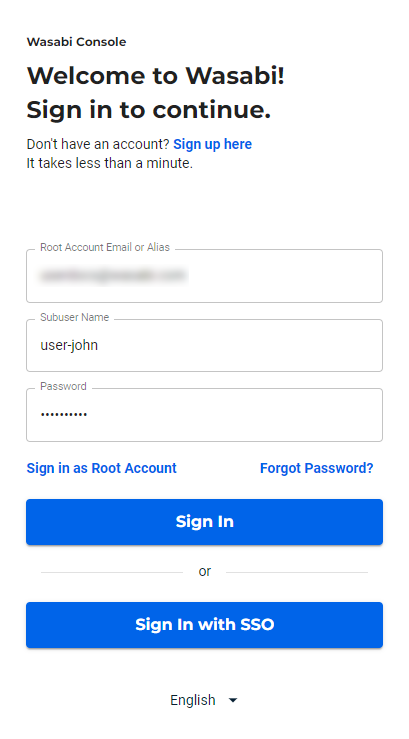
Test the access separation by logging into the Console as the sub-user you created.
On the Sign In page, click Sign in as Subuser (this option is below the Password box).
Enter the Root account email or alias.
Enter the sub-user.
Enter the sub-user password.
Once in the Console, the sub-user (user-john, in our example) can create, access, and delete all buckets that have the required prefix. user-john will receive "Access Denied" for all actions on other buckets.
Separate User Access at the Bucket Level
In some scenarios, you may want to separate users at the bucket level (each user has their own bucket and, while a user can access their bucket, that user cannot access other users' buckets).
user1 has access to bucket 1, and user2 has access to bucket 2.
user1 has no access to bucket2, and user 2 has no access to bucket 1.
Follow the steps below to separate user access at the bucket level.
Create a Wasabi Root account (if one does not already exist).
Create a storage bucket for each customer.
Create an IAM policy (click Policies and then Create Policy) for each customer. The policy should limit the customer's access to their storage bucket. For example, a policy named "user1-limit" is created for customer1, and a bucket named "user1-bucket" is used. Adjust the policy according to your needs. The complete policy is provided after the example below. For additional information, refer to Creating a Policy.
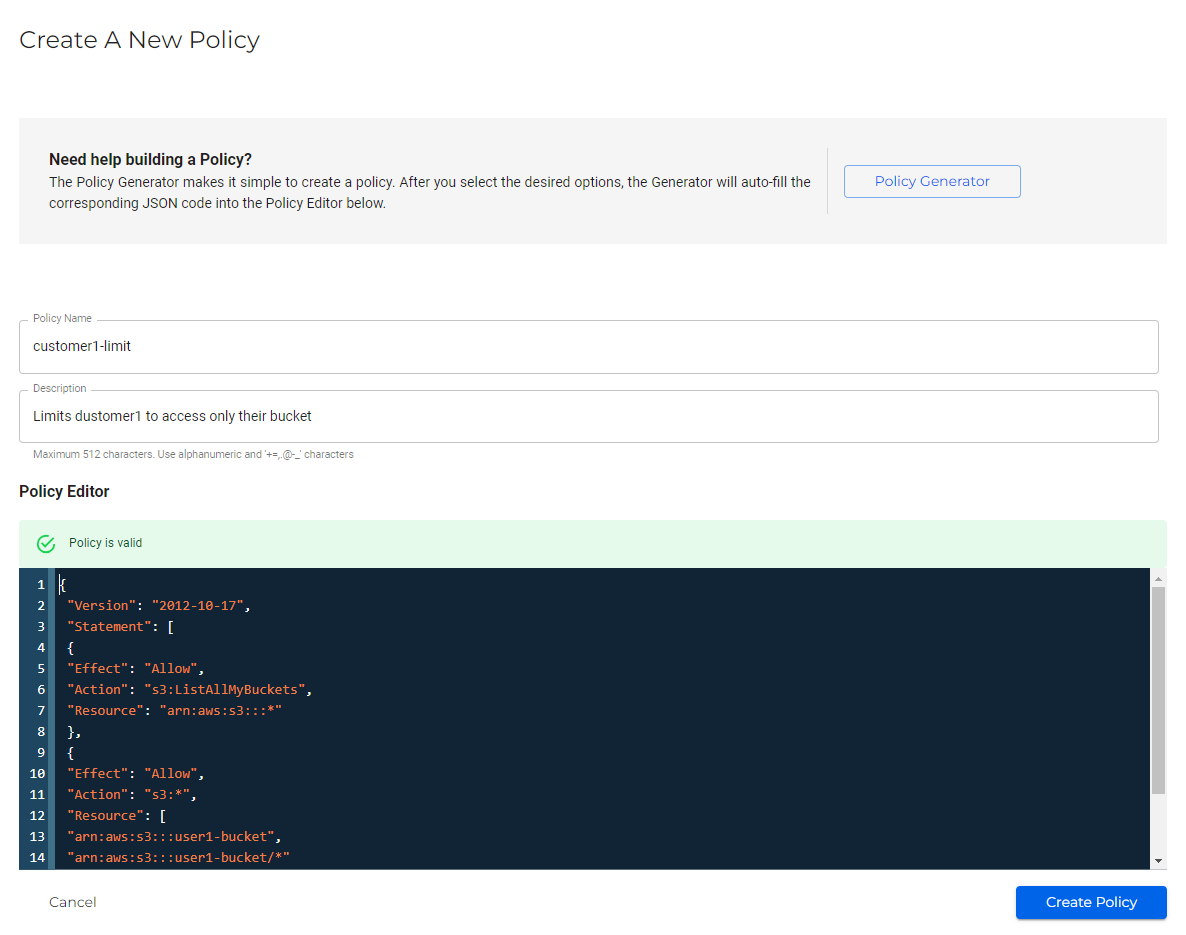
The actual policy syntax for limiting access to "customer1-bucket" is provided below in several examples. Edit the policy to reflect the proper bucket name in your actual use case.
Policy to Allow Sub-User to Perform Bucket Operations: This policy is for customers who want to allow sub-users to perform bucket operations through the Console.
To perform any bucket/object operations through the Console, the sub-user MUST have "ListAllMyBuckets" permission. This will allow the sub-user to list all the buckets when logged into the Console, but the sub-user can access and see contents only from the bucket for which that sub-user has permission.
{
                 "Version": "2012-10-17",
                 "Statement": [
                 {
                 "Effect": "Allow",
                 "Action": "s3:ListAllMyBuckets",
                 "Resource": "arn:aws:s3:::*"
                 },
                 {
                 "Effect": "Allow",
                 "Action": "s3:*",
                 "Resource": [
                 "arn:aws:s3:::user1-bucket",
                 "arn:aws:s3:::user1-bucket/*"
                 ]
                 }
                 ]
                }
Policy for Customers With Sensitive Information in Bucket Names: This policy is for customers who have sensitive information in the bucket names and do not want the sub-users to list all the bucket names.
With this policy, the sub-user cannot perform operations from the Console.
{
                 "Version": "2012-10-17",
                 "Statement": [
                 {
                 "Effect": "Allow",
                 "Action": [
                 "s3:*"
                 ],
                "Resource": [
                 "arn:aws:s3:::user1-bucket/*",
                 "arn:aws:s3:::user1-bucket"
                 ]
                 }
                 ]
                }
Policy to Explicitly Deny Access/Actions: Sometimes, customers can have issues with the policy above, still listing all bucket names for sub-users in third-party applications when not specifying the direct bucket path. If this occurs, the customer may need to attach an additional policy to a sub-user explicitly denying access/actions to all buckets not mentioned in the policy.
With this policy, the sub-user cannot perform operations from the Console.
{
                 "Version": "2012-10-17",
                 "Statement": [
                 {
                 "Effect": "Deny",
                 "Action": [
                 "s3:ListBucket",
                 "s3:GetBucketLocation",
                 "s3:ListBucketMultipartUploads"
                 ],
                 "NotResource": [
                 "arn:aws:s3:::user1-bucket/*",
                 "arn:aws:s3:::user1-bucket"
                 ]
                 },
                 {
                 "Effect": "Deny",
                 "Action": "s3:*",
                 "NotResource": [
                 "arn:aws:s3:::user1-bucket/*",
                 "arn:aws:s3:::user1-bucket"
                 ]
                 }
                 ]
                }
Now that you have created a bucket limit policy for each customer, you can create sub-users for each customer.
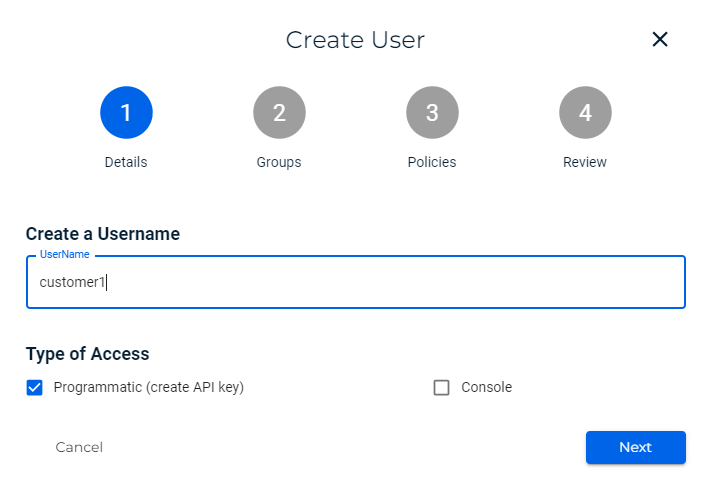
For each customer, create a sub-user account that leverages the bucket policy (click Users and then Create User). For additional information, refer to Creating a User. Be sure to select the Programmatic (create API key) option.
Attach the "customer1-limit" policy along with "IAMUserChangePassword" policy to the sub-user. This will give Console access and require that the sub-user change the password. You can attach more policies to the user according to your use case.
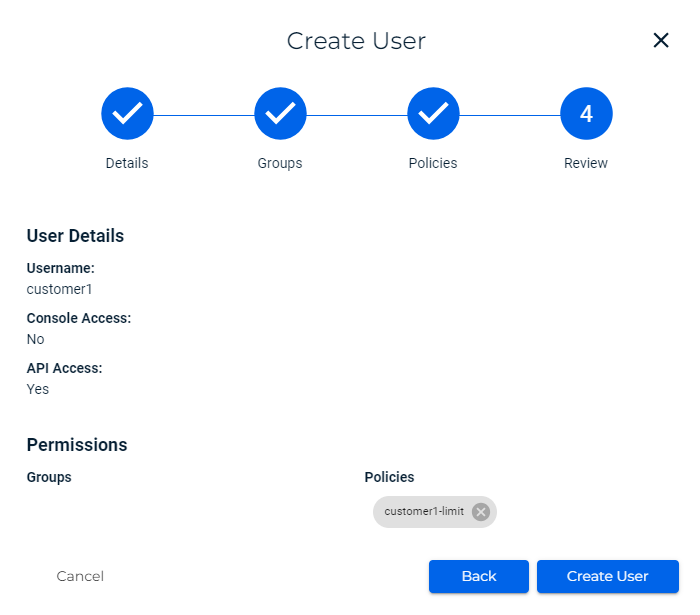
When you click Create User, API keys are generated. This is the key set that you will use with the third-party storage application to send the storage to Wasabi. Download the key set to a CSV or copy it to the Clipboard.
Create an API key set for each sub-user/customer using the standard Wasabi process for creating API keys (click Access Keys and then Create Access Keys), except apply it to the sub-user, not the Root user. For additional information, refer to Creating a New Access Key.
Now that you have completed the necessary Wasabi system configuration, you can use the service in a manner that prevents customer1 from accessing customer2 buckets (and vice versa).
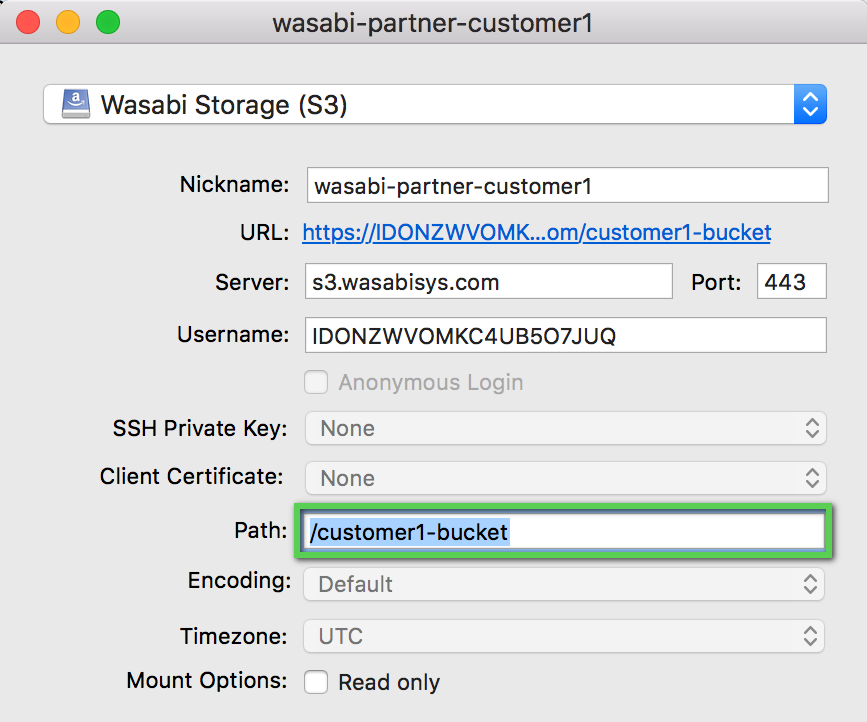
The "path" is an important configuration setting that must be used in the storage application. Refer to the highlighted area in the example below for the Mountain Duck sample application. The path of /customer1-bucket is set (along with the configuration of the API key set for customer1). You must do this as a means of ensuring that the storage application only tries to mount the bucket associated with customer1. Most storage applications connect and try to list all buckets (this would fail because of the policy limitations that were set).
Separate User Access at the Folder Level
In some scenarios, you may want to separate users at the folder level. Users share a common bucket, but each user has their folder that is not accessible by other users with access to the same bucket. Separation at the folder level means:
user1 and user2 share a common bucket
user1 has access to folder1 and user2 has access to folder2
user1 has no access to folder2 and user2 has no access to folder 1
Attach the following policy to the sub-user to give access to a specific folder within a specific bucket:
{
   "Version":"2012-10-17",
   "Statement":[
      {
         "Sid":"AllowUserToSeeBucketListInTheConsole",
         "Action":[
            "s3:ListAllMyBuckets",
            "s3:GetBucketLocation",
            "s3:GetBucketCompliance"
         ],
         "Effect":"Allow",
         "Resource":[
            "arn:aws:s3:::*"
         ]
      },
      {
         "Sid":"AllowRootAndHomeListingOfCompanyBucket",
         "Action":[
            "s3:ListBucket",
            "s3:ListBucketVersions"
         ],
         "Effect":"Allow",
         "Resource":[
            "arn:aws:s3:::<BUCKET-NAME>"
         ],
         "Condition":{
            "StringEquals":{
               "s3:prefix":[
                  "",
                  "<USER-FOLDER-NAME-INSIDE-BUCKET>/"
               ],
               "s3:delimiter":[
                  "/"
               ]
            }
         }
      },
      {
         "Sid":"AllowListingOfUserFolder",
         "Action":[
            "s3:ListBucket",
            "s3:ListBucketVersions"
         ],
         "Effect":"Allow",
         "Resource":[
            "arn:aws:s3:::<BUCKET-NAME>"
         ],
         "Condition":{
            "StringLike":{
               "s3:prefix":[
                  "<USER-FOLDER-NAME-INSIDE-BUCKET>/*"
               ]
            }
         }
      },
      {
         "Sid":"AllowAllS3ActionsInUserFolder",
         "Effect":"Allow",
         "Action":[
            "s3:*"
         ],
         "Resource":[
            "arn:aws:s3:::<BUCKET-NAME>/<USER-FOLDER-NAME-INSIDE-BUCKET>/*"
         ]
      }
   ]
}
Sub-User Limiting Access Policy
The following is a sub-user limiting access policy to:
Allow the sub-user to read, write, and delete objects in the sub-user's bucket
Not allow the sub-user to delete the bucket
{
        "Version": "2012-10-17",
        "Statement": [
        {
        "Effect": "Allow",
        "Action": "s3:ListAllMyBuckets",
        "Resource": "arn:aws:s3:::*"
        },
        {
        "Effect": "Allow",
        "Action": "s3:*",
        "Resource": [
        "arn:aws:s3:::bucket-name",
        "arn:aws:s3:::bucket-name/*"
        ]
        },
        {
        "Effect": "Deny",
        "Action": "s3:DeleteBucket",
        "Resource": [
        "arn:aws:s3:::bucket-name",
        "arn:aws:s3:::bucket-name/*"
        ]
        }
        ]
        }