Wasabi offers Single Sign-On (SSO) for Wasabi accounts via miniOrange as the Identity Provider (IdP) using SAML2 (Security Assertion Markup Language).
This article provides configuration instructions for both the miniOrange administrator and the SSO user to properly set up and complete a Wasabi Console login using your organization’s SAML2 SSO service.
Configuring the SAML App in miniOrange (IdP Side)
Log in to your miniOrange Admin Console account
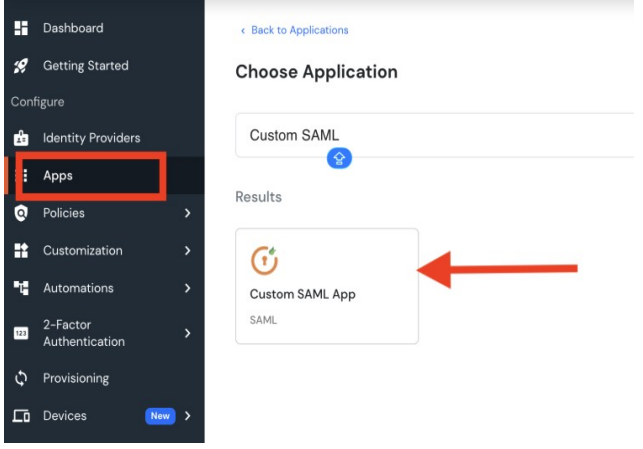
https://login.xecurify.com/moas/login).Navigate to Apps. The Applications page is displayed.
Click + Add Application to create a new application.
On the Choose Application page, search for and select Custom SAML App.
On the Basic tab, configure the Wasabi Service Provider (SP).
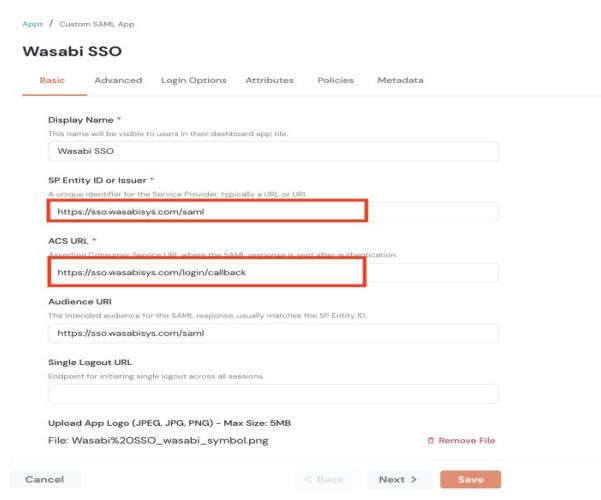
Enter the following values in their respective fields.
Display Name—Wasabi SSO.
SP Entity ID or Issuer—A unique Identifier for the service provider
https://sso.wasabisys.com/saml.ACS URL—The Assertion Consumer Service URL is used when configuring SAML 2.0 Single Sign-On (SSO)
https://sso.wasabisys.com/login/callback.Audience URI—Identifies Wasabi as the intended service provider for the SAML authentication response
https://sso.wasabisys.com/saml.Single Logout URL—Leave this field blank.
Upload App Logo—Optionally, upload an application logo for the Wasabi SSO application.
Verify that the values are entered correctly, click Next, then select the Advanced tab to configure.
.png)
Enter the following values in their respective fields:
Signed Request—Leave this option unchecked.
Sign Response—Leave this option unchecked.
Sign Assertion—Enable this option.
Signature Algorithm—Select RSA-SHA256 from the dropdown.
Encrypt Assertion—Leave this option unchecked.
Relay State—Leave the default setting.
Override Relay State—Leave this option unchecked.
Keep the remaining settings at their default values.
Click Next, then select the Login Options tab for configuration.
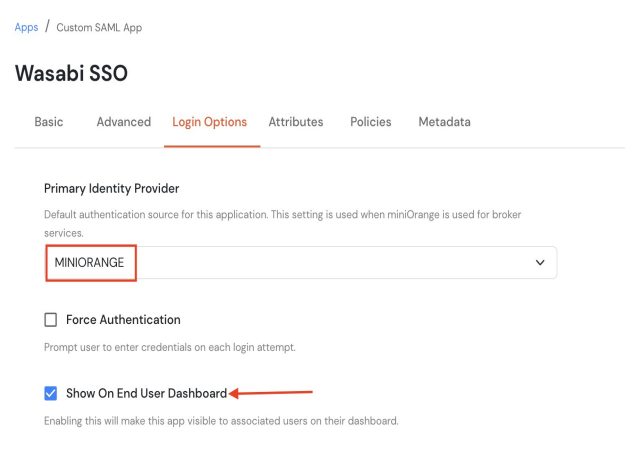
Enter the following values in their respective fields:
Primary Identity Provider—Select MINIORANGE from the dropdown.
Force Authentication—Leave this option unchecked.
Show On End User Dashboard—Enable this option to make the Wasabi SSO application available to assigned users.
Click Next, then select the Attributes tab for configuration.
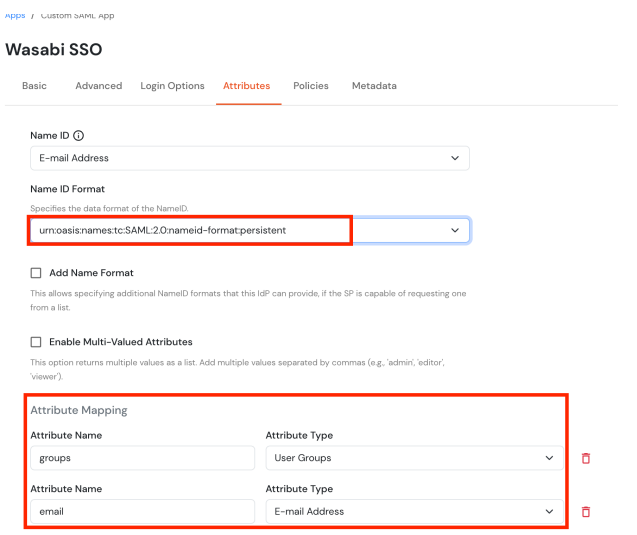
Enter the following values in their respective fields:
Name ID—Select E-mail Address from the dropdown.
Name ID Format—Select
urn:oasis:names:tc:SAML:2.0:nameid-format:persistentfrom the dropdown.Add Name Format—Leave this option unchecked.
Enable Multi-Valued Attributes—Leave this option unchecked.
In the Attribute Mapping section:
Attribute Name—Add groups.
Attribute Type—Select User Groups from the dropdown.
Attribute Name—Add email.
Attribute Type—Select E-mail Address from the dropdown.
Click Save to complete the SAML configuration.
Create a Group in miniOrange
A group is a collection of users. Create a Group in miniOrange to map an application to a set of users.
Navigate to Groups, then select Manage Groups. The Groups page is displayed.
Click Add Group in the upper-right corner. The Add New Group modal is displayed.
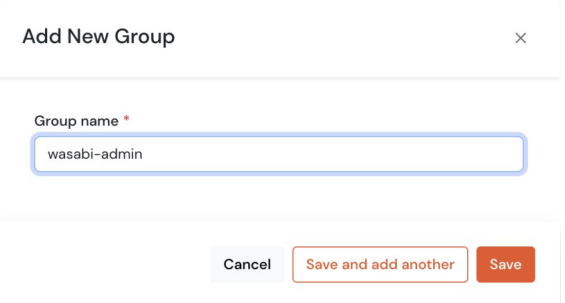
Enter a Group name to assign Wasabi access to users, for example, wasabi-admin. Note the group name for later use when configuring SSO in the Wasabi Console. You must use the same name for the Wasabi SSO role as in the miniOrange group.
Click Save to create the new group.
Add Users to the Group
Navigate to the new wasabi-admin in Groups, click the three dots, and then select Edit. The wasabi-admin Group page is displayed.
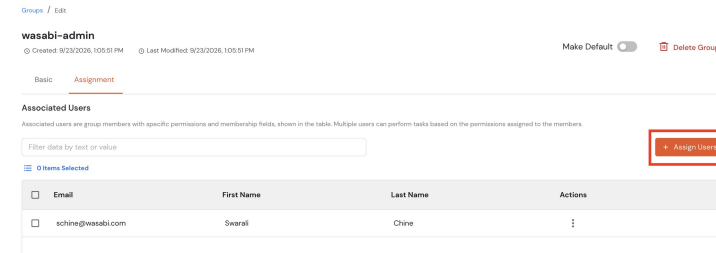
In the Assignment tab, click Assign Users, select the users who should have access to the Wasabi Console.
Save the assignment.
Assign the Group to the Wasabi SSO Application
Assigning a group to the Wasabi application determines which miniOrange users can access the application. Mapping a group attribute determines whether group information is included in the SAML assertion sent to Wasabi.
Navigate to Apps, select the Wasabi SSO application, then click the Policies tab.
Click Assign Group.
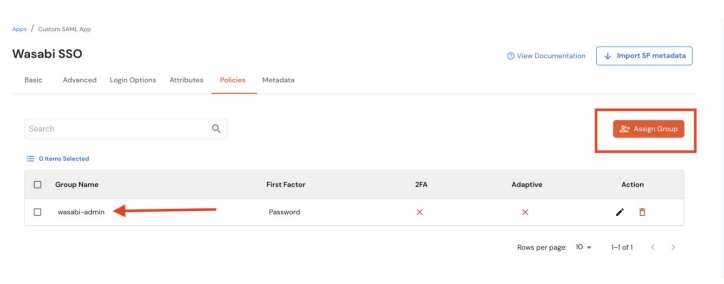 Enter or select the following values in the corresponding columns for the new group:
Group Name—Select the checkbox for the Group Name, for example, wasabi-admin.
First Factor—Set to Password.
2FA—Leave this field disabled, unless required by your organization.
Adaptive—This field refers to authentication. Leave this field disabled, unless required by your organization.
Save the Policy.
Configure IdP Metadata in Wasabi
Configure the Identity Provider (IdP) metadata in Wasabi to establish the SAML SSO connection and enable user authentication.
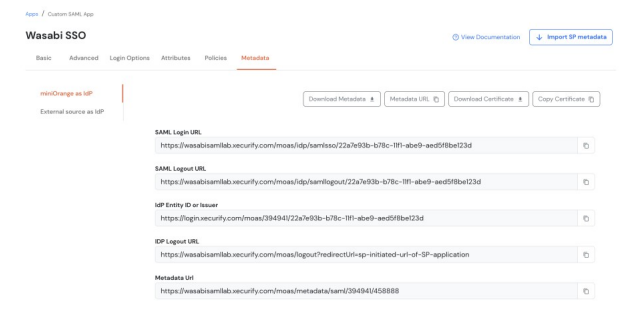
Navigate to Apps, select the Wasabi SSO application, and click the Metadata tab.
Choose one of the following three methods required to configure miniOrange IdP for Wasabi.
IdP Metadata XML—Download the Metadata XML file from miniOrange and upload it to Wasabi.
IdP Metadata URL—Copy the Metadata URL from miniOrange and enter it in Wasabi.
Manually enter details—Configure the following:
Sign In URL—miniOrange SAML Login URL.
Sign Out URL—miniOrange SAML Logout URL.
X509 Signing Certificate—miniOrange Download Certificate.
In this example, the IdP Metadata XML file was used.
Configuring SAML Settings in Wasabi Console (SP / Client Side)
Configure the SAML settings in Wasabi Control to establish Wasabi as the Service Provider (SP) and enable SSO authentication with your Identity Provider (IdP).
Sign in to the Wasabi Console
https://console.wasabisys.com/loginusing a Root account email.Select Security in the left menu, then select the SSO (Single Sign On) tab and click Start SSO Configuration. The SSO (Single Sign On) page is displayed.
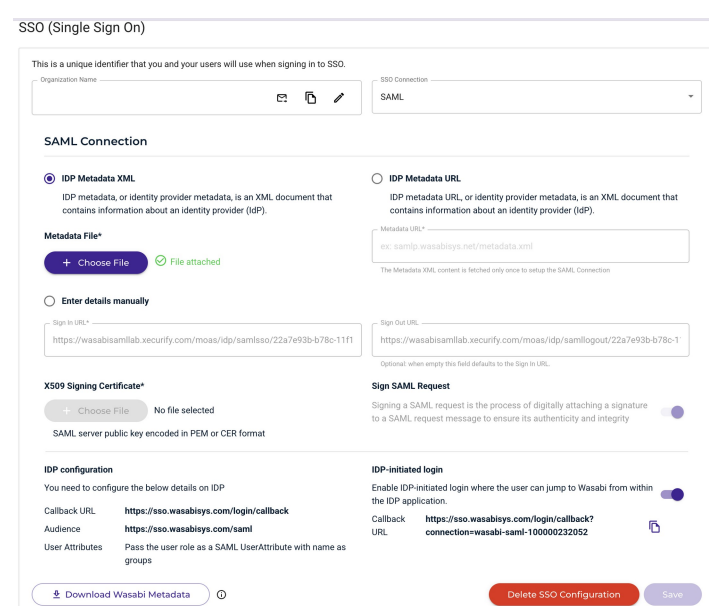
Enter or select the following values in their respective fields:
Organization Name—Enter your organization’s unique name, then click Add Organization.
SSO Connection—Select SAML from the dropdown.
IDP Metadata XML—Select this option in the SAML Connection section.
Metadata File—Select + Choose File, then upload the miniOrange Metadata XML file downloaded earlier.
Sign In URL—Verify this field was populated from the miniOrange metadata.
Sign Out URL—Verify this field was populated from the miniOrange metadata.
Sign SAML Request—Keep this field enabled.
Click Save to save the SSO configuration.
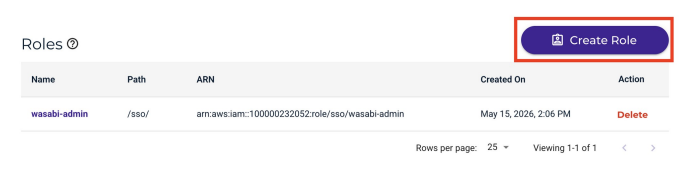
In the SSO Single Sign-On tab, select Settings, then click Create Role. The role name should match the miniOrange group name configured earlier. For example, wasabi-admin.
Do not create the role through the Role tab on the left. SSO roles must be created using the SSO tab in the Settings section.
In the Assign Role Policies panel, select the appropriate policy for the newly created role, then click Create Role. The new role is displayed in the Roles panel.
Testing the Integration
Test the SAML SSO integration to verify that users can successfully authenticate through the Identity Provider (IdP) and access Wasabi Control.
Sign in to the Wasabi Console
https://console.wasabisys.comto test the SSO configuration.Click Sign In With SSO. The SSO Sign In panel is displayed.

In the SSO Sign In panel, select Sign In With an Organization Name, and enter your organization’s name configured earlier. You are redirected to miniOrange for authentication.
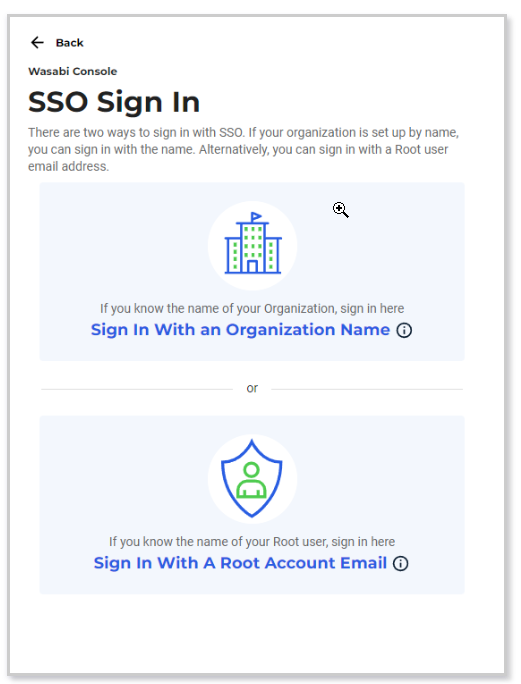
In miniOrange, sign in as an authorized miniOrange user assigned to the appropriate group.
After successful authentication, you are redirected back to the Wasabi Console.
Verify that the user is successfully logged in and has the permissions associated with the corresponding Wasabi SSO role.
To configure IdP-initiated login, refer to IdP-Initiated SAML Login for miniOrange SSO.