Dell Technologies PowerProtect Data Manager (PPDM) offers efficient data protection capabilities, leveraging the latest evolution of Dell's trusted protection storage architecture. PPDM enables the protection, management, and recovery of your data, empowering you to rapidly evolve to meet future IT demands.
Wasabi has been validated to work with PowerProtect Data Manager as a Cloud Tier target. Wasabi's object storage can be added as a long-term retention destination to store backup data in the cloud using PowerProtect Data Manager and DD Cloud Tier. This article provides describes the procedure to integrate Wasabi cloud storage with PowerProtect Data Manager using DD Cloud Tier. The procedure outlined in this article applies to PowerProtect DM software as well as Data Manager appliance DM5500.
Prerequisites
Active Wasabi cloud storage account
PowerProtect DD product installed with Cloud Tier feature
Cloud Tier license on PowerProtect DD
PowerProtect Data Manager installed and configured
The data restoration process is handled by your specific backup software application. As many potential variables will affect your unique environment, it is strongly recommended that you seek the guidance of your backup software's technical support team if you encounter difficulty, or have application-specific inquiries.
Architecture Diagram

Configuring Cloud Tier on Dell PowerProtect DD
Log in to your PowerProtect DD Web Console and follow the steps in Using Dell Data Domain Cloud Tier with Wasabi to enable Cloud Tier and add your Wasabi bucket as a cloud unit.
Once configured, you should have Wasabi configured as a Cloud Unit.

Adding a Virtual Machine Source
The following instructions add a vCenter as virtual machine source to protect the VMs hosted on the vCenter.
Log in to PowerProtect Data Manager as an administrator. Click Infrastructure and Asset Sources. Click + to add a new asset source.
Only an administrator role can manage asset source.

In the Asset Sources window, click Enable Source for the Virtual Machine asset source.

Click the vCenter asset tab. Click Add.

In the Add vCenter window, input the following:
Name for the vCenter
FQDN/IP for the vCenter
Host Credentials - Add new credentials for the vCenter user by clicking Add Credentials or choosing existing credentials
Note: Ensure that you specify the credentials for a user whose role is defined at the vCenter level as opposed to a lower-level container object in the vSphere object hierarchy.Optionally, select vSphere Plugin install to make some of the PPDM UI functionality available on the vSphere client.
For more details on the above parameters, refer to Add a VMware vCenter as an asset source.
Click Verify to verify the credentials. If the vCenter SSL certificate cannot be automatically accepted, it will show a pop-up for reviewing the certificate details. Review the certificate and accept it to continue.

Once the credentials and SSL certificate are verified, click Save to add the vCenter as an asset source. The PPDM will initiate a discovery automatically.

After the discovery is completed, the assets can be viewed under Infrastructure, Assets, then Virtual Machines.

Configuring PPDM to Back Up to Wasabi Cloud Tier
Log in to the PPDM web portal.

Click Protection and then Protection Policies. On the protection policies page, click Add to add a new protection policy.

Input a name for the policy and a description. Click Next to continue.

Select the policy purpose from the list and click Next to continue. For more details on the supported policy purposes, refer to Dell documentation on supported protection policy purposes.

In the Assets tab. browse the assets and click on the checkbox beside the asset you want to protect. You can also search assets using the Search bar. Click Next.

In the Objectives tab, click Add below Primary backup to add a primary backup storage device.

Select the PowerProtect DD Storage device name from the drop-down list and set the schedule for the backup. Click Save.

To enable Cloud Tier for this policy, click Cloud Tier.

Click Add under Cloud Tier to add cloud tiering to the policy.

Select the Wasabi cloud unit from that list of cloud units on your PowerProtect DD where you want to send the backups for Long Term Retention. Input the number of days after which you want backups to be moved to Wasabi. Click Save.

Once the primary backup and Cloud Tier is added, click Next to continue.

Review the options and check the ones that are relevant to your protection needs. For details on the various options, refer to configure protection policy options.

In the Summary tab, review the policy and click Finish to create the protection policy.

The newly created protection policy is now listed under Protection and Protection policies. The policy will run as per schedule. You can also run the policy manually by selecting the policy and click Protect Now and going through the wizard.
You can review the status of the protection jobs by clicking on "Jobs" and then "Protection Jobs".
The protected backups will initially be stored on the PowerProtect DD. Backups will move to Wasabi only after they have aged beyond the number of days in "tier after" setting of Cloud Tier schedule.
Recalling Backups From Wasabi Cloud Tier
Backups that are stored in the Cloud Tier can be recalled to the local storage prior to restoring. Follow the instruction in this section to recall a copy of the backup stored in the Wasabi cloud as Cloud Tier.
Log in to the PowerProtect Data Manager web portal.

From the Dashboard, click Infrastructure and Assets. Select the checkbox next to the backup that you want to recall and click View Copies.

Click on the storage target icon to view the list of backup copies. Select the backup copy to be recalled from Cloud Tier. Backups stored in Wasabi cloud will have the location set to Cloud in the location column. Once the backup copy is selected, click Recall from Cloud to recall the the backup to the local storage from Wasabi.

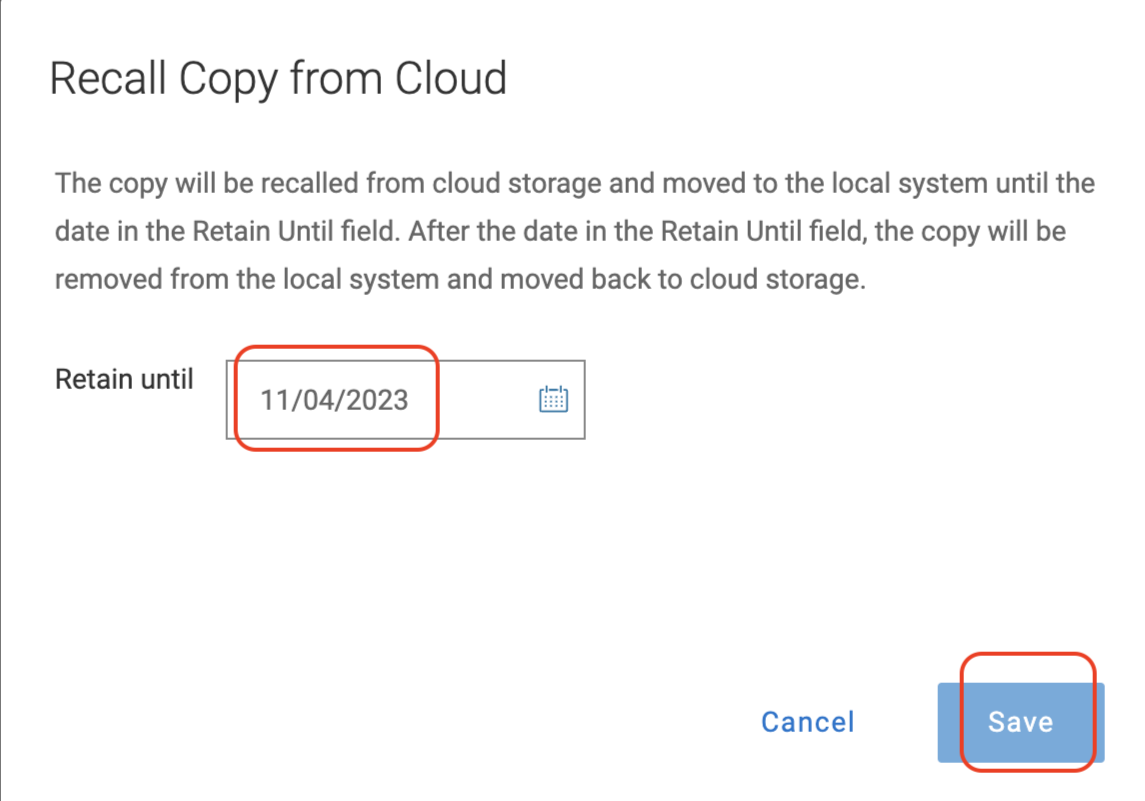
Select the date until which the copy is to be retained in local storage. Click Save.
The progress of the backup recall job can be viewed under Jobs and then clicking Protection Jobs. Once the recall job has completed successfully, the backup is available on the local storage to be restored.

Performing Restore on PPDM From Backups on Cloud Tier
Restoring backups that are stored in Cloud Tier for long term retention is a two-step process:
Step 1: Recall the backup copy to the local storage. Refer to Recalling Backups From Wasabi Cloud Tier (above) for instructions to recall backups from Wasabi cloud.
Step 2: Restore the backup copy from the local storage. Once the backup has been recalled from cloud tier, follow the steps in this section to restore the backup.
From the PPDM Dashboard, click Restore and Assets. Select the asset that needs to be restored, then click Restore.

In the Restore window, select the VM asset name that needs to be restored and click Choose Copy.

In the Choose Copy window, click on the storage icon to list the backup copies.

Select the copy to be restored from the list of the backup copies. Copies that are local will have the location set to Local. Copies that were recalled from Cloud Tier will have the location set to Local Recalled in the location column. Once the backup copy is selected, click OK.

In the Select Copy window, click Next to continue.

In the Purpose window, select from the given options. In this example, we are restoring the Entire VM. Click Restore Enter VM(s) and Next.
For information on restoring individual virtual disks, review the Restoring a virtual machine or VMDK section in the PowerProtect Data Manager Virtual Machine User Guide.

In the Restore Type window, select the option from the list and click Next.
In this example, we are creating and restoring as a new VM. For other restore types, review the Restoring a virtual machine or VMDK section in the PowerProtect Data Manager Virtual Machine User Guide.

Select the vCenter and the Datacenter to restore your VM. Click Next.

Select the destination host. Click Next.

In the Datastore window, select the destination storage for the Virtual disk. Click Next to continue the restore.

Input the name for the restored VM and select the applicable options. Click Next to continue.

Select the applicable network and the connection state for each of the network adapters.

Review the Summary and click Restore to start the restore job.

The restore job can be viewed under Jobs and Protection Jobs. Once the job is completed successfully the VM can is restored and can be used as needed.
