Dell Technologies PowerProtect Data Manager (PPDM) offers efficient data protection capabilities, leveraging the latest evolution of Dell's trusted protection storage architecture. Data Manager offers a seamless and secure workflow for configuring archive solutions to storage and provisioning data transmission to cloud.
Wasabi Hot Cloud storage has been validated to work with PowerProtect Data Manager as an Archive target. Key features of this integration include:
Seamless integration of archive solutions with Wasabi, ensuring smooth data management
Capability to instantly archive your data to Wasabi following a backup
Co-existence with Data Domain Cloud Tier solution
Secure transmission and data-at-rest encryption in Wasabi maintaining data integrity and compliance
Resiliency through retention lock governance, ensuring data integrity and compliance with regulatory requirements
This article lists example steps for Data Manager deployed using VMWare vCenter infrastructure. VMWare is one of the supported deployment model for Data Manager. For other Data Manager deployments, refer to Data Manager documentation for the specific infrastructure on Dell’s support website.
Reference Architecture
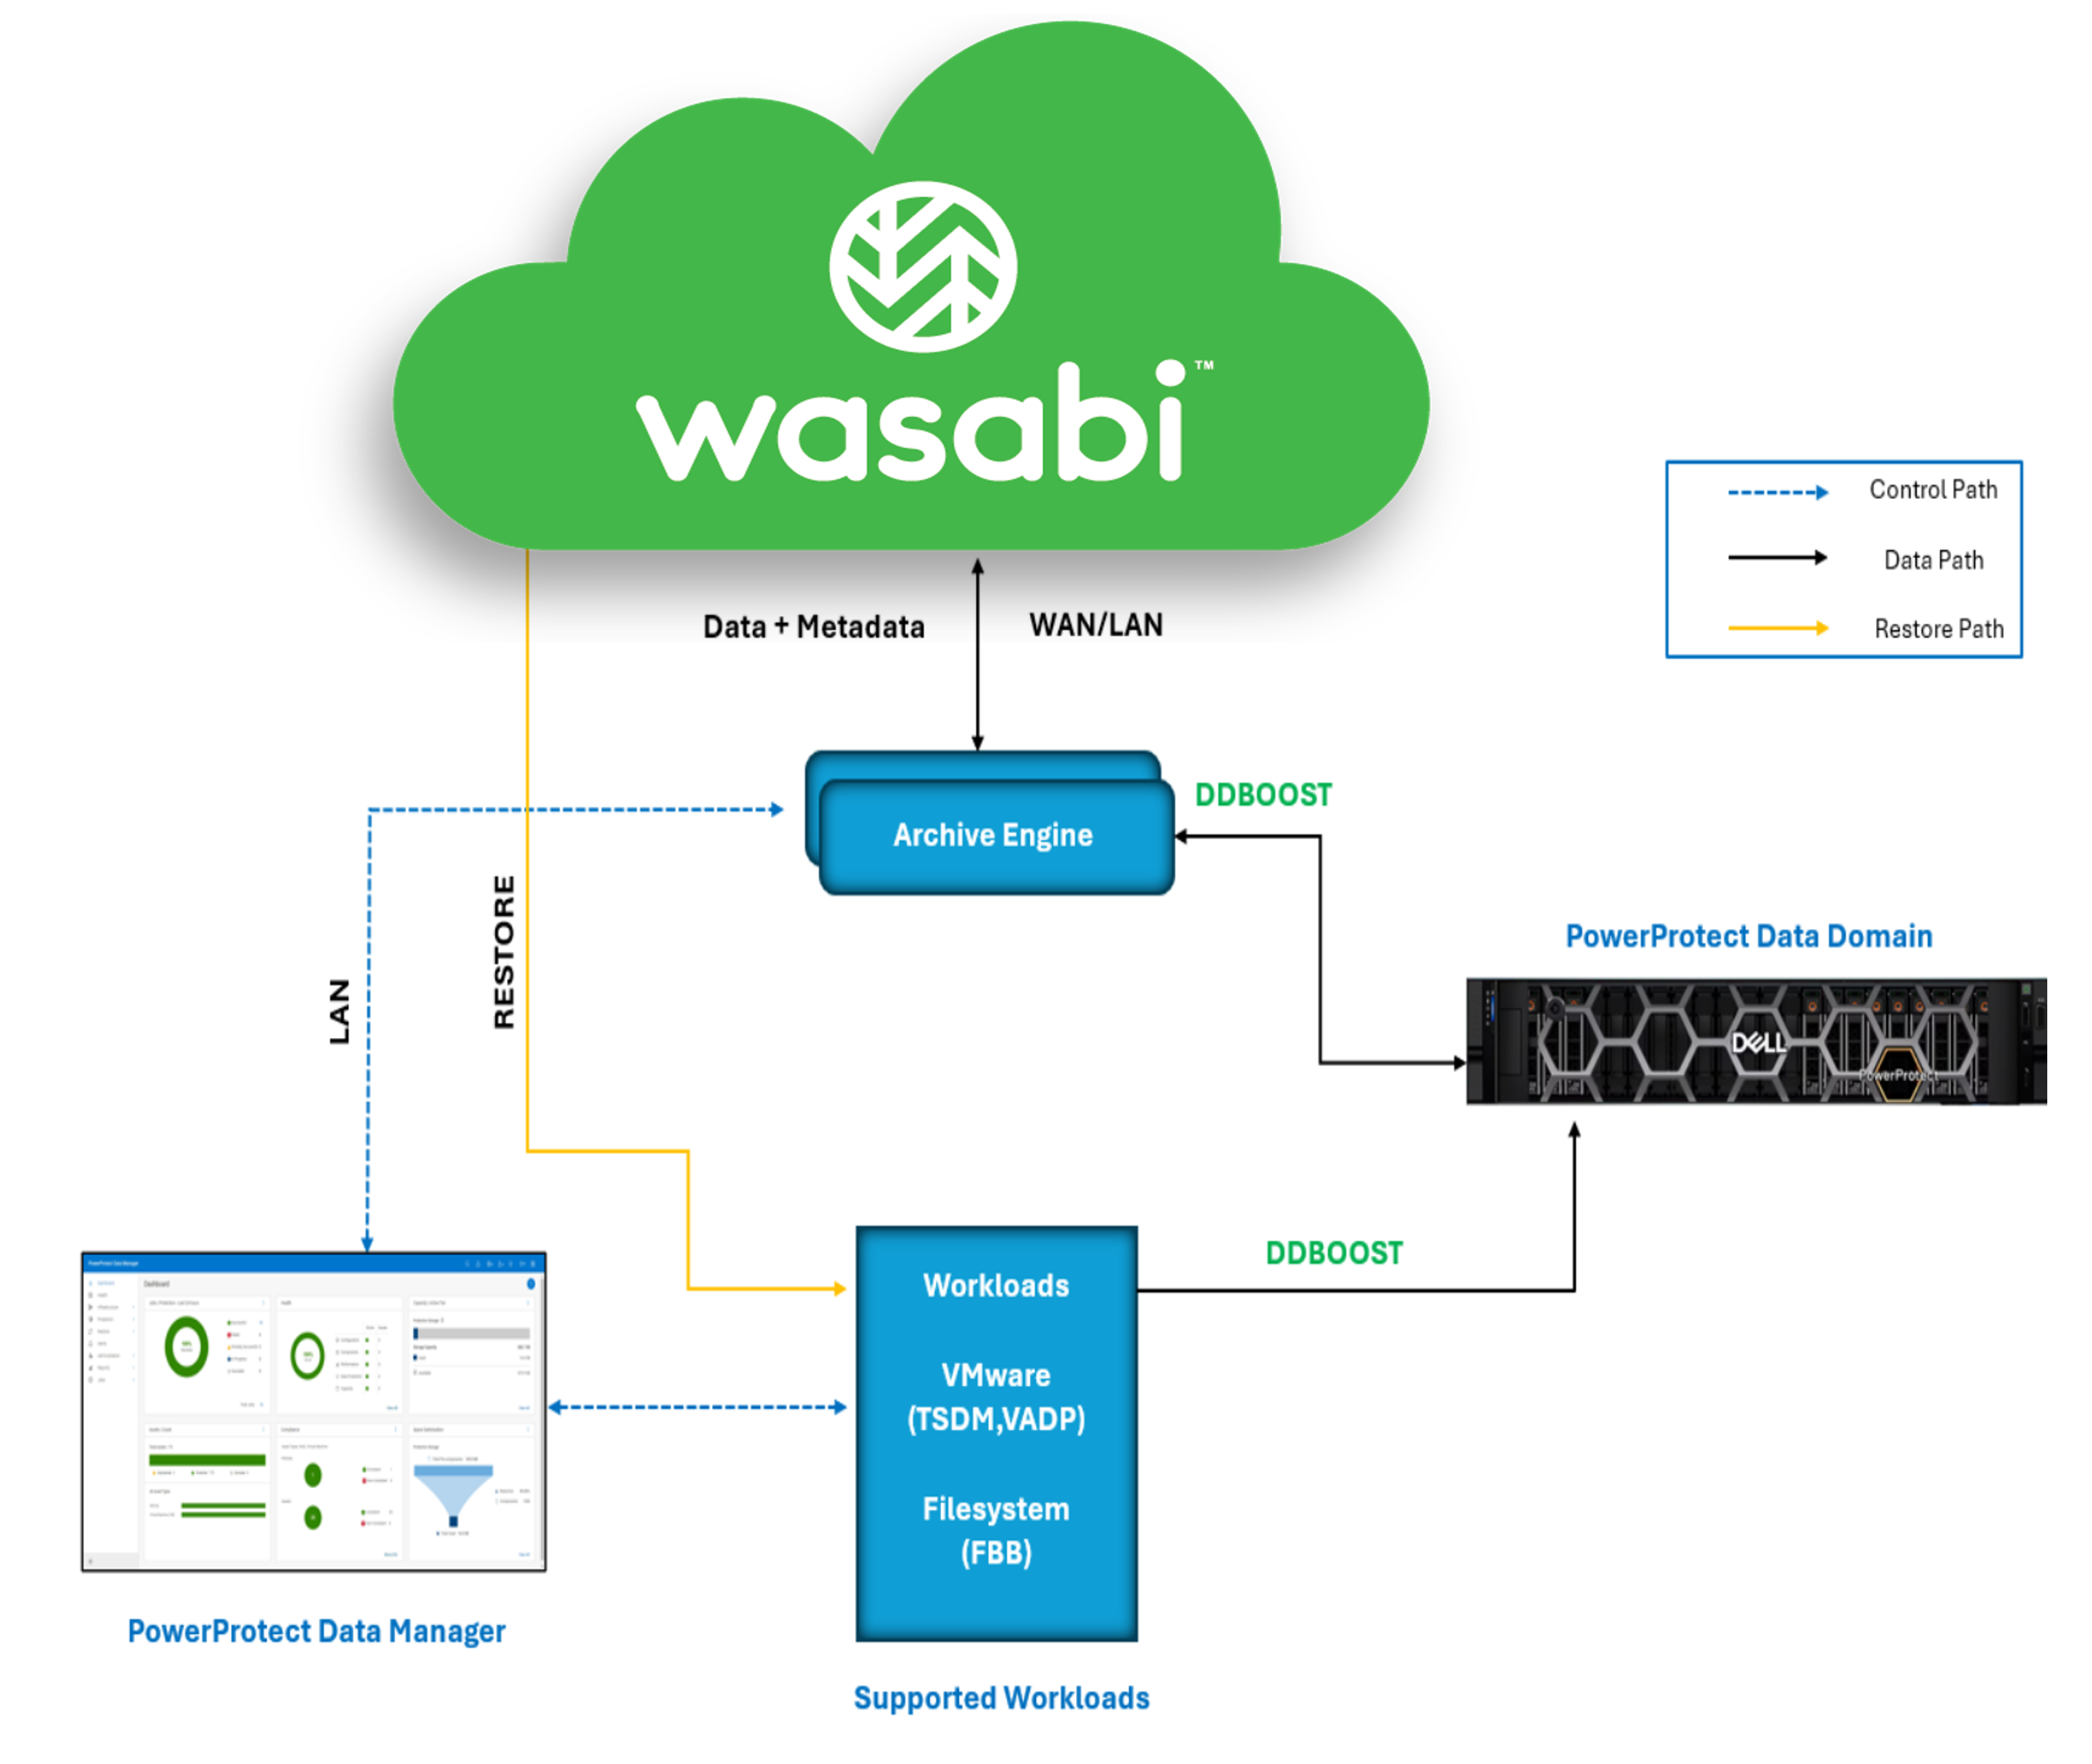
Requirements
Active Wasabi cloud storage account
PowerProtect Data Manager version 20.3 (or later) installed and configured
PowerProtect DD product installed and integrated with PPDM
Wasabi Configuration
The Wasabi configuration consists of three steps: creating a user, assigning an IAM policy to the user, and creating access keys.
Create a new sub-user with programmatic access. Refer to Creating a User for details.
Assign the appropriate IAM policy to the user. The example here uses AmazonS3FullAccess policy added to the user. Refer to Creating a User for details.
Create an Access Key and Secret Key pair for the user. This enables PPDM to access data stored in the Wasabi Hot Cloud Storage account.
Data Manager Configuration
This section details the configuration steps on PowerProtect Data Manager to write backup archives to Wasabi. The configuration consists of three steps.
Add Wasabi as an object storage target.
Create a protection engine for archive workloads.
Create a protection policy to write archives into Wasabi.
Adding Wasabi as an Object Storage
Log in to Data Manager and navigate to Infrastructure Storage Object Storage. Click on Add to create a new Object storage target.

Input the following object storage details.
Object Storage—Enter an appropriate name.
Object Storage Provider—Select S3 Compatible.
Host credentials—Select existing or add new credentials. These are the access and secret keys that you created on the Wasabi console for your user.
Endpoint—Input the URL “s3.wasabisys.com”. This example uses Wasabi’s us-east-1 storage region. Use the region where your bucket is located. For a list of regions, see Available Storage Regions.
Port—443.
Certificate—Click Accept to accept the SSL certificate.
Click Next.

If you use a proxy to access Wasabi, enter the details in this section. If not, then skip this configuration and click Next.

Click Verify to verify the connection with your Wasabi Hot Cloud Storage account. If the configuration is correct, you receive a Successfully Verified confirmation.
Click Save to complete the configuration.

The object storage should be listed under the Object Storage section. Check the checkbox next to the newly added object storage.
Click Manage Object Storage Unit.

Click Add to add a storage unit.

Input the details for the S3-compatible object storage unit.
Name—Enter the name of the Wasabi bucket that you want to create. The bucket name must be unique within Wasabi Hot Cloud Storage and DNS-compatible.
Soft Capacity Quota—(optional) Enter a soft quota for this storage unit to receive an alert on Data Manager when the quota is reached.
Retention Lock—Enable retention lock for this storage unit, if required.
Server-side encryption—Enable server-side encryption.
Click Save to save the configuration and create the cloud unit.

Add a Protection Engine
This section details the steps to deploy a protection engine that acts as a data mover for moving backups to and from Wasabi.
Select the Infrastructure tab.
Select Protection Engines.
Click Protection Engines.
Click Add to add a new protection engine.

Input the configuration for the Protection engine.
Supported Protection Type—Archive
Host name—Appropriate host name. Hostname should be resolved by DNS
Primary DNS—Primary DNS IP
Secondary DNS—Secondary DNS IP
Tertiary DNS—Tertiary DNS IP
Gateway—Network gateway IP
Netmask—Netmask to be used
Network—Select the network to be used for the protection engine VM
vCenter server to deploy—Select the vCenter server from the list
Datastore—Use automatic or select a specific datastore to be used
ESX Host/Cluster—Select the specific ESX Host to be used for deploying this VM
Click Next.

Select the appropriate preferred Network PortGroup.
Click Next.
.png)
Review the configuration on the summary page. Click Finish.
.png)
Creating a Protection Policy for Archiving Backups to Wasabi
Select the Protection tab.
Select Protection Policies.
Click Add.
,
Input the details for the protection policy.
Name—Name for the policy.
Description—Description for the policy.
Type—From the drop-down, select the policy type depending on the asset that you want to protect. This example uses VMware Virtual Machine.
Click Next.

Select the appropriate purpose for the protection policy.
Click Next.

Search and check the checkbox next to the assets to protect.
Once all assets are checked, click Add to add the assets.
Click Next.

On the Objectives window, click Add under Primary Backup to add your primary storage target.

This part of the configuration details the primary on-prem backup which is typically a PowerProtect DD. Select the appropriate storage name, interface, retention lock settings and schedule. This is independent of the settings for archive workloads. Once you have selected the appropriate settings, click Save.

Once back on the Objectives page, click Archive.
Click Add under Archive to add the archive target configuration.

Configure the settings for the archive target.
Object Storage—Select the Object storage that you created for Wasabi in the steps above.
Object Storage Unit—Select the storage unit that was created above for your Wasabi account.
Retention Lock—Enable if required. Data Manager supports Governance mode retention lock.
Schedule—Configure the archive schedule as needed. The Data Manager will send an archived copy of the backups to Wasabi according to this schedule. Optionally, you can create an archive copy after every backup job by moving the Archive immediately toggle to On immediately after the primary backup completes.
Click Save to add the archive target configuration.

On the Options page, select the appropriate settings and click Next to proceed.

Review the summary for the protection policy. Click Finish.

You can list the newly created protection policy. Select the Protection tab.
Select Protection Policies.

Creating an On-Demand Archive to Wasabi
Data Manager allows you to create an on-demand archive copy to your Wasabi Hot Cloud Storage account. Follow the steps below to manually create a one-time archive copy to Wasabi. The backup job has been completed locally prior to creating an archive copy to Wasabi.
From your Data Manager portal, select the Infrastructure tab.
Select Assets.
Search for your VM asset that you would like to archive. Select your asset by checking the checkbox next to the asset.
Click View Copies.

Ensure you list the Primary backup copies, then select the copy you want to archive by checking the checkbox next to it. Click More Actions.
Select Archive to bring up the Archive window for this copy.

In the Archive window, select the Wasabi object storage and the desired storage unit from the list. Input the retention period in days, weeks, months, or years.
Optionally, to enable Retention Lock, select the checkbox next to Retention Lock.
Click Save to save the archive configuration. Once saved, it will trigger a one-time archive copy of the selected backups to Wasabi.

You can view the progress of the archive job by navigating to Jobs on Data Manager.
Restoring Archive Backups Stored in Wasabi
Archive backups stored in Wasabi have to be restored through Data Manager. There is no way to restore these backups from outside of Data Manager. Follow the steps below to restore Data Manager backups archived in your Wasabi Hot Cloud Storage account.
Select the Restore tab.
Select Assets.
Search the asset to restore and select it by checking the checkbox next to the asset.
Click View Copies.

To restore Archive backups, click Archive.
Select the restore point and click Restore.

In the Restore window, select the options and settings to restore the asset, then complete the wizard based on your requirements.
On the summary page, review the restore configuration. Click Restore to initiate restoring the backup from Archive.

You can view the progress of the restore job by navigating to Jobs on Data Manager.