Wasabi is a member of Veeam's cloud partner ecosystem. Wasabi has worked with Veeam closely to offer both a seamless implementation and a smooth transition to cloud storage. For more information on how Veeam works with Wasabi, refer to the Veeam and Wasabi Solution Brief.
This article describes the procedure to use Wasabi Covert Copy to protect a Golden Copy of Veeam backups for use in case of a disaster that affects other copies of backups.
Covert Copy's incremental support functionality works with Veeam v12 & v13. For more information about how Covert Copy supports incremental backups, please refer to Covert Copy: Using Incremental Support.
For ongoing replication of backups, refer to Wasabi Object Replication With Veeam v12 SOBR.
This article covers only Scale-Out Backup Repositories (SOBRs). Refer also to Direct to Object Storage and Backup Copy Jobs.
The data restoration process is handled by your specific backup software application. As there are many potential variables that will affect your unique environment, Wasabi strongly recommends that you seek the guidance of your backup software's technical support team in the event that you encounter difficulty or have application-specific inquiries.
Requirements
Veeam Backup and Replication (VBR) v12 is installed and licensed. This solution was tested with v12.3.
You have an active Wasabi Hot Cloud Storage account.
You have an active Veeam Scale-Out Backup Repository with the capacity tier pointing to a Wasabi bucket.
Existing backups reside in a Wasabi object-locked (immutable) bucket. The Versioning and Object Lock features must have been previously enabled on the bucket.
Multi-Factor Authentication is enabled for the Wasabi account root user. See MFA (Multi-Factor Authentication) for details on how to enable and use MFA on your account.
High-Level Steps
Follow the high-level steps below to implement Covert Copy for your Veeam backups. These are detailed further in the sections below.
Enable Multi-User Authorization (MUA) on your account and configure Covert Copy activities that your security contacts approve.
Pause Veeam backup activities by disabling backup jobs pointing to Wasabi.
Enable Covert Copy on your bucket containing Veeam backups.
Wait for your Veeam backups to be copied to the Covert Copy bucket.
Resume Veeam backup activities by enabling backup jobs pointing to Wasabi.
In the case of a disaster, a Veeam repository pointing to the Covert Copy bucket may be created and a restore performed. This will require that a Wasabi Support ticket be created to place the Covert Copy bucket in Restore Mode and make it visible to Veeam.
Enabling Multi-User Authorization (MUA) on Your Account
Log in to the Wasabi Console.
Click Security in the navigation panel. Click MUA.

If you have existing security contact(s), follow this step. If you do not have existing security contact(s), follow Step 4.
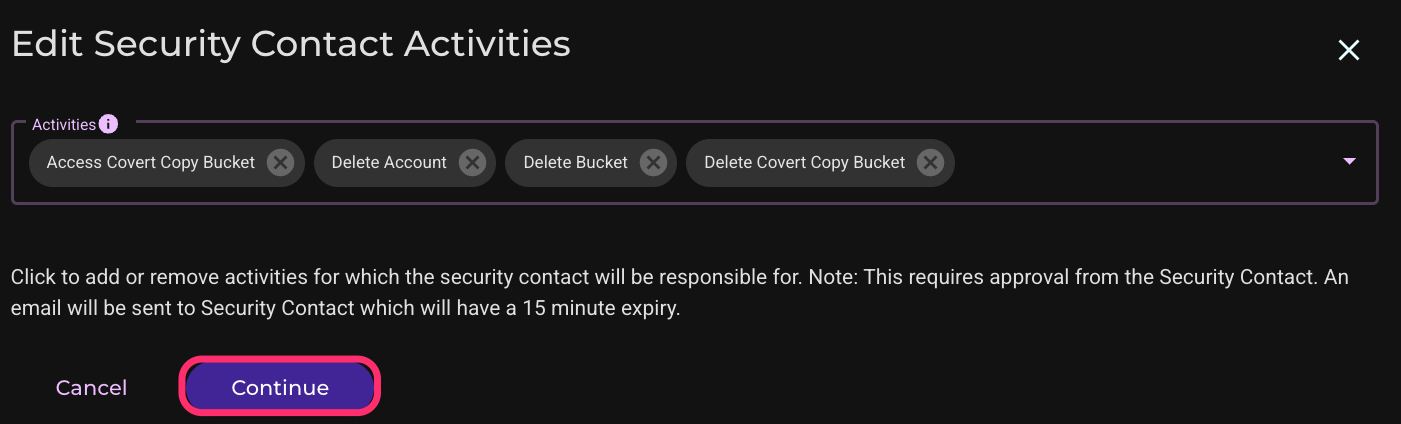
Click the three vertical dots under Action. Click Edit Activities.

Click the down arrow under Activities.

Check to select the Delete Covert Copy Bucket and Access Covert Copy Bucket options.
.png)
Click Continue.
Enter your Multi-Factor Authentication (MFA) code. Click Send. This will send an invitation to your security contact, who must approve within 15 minutes for the changes to take effect.

Repeat Step 3 for your other security contact(s).
If you do not have any security contacts:
Click Add Security Contact.

Enter the security contact’s email address and select all activities.
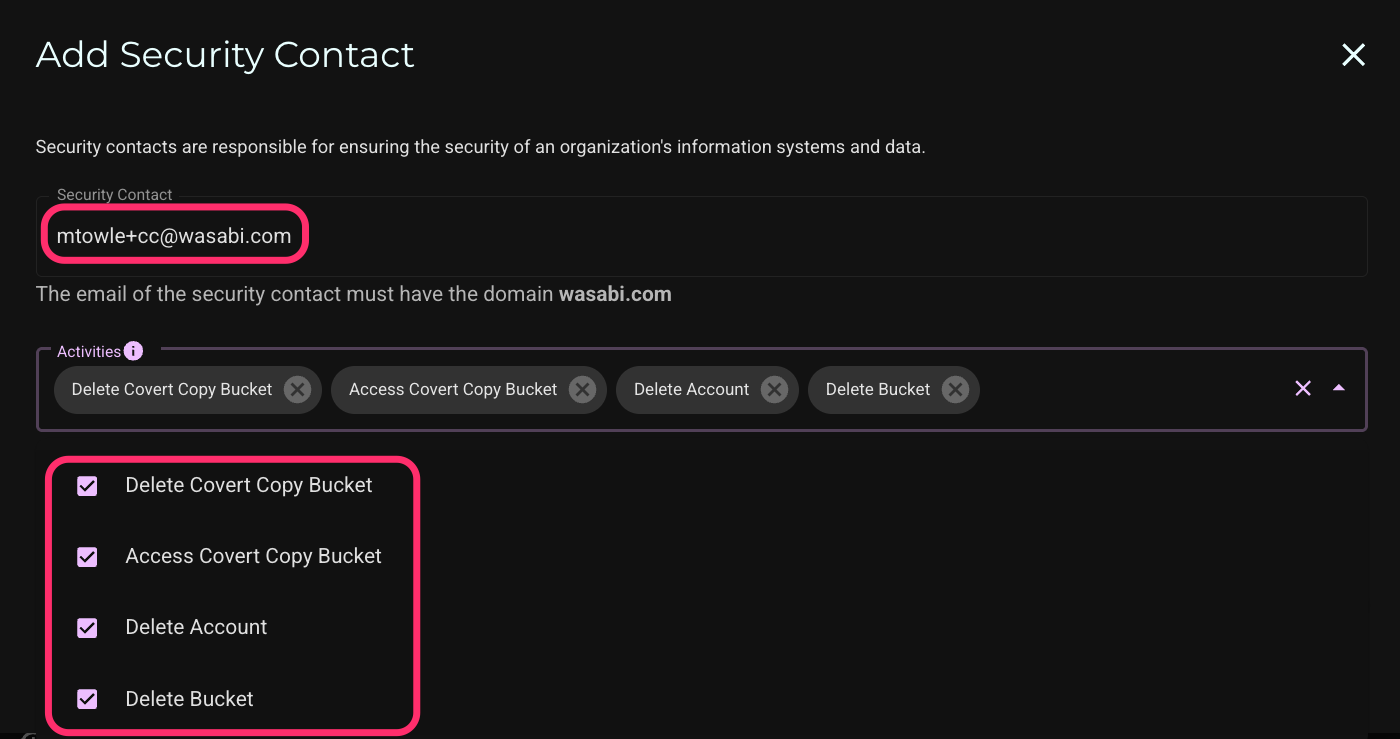
Click Continue.

Enter your Multi-Factor Authentication (MFA) code and click Send. This will send an invitation to your security contact, who must approve within 15 minutes for the changes to take effect.
.png)
Repeat Step 4 for your other security contact(s).
Pausing Veeam Backup Activities
Log in to your Veeam console.
Disable the backup job(s) pointing to Wasabi. Navigate to the Home tab, then Jobs . Click Backup, and click on the backup job. Click Disable.

Wait for current backup jobs to complete.
Enabling Covert Copy
Log in to the Wasabi Console.
Click Buckets, then click the three vertical dots next to the bucket containing your Veeam backups.

Click Covert Copy.

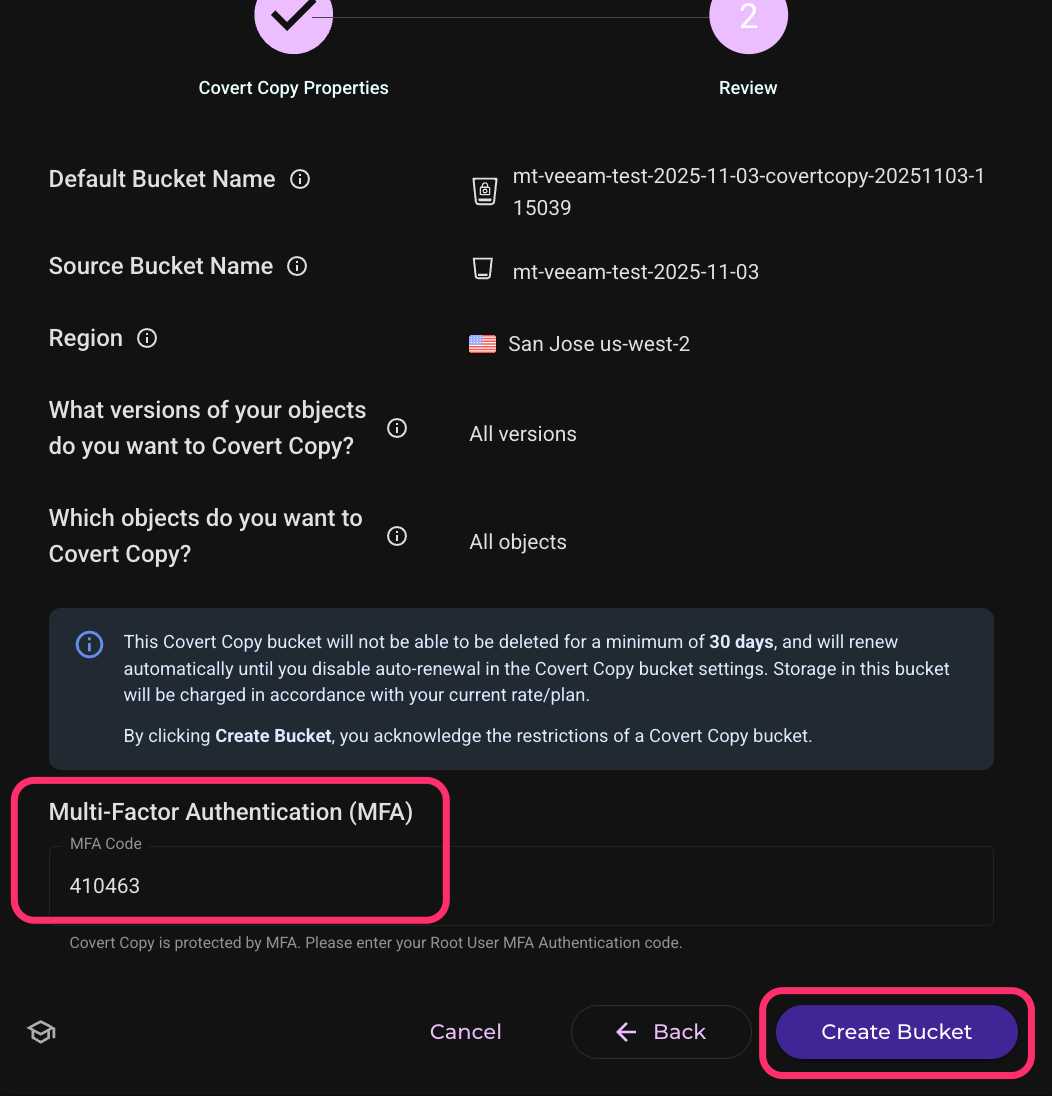
Enter the region for the Covert Copy bucket. For the other settings, it is recommended to keep the default values as shown in the screenshot below. Click Next.
.png)
This configuration example discusses the use of Wasabi's us-west-2 storage region for the Covert Copy bucket. For a list of regions, see Available Storage Regions.The region must be in the same continent as the primary bucket.
Enter your MFA code on the next screen. Click Create Bucket.
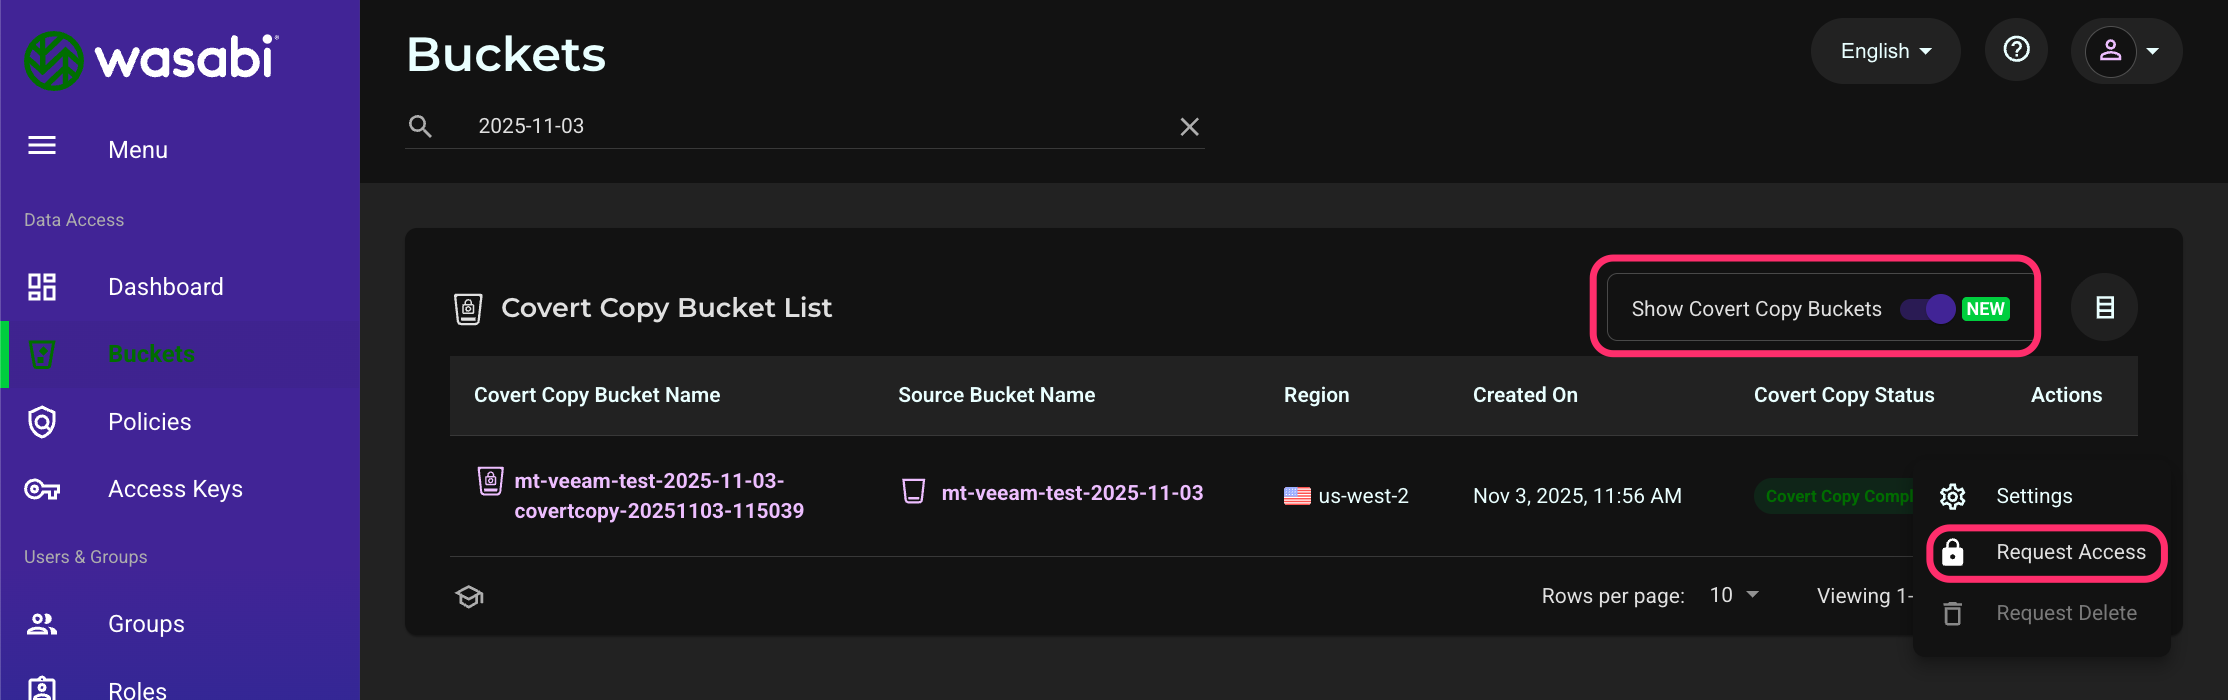
Move the slider to enable Show Covert Copy Buckets on your list of buckets. The Covert Copy Status will show In Progress until all objects in the source bucket have been copied to the Covert Copy bucket.

There is no estimated time for how long the Covert Copy process will take, as there are many variables affecting it, such as how many objects are in the source bucket. It may take a significant amount of time. When the process is complete, the Covert Copy Status will show Covert Copy Completed.

(Optional) To see the data in the Covert Copy bucket, click the three vertical dots next to the bucket on the right side of the Wasabi console. Click Request Access.
Click Send Request to request permission from your security contact(s) to view the Covert Copy bucket contents.

The security contact(s) have 15 minutes to approve the request. After the security contacts approve the request, you may view the contents of the bucket for 24 hours. Navigate to Buckets and enable Show Covert Copy Buckets. Click the name of the Covert Copy bucket.

Resuming Veeam Backup Activities
Log in to your Veeam console.
Enable the backup job(s) pointing to Wasabi. navigate to the Home tab, then Jobs. Click Backup, and click on the backup job. Click Disable (there is no enable button).

In Case of Disaster
In the case of a disaster, the root user may submit a Wasabi Support ticket by emailing support@wasabi.com. In the email, request Restore Mode and include the name of your Covert Copy bucket. After Support enables Restore Mode, the Covert Copy bucket will be visible to Veeam and will allow a restore to be performed from backups in the bucket.
In the Veeam console, go to the Backup Infrastructure tab, click Backup Repositories. Click Add Repository.

Click Object Storage.
.png)
Click Additional Providers.
.png)
Click Wasabi Cloud Storage.

Name the repository and click Next.

Enter the region your Covert Copy bucket is in and select your Wasabi root user credentials (access and secret keys). You may add them if they do not appear in the drop-down menu by clicking Add. Click Next.
.png)
Click Browse next to Bucket.
.png)
Select your Covert Copy bucket. Click OK.
Click Browse next to the Folder .

Select your existing top-level folder (named Veeam in this example). Click OK.

Check the Make recent backups immutable for option, and set the value to 30 days. Click Next.
.png)
On the next screen, adjust the Mount server and/or Instant recovery write cache folder as needed (the defaults are shown in this example). Click Next.

Select the two checkboxes on the Review screen to search the repository for existing backups. Click Apply.

Click Next on the following screen when the button becomes available (it may take a short time).

Click Finish.

When the Status shows Success, click Close.

Select the Covert Copy repository. Click Import Backups.

Click Yes.

Select the Import guest file system index option. Click OK.

Click Next.

Click Finish.

When the status shows Success, click Close.

On the Home tab, click Backups, and then Capacity Tier (Imported). Under the job that created the backup, select the virtual machine or other disks, files, and so on that you want to restore (a VM is selected in this example). Since a VM is being restored in this example, click Entire VM.

Click Point.

Select the appropriate restore point under your Covert Copy repository and click OK. Note that Veeam may not display the name of the repository. Do not select a restore point that lists the name of the SOBR as this will restore from the SOBR, not the Covert Copy import. See the example below for details.

Click Next.

Select the appropriate option on the Restore Mode screen and click Next. In this example, the original location is being restored. If you restore to a new location, it is recommended (on a later screen) to disconnect it from the network to avoid IP address conflicts.

Optionally, enter a restore reason and click Next.

Click OK on the message window. (Click Show VMs for more detail.)

Click OK on the next message window. (Click Show VMs for more detail.)

Review the settings and select Power on target VM after restoring. Click Finish.

Wait for the status to show Success. This can take significant time depending on the size of the VM, your Internet connection speed, Veeam server resources, and so on. Click Close.

Email Wasabi Support at support@wasabi.com to request that Restore Mode be disabled for your Covert Copy bucket.