Reviewing Folder Details
You can review folder details and make the folder public or private (if the public access feature is available to you).
Accessing Folder Details
Click the folder icon
 to view the Folder Details on the right side of your screen.
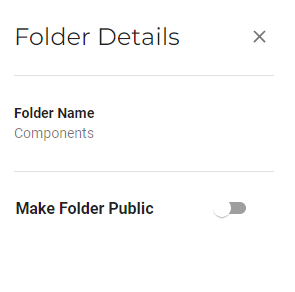
The folder name is displayed. If public access is available, Make Folder Public is displayed, and you can enable this option as described for Bucket and Object Access.
Click X to close the Folder Details.
Reviewing File Details
You can review file details and then:
Link to a file that has public access, described in the Product Guide (Bucket and Object Access)
Add or change file tags, described in the Product Guide (Object Tags)
Make a file public if this option is available, as described in the Product Guide (Bucket and Object Access)
Accessing File Details
Click anywhere (except
 ) in the row of the file for which you want details. File Details are displayed on the right side of your screen.
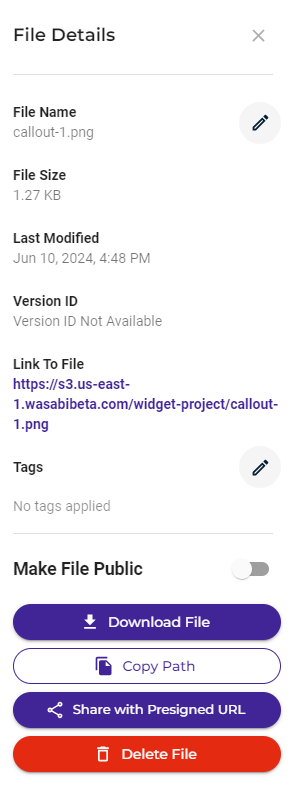
You can review the file details (file name, size, date/time last modified, and version identification number if versioning is enabled). Additional tools are provided, as described in this article.
Click X to close the File Details panel.
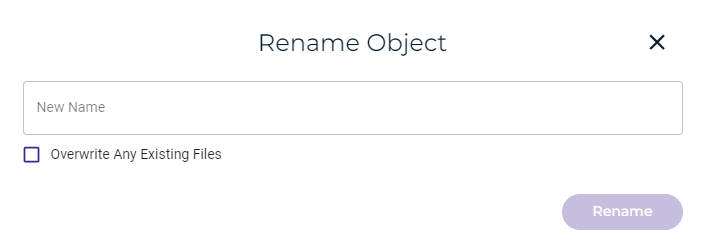
Renaming a File
You can change the name of a file.
On the File Details panel, click
 to the right of the file name on the File Details panel.
Enter a new name for the file.
Avoid the use of the following special characters in a file name:
% (percent)
< (less than symbol)
> (greater than symbol)
\ (backslash) # (pound sign)
? (question mark)Certain file names may have non-ASCII characters that are 4 byte UTF8 characters (such as emojis). Wasabi does not support these characters and will return a 400 error message to an application that tries to write a file with 4 byte UTF characters in the file name. We recommend renaming the affected files, if possible.
Optionally, check the box to overwrite any existing file that uses the name to which you are renaming.
Click Rename.
Downloading a File
You can download a file to your local computer.
On the File Details panel, click the Download File button. The file is downloaded to your local Downloads folder and ready to open, save, etc.
Copying the File Path
You can copy a file path, which is the path within the bucket. This might be useful, for example, to copy into an API call, such as to delete a file.
On the File Details panel, click the Copy Path button. A message under the Copy Path button indicates that the object path is copied to the clipboard.
Sharing a File with a Presigned URL
You can share an object for up to 12 hours or until your session expires. To share, you create a presigned URL, which uses security credentials and lets you grant time-limited permission to download the object through a browser or application. Refer to Presigned URLs: Generating for Temporary Access for additional information.
Until the time-limited permission expires, anyone can access an object shared with a presigned URL—even if the bucket and object are private.
On the File Details panel, click the Share with Presigned URL button to grant access to an object for a specific period of time.
Enter the number of hours and minutes for which the file will be shared.
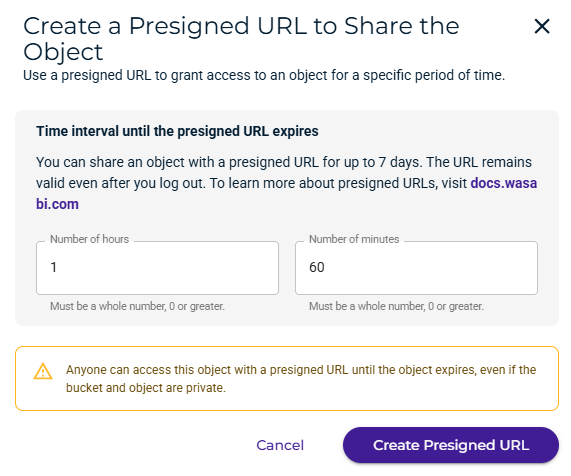
Click Create Presigned URL.
A message shows the URL created for this object. Be sure to copy the URL before closing this window. Once this window is closed, you will no longer be able to copy the presigned URL.
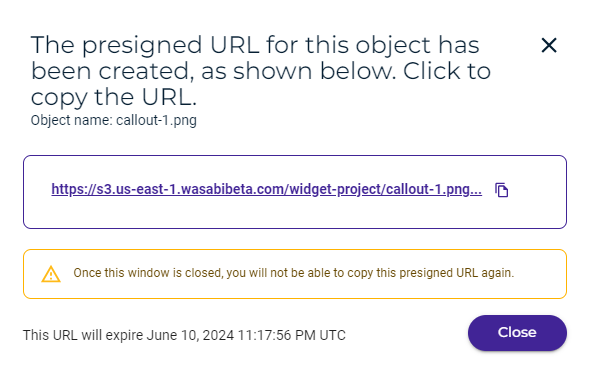
Click Close.
Deleting a File (Deleting Data)
You can easily remove a file (data) from a bucket.
When you delete a file, all objects stored with the Wasabi service are subject to Wasabi’s minimum storage policy, which applies even if the objects are deleted. For additional information, refer to wasabi.com/pricing.
You cannot delete a file from a compliance bucket.
On the File Details panel, click the Delete File button.
A message prompts you to confirm that you want to delete the file.
The Delete File button deletes only the file listed on the File Details panel. If you want to select multiple files for deletion, use the Delete option on the More Options menu (see Deleting One or More Folders or Files).
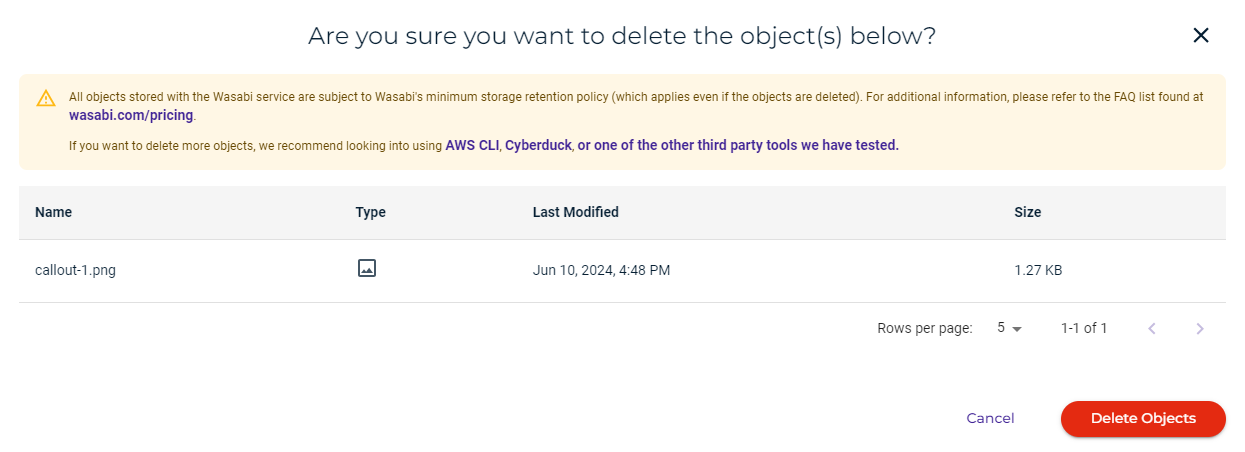
Click Delete if you are sure you want to delete the file.
Wasabi calculates data every 24 hours when determining quota for buckets. If you attempt to free up quota space by deleting files, it may take up to 24 hours for that change to be effective in Wasabi and allow you to continue uploading data.
For more information, refer to Deleted Data (Files and Objects).